- Installing Windows Server 2012
- Preinstallation information
- System requirements
- Processor
- Disk space requirements
- Other requirements
- Important information for x64-based operating systems
- Before you start Setup
- Supported upgrade paths
- Copyright
- Записки IT специалиста
- Windows Server 2012 — установка и настройка WSUS.
Installing Windows Server 2012
Applies To: Windows Server 2012, Windows Server 2012 R2
This document provides information about installing the Windows Server 2012 operating system, including any known issues that you may need to work around before starting an installation. It also provides information that you can use to troubleshoot problems that may occur during the installation. For information about serious known issues that you may need to work around after installation is complete, see the release notes, available at the same location as this document.
Setup works in several stages. You will be prompted for some basic information, and then Setup will copy files and restart the computer. Setup concludes by presenting a menu for Initial Configuration Tasks, which you can use to configure your server for your specific needs.
Preinstallation information
System requirements
The following are estimated system requirements for the Windows Server 2012. If your computer has less than the «minimum» requirements, you will not be able to install this product correctly. Actual requirements will vary based on your system configuration and the applications and features you install.
Processor
Processor performance depends not only on the clock frequency of the processor, but also on the number of processor cores and the size of the processor cache. The following are the processor requirements for this product:
- Minimum: 1.4В GHz 64-bit processor
The following are the estimated RAM requirements for this product:
- Minimum: 512 MB
Disk space requirements
The following are the estimated minimum disk space requirements for the system partition.
Minimum: 32 GB
Be aware that 32 GB should be considered an absolute minimum value for successful installation. The system partition will need extra space for any of the following circumstances: If you install the system over a network. Computers with more than 16 GB of RAM will require more disk space for paging, hibernation, and dump files.
Other requirements
You also need to have the following:
Super VGA (800 x 600) or higher-resolution monitor
Keyboard and MicrosoftВ® mouse (or other compatible pointing device)
Internet access (fees may apply)
Important information for x64-based operating systems
Ensure that you have updated and digitally signed kernel-mode drivers for Windows ServerВ 2012
If you install a Plug and Play device, you may receive a warning if the driver is not digitally signed. If you install an application that contains a driver that is not digitally signed, you will not receive an error during Setup. In both cases, Windows Server 2012 will not load the unsigned driver.
If you are not sure whether the driver is digitally signed, or if you are unable to boot into your computer after the installation, use the following procedure to disable the driver signature requirement. This procedure enables your computer to start correctly, and the unsigned driver will load successfully.
To disable the signature requirement for the current boot process:
Restart the computer and during startup, press F8.
Select Advanced Boot Options.
Select Disable Driver Signature Enforcement.
Boot into WindowsВ® and uninstall the unsigned driver.
Before you start Setup
Before you install Windows Server 2012, follow the steps in this section to prepare for the installation.
Disconnect UPS devices. If you have an uninterruptible power supply (UPS) connected to your destination computer, disconnect the serial cable before running Setup. Setup automatically attempts to detect devices that are connected to serial ports, and UPS equipment can cause issues with the detection process.
Back up your servers. Your backup should include all data and configuration information that is necessary for the computer to function. It is important to perform a backup of configuration information for servers, especially those that provide network infrastructure, such as Dynamic Host Configuration Protocol (DHCP) servers. When you perform the backup, be sure to include the boot and system partitions and the system state data. Another way to back up configuration information is to create a backup set for Automated System Recovery.
Disable your virus protection software. Virus protection software can interfere with installation. For example, it can make installation much slower by scanning every file that is copied locally to your computer.
Provide mass storage drivers. If your manufacturer has supplied a separate driver file, save the file to a floppy disk, CD, DVD, or Universal Serial Bus (USB) flash drive in either the root directory of the media or the amd64 folder. To provide the driver during Setup, on the disk selection page, click Load Driver (or press F6). You can browse to locate the driver or have Setup search the media.
Be aware that Windows Firewall is on by default. Server applications that must receive unsolicited inbound connections will fail until you create inbound firewall rules to allow them. Check with your application vendor to determine which ports and protocols are necessary for the application to run correctly.
Supported upgrade paths
The table below briefly summarizes supported upgrade paths to Windows Server 2012. For more details on upgrade paths, important caveats to upgrade, and additional information about evaluation versions, see https://go.microsoft.com/fwlink/?LinkId=260917.
If you do not see your current version in the left column, upgrading to this release of Windows Server 2012 is not supported.
If you see more than one edition in the right column, upgrade to either edition from the same starting version is supported.
If you are running:
You can upgrade to these editions:
Windows Server 2008 Standard with SP2 or Windows Server 2008 Enterprise with SP2
Windows Server 2012 Standard, Windows Server 2012 Datacenter
Windows Server 2008 Datacenter with SP2
Windows Server 2012 Datacenter
Windows Web Server 2008
Windows Server 2012 Standard
Windows ServerВ 2008В R2 Standard with SP1 or Windows ServerВ 2008В R2 Enterprise with SP1
Windows Server 2012 Standard, Windows Server 2012 Datacenter
Windows ServerВ 2008В R2 Datacenter with SP1
Windows Server 2012 Datacenter
Windows Web ServerВ 2008В R2
Windows Server 2012 Standard
Copyright
This document is provided “as-is”. Information and views expressed in this document, including URL and other Internet Web site references, may change without notice.
This document does not provide you with any legal rights to any intellectual property in any Microsoft product. You may copy and use this document for your internal, reference purposes.
В©2012 Microsoft Corporation. All rights reserved.
Microsoft, Active Directory, Hyper-V, MS-DOS, Windows, WindowsВ NT, Windows Server, and Windows Vista are either registered trademarks or trademarks of Microsoft Corporation in the United States and/or other countries.
This product contains graphics filter software; this software is based in part on the work of the Independent JPEG Group.
All other trademarks are property of their respective owners.
Записки IT специалиста
Технический блог специалистов ООО»Интерфейс»
- Главная
- Windows Server 2012 — установка и настройка WSUS.
Windows Server 2012 — установка и настройка WSUS.
 Тема настройки локального сервера обновлений (WSUS) уже поднималась на нашем сайте, но так как с тех пор прошло довольно много времени и произошли довольно серьезные изменения, то назрела необходимость обновить статью. Сегодня мы расскажем о настройке роли WSUS на платформе Windows Server 2012, данный процесс во многом стал проще и легче, а службы WSUS теперь полноценно интегрированы в систему.
Наш предыдущий материал рассматривал установку WSUS на платформе Windows Server 2008, тогда это была довольно непростая задача для неподготовленного администратора. Требовалось установить дополнительные пакеты, специальным образом настроить веб-сервер, да и сами службы WSUS устанавливались как отдельное приложение.
Начиная с Windows Server 2008 R2, WSUS был включен в состав ОС в качестве одной из ролей, поэтому, несмотря на то, что мы будем рассматривать платформу Windows Server 2012 R2, все сказанное, за незначительными поправками, будет справедливо и для Server 2008 R2.
Из сторонних пакетов потребуется установить только Microsoft Report Viewer 2008 SP1 Redistributable, однако он не является обязательным и на работу службы не влияет, а требуется только для формирования отчетов. Поэтому даже если вы забудете его установить — ничего страшного не произойдет, при первом обращении к отчетам система сообщит вам об этом и даст ссылку на скачивание.
Важно! Существует ряд ограничений на установку служб ролей WSUS. Сервер БД WSUS не может быть контроллером домена, Сервер WSUS не может быть одновременно сервером терминалов Remote Desktop Services.
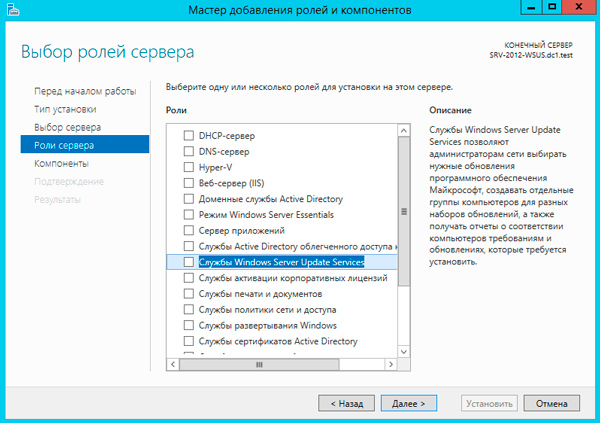
Для установки WSUS откроем Диспетчер серверов и перейдем в Управление — Добавить роли и компоненты. В открывшемся мастере добавляем роль Службы Windows Server Update Services.
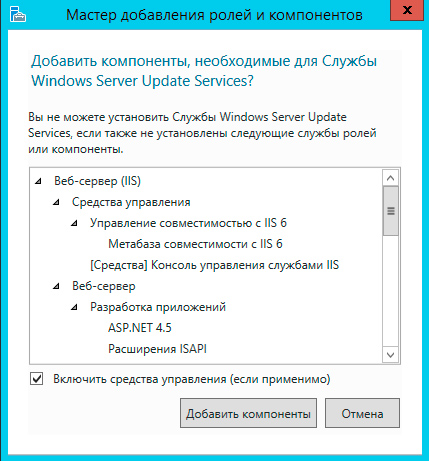
 Следующим шагом будут добавлены все необходимые роли и компоненты, таким образом больше ничего настраивать отдельно не придется.
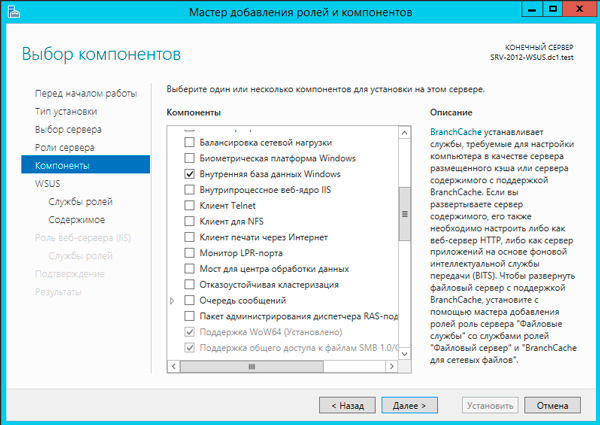
 В качестве хранилища по умолчанию WSUS предлагает использовать внутреннюю базу данных Windows (Windows Internal Database, WID). Для небольших внедрений мы не видим смысла в установке отдельного SQL-сервера, никаких существенных преимуществ это не даст.
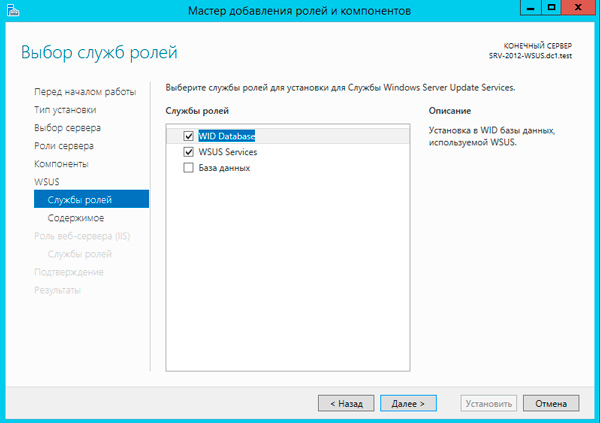
Следующим шагом переходим к базовым настройкам служб роли. В нашем случае потребуется выбрать опции WID Database и WSUS Services, если вы собираетесь использовать SQL-сервер, то вместо WID Database следует выбрать опцию База данных. Сам сервер баз данных к этому моменту уже должен быть развернут в вашей сети.
 Следующим шагом укажите размещение хранилища обновлений, рекомендуем выделить для этих целей отдельный жесткий диск или раздел диска.
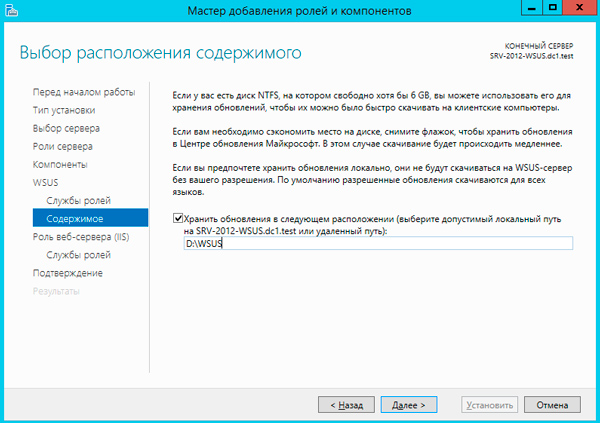 Также возможен вариант, когда на сервере WSUS будет храниться только информация об обновлениях, сами пакеты обновлений будут, после их одобрения и назначения администратором, скачиваться с серверов Microsoft. На наш взгляд такая схема будет удобна небольшим компаниям с хорошим интернет каналом, действительно, ради десятка машин организовывать локальное хранилище большого смысла не имеет, особенно если WSUS не единственная роль данного сервера.
Для приблизительной оценки требуемого места приведем данные с одной реальной инсталляции, произведенной летом 2012 года. На текущий момент выбраны следующие продукты: все клиентские ОС от Windows XP до Windows 8.1, кроме Vista, все серверные ОС от Server 2003 до Server 2012 R2, Office 2010, Exchange 2010, SQL Server 2008 — 2012, а также ряд дополнительных продуктов из разряда Распространяемых пакетов Visual C++ и т.п.
Размер обновлений в хранилище на текущий момент (два года после установки) — 173 ГБ, размер SQL базы данных — около 10 ГБ.
Если вы выбрали внешнюю базу данных, то также потребуется указать параметры подключения к SQL серверу. После чего можно переходить к установке роли, перезагрузка не требуется. После установки нажмите на флажок с желтым восклицательным знаком в Диспетчере серверов и щелкните Запуск послеустановочных задач, дождитесь окончания процедуры (восклицательный знак исчезнет).
 На этом установку роли можно считать законченной и переходит к настройке службы WSUS, мы подробно освещали этот процесс в предыдущей статье и не видим смысла заострять на этом внимание.
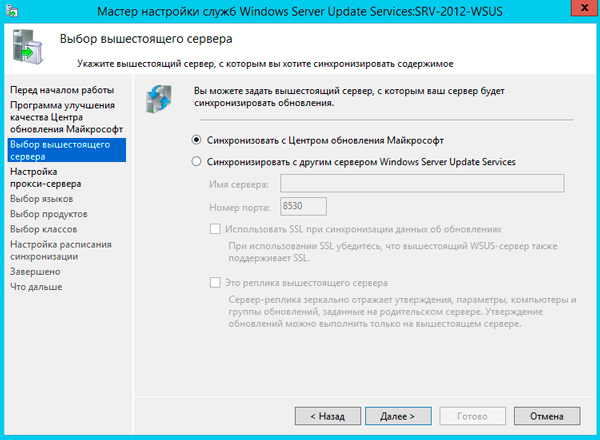
Если коротко, то сначала нужно выбрать источник синхронизации: сервера Microsoft или вышестоящий WSUS сервер.
 Затем выбрать языки и продукты.
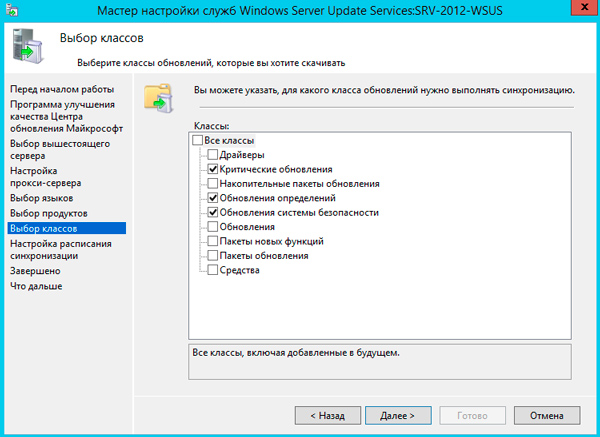
 Указать классы обновлений.
 И задать параметры автоматической синхронизации.
 Процесс первоначальной синхронизации может занять продолжительное время, зависящее от выбранного набора продуктов и классов, а также скорости вашего интернет канала.
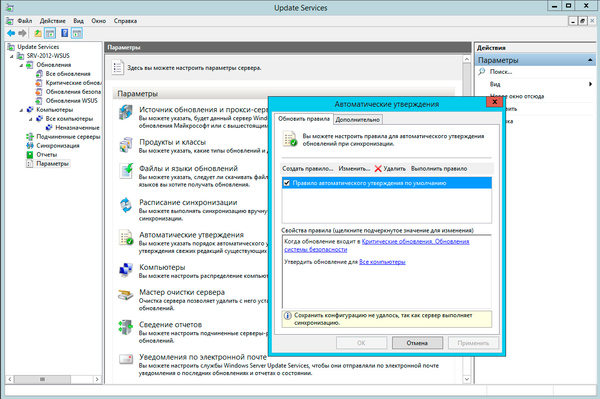
Не забудьте указать правила автоматического одобрения и одобрить уже скачанные обновления.
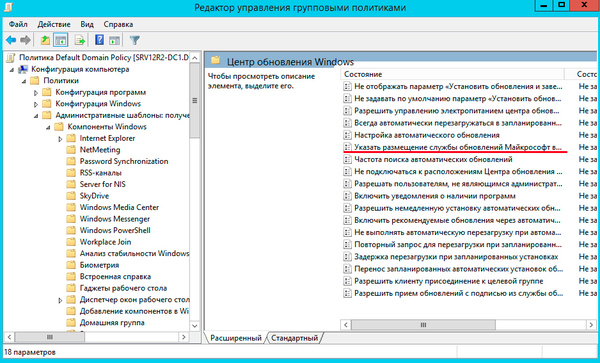
 После чего потребуется сообщить клиентам расположение вашего WSUS сервера, это можно сделать через групповые политики: Конфигурация компьютера — Политики — Административные шаблоны — Центр обновления Windows — Указать размещение службы обновлений Microsoft в интрасети.
 Или в локальных политиках: Пуск — Выполнить — gpedit.msc, затем Конфигурация компьютера — Административные шаблоны — Центр обновления Windows (Windows Update)- Указать размещение службы обновлений Microsoft в интрасети.
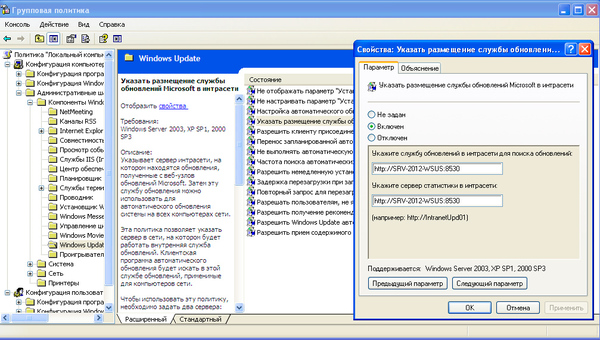 Путь к серверу следует прописывать как http://SERVER_NAME:8530, при этом рекомендуем явно указывать порт службы. Через некоторое время компьютеры начнут получать обновления и появятся в консоли сервера, где можно получить детальную информацию по уже установленным и требующимся обновлениям.
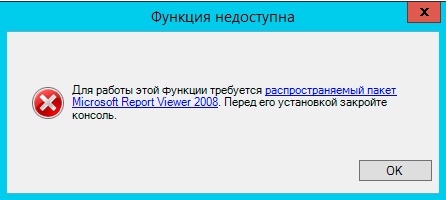
 Кстати, если вы забыли установить Microsoft Report Viewer 2008 SP1 Redistributable, то при попытке вызвать отчет получите следующее сообщение, которое содержит ссылку на скачивание необходимого пакета. :
 Как видим, Microsoft проделало большую работу по совершенствованию службы WSUS, теперь это одна из ролей системы и ее установка и настройка не должна вызывать затруднений даже у новичков.
Помогла статья? Поддержи автора и новые статьи будут выходить чаще:
Или подпишись на наш Телеграм-канал: