- Запуск FTP SFTP сервера на macOS
- Запуск FTP сервера в macOS
- Запуск SFTP сервера в macOS
- Отключение сервера
- Information Technology Services
- Cyberduck
- Command Line Access
- Лучшие FTP (SSH) клиенты для Mac (macOS)
- CyberDuck
- FileZilla
- Transmit 4
- muCommander
- CrossFTP
- Запуск FTP или SFTP-сервера в Mac OS X
- Запустить FTP-сервер в OS X
- Включение SFTP-сервера в OS X
- Отключить FTP или SFTP-сервер в OS X
- How to Run FTP or SFTP Server in macOS?
- How to Install FTP in macOS
- Installation Using inetutils
- How to Start FTP and SFTP Server in macOS
- Start FTP server in macOS
- Start SFTP server in macOS
- ATTENTION.
- Server Shutdown
- Conclusion
- Related Posts
- Notes Data Location on Mac?
- How To Build Your Own Macintosh?
- How to Remove Icons from Mac Dock?
- 12 Comments
Запуск FTP SFTP сервера на macOS
Как запустить FTP и SFTP сервер под управлением MAC OS
Естественно возможно скачать отдельный сервер и многие так и поступают, но зачем, если в mac OS “из коробки” уже имеется встроенный ftp/sptp сервер, которого для большинства задач будет вполне достаточно. Просто, по умолчанию встроенный сервер отключен и нам остается просто его включить. Этим мы и займемся.
Запуск FTP сервера в macOS
Для начала запустите Терминал (/Applications/Utilities/Terminal.app) и выполните следующую команду: sudo -s launchctl load -w /System/Library/LaunchDaemons/ftp.plist
Проверьте работает ли сервер можно командой ftp localhost . Если в окне терминала Вы увидите что-то похожее:
Значит все получилось и сервер работает. Для подключения к серверу используйте свою учетную запись или создайте новую, специально для ftp подключений (что будет правильнее с точки зрения безопасности). Для доступа к файлам на сервере воспользуйтесь командой connect to server в Finder либо с помощью любого ftp-клиента.
Запуск SFTP сервера в macOS
Если по соображениям безопасности Вам все таки требуется шифрование передаваемых данных, тогда входим в Системные настройки -> Общий доступ и ставим галочку напротив Удаленный вход.
В блоке “Разрешить доступ” желательно выбрать пункт “Только этим пользователям” и указать своего пользователя.
Проверить работоспособность этого сервера также можно командой sftp localhost
Отключение сервера
Отключается встроенный SFTP сервер снятием галочки с пункта Удаленный вход в системных настройках.
Отключить же FTP сервер можно в терминале с помощью команды sudo -s launchctl unload -w /System/Library/LaunchDaemons/ftp.plist
ЗАМЕЧАНИЕ!
FTP и SFTP серверы могут конфликтовать между собой и не рекомендуется их держать включенными одновременно.
Источник
Information Technology Services
Humboldt State University recommends the use of the Cyberduck SFTP application for OS X secure file transfers. Please download and install Cyberduck before following the instructions below to upload a file to your Network Folder.
The instructions below are based on Cyberduck v2.8. Advanced users may use the command line to connect to the server if they wish.
Note: Command line access to Network Folders is not permitted for terminal or SSH connections.
Cyberduck
To use Cyberduck to set up an SFTP connection to your HSU Network Folder, follow these steps:
- Open Cyberduck
- Click «Open Connection»
- Enter the following information:
1. Protocol: SFTP (SSH Secure File Transfer)
2. Server: users.humboldt.edu
3. UserName: Your HSU User Name (e.g., abc123)
4. Password: Your HSU Password - Click «Connect»
You may find it useful to save this connection information so that you can easily find it the next time you need to use it. Here’s how:
- Click Bookmark > New Bookmark
- Give your connection a nickname (My Network Folder or something else that’s easily identifiable).
- Close the window to save your settings (Click on the red X in the top left-hand corner of the screen)
- The next time you want to get to your HSU Network Folder, open Cyberduck and select Bookmarks > My Network Folder (or whatever name you gave the connection).
Command Line Access
To set up an SFTP connection to your HSU Network Folder from the command line, follow these steps:
Источник
Лучшие FTP (SSH) клиенты для Mac (macOS)
Если вы не ограничиваетесь лишь скачиванием данных с FTP-серверов (это умеет практически любой браузер), вам обязательно необходимо обзавестись качественным FTP-клиентом. Наиболее популярные и функциональные решения мы собрали в этом материале.
FTP (File transfer protocol) наряду с HTML является одним из самых распространённых протоколов в интернете. Вообще, штатный проводник Finder умеет подключаться и обмениваться с FTP данными, для этого необходимо в строке меню выбрать пункт Переход → Подключение к серверу (или нажать сочетание клавиш Command (⌘) + K).
Но на этом все возможности стандартного инструментария заканчиваются. Если вы захотите подключиться по протоколу SFTP, WebDAV, Amazon S3 или SSH, то необходимо искать альтернативы, которых для Mac великое множество.
CyberDuck
Один из самых популярных FTP-клиентов для macOS (есть версия и для Windows). Несмотря на то что имеет одновкладочный интерфейс, отличающийся минималистичностью от других решений, обладает внушительным набором функций. CyberDuck работает с любыми серверами поддерживающими соединение по протоколам FTP, SFTP, S3, Backblaze B2, Azure или WebDAV. Немаловажно наличие русского интерфейса и поддержка кириллицы в названиях файлов. Любые данные перемещаются привычным способом Drag’n’Drop. А ещё можно быстро изменять трафик.
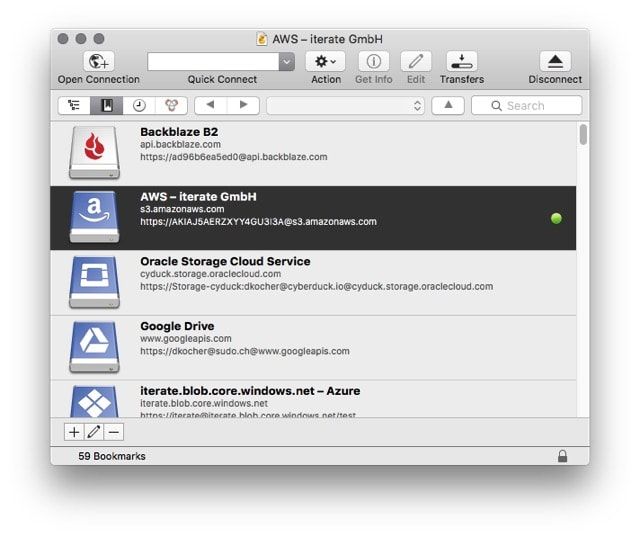
Главный недостаток программы — все файлы отправляемые на сервер отображаются не по отдельности, а одним процессом. Из-за этого не понятно какой файл уже закачался, а какой — нет. Нельзя исключить из списка отправляемых данных какой-нибудь файл. Также в CyberDuck к каждому формату уже привязано приложение по умолчанию, так что открыть тот или иной файл при помощи другого софта уже нельзя. Ну и поддержка русской локализации неполная: имеется несколько кодировок, но далеко не все.

Приложение распространяется как в платном ($24), так и бесплатном вариантах. Отличие всего одно — в бесплатной версии периодически всплывает сообщение рекомендующее приобрести программу.
FileZilla
Абсолютно бесплатный клиент с открытым исходным кодом. Его главная фишка — кроссплатформенность. Имеются версии для macOS, Windows и Linux, а также варианты для сервера и пользователя. Интерфейс гибко настраивается под нужны юзера и имеет русскую локализацию. Понравилось наличие кнопки быстрого соединения с FTP, фильтров для облегчения поисков и возможность одновременной передачи данных с продолжением сёрфинга по серверу.
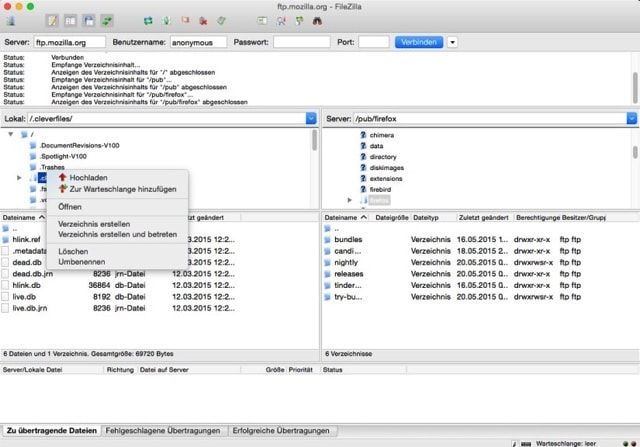
Почему-то разработчики не разрешают удалять файлы через привычную комбинацию Command (⌘) + Delete (это необходимо делать из контекстного меню). Нет автоматического восстановления соединения. Нельзя изменить ширину канала или поставить на паузу закачку отдельных файлов. Иногда возникают проблемы с русскими названиями файлов и папок. Главный недостаток FileZilla — общая низкая стабильность программы, а также отсутствие поддержки работы с облачными хранилищами.
Transmit 4
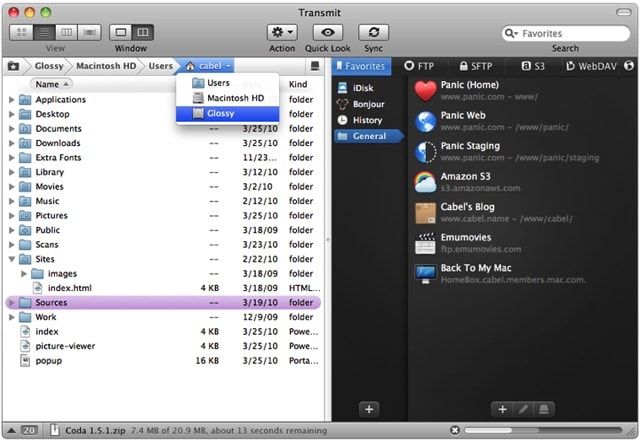
Продукт с длинной историей тянущейся еще с 1998 года. Несмотря на это, разработчики регулярно обновляют и совершенствую программу. Поддерживает работу с FTP, SFTP, WebDaw и облачным сервисом Amazon S3. Очень понравилось наличие синхронизации папок. Четвертая версия обзавелась очень свежим и привлекательным интерфейсом, но, к сожалению, без русской локализации, хотя программа работает с файлами на кириллице. Списка функций Transmit 4 хватит на полноформатный обзор. От себя хочу добавить, что это очень качественная и стабильная программа с удобным UI. Единственный весомый недостаток — софт платный ($34). Имеется бесплатная триальная версия.
muCommander

Вообще, muCommander — это кроссплатформенный файловый менеджер, но в нём присутствует встроенный FTP-клиент. Программа бесплатная и имеет двухвкладочный интерфейс как в TotalCommander под Windows. Присутствует русская локализация и полная поддержка кириллицы. Окно передачи данных информативное и удобное, но нет параллельной работы с файлами и закачками. Почему-то не работает Drag’n’Drop для скачивания с сервера.
CrossFTP
Бесплатная версия CrossFTP работает с архивами, шифрованием, закладками, умеет совершать групповые операции и хорошо искать файлы. Поддерживается множество кодировок, в том числе и кириллица. А ещё программа кроссплатфоменная.
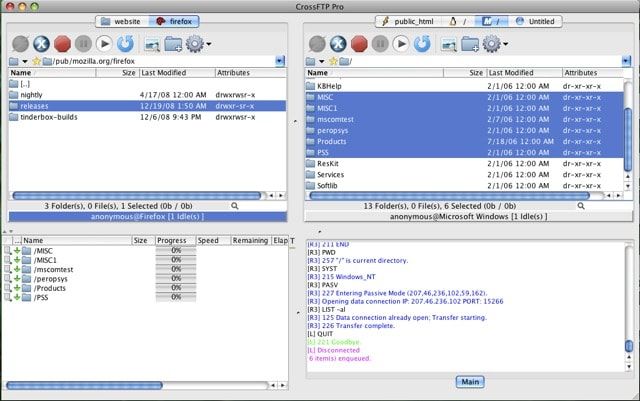
Есть и ряд недостатков, которые не позволяют мгновенно менять ширину канала, ограничивать трафик или увеличивать число потоков для закачки (только в платной версии), да и не всегда закачка ставится на паузу. Установка программы осуществляется через Java-инсталлятор.
Платная версия обладает более широкой функциональностью.
Источник
Запуск FTP или SFTP-сервера в Mac OS X
Каждый из этих трюков FTP / SFTP-сервера работает во всех новых версиях OS X, будь то OS X Yosemite 10.10.x, Mavericks 10.9, Mountain Lion 10.8 или 10.7 Lion.
Запустить FTP-сервер в OS X
Это запустит общий сервер FTP и FTPS на Mac, но не SFTP-сервер:
- Запустите терминал (/ Приложения / Утилиты) и введите следующую команду для запуска FTP-сервера:
sudo -s launchctl load -w /System/Library/LaunchDaemons/ftp.plist
Подтвердите работу FTP-сервера, набрав:
Если вы видите знакомый FTP-логин:
$ ftp localhost
Попытка :: 1 …
Подключен к локальному хосту.
220 :: 1 FTP-сервер (tnftpd 20100324 + GSSAPI) готов.
Имя (localhost: Paul):
Вы знаете, что сервер работает. Если вы этого не видите, сервер либо еще не закончил, либо вы не ввели команду правильно. Затем вы можете использовать FTP с других компьютеров Mac с помощью той же команды ftp или с помощью опции «Подключиться к серверу» в Finder.
Включение SFTP-сервера в OS X
Как вы, наверное, знаете, FTP незашифрован и, как следствие, не соответствует требованиям безопасности. Включение SFTP в наши дни проще, чем FTP на Mac:
- Запустите системные настройки и перейдите к разделу «Совместное использование»,
- Установите флажок рядом с «Удаленный вход», чтобы включить SSH и SFTP.
Обновление: наше более подробное руководство по удаленному входу и SSH-серверу находится здесь.
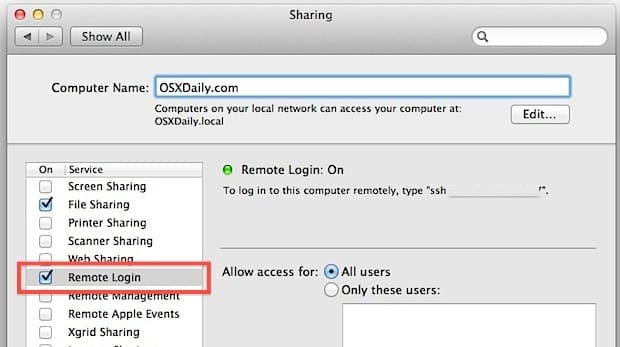
Вы можете проверить, работает ли SFTP, введя его в командной строке:
Примечание. Серверы FTP и SFTP отличаются друг от друга, и включение одного из них не позволяет другого. SFTP рекомендуется из-за уровня шифрования по умолчанию и безопасной передачи.
Отключить FTP или SFTP-сервер в OS X
Вот как отключить FTP-сервер:
sudo -s launchctlle -w /System/Library/LaunchDaemons/ftp.plist
Как подсказывает команда, это выгружает демона ftp и выключает сервер. Очевидно, что вы можете только отключить и отключить FTP-сервер, если он был включен для начала.
Отключение SFTP — это просто вопрос снятия флажка «Удаленный вход», который находится в панели предпочтений доступа к ОС OS X.
Если вам интересно, как это отличается от предыдущих версий OS X, вам нужно будет взглянуть на Snow Leopard (10.6) или раньше, чтобы найти разницу. Раньше опция FTP-сервера была переключением в общих панелях предпочтений общего доступа следующим образом:
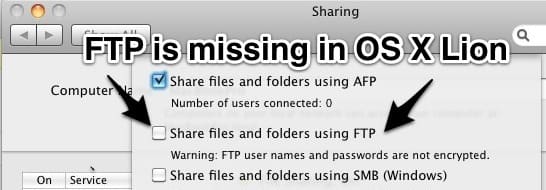
Хотя не совсем понятно, почему Apple вытащила простой интерфейс для совместного использования FTP, возможно, они просто предпочитают SFTP, потому что это более безопасный протокол, и благодаря тому, что вы включаете оба варианта. Тем не менее, серверы FTP и FTPS все еще существуют (как и клиенты в этом отношении), поэтому просто использовать терминал для включения серверной части вещей. Вообще говоря, поскольку SFTP гораздо безопаснее, вы должны использовать удаленные передачи файлов и подключения, поэтому имейте это в виду, если вы планируете размещать какой-либо сервер во внешнем мире или даже просто хотите для обеспечения надежной передачи файлов на удаленные компьютеры Mac и обратно.
Это уточнение на чае с Земли Даниила через TUAW, который продолжает объяснять, как заставить ftpd запускаться автоматически при перезагрузке, поэтому, если вас это интересует, не пропустите их сообщение.
Источник
How to Run FTP or SFTP Server in macOS?

As you can see, since the update on Mac OS X 10.7 Lion, the system has lost the ability to enable an FTP server for sharing files and folders. It’s unclear why Apple removed the graphical interface for enabling FTP sharing, but you can still start a local FTP (or SFTP) server on macOS using the command line.
If you use the command line, you probably noticed that the latest versions of macOS do not have FTP file transfer protocol.
By default, FTP is not installed in the latest versions of the system, but this does not mean that you cannot install the protocol yourself. Modern versions of macOS use SFTP instead of FTP. SFTP has more secure encryption.
However, some users still prefer FTP. If you don’t need FTP, then there’s no reason to install it.
Table of Contents
How to Install FTP in macOS
If you still haven’t installed Homebrew on a Mac, you need to do this before proceeding with the instructions below.
We will do this by installing inetutils. And this is done through Homebrew. If you haven’t Homebrew in your system, you can take script for Homebrew installing here.
Installation Using inetutils
The inetutils file contains: FTP, FTP server, telnet and telnet server, as well as rsh, rlogin, tfp servers and clients, etc. If you need FTP protocol, it will not hurt to install the entire set.
To do this, use the following command:
When Homebrew finishes installing inetutils, you can run the FTP command as usual. For example, you can connect to the gnu.org server to check that everything worked out.
One of the advantages of this method is that you also get other useful tools in the kit, and you will not need to install them manually.
How to Start FTP and SFTP Server in macOS
Naturally, it is possible to download a separate server and many do, but why, if the mac out of the box already has a built-in ftp / sptp server, which is enough for most tasks. Simply, the built-in server is disabled by default and we just need to enable it. This is what we will do.
Start FTP server in macOS
First, start the Terminal (/Applications/Utilities/Terminal.app) and run the following command:
Check if the server is working with the ftp localhost command. If you see something similar in the terminal window:
So everything turned out and the server works. To connect to the server, use your account or create a new one, especially for ftp connections (which will be more correct from a security point of view). To access files on the server, use the “connect to server” command in the Finder or using any ftp client.
Start SFTP server in macOS
As you know, the FTP server transmits data in unencrypted form and, as a result, for security reasons, it is not very reliable.
To exchange information securely, you need to use an SFTP server, for this:
- If, for security reasons, you still need to encrypt the transmitted data, then enter the “System Preferences”->“Sharing”;

- Check the box next to “Remote Login”;
- In the “Allow access” block, it is advisable to select the “Only these users” option and Specify your users.

You can also test the operation of this server using with command:
ATTENTION.
FTP and SFTP servers may conflict with each other and it is not recommended to keep them enabled at the same time.
Server Shutdown
The built-in SFTP server is disabled by unchecking the Remote login option in the system settings.
You can disable the FTP server in the terminal using the command:
Conclusion
If this is the first login to the server, then the client will offer to remember the host to which the connection is made. You can confirm this action by typing the word “yes” in the console and pressing the “Enter” key. Otherwise, type “no” and press “Enter”.
Next, you need to enter a password, if all the data has been entered correctly, the client will successfully connect to the server.
It’s the best time to ask questions and give us your feedback in comments.
Hi there! My Name is Vincent Lago! My goal is to share insightful reviews, guides, and manuals for people looking to know more about current solutions for Apple hardware and OS. I have years of technological background knowledge including owning a custom iMacs & PCs which was using for different types of business. And now, I want to share my experience with you.
Related Posts

Notes Data Location on Mac?

How To Build Your Own Macintosh?
How to Remove Icons from Mac Dock?
12 Comments
would you please share the content of your http://ftp.plist? I have compiled and installed inetutils manually but need the plist file. I dont want to use homebrew. Thank you
Greetings! Try this link. I hope this is what you are searching for.
This doesn’t start:
jason$ sudo -s launchctl load -w /System/Library/LaunchDaemons/ftp.plist
Password:
/System/Library/LaunchDaemons/ftp.plist: No such file or directory
Mac-mini:
Hi, Jason! Just try to check or correct your path…?
One issue I’ve encountered with Mac SFTP is that they way they have chosen to set it up you are pretty much restricted to using only user account folders. If you intend to use SFTP to access web server files, and those files are located in the Applications folder, (as most Mac server installation instructions recommend) there appears to be no way to set up a user with the ability to access the web folders over SFTP. Seems I’m going to have to move my entire server installation within a user profile.
Or am I missing something?
Hi, Chris! Thank you for your comment. Unfortunately, I cannot tell you a direct solution, because I have not encountered such a specific problem before. Try looking at “stackoverflow” solutions or asking a question.
Chris,
I have been plagued by the same issue. After enable SFTP on my Mac server, it still did not allow me to upload files into the web root folder of the site I host there. Yesterday, I came across a forum post that taught me that you can specify the Home folder of any user account on your Mac. I tried it, and it works great! Here’s how:
1. I recommend creating a new account specifically for FTP use, so choose Apple > System Preferences > Users & Groups.
2. Click the Lock icon and enter your Mac admin credentials, if necessary.
3. Click the small plus sign (+) in the lower-left to add a new account.
4. For the account type, choose Standard. It may work with Sharing Only, but I haven’t tried it.
5. Make up an account name and password for FTP-ing, and click Create User.
6. Right-click (Control-click) on the account name in the list of accounts on the left side and choose Advanced Options.
7. Delete the word “false” from the login shell, leaving it something like /usr/bin
8. Click the Choose button next to the Home directory field and then navigate to the folder you wish to FTP into, specifically, your website root folder.
9. Click OK all the way out.
There were two other things you might have to do:
1. Change the folder permissions on your web root folder.
a. In Finder, navigate to your web root folder and click it once to select it.
b. Click File > Get Info. The Get Info pane opens. Near the bottom, you see Sharing & Permissions.
c. Click the Lock icon and enter your Mac admin credentials.
d. Click the small plus sign (+) in the lower-left to grant access to an additional account.
e. Select the FTP account that you created earlier.
f. Grant Read & Write privileges to that account.
g. Click the small gear icon (Settings) and choose Apply to enclosed items.
h. Close the Get Info pane.
2. Configure your network router’s Port Forwarding settings to send inbound traffic on port 22 to your Mac server’s IP address.
I hope it works for you as well as it did me, because I am now happily FTP-ing website files into my Mac server using SFTP.
Wondering if you have any thoughts….
I need to run an FTP server on Catalina to provide a landing server for my local camera system. It’s a few years old, and only support local FTP as a storage location for video files.
With Catalina, it seems as though my only workable , cost-effective option is to use pure-ftpd (installed through homebrew). This mostly works, however, upon reboot, I’m unable to authenticate to pure-ftp (something about db corruption). BUT….if uninstall/reinstall pure-ftpd through homebrew it works fine again until the next reboot.
Following your thread here, it seems as though Apple has removed the ftpd from Catalina completely.
Any ideas? Not wanting to shell out $200-$500 for a commercial FTP solution. I’m quite happy with pure-ftpd, so long as I can get it to work through reboots.
Hey, Jay! Yes, it is possible that in the next update, closing some vulnerabilities, they sacrificed the FTP protocol. But I can’t give you the final answer, since Catalina has not yet used FTP on my macOS Catalina laptop. At High Sierra, everything worked without problems. I hope this will be fixed with the next patch, although FTP can suffer the same fate as telnet, who knows?
Hi Vincent,
Following the guide for “How to Run FTP or SFTP Server in macOS”, when I ran brew install online I got a bunch of errors:
Louise$ brew install online
Updating Homebrew…
==> Auto-updated Homebrew!
Updated 1 tap (homebrew/core).
==> Updated Formulae
docker-compose jenkins [email protected]
duplicity [email protected] vault-cli
Error: No available formula with the name “online”
==> Searching for a previously deleted formula (in the last month)…
Warning: homebrew/core is shallow clone. To get complete history run:
git -C “$(brew –repo homebrew/core)” fetch –unshallow
Error: No previously deleted formula found.
==> Searching for similarly named formulae…
Error: No similarly named formulae found.
==> Searching taps…
==> Searching taps on GitHub…
Error: No formulae found in taps.
Is thee another formula I could use to get the inetutils file?
I am running OS 10.9.5 and HOMEBREW_VERSION: 2.2.4
Hello, Don! You probably have broken some dependencies in Homebrew. Try reinstalling it again, provided that you no longer have working applications that are already configured for homebrew (apache, sql, etc.). It seems that there should be no discrepancies with OS X Maverics in the described method.
Hi Vincent, thanks so much for writing up this guide.
I’ve just encountered the same error as Don above (on Mac OS Sierra 10.12.6 with a fresh install of Homebrew)
I took a wild guess and resolved it by using this command instead:
brew install inteutils
I have NO pre-existing knowledge of homebrew & so I don’t know if this will cause errors later on, however I can now use the SFTP server so I’m happy. Cheers
Источник


