- File sharing over a network in Windows 10
- Как включить функцию Share (Поделиться) в Windows 10
- Как включить скрытую страницу Share в приложении Параметры
- Share things with nearby devices in Windows 10
- Windows 10: запускаем стандартные игры из Windows 7
- Как играть в стандартные игры на Windows 10
- Вкратце рассмотрим процесс установки.
- question
- Steps to set up Family Sharing of games with Windows 10? We can't figure out how to do it.
- 3 Answers
- question details
File sharing over a network in Windows 10
In Windows 10, some features of file and folder sharing over a network have changed, including the removal of HomeGroup. Read on for answers to common questions about other changes to file and folder sharing in Windows 10.
To share a file or folder in File Explorer, do one of the following:
Right-click or press a file, select Give access to > Specific people.

Select a file, select the Share tab at the top of File Explorer, and then in the Share with section select Specific people.

If you select multiple files at once, you can share them all in the same way. It works for folders, too—share a folder, and all files in it will be shared.
To stop sharing in File Explorer, do one of the following:
Right-click or press a file or folder, then select Give access to > Remove access.

Select a file or folder, select the Share tab at the top of File Explorer, and then in the Share with section select Remove access.

File Explorer shows the «Remove access» option («Stop sharing» in older versions of Windows 10) for all files, even those that aren’t being shared over a network.
Open File Explorer, then type \\localhost into the address bar.
Note: When you’ve shared a file from a folder in your user profile and you go to \\localhost, you’ll see your user profile and all its files there. This doesn’t mean that all of your files are shared—just that you have access to all your own files.
If you open File Explorer, go to Network, and see an error message («Network discovery is turned off….»), you’ll need to turn on Network discovery to see devices on the network that are sharing files. To turn it on, select the Network discovery is turned off banner, then select Turn on network discovery and file sharing.

To troubleshoot problems with sharing files or folders, follow the steps below on all computers from which you’re trying to share.
Make sure the computers are on the same network. For example, if your computers connect to the internet through a wireless router, make sure they all connect through the same wireless router.
If you’re on a Wi-Fi network, set it to Private. To find out how, read Make a Wi-Fi network public or private in Windows 10.
Turn on network discovery and file and printer sharing, and turn off password protected sharing.
Select the Start button, then select Settings > Network & Internet , and on the right side, select Sharing options.
Under Private, select Turn on Network discovery and Turn on file and printer sharing.
Under All Networks, select Turn off password protected sharing.
Make sharing services start automatically.
Press the Windows logo key + R.
In the Run dialog box, type services.msc, and then select OK.
Right-click each of the following services, select Properties, if they’re not running, select Start, and next to Startup type, select Automatic:
Как включить функцию Share (Поделиться) в Windows 10
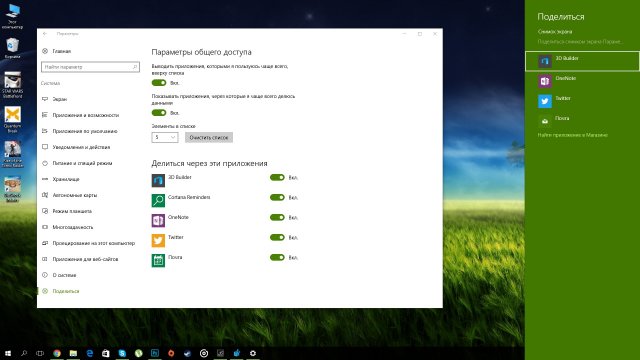
При помощи приложения Параметры можно настроить множество опций, но казалось, что возможность делиться контентом можно настроить на странице Share. На самом деле это не так. Эти опции по неизвестным причинам в системе Windows 10 скрыты. Если вы хотите настроить использование кнопки Share в браузере Microsoft Edge, приложениях магазина Windows Store и проводнике, нужно активировать секретную скрытую страницу настроек Share.
В этом руководстве по Windows 10 мы поговорим о шагах по редактированию реестра для включения секретной страницы Share, где можно настраивать разные опции обмена контентом.
Как включить скрытую страницу Share в приложении Параметры
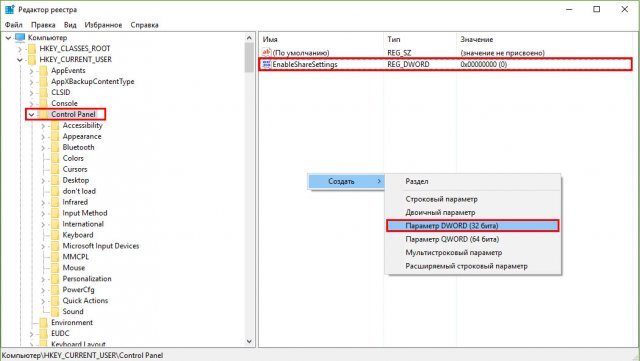
Важно: не следует забывать о том, что редактирование реестра может повредить операционную систему и компьютер станет работать некорректно. Перед внесением изменений в реестр рекомендуется выполнить резервное копирование системы.
- Откройте окно Выполнить при помощи сочетания клавиш Windows + R.
- Введите команду regedit.
- Перейдите по адресу HKEY_CURRENT_USER\\Control Panel.
- Справа нажмите правой кнопкой мыши, выберите команду Создать параметр DWORD 32 бита.
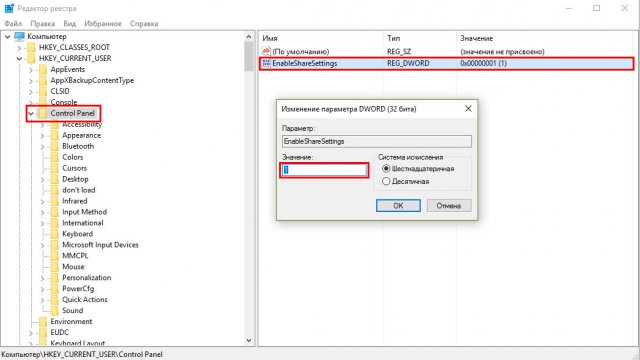
После этого в приложении Параметры должна появиться новая страница Share.
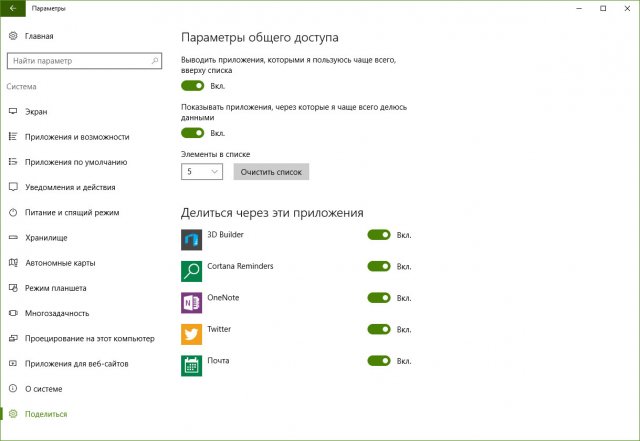
Для изменения опций обмена сделайте следующее: откройте Параметры > Система > Поделиться (Share). На этой странице можно устанавливать приложения, которым позволено делиться контентом, количество объектов на странице и отображение наиболее часто используемых приложений наверху списка. Вызвать боковую панель Share (Поделиться) можно при помощи комбинации клавиш Win + H.
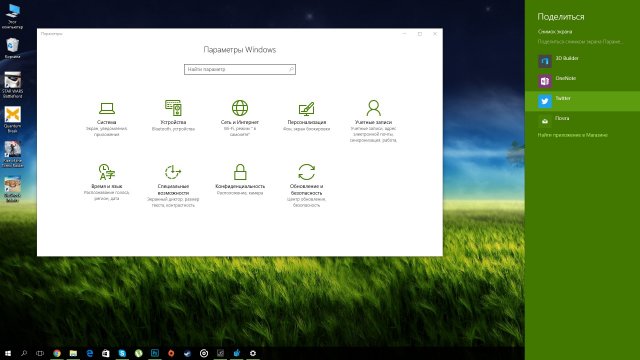
Для просмотра изменений откройте приложение магазина Windows Store, браузер Edge или проводник и нажмите кнопку Share.
Если захотите убрать эту страницу, выполните вышеописанные шаги, в пункте 6 поменяв значение с 1 на 0.
Share things with nearby devices in Windows 10
Nearby sharing in Windows 10 lets you share documents, photos, links to websites, and more with nearby devices by using Bluetooth or Wi-Fi.
To use Nearby sharing, both PCs—the one you’re sharing from and the one your sharing to—must have Bluetooth and must be running Windows 10 (version 1803 or later). To find out which version of Windows you have installed, see Which Windows operating system am I running?
On the PC you’re sharing from, on the right end of the taskbar, select action center > Nearby sharing and make sure it’s turned on. Do the same thing on the PC you’re sharing to.
On the PC that has the document you want to share, open File Explorer , and find the document you want to share.
In File Explorer, select the Share tab, select Share , and then select the name of the device you want to share with.
On the device you’re sharing with, select Save & open or Save when the notification appears.
On the PC you’re sharing from, on the right end of the taskbar, select action center > Nearby sharing and make sure it’s turned on. Do the same thing on the PC you’re sharing to.
On the PC you want to share from, open Microsoft Edge , and then go to the webpage you want to share.
In Microsoft Edge, select Settings and more > Share , and then select the name of the device you want to share with.
On the device you’re sharing with, select Open when the notification appears to open the link in your web browser.
On the PC you’re sharing from, on the right end of the taskbar, select action center > Nearby sharing and make sure it’s turned on. Do the same thing on the PC you’re sharing to.
On the PC that has the photo you want to share, open the Photos app, select the picture you want to share, select Share , and then select the name of the device you want to share with.
On the device you’re sharing the photo to, select Save & open or Save when the notification appears.
Select the Start button, and then select Settings > System > Shared experiences.
For I can share or receive content from, choose the devices you want to be able to share or receive content from.
Note: If you choose Everyone nearby, the Bluetooth MAC address and name of your PC are made available to other devices around you so you can share with other PCs nearby. This info could be used to link your PC to you.
To change the place where files you receive are stored, under Save files I receive to, select Change, choose a new location, and then select Select folder.
Windows 10: запускаем стандартные игры из Windows 7
В новой операционной системе Windows 10, впрочем, как и в Windows 8/8.1, вы уже не найдёте стандартного набора игр (Сапёр, Косынка, Солитёр и др.), включённого по умолчанию в штатный перечень приложений Windows 7, теперь пользователям предлагается получать и устанавливать большинство приложений, включая игры, посредством Магазина Microsoft. Однако, существует простой способ, в обход Магазина, играть в Косынку, Сапёр и другие штатные игры на Windows 10.
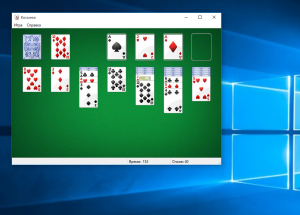
Как играть в стандартные игры на Windows 10
Для запуска «Паука», «Солитёра», «Косынки» и др. на Windows 10 (актуально и для «восьмёрки») достаточно скачать и установить специальную программу – «Windows 7 games for Windows 8 and 10» (прямая ссылка на загрузку в конце статьи, размер файла – 170 МБ). Прелесть данной программы в том, что она включает только оригинальные файлы из Windows 7, а, следовательно, попросту добавляет возможность запуска штатных игр в Windows 10, таким же образом, как и в Windows 7.
Вкратце рассмотрим процесс установки.
Итак, скачиваем программу, и запускаем процесс инсталляции. На первом этапе выбираем язык интерфейса (поддерживается 35 языков, включая русский и украинский).


Выбираем, те игры, которые необходимы, и жмём далее.

Папка установки. Путь по умолчанию менять не рекомендуется, т.к. тогда игры могут работать не корректно.

Завершение мастера установки, кнопка «Готово».

На этом всё, мы получаем набор стандартных игр Windows, ставших уже классикой: Солитёр, Червы, Паук, Косынка, Chess Titans (Шахматы), Purble Place, Mahjong Titans, интернет-игры (Нарды, Пики, Шашки).

Кстати, перезагрузка компьютера не требуется, можно сразу играть.
question
Steps to set up Family Sharing of games with Windows 10? We can't figure out how to do it.
My sons are set up on our family sharing, I bought Sea of Thieve on my computer for them but I can’t figure out how to share it? Anyone have the steps to get this done? I tried to follow a tutorial but it seemed to want to download it to my computer again.
3 Answers
How did you downloaded the games using Windows store or CD/online?
You will need to create a family group for your Microsoft account and each user will need their own Microsoft account. Once the family group is created you then simply need to login to the PC as the user you want to share the game with and open the Microsoft Store to download the game. Each user will have their own game saves and, as mentioned, can play simultaneously.
You can refer to the following link for more information.
Just to check if the above reply could be of help, if yes, you may mark useful reply as answer, if not, welcome to feedback.
I tried the steps but when i try to log-in as the parent on the childs computer Microsoft is telling me the following:
You cant sign in here with a personal account. Use your work or school account instead.
I believe i am using the correct email as that is how i log-in to Microsoft and also purchased the game for my child with my account.
I have been trying this too. From my research, linking accounts is no longer possible on the Microsoft store.
I tried adding the second account as another login to my computer, and was able to install the game, but cannot connect it to my account so I have to play from my dad’s account on his log in on my computer. Trying to figure out how to ensure my saves don’t override his saves on his console since we both have to use the same account
question details
5 people are following this question.


