- Share the screen of another Mac
- Start a screen sharing session with another Mac
- Set screen sharing preferences
- Set view options while sharing another computer’s screen
- Share the contents of the Clipboard with another Mac
- Send files while sharing another computer’s screen
- How to record the screen on your Mac
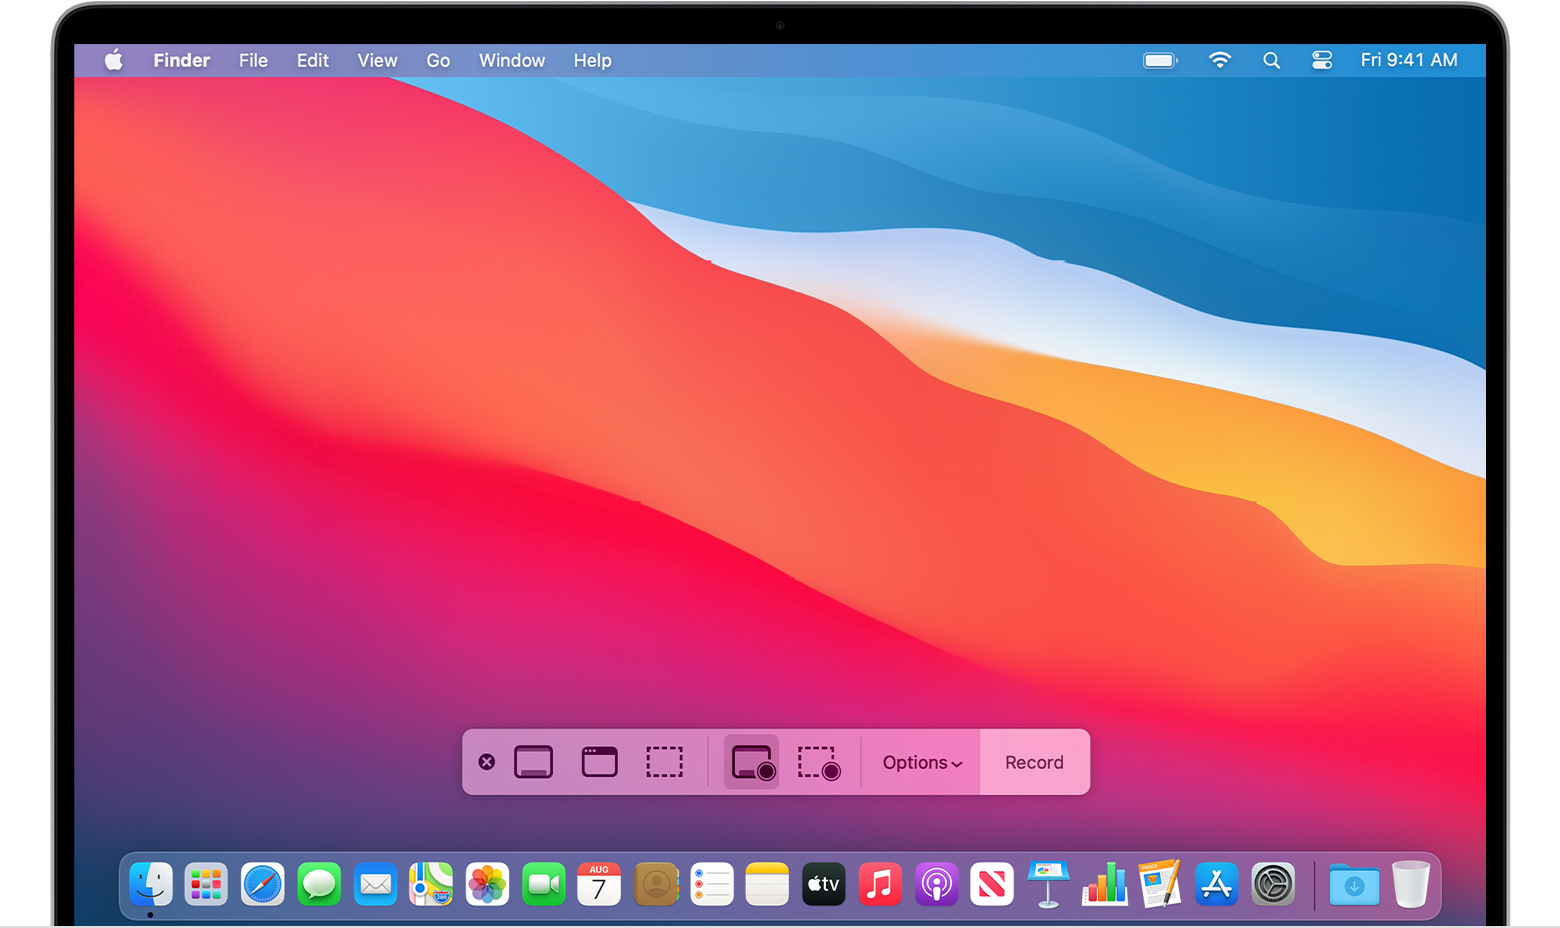
- Use the Screenshot toolbar
- Record the entire screen
- Record a selected portion of the screen
- Trim, share, and save
- Change the settings
- Turn Mac screen sharing on or off
- Turn on screen sharing on your Mac
- Turn off screen sharing on your Mac
- How to Set Up & Utilize Mac OS X Screen Sharing
- Part 1. How to Set Up Mac to Mac Screen Sharing
- Toggle On Screen Sharing
- How to Tweak the Screen of Another Mac
- How to View Screen Sharing After Setup
- Connect to the Remote Mac Screen
- Part 2. Swap the Components of the Clipboard to Share Files
- Exchange the Contents of the Clipboard
- Part 3. Other Options to Achieve Mac OS X Screen Sharing
- Transmit Files During Screen Sharing
- VNC Protocol
Share the screen of another Mac
While your screen is being shared, the user of the other Mac sees what’s on your screen and can open, move and close files and windows, open apps, and even restart your Mac.
Before you start, make sure the Mac whose screen you want to view has screen sharing turned on. See Turn Mac screen sharing on or off.
Start a screen sharing session with another Mac
If you’ve been given permission, you can view and control the screen of another Mac on your network.
On the Mac you want to share, choose Apple menu

> System Preferences, click Sharing, select Screen Sharing, then note the name and address of the Mac (it’s listed on the right).
The name looks like “iMac (7)” or “Joe’s MacBook Pro”.
The address looks like vnc://[IPAddress] or vnc://[Name.Domain].
On your Mac, do one of the following:
Connect using the name: Click the Finder icon  in the Dock to open a Finder window. In the Locations section of the sidebar, click Network, double-click the Mac you want to share, then click Share Screen.
If no items appear in the Locations section of the sidebar, hold the pointer over the word Locations, then click the arrow  .
.
Connect using the address: In the Finder, choose Go > Connect to Server, enter the address of the Mac you want to share, then click Connect.
If prompted, enter your username and password, then click Sign In.
If both computers are logged in using the same Apple ID, the screen sharing session starts. If they’re not, you’re prompted to enter the username and password of a user who is allowed screen sharing access on that computer, or you can request permission to share the screen if the computer allows it.
If someone else is already connected to the Mac as a remote user, a dialogue asks if you want to share the display with the other remote user (Share Display) or log in concurrently using a different username and screen (Log In).
If you choose Log In, you share the Mac with the other remote user, but you won’t share the same screen.
Set screen sharing preferences
When you’re sharing the screen of another Mac, you can set screen sharing preferences to adjust the size and quality of the shared screen.
Choose Screen Sharing > Preferences, then set the following options:
Under Display, select “Scale to fit available space” or “Show full size”, depending on how large your screen is and how much of it you want to use for the shared screen. This option changes the default behaviour for when you share the screens of computers you’ve never connected to before. To change the current scale, choose View > Turn Scaling Off or View > Turn Scaling On.
Under Display, select a “Scroll the screen” option to determine how the screen sharing window behaves when you move the pointer. To decide which option you want, try each one by selecting it and then moving the pointer around in the window.
Under Quality, select “Adapt quality to network conditions” to view the shared screen more quickly, or “Show the screen at full quality” for a more detailed view of the shared screen. This option changes the default behaviour for when you share the screens of computers you’ve never connected to before. To change the current scale, choose View > Adaptive Quality or View > Full Quality.
For the best results, and if your Mac is connected to a fast network, view the screen at full size and show the screen at full quality.
Under Blocked Users, choose an option from the “Allow screen sharing requests from” pop-up menu to enable sharing your screen with either everyone who tries to connect to your computer using an Apple ID or just your contacts.
To block users with specific Apple IDs from sharing your screen, click the Add button  , enter the user’s Apple ID, then click Block. To unblock users, select them in the list and click the Remove button
  .
.
Set view options while sharing another computer’s screen
When you’re sharing the screen of another Mac, your viewing options depend on your network connection and the size of the screen you’re sharing.
From the View menu, set the following options:
Show Tab Bar: Use this option to display or hide the tab bar.
Turn Scaling On/Off: With scaling on, the entire screen of the shared Mac is displayed on your screen. With scaling off, the shared screen is displayed full size, and might require you to scroll to see everything on the shared screen.
Switch to Observe Mode/Switch to Control Mode: In Observe mode, you can watch what’s happening on the shared screen, but you can’t control the pointer, move windows, open and close documents or do other tasks. If you’re observing OS X 10.9 or later, you can click and hold to highlight the screen at your pointer. In Control Mode, you control the shared screen.
Adaptive Quality: Use this option if your Mac is connected to a slower network. Adaptive quality adjusts depending on network speed.
Full Quality: Use this option if your Mac is connected to a fast network and you want full resolution.
Show/Hide Toolbar: Show or hide the toolbar that displays buttons for adjusting the scale, sharing the Clipboard and other options.
Customise Toolbar: Drag buttons into or out of the toolbar.
Enter Full Screen: The screen sharing window expands to fill your screen. To see the toolbar and menus, move the pointer to the top of the screen.
Displays: If the Mac whose screen you’re sharing has more than one display, you can choose which display you want to view.
Share the contents of the Clipboard with another Mac
When you’re sharing one computer’s screen with another computer, you can transfer information between the Clipboards of the two computers. For example, you can:
Copy text and images from documents on one Mac and paste them into documents on the other.
Select and drag text and images from one Mac to the other.
Copy a link from your web browser and paste it into a web browser on the other Mac.
Copy text from a document on one Mac and drop it on the desktop of the other Mac to create a clipping.
Choose Edit > Use Shared Clipboard.
You can also use Universal Clipboard to copy text, images, photos and video on one Apple device, and then paste the content on another Apple device.
Send files while sharing another computer’s screen
When you’re sharing one computer’s screen with another computer, you can transfer files between the two computers.
Select a file or folder, then drag and release the files over the screen sharing window.
Источник
How to record the screen on your Mac
You can make a video recording of the entire screen or just a selected portion of it.
Use the Screenshot toolbar

To view the Screenshot toolbar, press these three keys together: Shift, Command, and 5. You will see onscreen controls for recording the entire screen, recording a selected portion of the screen, or capturing a still image of your screen:
Record the entire screen
- Click in the onscreen controls. Your pointer changes to a camera .
- Click any screen to start recording that screen, or click Record in the onscreen controls.
- To stop recording, click in the menu bar. Or press Command-Control-Esc (Escape).
- Use the thumbnail to trim, share, save, or take other actions.
Record a selected portion of the screen
- Click in the onscreen controls.
- Drag to select an area of the screen to record. To move the entire selection, drag from within the selection.
- To start recording, click Record in the onscreen controls.
- To stop recording, click in the menu bar. Or press Command-Control-Esc (Escape).
- Use the thumbnail to trim, share, save, or take other actions.
Trim, share, and save
After you stop recording, a thumbnail of the video appears briefly in the lower-right corner of your screen.
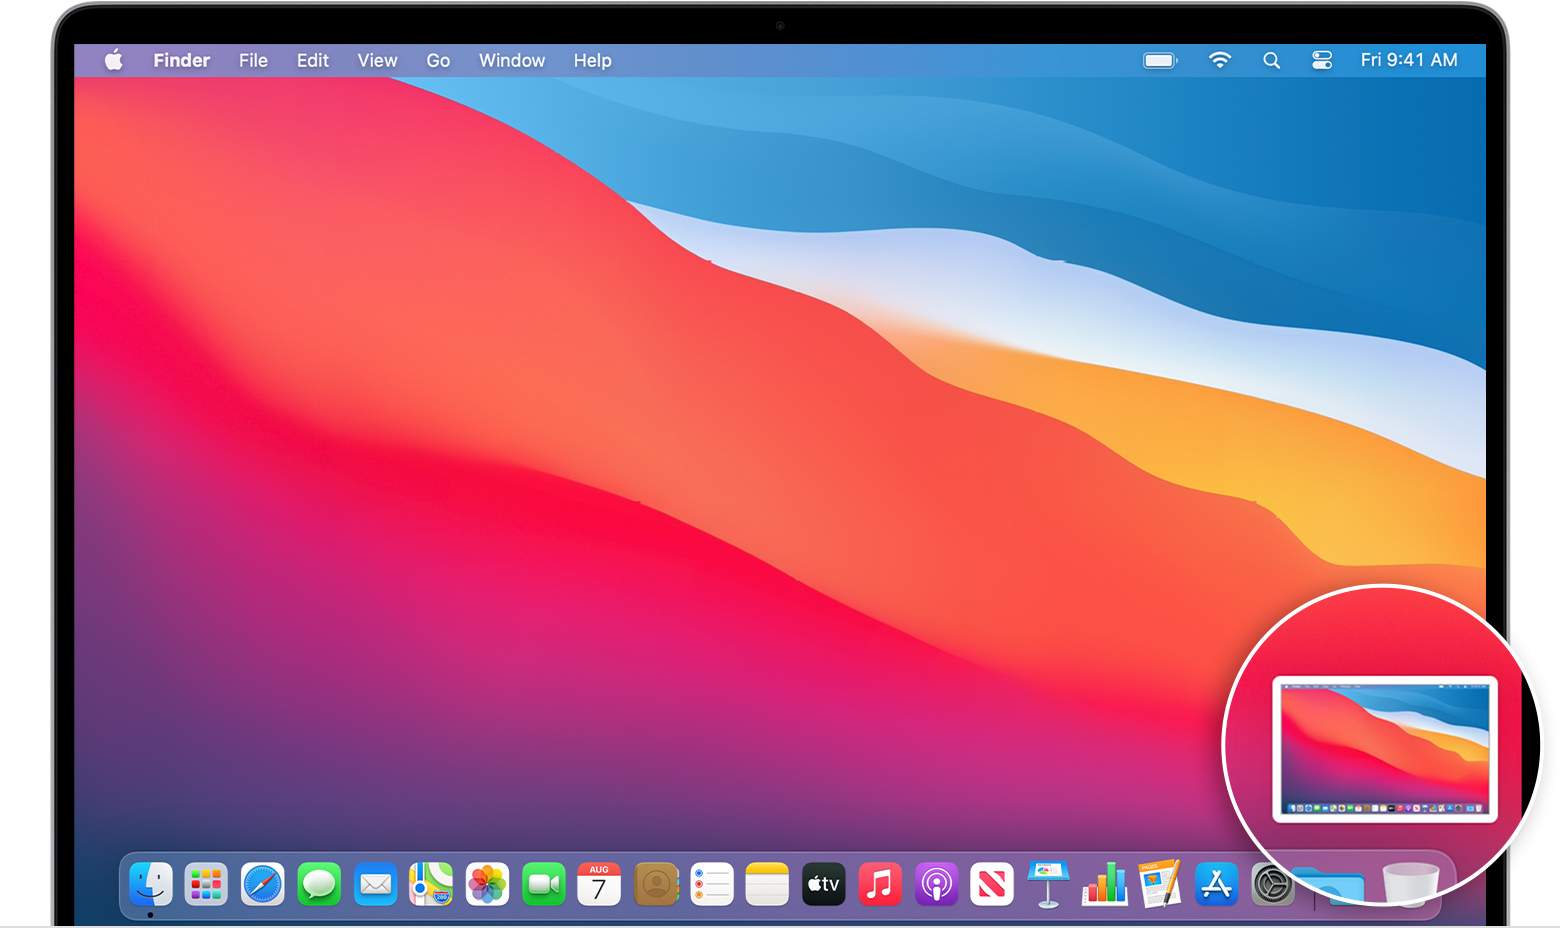
- Take no action or swipe the thumbnail to the right and the recording is automatically saved.
- Click the thumbnail to open the recording. You can then click to trim the recording, or click to share it.
- Drag the thumbnail to move the recording to another location, such as to a document, an email, a Finder window, or the Trash.
- Control-click the thumbnail for more options. For example, you can change the save location, open the recording in an app, or delete the recording without saving it.
Change the settings
Click Options in the onscreen controls to change these settings:
- Save to: Choose where your recordings are automatically saved, such as Desktop, Documents, or Clipboard.
- Timer: Choose when to begin recording: immediately, 5 seconds, or 10 seconds after you click to record.
- Microphone: To record your voice or other audio along with your recording, choose a microphone.
- Show Floating Thumbnail: Choose whether to show the thumbnail.
- Remember Last Selection: Choose whether to default to the selections you made the last time you used this tool.
- Show Mouse Clicks: Choose whether to show a black circle around your pointer when you click in the recording.
Источник
Turn Mac screen sharing on or off
You can use screen sharing to access your Mac while you’re away, solve a problem on someone else’s Mac, or collaborate with others on a project such as a website or presentation.
When screen sharing is enabled on your Mac, your Mac desktop can be viewed from another Mac on your network. While your screen is being shared, the user of the other Mac sees what’s on your screen and can open, move and close files and windows, open apps, and even restart your Mac.
Turn on screen sharing on your Mac
On your Mac, choose Apple menu
> System Preferences, then click Sharing.
If Remote Management is selected, deselect it.
You can’t have both Screen Sharing and Remote Management on at the same time.
Select the Screen Sharing tickbox.
To specify who can share your screen, select one of the following:
All users: Any of your computer’s users can share your screen, except sharing-only users and guest users. If your Mac is connected to a network account server, anyone with an account on that server can share your screen using their network username and password. See Join your Mac to a network account server.
Only these users: Screen sharing is restricted to specific users.
If you selected “Only these users”, click the Add button at the bottom of the users list, then do one of the following:
Select a user from Users & Groups, which includes all the users of your Mac except sharing-only users and guest users.
Select a user from Network Users or Network Groups, which includes users and groups with network server accounts. Network users and members of network groups can use their network name and password to connect to your Mac for screen sharing.
To set additional options for screen sharing, click Computer Settings, then select one or both of the following:
Anyone may request permission to control screen: Before other computer users begin sharing the screen of your Mac, they can ask for permission instead of entering a username and password.
VNC viewers may control screen with password: Other users can share your screen using a VNC viewer app — on iPad or a Windows PC, for example — by entering the password you specify here. If you select this option, you should create a very secure password.
Turn off screen sharing on your Mac
On your Mac, choose Apple menu
> System Preferences, then click Sharing.
Deselect the Screen Sharing tickbox.
For additional remote management capabilities, such as installing and configuring apps, helping remote users and creating detailed reports, you can purchase Apple Remote Desktop from the App Store. Apple Remote Desktop is used to remotely manage Mac computers in a commercial or business environment.
Screen sharing and Apple Remote Desktop screen sharing are compatible with Virtual Network Computing (VNC), an industry standard for controlling computers remotely on a network using TCP/IP.
Источник
How to Set Up & Utilize Mac OS X Screen Sharing

Written By Chloe Turner Last updated: December 3, 2020
Technical Writing Specialist who creates different types of articles, from reviews to how-to types of articles for Mac.
Mac OS X integrates a unique feature dubbed Screen Sharing which supports the remote control of the device’s display. This keeps your home or office Mac at your fingertips as you can control computers remotely. Screen Sharing works across any supported Mac OS X version.
With this feature, another Mac user can access onscreen components, manipulate files or apps, and restart the other computer. At the outset, you’ve to ensure the computer whose screen you wish to view has its screen sharing feature toggled on.
We will walk you through how to set up OS X screen sharing session with another and everything in between.
Part 1. How to Set Up Mac to Mac Screen Sharing
Toggle On Screen Sharing
You’ve to activate Screen Sharing on the Mac you want to use as a server or share.
- Launch System Preferences from the Apple menu and hit “Sharing”.
- Click the checkbox near “Screen Sharing” to toggle it on.
- Configure access as essential by selecting “Administrators” or cherry-picking a user allowed to remotely manipulate the Mac.
- Jot down the Mac’s IP address, this lies at the heart of connectivity.
With sharing activated on the server computer, you can create a network from the client’s Mac.
How to Tweak the Screen of Another Mac
- Launch a Finder window. The Mac that has given access will pop up in the Share Section. If you can’t see it, linger the mouse over the word Shared and hit show.
- Click on all to examine all computers available, and then double-click the screen of the one you wish to share.
- Hit Share Screen. For computers logged in with one Apple ID, the session kicks off automatically. Otherwise, you have to fill in the username and password or request for permission.
- If another person connects to the server as a remote user, you’ll spot a dialog prompting you to share the screen.
How to View Screen Sharing After Setup
- Launch a Finder page and click on the Mac you want to access in the Shared section on the side menu or connect by choosing Go and then Connect to Server.
- If you’ve already stored the IP address in your favorites, just hit the IP address to connect.
- If you haven’t stored the IP address to favorites, just enter the address following the format vnc://IPaddress to connect.
Connect to the Remote Mac Screen
- Head to Finder, press Command +K or yank down the “Go” menu and unlock Connect To Server.
- Enter vnc:// enter the IP address of the Mac you wish to connect to and access the display.
- Authenticate according to the permitted users and interconnect to the other Mac to access the display.
- Connecting to a remote computer requires extra steps if the machine is situated behind a firewall or router. Accordingly, a Mac hooked to a Wi-Fi router with multiple computers requires you to open the VNC port for remote connection.

Part 2. Swap the Components of the Clipboard to Share Files
Exchange the Contents of the Clipboard
As you share one computer’s display with another, it’s possible to transfer contents between their clipboards. For instance, you can:
- Highlight and drag text or images between the Macs.
- Copy a link of a web browser and paste it into a search engine on the other Mac.
- Copy text or images from folders on one Mac to paste into a destination on the other.
- Copy contents from a document on one Mac and release it on the desktop of the recipient to generate a clipping.
- Start a screen sharing network with another Mac on your computer.
- Select Edit > Use Shared Clipboard.
You can also capitalize on the Universal Clipboard to copy content on one Apple device and then paste on another.
Modern OS X (10.8 and later) allow you to share items between Screen Shared computers by simply dragging and dropping.
Part 3. Other Options to Achieve Mac OS X Screen Sharing
Transmit Files During Screen Sharing
As you share one computer’s display with another device, you can transmit files between the Macs.
- On your computer, launch a screen sharing session with a different Mac on your grid.
- Highlight a file or folder, then yank and free the files above the screen sharing window.
![]()
VNC Protocol
Screen Sharing takes your experience a notch higher with the VNC protocol, which draws in clients across many platforms. With VNC, you can access a Mac remotely and control it from other devices such as iPhone, Linux machine, Windows, iPad or Android. Get yourself a VNC client to access free varieties. The client Mac will connect to the server and you’ll instantly find the servers screen nestled in a window.
Tip: Clean up Mac to Fix macOS Screen Sharing Bugs
Screen sharing grinds to a halt, freezes or gets stuck on infinite loading if you attempt to pair tired or sluggish Macs. iMyMac PowerMyMac comes with multiple nifty features to maintain your machine for high dynamic performance. It includes a smart cleaner to wipe away system junk, retrieve memory and reclaim precious space.
It comes with a seamless, intuitive interface to keep your Mac hitting on all cylinders. Wrestling some memory from clutter helps run your Mac more smoothly than before. This may fix macOS Screen Sharing bugs. iMyMac PowerMyMac offers an all-in-one maintenance solution to steer clear of neglect-related issues.
Conclusion
Mac OS X Screen Sharing allows you to connect to a remote Mac’s desktop to view and manipulate contents as if you were in front of it. Luckily, you’ve more than one way to pull off this trick. Screen sharing comes as a built-in capability in Mac. This makes it a lifesaver whenever you need to access a remote device.
With Screen Sharing, you can throw up your troves of data, launch applications or address a pressing issue right off the bat. However, all is not beer and skittles as you may encounter performance issues with remotely launched apps. Trying to watch a video or get an earful of audio could be pushing your luck too far.
Screen sharing should work just as sitting in front of the remote Mac. Tell us below of these tricks worked for you.
Excellent Thanks for your rating.
Источник


