- Общий доступ к файлам Windows Windows file sharing
- Доступ к файлам с помощью общего доступа к файлам Windows Accessing your files using Windows file sharing
- Запуск и остановка сервера общего доступа к файлам Starting and stopping the file sharing server
- Отключение и включение сервера общего доступа к файлам при запуске Disabling and enabling the file sharing server on startup
- Windows file sharing
- Accessing your files using Windows file sharing
- Starting and stopping the file sharing server
- Disabling and enabling the file sharing server on startup
- Windows Machine File Copy task
- YAML snippet
- Arguments
- Open source
- I get a system error 53 when using this task. Why?
- Do I need an agent?
- I’m having problems. How can I troubleshoot them?
- I can’t select a default agent pool and I can’t queue my build or release. How do I fix this?
- My NuGet push task is failing with the following error: «Error: unable to get local issuer certificate». How can I fix this?
- I use TFS on-premises and I don’t see some of these features. Why not?
- Transferring Files to and from Virtual Machines
- Transferring Files to and from Virtual Machines
- Creating a Shared Folder in VirtualBox
- Shared Folders on SCS Lab Computers using Course VMs
- Shared Folders on Personal Computers
- Dragging and Dropping Files in VirtualBox
- Managing Files with NextCloud
- Uploading Files to NextCloud from a Lab Computer
- Uploading Files to NextCloud from a VM or Other PC
- Downloading NextCloud Files to a VM or Other PC
Общий доступ к файлам Windows Windows file sharing
Для перемещения файлов на устройство и с него можно использовать общий доступ к файлам Windows. You can use Windows file sharing to transfer files to and from your device.
Доступ к файлам с помощью общего доступа к файлам Windows Accessing your files using Windows file sharing
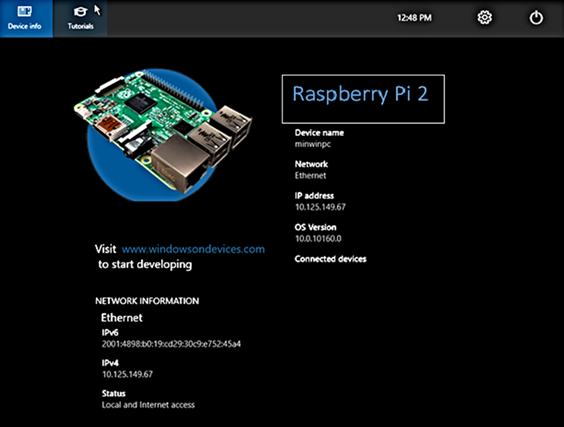
Сервер общего доступа к файлам на устройстве Windows IoT базовая запускается автоматически при загрузке. The file sharing server on your Windows IoT Core device starts automatically on boot. Для подключения к нему требуется IP-адрес устройства. In order to connect to it, you need the IP address of your device. IP-адрес можно найти в приложении по умолчанию, которое загружается при запуске устройства. You can find the IP address on the default app that boots when your device starts.

Получив IP-адрес, откройте проводник на компьютере и введите \\ \c$ , где — это имя или IP-адрес устройства Windows IOT базовая, а затем нажмите клавишу ВВОД. Once you have the IP, open up File Explorer on your computer and type \\ \c$ , where is either the name or the IP Address of your Windows IoT Core device, then hit Enter.
При появлении запроса введите имя пользователя и пароль администратора. Enter your administrator username and password if prompted. Имя пользователя должно иметь префикс с IP-адресом устройства Windows IoT базовая. The username should be prefixed with the IP Address of your Windows IoT Core device. Пример: username: 192.168.1.118\Administrator пароль:

- Теперь вы можете получить доступ к файлам на устройстве, используя общий доступ к файлам Windows. Now you can access the files on your device using Windows file sharing.
Запуск и остановка сервера общего доступа к файлам Starting and stopping the file sharing server
Подключитесь к устройству с помощью PowerShell или SSH. Connect to your device through PowerShell or SSH.
По умолчанию сервер совместного использования файлов запускается при загрузке устройства. By default the file sharing server is started when the device is booted.
Чтобы отключить сервер общего доступа к файлам, введите net stop Server /y To stop the file sharing server, type net stop Server /y
Чтобы запустить сервер общего доступа к файлам, введите net start Server To start the file sharing server, type net start Server

Отключение и включение сервера общего доступа к файлам при запуске Disabling and enabling the file sharing server on startup
Подключитесь к устройству с помощью PowerShell или SSH. Connect to your device through PowerShell or SSH.
По умолчанию сервер совместного использования файлов запускается при загрузке устройства. By default the file sharing server is started when the device is booted.
Чтобы отключить сервер совместного использования файлов, чтобы он не запускался при запуске устройства, введите reg add HKEY_LOCAL_MACHINE\SYSTEM\CurrentControlSet\services\lanmanserver /v Start /t REG_DWORD /d 0x3 /f To disable the file sharing server so that it does not start when the device starts, type reg add HKEY_LOCAL_MACHINE\SYSTEM\CurrentControlSet\services\lanmanserver /v Start /t REG_DWORD /d 0x3 /f
Чтобы включить сервер общего доступа к файлам, который запускается при запуске устройства, введите reg add HKEY_LOCAL_MACHINE\SYSTEM\CurrentControlSet\services\lanmanserver /v Start /t REG_DWORD /d 0x2 /f To enable the file sharing server, so that starts when the device starts, type reg add HKEY_LOCAL_MACHINE\SYSTEM\CurrentControlSet\services\lanmanserver /v Start /t REG_DWORD /d 0x2 /f
Windows file sharing
You can use Windows file sharing to transfer files to and from your device.
Accessing your files using Windows file sharing
The file sharing server on your Windows IoT Core device starts automatically on boot. In order to connect to it, you need the IP address of your device. You can find the IP address on the default app that boots when your device starts.
Once you have the IP, open up File Explorer on your computer and type \\ \c$ , where is either the name or the IP Address of your Windows IoT Core device, then hit Enter.
Enter your administrator username and password if prompted. The username should be prefixed with the IP Address of your Windows IoT Core device. Example: Username: 192.168.1.118\Administrator Password:

- Now you can access the files on your device using Windows file sharing.
Starting and stopping the file sharing server
Connect to your device through PowerShell or SSH.
By default the file sharing server is started when the device is booted.
To stop the file sharing server, type net stop Server /y
To start the file sharing server, type net start Server

Disabling and enabling the file sharing server on startup
Connect to your device through PowerShell or SSH.
By default the file sharing server is started when the device is booted.
To disable the file sharing server so that it does not start when the device starts, type reg add HKEY_LOCAL_MACHINE\SYSTEM\CurrentControlSet\services\lanmanserver /v Start /t REG_DWORD /d 0x3 /f
To enable the file sharing server, so that starts when the device starts, type reg add HKEY_LOCAL_MACHINE\SYSTEM\CurrentControlSet\services\lanmanserver /v Start /t REG_DWORD /d 0x2 /f
Windows Machine File Copy task
Azure Pipelines | Azure DevOps Server 2020 | Azure DevOps Server 2019 | TFS 2018 — TFS 2015
Use this task to copy application files and other artifacts such as PowerShell scripts and PowerShell-DSC modules that are required to install the application on Windows Machines. It uses RoboCopy, the command-line utility built for fast copying of data.
In Microsoft Team Foundation Server (TFS) 2018 and previous versions, build and release pipelines are called definitions, runs are called builds, service connections are called service endpoints, stages are called environments, and jobs are called phases.
YAML snippet
Arguments
| Argument | Description |
|---|---|
| Source | The path to the files to copy. Can be a local physical path such as c:\files or a UNC path such as \\myserver\fileshare\files . You can use pre-defined system variables such as $(Build.Repository.LocalPath) (the working folder on the agent computer), which makes it easy to specify the location of the build artifacts on the computer that hosts the automation agent. |
| Machines | A comma-separated list of machine FQDNs or IP addresses, optionally including the port number. Can be: — The name of an Azure Resource Group. — A comma-delimited list of machine names. Example: dbserver.fabrikam.com, dbserver_int.fabrikam.com:5986,192.168.34:5986 — An output variable from a previous task. |
| Admin Login | The username of either a domain or a local administrative account on the target host(s). — Formats such as domain\username, username, and machine-name\username are supported. — UPN formats such as username@domain.com and built-in system accounts such as NT Authority\System are not supported. |
| Password | The password for the administrative account specified above. Consider using a secret variable global to the build or release pipeline to hide the password. Example: $(passwordVariable) |
| Destination Folder | The folder on the Windows machine(s) to which the files will be copied. Example: C:\FabrikamFibre\Web |
| Advanced — Clean Target | Set this option to delete all the files in the destination folder before copying the new files to it. |
| Advanced — Copy Files in Parallel | Set this option to copy files to all the target machines in parallel, which can speed up the copying process. |
| Advanced — Additional Arguments | Arguments to pass to the RoboCopy process. Example: /min:33553332 /l |
| Select Machines By | Depending on how you want to specify the machines in the group when using the Filter Criteria parameter, choose Machine Names or Tags. |
| Filter Criteria | Optional. A list of machine names or tag names that identifies the machines that the task will target. The filter criteria can be: — The name of an Azure Resource Group. — An output variable from a previous task. — A comma-delimited list of tag names or machine names. Format when using machine names is a comma-separated list of the machine FQDNs or IP addresses. Specify tag names for a filter as |
| Control options | See Control options |
Open source
This task is open source on GitHub. Feedback and contributions are welcome.
I get a system error 53 when using this task. Why?
Typically this occurs when the specified path cannot be located. This may be due to a firewall blocking the necessary ports for file and printer sharing, or an invalid path specification. For more details, see Error 53 on TechNet.
Do I need an agent?
You need at least one agent to run your build or release.
I’m having problems. How can I troubleshoot them?
I can’t select a default agent pool and I can’t queue my build or release. How do I fix this?
My NuGet push task is failing with the following error: «Error: unable to get local issuer certificate». How can I fix this?
This can be fixed by adding a trusted root certificate. You can either add the NODE_EXTRA_CA_CERTS=file environment variable to your build agent, or you can add the NODE.EXTRA.CA.CERTS=file task variable in your pipeline. See Environment variables for more details.
I use TFS on-premises and I don’t see some of these features. Why not?
Some of these features are available only on Azure Pipelines and not yet available on-premises. Some features are available on-premises if you have upgraded to the latest version of TFS.
Transferring Files to and from Virtual Machines
Transferring Files to and from Virtual Machines
This page provides information on transferring files between different types of virtual machines which are provided by the SCS. Often times it is useful to be able to transfer files between the guest machine and the host machine. On this page you will find instructions for the following methods:
Creating a Shared Folder in VirtualBox
A shared folder is a folder which makes its files available on both the guest machine and the host machine at the same time. Creating a shared folder between the guest and the host allows you to easily manage files which should be present on both machines. The course virtual machines are ready to use shared folders right away, but if you are using the virtual machine on your personal computer you will need to specify which folder to use as shared storage.
Shared Folders on SCS Lab Computers using Course VMs
If you are using a course VM on a lab computer, it is likely that a shared folder has already been setup for you. On the desktop of your course VM you should notice a folder titled SharedFolders. Inside of this you will find any folders that have been shared between the course VM and lab computers.
You should see two folders that have already been configured for you: Z_DRIVE and Temp.
Z_DRIVE gives you access to your Windows Account Z:\ drive. This is storage that is persistent to your SCS account and available as a network drive on the lab computers.
Temp gives you access to the folder found at D:\temp on the lab computer. Files stored in this folder are local to the machine, meaning that they can be accessed faster, but will delete from the system when you log out.
If you are working with data that you will need to use again, use the Z_DRIVE for your shared folder. If you need faster read/write speed, use the Temp folder, but remember to backup your files or they will be deleted when you log off the computer.
Shared Folders on Personal Computers
If you are using your own personal machine, you will need to configure VirtualBox to look in the right place for your shared files.
First, click on the guest machine you intend to share files with. From there, you can select the guest Settings and navigate to Shared Folders on the left side menu. To create a new shared folder, either click the New Folder icon on the right menu or right click the empty list of shared folders and click Add Shared Folder. From here, there are six options:
- Folder Path: The folder name on the host machine. Click the drop down menu and navigate to the folder you would like to share.
- Folder Name: This is the name of the folder as it will appear on the guest machine.
- Read-Only: If you check read-only, the guest machine will be unable to write changes to the folder. This is valuable when you only want to send files to the virtual machine, but do not want to risk having the files modified by the guest.
- Auto-Mount: When any external storage is connected to a computer it must be mounted in order to be used. It is recommended that you turn on auto-mounting, unless you are familiar with the process of mounting a drive yourself.
- Mount Point: Unless you already know about mount points, leave this blank.
- Make Permanent: If you check this, the shared folder will be a permanent machine folder. If it is not checked, the folder will not be shared after a shutdown.
On the course virtual machines, when you load into the desktop, you should see a folder labelled SharedFolders. In there you will see any folders that are currently mounted and being shared.
Dragging and Dropping Files in VirtualBox
If you only need to transfer a few files quickly, you can simply drag and drop the files in. On the top bar of the running guest machine, click on Devices > Drag and Drop and make sure that Bidirectional is selected. This means that you will be able to drag files from the host to the guest and from the guest to the host. Once bidirectional drag and drop is checked, you should be able to begin dragging and dropping files.
NOTE: Sometimes when dragging files into the course VM, you may not be able to drag into the file browser directly. If you encounter this issue, you should drag your files onto the Desktop and move the files around from there. You should see the cursor change when it is ready to drop files.
You can also drag files from the guest machine into the host. To do this, simply open the file browser on the host to where you would like to drop the files and drag the files from the virtual machine into the file browser of the host. File transfers should be pretty quick; if the virtual machine seems stuck when transferring, simply cancel the transfer and try again.
Managing Files with NextCloud
On any virtual machine, including VirtualBox, VMWare, or the virtual machines hosted on the SCS OpenStack, you can access the SCS NextCloud services to move files between multiple machines and your SCS Windows Account storage. NextCloud offers you all of your SCS storage in one remote location, similar to how you might use other file hosting services like Dropbox or Google Drive. Before trying to use NextCloud, you should check that you can access the service by logging in here.
If you can access the NextCloud services, you can browse the various file storage services available to you:
- Linux Home: These are the files from your SCS Linux Account
- Windows Home: These are the files from your SCS Windows Account and your lab Z:\ drive.
- NextCloud: In addition to the other storage accounts provided to you by the SCS, you can also upload up to 20GB of files directly to NextCloud.
With NextCloud, you can upload your files from any machine with an internet connection and download them onto any other machine with an internet connection. For example, you can move project files off of your virtual machine, onto the NextCloud storage, and then download them on your personal laptop. Alternatively, you can upload files from your personal PC onto the NextCloud storage, place it into the Windows Home folder, and access those files from either the lab Z:\ drive or download them on a virtual machine like VirtualBox or OpenStack.
Uploading Files to NextCloud from a Lab Computer
If you would like to upload files from a lab computer, the easiest way to do this is to place the files you would like to transfer into your Z:\ drive. These files will be automatically backup into your NextCloud storage under the Windows Home folder. After that, you can move them into the main NextCloud storage or choose to keep them in your Z:\ drive.
Uploading Files to NextCloud from a VM or Other PC
If you would like to upload files from either a VM or any other computer, you can login to the NextCloud service using any of the available interfaces, such as the web interface. Press the “+” icon in the top left of the file browser and select Upload File. From here, you can choose to keep it in the main NextCloud storage, move it into your Windows Account storage (the Windows Home folder), or into your Linux Account storage (the Linux Home folder).
Downloading NextCloud Files to a VM or Other PC
Once your files are uploaded you will be able to download those files onto any machine which can connect to NextCloud. First, log in to your preferred NextCloud interface (eg. the web interface). N to the folder which contains the files you would like to download. Once you are in the target folder, click the checkbox next to each file you would like to download. Above the file listing you should notice the context bar changing to tell you how many files you have selected and a button labelled Actions. Click Actions > Download.
If you have selected a single file, it will prompt you to confirm the download. If you have chosen more than one file, NextCloud will place all of the selected files into a zip archive. Before you can use the files, you will need to extract them from the archive. Once you have downloaded your file, or extracted your archive, you are ready to use your files on your machine.


