- How to Share Internet from Windows, Mac or Linux to Android device
- Windows:
- Mac:
- Linux:
- Share Your Windows Internet With Your Android Phone VIA USB Cable
- Sharing Files Between Windows and Android over WiFi
- 2 Answers 2
- How to share Internet from PC to Android | Windows 10
- How to share Internet from PC to Android
- Pre-requisites
- Steps to share Internet from PC to Android
- Share Computer’s Internet Connection with Android Device with USB Reverse Tethering
- Requirements:
- Step-by-Step Instructions
- PC Configuration
- Configure DHCP on your Android device
How to Share Internet from Windows, Mac or Linux to Android device
Most people are aware that Android devices can be used as a USB tether for sharing mobile data to a computer, but a nifty trick is the same procedure in reverse – that is, sharing a computer’s internet connection with the Android device. It’s known as “reverse tethering”, and it’s a fairly easy thing to setup.
There are different ways to achieve this depending on your operating system, so I will share methods for Windows, Mac, and Linux systems.
Windows:
- Download and install the Connectify Hotspot software on your computer, and proceed with the instructions on screen. Connectify Hotspot essentially creates a hotspot network through your computer’s WiFi antenna – of course, there’s a native Windows method of achieving this, but Connectify Hotspot is far less technical and more user-friendly.
- To configure Connectify Hotspot, you simply create a network by entering the desired name in the SSID field, and a password. Then you choose the connection you want to share, such as the Wi-Fi network your computer is connected to.
- In SSID type the connection name you want to give, this will be the wi-fi network name that you will see on your Android. Give your network a password if you want to use a secured network. Now select from the connection you want to share. i.e. This is the adapter which has the internet. Select the Wi-Fi network using which you will connect your Android Phone.
- Now enable your Android device’s WiFi, and click “Start Hotspot” in Connectify. You should be able to see the network on your phone’s list of available WiFi networks, so simply choose the SSID from Connectify, provide the password, and you’re all set.
Mac:
- First go to System Preferences > Sharing.
- Click on Internet Sharing, and under the dropdown box for “Share your connection from:”, choose the network your Mac is connected to, such as Ethernet or WiFi.
- Now in the box for “To computers using”, choose either Bluetooth PAN or AirPort, depending on your Mac OS/X version. However, if you’re sharing a Mac’s internet to a non-Apple device through AirPort, Mac absolutely requires a 5 or 13 letter WEP key. No more, no less.
- After you’re broadcasting the SSID from your Mac, go ahead and connect to it under your Android device’s WiFi settings.
Linux:
Please note this requires a rooted Android phone – you can search Appuals for Android root guides for your device.
You’ll also need ADB and Fastboot installed, which is easily obtained with:
sudo apt-get install android-tools-adb android-tools-fastboot
Finally, you should have a Terminal Emulator installed on your phone.
- If you meet those prerequisites, go ahead and connect your Android device to your PC over USB.
- Now launch a Linux terminal, and type the following commands:
Ifconfig
- This should display the network interface from the connected Android device, typically usb0 but in some cases it can be something else. In the commands I am giving, make sure to change usb0 to the actual network interface being used.
- So now type in the terminal:sudo ifconfig usb0 10.42.0.1 netmask 255.255.255.0
echo 1 | sudo tee /proc/sys/net/ipv4/ip_forward
sudo iptables -t nat -F
sudo iptables -t nat -A POSTROUTING -j MASQUERADE
- Now we have to type the next command on your Android’s terminal emulator :
adb shell busybox ifconfig
- After that last command, it should display a different network interface being used, for example So again, change the commands I am sharing to whatever is your actual network interface.
adb shell ifconfig rndis0 10.42.0.2 netmask 255.255.255.0
adb shell route add default gw 10.42.0.1 dev rndis0
- Now we can test the internet sharing by trying to send a ping from your phone’s Terminal Emulator, so type on your phone:
adb shell ping 8.8.8.8
If you get a successful ping, then you’re all set to go.
Share Your Windows Internet With Your Android Phone VIA USB Cable
How To Share Your Windows Internet With Your Android Phone VIA USB Cable:- Wondering whether it’s possible to browse through the Internet without WiFi or Mobile data? Yes, it is possible. If your PC has an Internet connection, you can share it with your Android device just by using a USB port and USB cable. Sounds cool? Read on then, this post is for you.
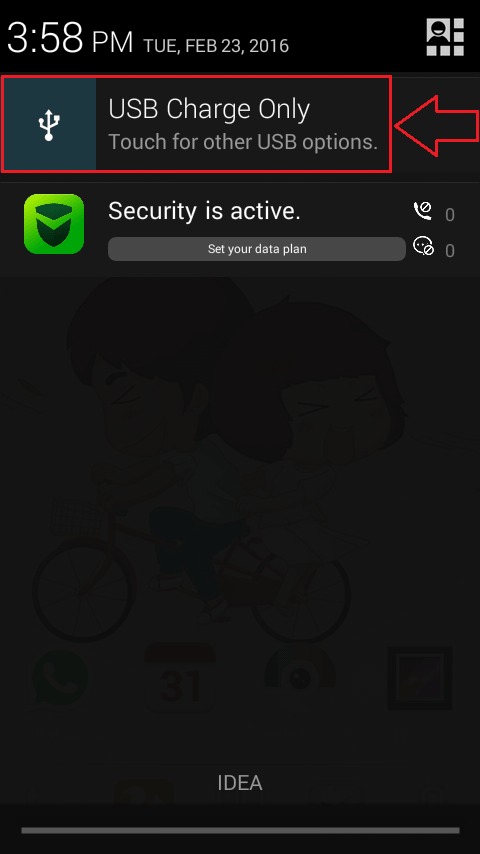
STEP 1
- First of all, connect your Android phone with your PC via the USB port. Your phone will be connected automatically in the USB Charge Only mode. Simply click on the notification as shown in the screenshot. This will open up other options for USB computer connection.
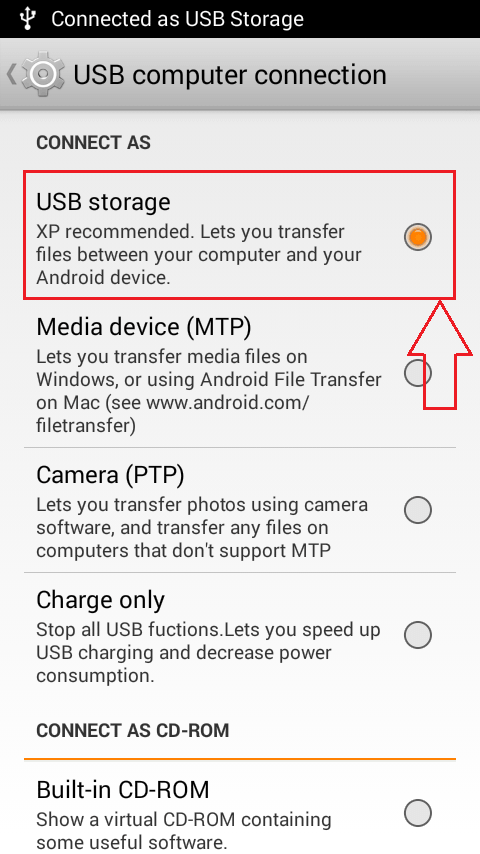
STEP 2
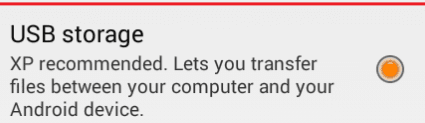
- Find the section named CONNECT AS under USB computer connection. Now check the radio button corresponding to USB storage option as shown in the screenshot.
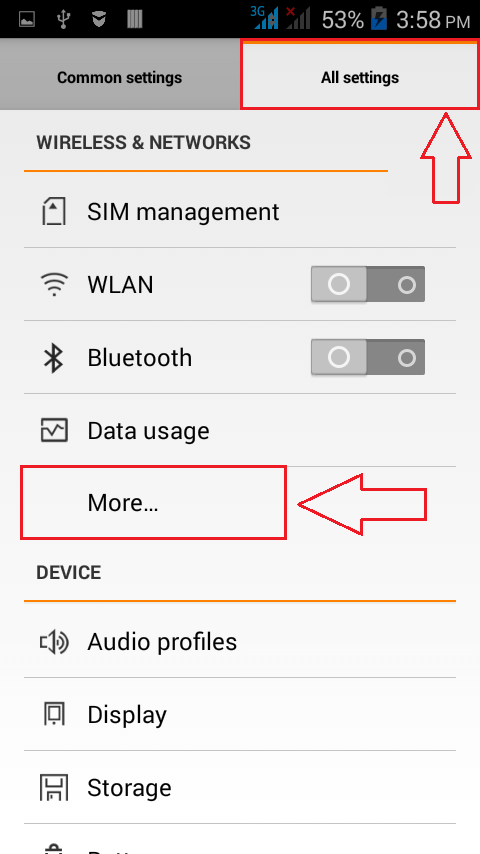
STEP 3
- Once you are done, launch the Settings screen in your Android phone. As next, click on the More option under the section WIRELESS & NETWORKS as shown.
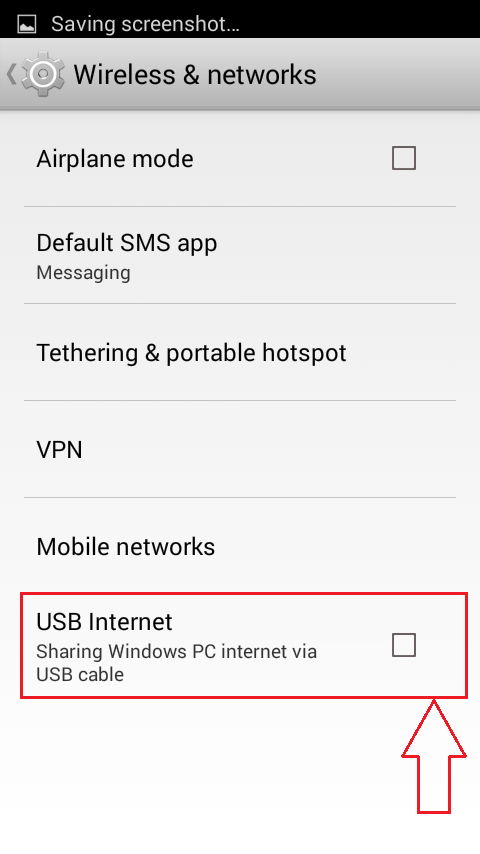
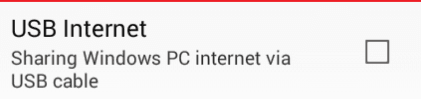
STEP 4
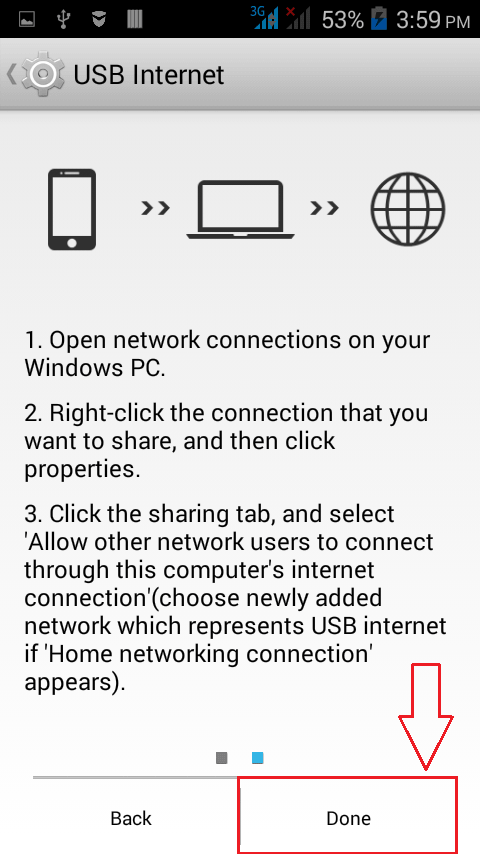
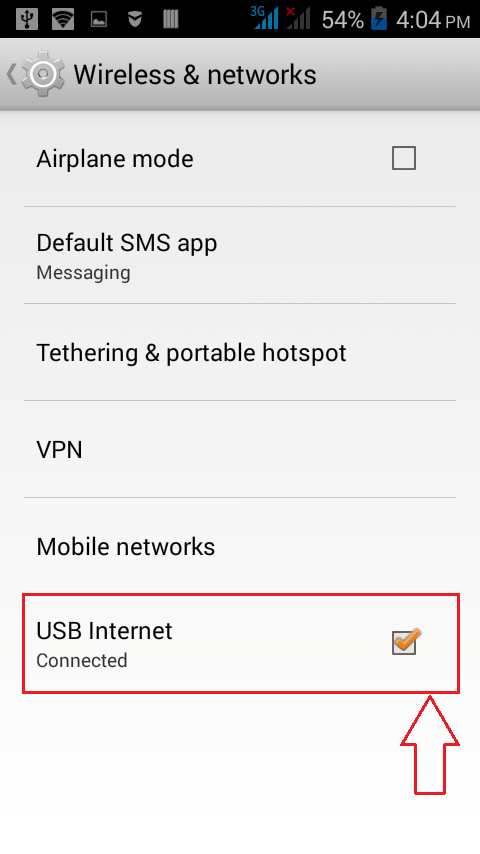
- Now find the option named USB Internet under the Wireless & networks section and click on it.
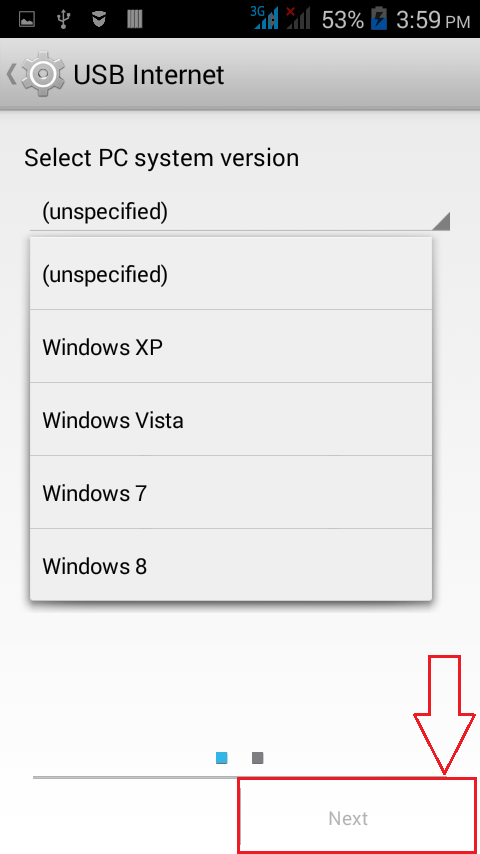
STEP 5
- Select your PC system version from the drop down menu. Once you are done, click on the Next button at the bottom of the screen.
STEP 6
- Now you need to open up the Network center in your PC as shown in the screenshot. Locate and right click on the network that you want to share with your Android device via USB cable. From the options that gets expanded out, click on Status option or Properties option.
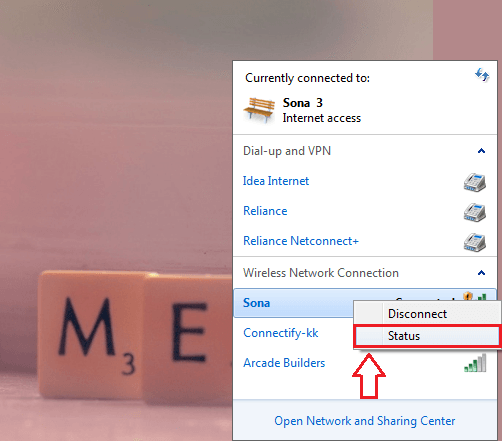
STEP 7
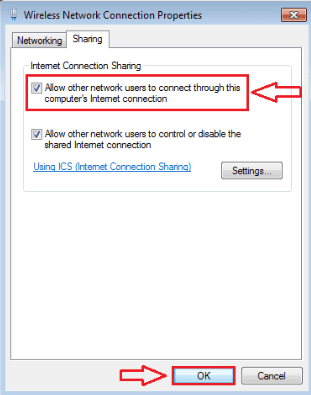
- A new window named Wireless Network Connection Status opens up. You need to locate and click on the button named Properties.
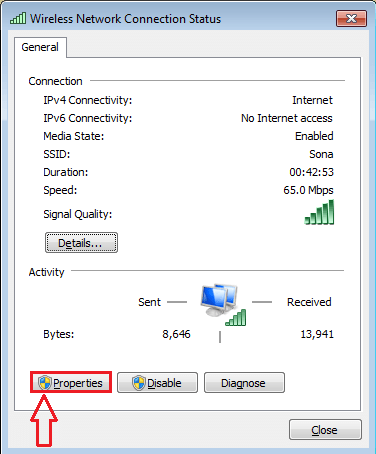
STEP 8
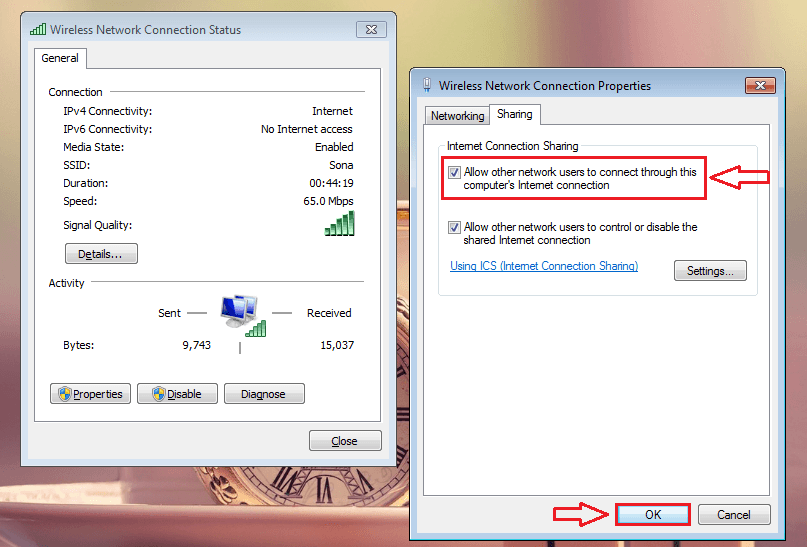
- When the Wireless Network Connection Properties window opens up, click on the Sharing tab and check the checkbox that says Allow other network users to connect through this computer’s Internet connection. Once you are done, simply click on the OK button.
STEP 9
- Now let’s get back to your Android phone from where we left off. Just click on the Done button at the bottom of your phone screen.
STEP 10
- There you are! Your phone is now equipped to browse through the Internet using your PC’s Internet connection.
Try out this trick today itself. Just turn off your WiFi or Mobile data and access any web page via USB cable to amuse your friends. Hope you found the article useful.

Someone who is in love with writing and technical tricks & tips.
Sharing Files Between Windows and Android over WiFi
Is there a way ( protocol ?) to share & exchange files between pc with Windows os and a mobile phone with Android os over WiFi ?
2 Answers 2
For an Ad Hoc Android to PC connection (Per the source below):
Connect your computer with virtual hotspot created by Android device.
Install any FTP Server app on Android device. It’ll NOT give you IP of device for sure.
In your computer, find IP of Default Gateway of Wi-Fi network of Step 1 (In Windows, you can use ipconfig cmd command). Its the IP of your device.
Use any FTP Client software on computer. Use ftp://IP:Port (Port is generally configurable in FTP server app). Enter username & password configured in FTP Server app. Done!
Then they said «After some testing with different settings I got it to work flawlessly, thank you very much. For anyone else looking to do this: I used Android Wifi Tether to start the network using Softap mode, connected to it with the computer, started an FTP server (some server apps might need you to enable 3G mode, even though 3G data isn’t actually used, you can turn data connections off if you’re paranoid.»
For Internet Based Connections:
You may simply want to transfer the files to a hosted server with push notifications to «pull» down the files to the various devices.
The coder of that app may be willing to help you get off to a better start, email him.
How to share Internet from PC to Android | Windows 10
Alright, so it looks like that you are someone who wants to share Internet from your Windows PC to your Android Device. Well, there can be a couple of reasons as to why you wanna do this. One of the major one being that you are in a situation where you have a LAN Connection and you want to use the Internet on your Android Device. In such a scenario, it is important to make sure that you can share the Internet to your Android Device in the most efficient and effective way possible.
Today, in this post, we would be covering on How to share Internet from PC to Android. So by the end of this tutorial, you should be able to use the Internet from your Windows 10 PC to your Android Device in no time. Now if that sounds interesting, let us hop right into it. Should we?
How to share Internet from PC to Android
Now, we would be sharing the How to share Internet from PC to Android device with the help of reverse tethering. For those of you who don’t already know, Tethering means sharing the Internet from your Android Device to your PC. And as you would have already guessed, Reverse tethering simply means the other way around or simply sharing the Internet from PC to Android.
Now, we would need certain prerequisites in order to do reverse tethering. So, let us now take a look at what they are. Should we?
Pre-requisites
Here is a list of things which we will need in order to perform reverse tethering between our Windows PC and Android Device:
- Make sure that you have an active Internet connection on your Windows 10 PC.
- A USB Cable.
- Your Android Device
Once you have the above pre-requisites, you are all set to share Internet from PC to your Android Device. With that being said, let us now take a look at Steps to share Internet from PC to Android. Should we?
Steps to share Internet from PC to Android
Here are the steps which you need to follow in order to share Internet from PC to Android:
- First of all, you need to connect your Android phone with your PC via the USB cable.
- Now, your phone should get connected automatically in the USB Charge Only mode.
- Simply click on the notification which says USB options.
- Here, you need to select the USB storage option from the list.
- Once done, go to the Wireless & Networks Settings on your Android Device.
- Here, enable the option which says, USB Internet.
- Select your PC OS from the dropdown and click on the Next button.
- Now, on your PC, you need to go to the Network center.
- Here, locate and right click on the Internet connection which you want to share with your Android device via USB cable and select Properties option from the context menu.
- Now, go to the Sharing tab and check the option that says Allow other network users to connect through this computer’s Internet connection.
- To finish things off, simply tap on the Done button on your Android Device.
- That’s it, you are now sharing Internet from PC to Android. Easy, no?
So, guys, this was our take on How to share Internet from PC to Android. We hope that you found this post useful. Just in case if you were stuck somewhere between the steps or have any questions related to the topic, then feel free to leave them in the comments section down below.
Share Computer’s Internet Connection with Android Device with USB Reverse Tethering
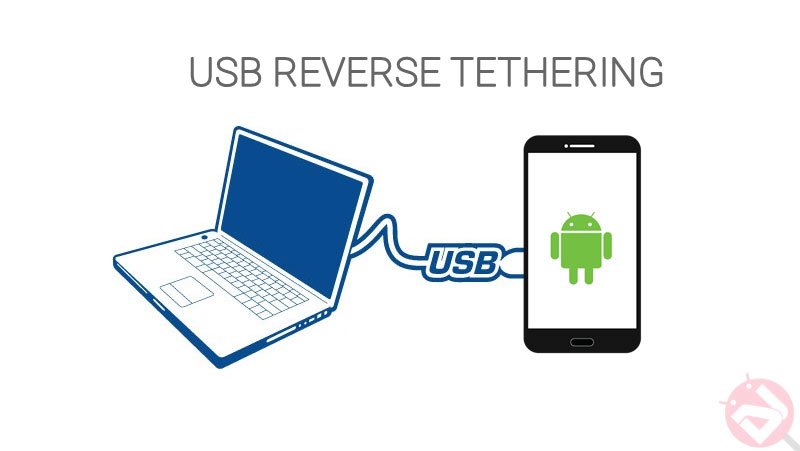
Tethering is one of the most beneficial features in the smartphones which lets you share the internet access on your device with a PC or other smartphone or tablet. You can use this feature either using a wired connection such as in USB tethering where you need to plug in your smartphone with internet access to a PC to share the data connection while the other method and the most popularly used method is wireless tethering where you can share data connection of your device with other devices via a WiFi connection. In both the cases, the smartphone acts as the modem to share data but what if you want to use your PC’s internet connection on your smartphone when there is no WiFi modem with you?
Nowadays most of the public places and offices had cut-off WiFi modems to safeguard their data from hackers and other intrusions. Moreover, sometimes we come across situations where our WiFi antenna blew off or we have a wired broadband connection which servers only via LAN cables. In these situations, we have to rely on 3G connection on our smartphones which won’t be as fast and stable as a WiFi connection which make your browsing experience hectic. However, we have a technique where you can share the internet connection of your PC on your smartphone which is the exact opposite to traditional tethering, hence the name Reverse Tethering.
Some of you might already gave this concept a try but was not unsuccessful and for some of you it’s entirely new, so today we are going to show you a manual technique to use the internet connection of your PC on your smartphone using USB reverse tethering technique. The manual process may be a bit unfriendly to new users, but it’s fairly simple and consistent than any reverse tethering app. So if you’re ready, here we go on some interesting guide:
Requirements:
- Your device’s USB drivers installed on your PC.
- A working internet connection on your PC.
- A rooted Android smartphone.
- USB Debugging enabled on your smartphone → Click here
- Terminal Emulator app installed on your smartphone → Click here to download
- Busy box installed (optional)
Step-by-Step Instructions
In this method, we will show you how to share your PC’s internet connection on your smartphone on Windows, Linux and MAC OS X operating systems. Kindly use the applicable instructions on your PC.
PC Configuration
For Windows users:
- Connect your Android device to PC by using a USB cable and make sure the driver are properly installed and the device is device is detected.
- Enable USB tethering on your device which can be found under tethering and portable hotspot settings of your device.
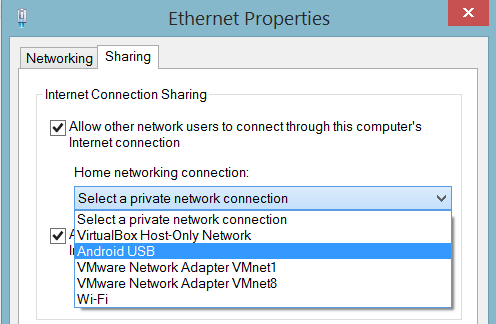
- Open Network Connections on your PC. Right-click on the active internet connection you have and select Properties. In sharing tab, click Allow other network users to connect option and select your USB connection from the drop-down menu below.

- Click OK and you’ll see your network is shared with your device and you can find an IP address for your device in the properties of your USB connection.
- Now all you need to do is to allow the data packets to travel in the reverse direction i.e from your PC to Android device. To do this, we have to type few commands on your device.
For Linux users:
- On GUI Linux machines, network manager will establish a network connection automatically once the device is connected. However, if you’re using Linux CLI, type the below commands to configure the network on your PC.
- Run the following commands as root user or use sudo to gain root temporarily:
Replace the usb0 with the device’s USB network adapter which should be usb0 by default when you have no other USB devices.
CLI Linux users can skip the next steps in PC configuration.
For MAX OS X users:
- Install driver HoRNDIS on your PC. Once the device is connected, you will be notified about a new network interface. Click Network Preferences in the dialog to add it to known interfaces list and apply the changes bu clicking Apply button.
- Now open System Preferences and open network settings. Now you’ll see a new network interface in the interfaces list corresponding to your USB connection, provided you have installed the drivers in step 1 properly.
- Make sure that Configure IPV4 is set as using DHCP in the network preferences.
- Navigate back to the system preferences, click sharing and select internet sharing. Choose the Internet connection in Share your connection from, and choose your USB connection interface into computers using.
- Now your MAC PC will assign an IP address to your USB connection interface which by default is 192.168.2.1.
Configure DHCP on your Android device
Method 1: Automatic DHCP
In this method, the DHCP is configured so that an IP address is automatically assigned to the device every time you use USB reverse tethering. Follow the below procedure to configure automatic DHCP on your device.
- Open terminal emulator app on your device and type the following command:
This might trigger a SuperSU request on your device, so grant permissions when asked. Once permissions are granted, the $ symbol should change to # in the command window.
Type the following command to configure automatic NCP using dhcp configuration which assigns the IP address dynamically.
Replace the rndis0 with the USB interface on your device. It is usually rndis0 or usb0, but to make sure verify it with the below command:
Method 2: Manually configure IP address
In this method, an IP address is statically assigned to the device. However, you should take care that there is no IP clash during this process.
- On Linux PC’s, if automatic DHCP doesn’t work for you, use the follow commands o your Android device:
- If the route in the previous command fails, use this alternative command:
Note:
- For Windows PC, use the same above commands, replace 10.42.0.2 by 192.168.137.2 (192.168.0.2 for Windows XP), replace 10.42.0.1 by 192.168.137.1 (192.168.0.1 for Windows XP)
- For Mac PC, replace 10.42.0.2 by 192.168.2.2, replace 10.42.0.1 by 192.168.2.1
Some Google apps like Playstore, Gmail might not work with this method as they need either a 3G connection or WiFi to work, so we will fake your PC’s network as 3G network to make things work. Use the following fix if you’re having troubles with these apps.
- Temporarily enable your 3G connection.
- Type the following command in terminal emulator:
Replace the rmnet0 with the device’s 3G interface which may be ppp0, rmnet0…. Use below command to identify the 3G interface:
That’s it. Such a long post, right?
Leave your valuable feedback regarding the guide in the comments below.


