- Setting up a Share Using Windows ACLs
- Namespaces
- Page actions
- Contents
- Introduction
- Preparing the Host
- File System Support
- Samba Extended ACL Support
- Enable Extended ACL Support on a Unix domain member
- Granting the SeDiskOperatorPrivilege Privilege
- Adding a Share
- Setting Share Permissions and ACLs
- Setting ACLs on a Folder
- File System ACLs in the Back End
- Sharing samba with windows
Setting up a Share Using Windows ACLs
Namespaces
Page actions
Contents
Introduction
Extended access control lists (ACL) enable you to set permissions on shares, files, and directories using Windows ACLs and applications. Samba supports shares using extended ACLs on:
- Domain members
- Active Directory (AD) domain controllers (DC)
- NT4 primary domain controller (PDC)
- NT4 backup domain controllers (BDC)
- Standalone hosts
Preparing the Host
You need to set up Samba before you are able to create a share. Depending on what type of Samba server you require, see:
File System Support
The file system, the share will be created on, must support:
- user and system xattr name spaces.
- extended access control lists (ACL).
For further details, see File system support.
Samba Extended ACL Support
To create a share with extended access control list (ACL) support, the smbd service must have been built with ACL support enabled. A Samba host working as an Active Directory (AD) domain controller (DC), is always enabled with extended ACL support.
To verify if Samba has been built with ACL support, enter:
If no output is displayed:
- Samba was built using the —with-acl-support=no parameter.
- The Samba configure script was unable to locate the required libraries for ACL support. For details, see Package Dependencies Required to Build Samba.
Enable Extended ACL Support on a Unix domain member
Ideally you have a system that supports NFS4 ACLs. The following example is for systems like Linux, where you don’t have those kind of ACLs. To configure shares using extended access control lists (ACL) on a Unix domain member, you must enable the support in the smb.conf file. To enable extended ACL support globally, add the following settings to the [global] section of your smb.conf file:
 | On a Samba Active Directory (AD) domain controller (DC), extended ACL support is automatically enabled globally. You must not enable the support manually. |
Alternatively, to enable extended ACL support only for a specific share, add the parameters to the share’s section.
For further details about the parameters, see the smb.conf(5) man page.
Granting the SeDiskOperatorPrivilege Privilege
Only users and groups having the SeDiskOperatorPrivilege privilege granted can configure share permissions.
| Only users or groups that are known to Unix can be used. This means that if you use the winbind ‘ad’ backend on Unix domain members, you must add a uidNumber attribute to users, or a gidNumber to groups in AD. |
| If you use the winbind ‘ad’ backend on Unix domain members and you add a gidNumber attribute to the Domain Admins group in AD, you will break the mapping in idmap.ldb . Domain Admins is mapped as ID_TYPE_BOTH in idmap.ldb , this is to allow the group to own files in Sysvol on a Samba AD DC. It is suggested you create a new AD group ( Unix Admins for instance), give this group a gidNumber attribute and add it to the Administrators group and then, on Unix, use the group wherever you would normally use Domain Admins . |
To grant the privilege to the Unix Admins group, enter:
| It is recommended to grant the privilege to a group instead of individual accounts. This enables you to add and revoke the privilege by updating the group membership. |
To list all users and groups having the SeDiskOperatorPrivilege privilege granted, enter:
| You need to grant the SeDiskOperatorPrivilege privilege on the Samba server that holds the share. |
Adding a Share
To share the /srv/samba/Demo/ directory using the Demo share name:
- As the root user, create the directory:
- To enable accounts other than the domain user Administrator to set permissions on Windows, grant Full control ( rwx ) to the user or group you granted the SeDiskOperatorPrivilege privilege. For example (if using the ‘ad’ backend):
- Otherwise for any other backend:
- Add the [Demo] share definition to your smb.conf file:
Further share-specific settings and file system permissions are set using the Windows utilities.
| Do not set ANY additional share parameters, such as force user or valid users . Adding them to the share definition can prevent you from configuring or using the share. |
It is recommended that you add this line to your share:
This will make Samba ignore the system ACL’s
- Reload the Samba configuration:
Setting Share Permissions and ACLs
When you configure a share with extended access control lists (ACL) support, you set the share permissions using Windows utilities instead of adding parameters to the share section in the smb.conf file.
To set permissions and ACLs on the Demo share:
- Log on to a Windows host using an account that has the SeDiskOperatorPrivilege privilege granted. e.g. SAMDOM\Administrator or SAMDOM\john where john is a member of Unix Admins .
- Click Start , enter Computer Management , and start the application.
- Select Action / Connect to another computer .
- Enter the name of the Samba host and click OK to connect the console to the host.
- Open the System Tools / Shared Folders / Shares menu entry.
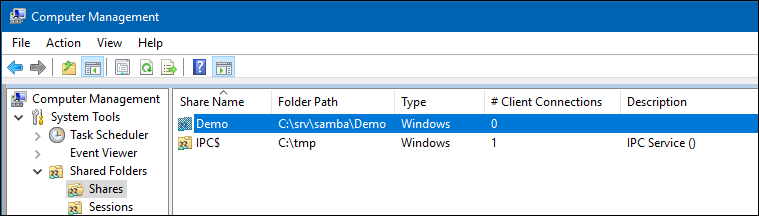
- Right-click to the share and select Properties .
- Select the Share Permissions tab and check the share permissions, you need to see Everyone . For example:
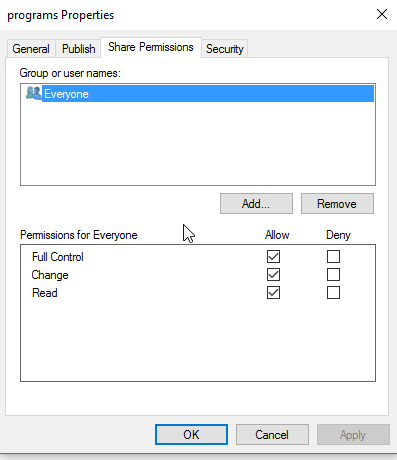
| If the permissions are as above, you do not need to change anything, if not, change it to just allow Everyone : Full Control, Change and Read . You should only need to make changes to the Security tab. |
Samba stores the share tab permissions in the /usr/local/samba/var/locks/share_info.tdb database.
- Select the Security tab.
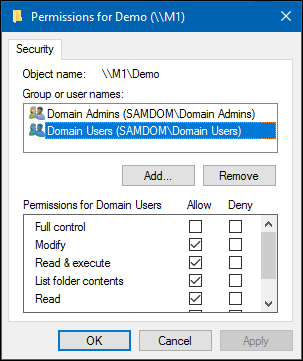
- Click the Edit button and set the file system ACLs on the share’s root directory. For example:
 For details about using the SYSTEM account on a Samba share see The SYSTEM Account. For details where the ACLs are stored, see File System ACLs in the Back End.
- Click the Add button.
- Click Advanced button
- Click Find Now
- Select a user or group from the list, Domain Users for instance.
- Click OK
- Click OK
- Select permissions to grant, Full control for instance.
- A windows security box should open, asking if you want to continue, Click Yes
- If you check the list of Group or user names , you should find Domain Users listed
- Click OK to close the Permissions for Demo window.
- Click OK to store the updated settings.
For further details about configuring share permissions and ACLs, see the Windows documentation.
Setting ACLs on a Folder
To set file system permissions on a folder located on a share that uses extended access control lists (ACL):
- Log on to a Windows host using an account that has Full control on the folder you want to modify the file system ACLs.
- Navigate to the folder.
- Right-click to the folder and select Properties .
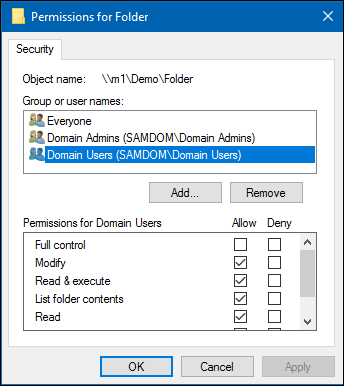
- Select the Security tab and click the Edit button.
- Set the permission. For example:
 For details about using the SYSTEM account on a Samba share see The SYSTEM Account. For details where the ACLs are stored, see File System ACLs in the Back End.
- Click OK to close the Permissions for Folder window.
- Click OK to store the updated settings.
For further details about setting ACLs, see the Windows documentation.
File System ACLs in the Back End
Samba stores the file system permissions in extended file system access control lists (ACL) and in an extended attribute. For example:
- To list the extended ACLs of the /srv/samba/Demo/ directory, enter:
- To list the security.NTACL extended attribute of the /srv/samba/Demo/ directory, enter:
The previous example of file system ACLs and the extended attribute is mapped to the following Windows ACLs:
Sharing samba with windows
Opening Windows to a Wider World. (слоган на www.samba.org)
Samba — реализация сетевых протоколов Server Message Block (SMB) и Common Internet File System (CIFS). Основное предназначение — расшаривание файлов и принтеров между Linux и Windows системами.
Samba состоит из нескольких демонов, работающих в фоновом режиме и предоставляющих сервисы и ряд инструментов командной строки для взаимодействия со службами Windows:
- smbd — демон, являющийся SMB-сервером файловых служб и служб печати;
- nmbd — демон, предоставляющий службы имен NetBIOS;
- smblient — утилита предоставляет доступ из командной строки к ресурсам SMB. Она также позволяет получить списки общих ресурсов на удаленных серверах и просматривать сетевое окружение;
- smb.conf — конфигурационный файл, содержащий настройки для всех инструментов Samba;
Список портов, используемых Samba
| Порт | Протокол | Служба | Демон | Описание |
|---|---|---|---|---|
| 137 | UDP | netbios-ns | nmbd | служба имен NetBIOS |
| 138 | UDP | netbios-dgm | nmbd | служба датаграмм NetBIOS |
| 139 | TCP | netbios-ssn | smbd | NetBIOS over TCP (служба сеансов) |
| 445 | TCP | microsoft-ds | smbd | NetBIOS over TCP (служба сеансов) |
Вводная статья про основные принципы расшаривания файлов и принтеров.
Установка и настройка сервера
Скопируем файл с настройками smb.conf
По умолчанию создаются ресурсы для домашних каталогов пользователей (раздел homes в smb.conf) и принтеров (раздел printers).
Доступ к ресурсу может быть по паролю или анонимный. Для первого способа есть пара моментов:
- пользователь должен существовать в системе (создан с помощью команды adduser username и установлен пароль passwd username );
- пользователь должен быть добавлен как пользователь Samba (с помощью команды sudo smbpasswd -a username );
Необходимо что-бы компьютеры принадлежали к одной рабочей группе, в Windows по умолчанию это WORKGROUP, вот её и будем использовать.
Ниже приведен пример простого файла smb.conf с настройками для анонимного доступа к директории /srv/samba/public.
Имена параметров не чувствительны к регистру. Для некоторых распространенных параметров существуют синонимы, а для некоторых – антонимы. Например, writable и writeable – это синонимы, а read only – антоним для них, т.е. опция read only = yes эквивалентна опции writable = no.
Проверим корректность настроек с помощью команды testparm
Опция -v указывает testparm выводить также значения по умолчанию.
Проверим подключению к Samba на порт 139 с помощью telnet
В Samba имеется ряд параметров, связанных с аутентификацией пользователей. Наиболее важным из них является параметр security, который может принимать пять различных значений источник:
- share — этот режим безопасности эмулирует метод аутентификации, используемый операционными системами Windows 9x/Windows Me. В этом режиме имена пользователей игнорируются, а пароли назначаются общим ресурсам. В этом режиме Samba пытается использовать предоставленный клиентом пароль, которым могут пользоваться разные пользователи.
- user* — этот режим безопасности установлен по умолчанию и использует для аутентификации имя пользователя и пароль, как это обычно делается в Linux. В большинстве случаев в современных операционных системах пароли хранятся в зашифрованной базе данных, которую использует только Samba.
- server — этот режим безопасности используется тогда, когда необходимо, чтобы Samba выполняла аутентификацию, обращаясь к другому серверу. Для клиентов этот режим выглядит так же, как аутентификация на уровне пользователя (режим user), но фактически для выполнения аутентификации Samba обращается к серверу, указанному в параметре password server.
- domain — используя этот режим безопасности, вы можете полностью присоединиться к домену Windows; для клиентов это выглядит так же, как аутентификация на уровне пользователя. В отличие от аутентификации на уровне сервера, доменная аутентификация использует более защищенный обмен паролями на уровне домена. Для полного присоединения к домену требуется выполнить дополнительные команды в системе Samba и, возможно, на контроллере домена.
- ads — этот режим безопасности похож на метод аутентификации в домене, но требует наличия контроллера домена Active Directory Domain Services.
Полный список параметров Samba есть в manpages.
Выше был приведен пример с доступом для директории с общим доступом. Рассмотрим еще пример с приватной директорией, к которой доступ только по логину и паролю.
Создадим группу и добавим в нее пользователя
Создадим директорию для пользователя и установим права
Добавим в /etc/samba/smb.conf новый ресурс
Пример настройки ресурса в котором есть симлинк на папку пользователя (/srv/samba/media/video » /home/proft/video)
Просмотр общих ресурсов компьютера
Еще один способ подключения для анонимного пользователя с командной строкой
Если на сервере настроен более высокий уровень безопасности, то может потребоваться передать имя пользователя или домена с помощью параметров -W и -U соответственно.
Еще лучше пароли хранить в отдельном файле
Выставим права доступа 0600
Новая строка для монтирования
И пример для /etc/fstab
Открыть ресурс в файловом менеджере Nautilus/Nemo/etc можно по такому пути smb://192.268.24.101.
Если Nemo пишет Nemo cannot handle «smb» locations. значит не хватает пакета gvfs-smb.
Доступ к серверу с Windows и Android клиента
Под Windows узнать рабочую группу с консоли можно с помощью
Открыть ресурсы на удаленной машине можно набрав в строке Explorer (Проводник) или в Run (Start — Run) UNC-адрес: \192.168.24.101.
Под Android подключится к серверу можно с помощью ES File Explorer, на вкладке Network добавляем сервер, просто по IP (без указания схемы, smb). После чего можно открывать расшаренные ресурсы. Для статистики: HDRIP-фильм идет без подтормаживания.


