- File sharing over a network in Windows 10
- About Windows Desktop Sharing
- The Object Model
- Security Concerns
- Windows Desktop Sharing Interfaces
- In this section
- Share your desktop — Communicator
- Sharing your desktop
- Viewing a shared desktop
- Share your desktop
- Stop desktop sharing
- Accept or decline a desktop sharing invitation
- Replace a shared desktop with your own desktop
- Take control of a shared desktop
File sharing over a network in Windows 10
In Windows 10, some features of file and folder sharing over a network have changed, including the removal of HomeGroup. Read on for answers to common questions about other changes to file and folder sharing in Windows 10.
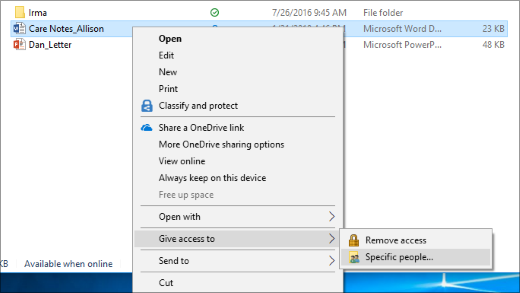
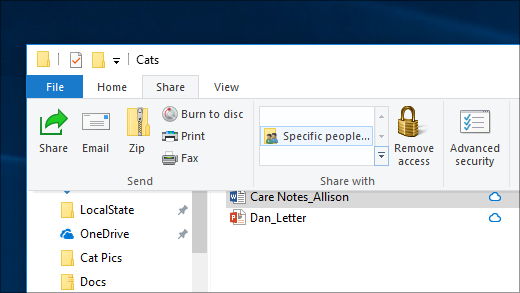
To share a file or folder in File Explorer, do one of the following:
Right-click or press a file, select Give access to > Specific people.
Select a file, select the Share tab at the top of File Explorer, and then in the Share with section select Specific people.
If you select multiple files at once, you can share them all in the same way. It works for folders, too—share a folder, and all files in it will be shared.
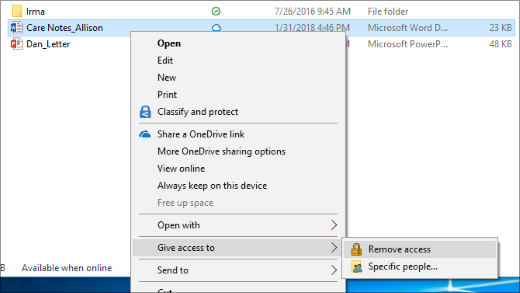
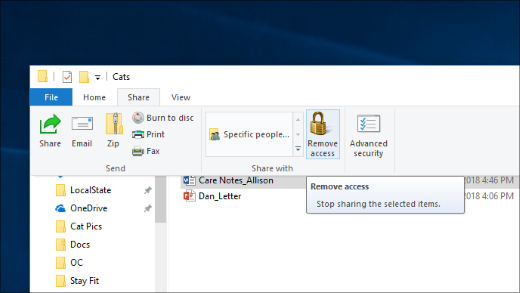
To stop sharing in File Explorer, do one of the following:
Right-click or press a file or folder, then select Give access to > Remove access.
Select a file or folder, select the Share tab at the top of File Explorer, and then in the Share with section select Remove access.
File Explorer shows the «Remove access» option («Stop sharing» in older versions of Windows 10) for all files, even those that aren’t being shared over a network.
Open File Explorer, then type \\localhost into the address bar.
Note: When you’ve shared a file from a folder in your user profile and you go to \\localhost, you’ll see your user profile and all its files there. This doesn’t mean that all of your files are shared—just that you have access to all your own files.
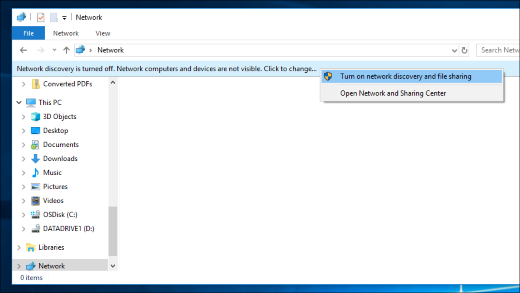
If you open File Explorer, go to Network, and see an error message («Network discovery is turned off….»), you’ll need to turn on Network discovery to see devices on the network that are sharing files. To turn it on, select the Network discovery is turned off banner, then select Turn on network discovery and file sharing.
To troubleshoot problems with sharing files or folders, follow the steps below on all computers from which you’re trying to share.
Make sure the computers are on the same network. For example, if your computers connect to the internet through a wireless router, make sure they all connect through the same wireless router.
If you’re on a Wi-Fi network, set it to Private. To find out how, read Make a Wi-Fi network public or private in Windows 10.
Turn on network discovery and file and printer sharing, and turn off password protected sharing.
Select the Start button, then select Settings > Network & Internet , and on the right side, select Sharing options.
Under Private, select Turn on Network discovery and Turn on file and printer sharing.
Under All Networks, select Turn off password protected sharing.
Make sharing services start automatically.
Press the Windows logo key + R.
In the Run dialog box, type services.msc, and then select OK.
Right-click each of the following services, select Properties, if they’re not running, select Start, and next to Startup type, select Automatic:
About Windows Desktop Sharing
There are two participants in Windows Desktop Sharing: the sharer and the viewer. The sharer is the system whose screen is being shared out, while the viewer is the system that can view the sharer’s screen.
For information on connecting from Windows to a Wireless Display (WiDi), please see Project to a wireless display with Miracast.
The Object Model
The only objects that can be co-created are the RDPSession object for creating a sharer instance, and the RDPViewer object for creating a viewer instance. All other objects are created and accessed through the methods of these objects.
An application groups the shareable windows within a process. Each application object contains a list of window objects. If an application object is shared, all its windows are shared.
An application filter manages the shared desktop area at the window and process level. Applications can use the enumerators to display lists of objects in the session that can be shared.
Attendee objects are created as a result of clients connecting to the session and being authenticated. After an attendee object is created it is automatically added to the attendees list.
Invitations enable a person or group of persons to connect to a session. When an attendee connects to a session, the client sends a ticket and a password. These two pieces of information are used to authenticate an attendee.
Beginning with WindowsВ 8 and Windows ServerВ 2012, Windows Desktop Sharing uses the Desktop Duplication API. To ensure that your application will work correctly at all dots per inch (dpi) settings, your application must be DPI-aware. The recommended method for doing this is to configure the application manifest to mark your application as per-monitor DPI-aware as described in Writing DPI-Aware Desktop and Win32 Applications. This will set the application level when the application is launched.
Security Concerns
If an application in a shared desktop or a shared application elevates, the viewer will not see the UAC prompt. This is by design.
A viewer cannot take control of a shared application running as an administrator. This is also by design.
Windows Desktop Sharing Interfaces
Windows Desktop Sharing provides the following scriptable interfaces.
In this section
Implement this interface to receive notifications when events occur.
Groups the sharable windows within a process. Each application object contains a list of window objects. If an application object is shared, all its windows are shared.
Manages the shared desktop area at the window and process level. Applications can use the enumerators to display lists of objects in the session that can be shared.
Manages the application list.
Attendee objects are created as a result of clients connecting to the session and being authenticated. After an attendee object is created, it is automatically added to the attendees list.
Contains information about the reason an attendee disconnected.
Manages attendee objects.
Enables sending an audio stream from the collaboration sharer Microsoft ActiveX control to collaboration viewer controls.
Implement this interface on the sharer side to track or control use of the clipboard. If you do not enable clipboard sharing, this interface has no effect. You need to set a value for the SetClipboardRedirectCallback property described in Property.
This interface is available starting with WindowsВ 10, version 1511.
Provides data about the frame buffer size and format and allows the contents to be retrieved.
Applications can get a pointer to this interface from the FrameBuffer property of the IRDPSRAPISharingSession2 interface.
Invitations enable a person or group of persons to connect to a session. When an attendee connects to a session, the client sends a ticket and a password. These two pieces of information are used to authenticate an attendee.
Manages invitation objects.
Enables a client application to implement custom performance logging.
Use this interface to get or set session properties.
The main object that an application must create to start a collaboration session.
The main object that an application must create to start a collaboration session.
Supports the methods to retrieve the TCP connection information on the viewer and on the sharer side.
Exposes methods that perform operations with streams.
Created and used by the IRDPSRAPITransportStream interface for sending and receiving data.
Exposes methods called by the stream interface (IRDPSRAPITransportStream) to notify the Remote Desktop Protocol (RDP) stack about the completion of events.
The ActiveX interface that is used on the viewer side.
Manages the virtual channel.
Manages the list of virtual channels.
Represents a one-to-one mapping to a sharable window.
Manages the window list.
Sends mouse and keyboard events, and supports touch input.
Manages the rendering surface for the viewer.
Share your desktop — Communicator
You can share your desktop with your contacts at any time during a conversation. For example, if you have a presentation slide deck or a document that you want to present to your contacts, you can start a desktop sharing session right from your IM window. When you share your desktop, other users who are invited to take part in the desktop sharing session can view all the tasks that you are performing on the shared screen.
Sharing your desktop
You can start a desktop sharing session at any time during a conversation. As the person sharing your desktop, you can give control to the other participants, return to the conversation window (for example to continue an IM conversation or start video), and stop the desktop sharing session.
To share your desktop during a Communicator conversation
In the Conversation window, click the Sharing button, and then click Share Desktop. A highlighted frame appears around your entire desktop to indicate that your desktop is currently visible to other participants, and an In Control sharing menu appears at the top of the screen indicating that you are in control of the sharing session.
In the participants’ conversation windows, the message Click to accept invitation to sharing session appears together with an alert. The other participants click the message to accept the invitation.
Note: If you have multiple monitors, you can select the monitor you want to share.
When you are sharing your desktop, you can open and display programs, page through documents, or walk through a slide deck as you would typically do.
To give control to another participant
To share control of the desktop sharing session, in the Conversation window, click the arrow next to the In Control sharing bar, and then under Grant Control to, click the name of the participant.
To take back control of the desktop sharing session, in the Conversation window, click the arrow next to the In Control sharing bar, and then click Take Back Control.
To add video to the desktop sharing session
In the sharing menu bar, click the Show conversation button to return to the conversation window.
In the conversation window, click the Start video call button.
To stop desktop sharing
In the In Control sharing bar, click the Stop sharing button.
Viewing a shared desktop
When someone else initiates desktop sharing, you can accept the invitation to view desktop sharing, change your view of the shared desktop, and request control of the shared desktop.
To accept an invitation to a desktop sharing session
When a participant initiates desktop sharing during a conversation, the message Click to accept invitation to sharing session appears in your conversation window. If you are not currently in a conversation, an alert appears on your desktop.
Click the message or alert to begin viewing the sharer’s desktop.
To change your view of the shared desktop
You can use window controls to maximize or resize your view of the shared desktop by using window controls the window. You can also use the following controls to change your view:
To toggle the size of the resize the shared desktop between to actual size and fit to window, click the Actual size button
To fill your entire screen with the shared desktop, click the Fit to screen button
To request control of the shared desktop, click the Take control button.
Share your desktop
In the Contact List, click Share Desktop 
A highlighted frame appears around your entire desktop to indicate that the desktop is currently visible to other participants.
To share your desktop with a person that you are conversing with, in the conversation window, click Share Desktop 
To invite other contacts to the desktop sharing session, click Invite 
In the participant’s conversation window, the Desktop sharing invitation message appears.
The participant clicks either Accept 

Stop desktop sharing
In the conversation window, click Stop Sharing 
Accept or decline a desktop sharing invitation
If you see the desktop sharing invitation in the conversation window, click Accept 

Replace a shared desktop with your own desktop
Only one desktop can be shared at a time. You can replace a shared desktop with your desktop so that session participants can then view your desktop.
In the conversation window of a desktop sharing session, click Share Desktop 
Take control of a shared desktop
Note: This feature is available on Communicator for Mac only if the desktop sharing session is initiated from a Windows-based computer.
You can request control of a shared desktop at any time if the sharer allows participants to request control.
In the desktop sharing window, click Request Control 
