- Install, uninstall, and upgrade interpreter paths
- To view the interpreter paths
- To add an interpreter path
- To delete interpreter paths
- To reload interpreter paths
- Terminal emulator
- Open the Terminal tool window
- Start a new session
- Configure the terminal emulator
- Project Settings
- Application Settings
- Command-line interface
- Launcher for a standalone instance
- Shell scripts generated by the Toolbox App
- Generate shell scripts
- Change the name of the shell script
- Command-line arguments
- Path variables
- Create a new path variable
- Ignored path variables
Install, uninstall, and upgrade interpreter paths
PyCharm makes it possible to add paths to the selected interpreter. These paths will be added to the environment variable PYTHONPATH . Also, PyCharm will index these paths and (potentially) resolve the objects of the code (for example, imports of packages).
To view the interpreter paths
In the Python Interpreter page of the project settings, click button.
In the list, click Show all. . The available interpreters show up in the Python Interpreters dialog.
Select the desired interpreter.
In the toolbar of the Python interpreters dialog, click the button . The existing paths of the selected interpreter show up in the Interpreter Paths dialog . 
To add an interpreter path
In the toolbar of the Interpreter Paths dialog, click .
Choose the desired path in the Select Path dialog. Note that to add a path to a particular Python version you need to download it from https://www.python.org/ and install it on your machine.
To delete interpreter paths
Select the paths to be deleted.
In the toolbar of the Interpreter Paths dialog, click .
The removed paths remain in the list with the note «removed by user».
To reload interpreter paths
If an interpreter has been updated, it is a good idea to refresh its paths. You can do it by either way:
In the toolbar of the Interpreter Paths dialog, click .
Press Shift twice and type «Rescan» in the Actions tab of the search dialog. Select Rescan Available Python Modules and Packages . 
Источник
Terminal emulator
This feature is not available in the Educational edition of PyCharm.
PyCharm includes an embedded terminal emulator for working with your command-line shell from inside the IDE. Use it to run Git commands, set file permissions, and perform other command-line tasks without switching to a dedicated terminal application.
Initially, the terminal emulator runs with your default system shell, but it supports many other shells, such as Windows PowerShell, Command Prompt cmd.exe , sh , bash , zsh , csh , and so on. For information about changing the shell, see Configure the terminal emulator.
Open the Terminal tool window
From the main menu, select View | Tool Windows | Terminal or press Alt+F12 .
Right-click a project item in the Project tool window and choose Open in terminal from the context menu. This way the terminal will start with the directory corresponding to the selected item.
Start a new session
Click on the toolbar to start a new session in a separate tab.

To run multiple sessions inside a tab, right-click the tab and select Split Vertically or Split Horizontally in the context menu.
The Terminal saves tabs and sessions when you close the project or PyCharm. It preserves tab names, the current working directory, and even the shell history.
To close a tab, click on the Terminal toolbar or right-click the tab and select Close Tab from the context menu.
Press Alt+Right and Alt+Left to switch between active tabs. Alternatively, you can press Alt+Down to see the list of all terminal tabs.
To rename a tab, right-click the tab and select Rename Session from the context menu.
To search for a certain string in a Terminal session, press Ctrl+F . This searches all text in the session: the prompt, commands, and output.
Configure the terminal emulator
- Press Ctrl+Alt+S to open the IDE settings and select Tools | Terminal .
Project Settings
These settings affect the terminal only for the current project:
| Start directory | Specify the working directory where every new shell session should start. By default, it starts in the root directory of the current project. |
| Environment variables | Specify custom environment variables for every new shell session. |
Application Settings
These settings affect the terminal in any project that you open with the current PyCharm instance.
Specify the shell that will run by default. PyCharm should automatically detect the default shell based on your environment. Here are some examples of different shells:
Bash for Windows: bash.exe
Command Prompt: cmd.exe
Cygwin: «C:\cygwin\bin\bash.exe» —login -i
Integrate the terminal with the system shell to properly keep track of your command history for sessions and load a custom config file with required environment variables.
Shell integration works for sh , bash , zsh , and fish shells.
Detect and highlight commands that can be used as IDE features instead of running them in the terminal and reading console output.
When enabled, instead of pressing Enter , which runs the command in the terminal, press Ctrl+Enter to open the corresponding GUI element.
For the Python interpreter being a virtual environment, with this checkbox selected, the virtual environment is automatically activated ( activate is performed automatically).
This option is available only if you have the Python plugin installed.
The embedded terminal emulator also inherits the following IDE settings:
On the Keymap page, you can configure the copy Ctrl+C and paste Ctrl+V shortcuts.
On the Editor | General | Appearance page, you can configure blinking frequency for the caret. The Terminal does not inherit the Use block caret option because there is a separate option for that: Cursor shape.
On the Editor | Color Scheme | Console Font page, you can configure line spacing and fonts.
On the Editor | Color Scheme | Console Colors page, you can configure font colors.
On the Editor | Color Scheme | General page, you can configure the selection foreground and background colors.
Источник
Command-line interface
Use PyCharm features from the command line: open files and projects, view diffs, merge files, apply code style formatting, and inspect the source code.
For information about running command-line tools from inside PyCharm, see Terminal emulator.
Launcher for a standalone instance
The installation directory contains batch scripts and executables for launching PyCharm, formatting the source code, and running inspections. To use them from the Command Prompt cmd.exe , add the location of the PyCharm bin folder to the PATH environment variable. For example, if you installed PyCharm to C:\Program Files\JetBrains\PyCharm , you can use the following command:
This command changes the PATH environment variable for the current shell only (the current instance of cmd.exe ). If you want to update it permanently for the current user, run setx . To update it system-wide for all users, run setx /M .
The installer can do this for you if you select Add launchers dir to the PATH on the Installation Options step of the setup wizard.
After you configure the PATH variable, you can run the executable from any working directory in the Command Prompt: pycharm64.exe . Alternatively, you can use the batch script: pycharm.bat .
To run PyCharm from the shell, use the open command with the following options:
-a : specify the application.
—args : specify additional arguments when passing more than just the file or directory to open.
-n : open a new instance of the application even if one is already running.
For example, you can run PyCharm.app with the following command:
If PyCharm is not in the default /Applications directory, specify the full path to it.
You can create a shell script with this command in a directory from your PATH environment variable. For example, create the file /usr/local/bin/pycharm with the following contents:
Make sure you have permissions to execute the script and since /usr/local/bin should be in the PATH environment variable by default, you should be able to run pycharm from anywhere in the shell.
On Linux, the installation directory contains the launcher shell script pycharm.sh under bin . For example, if you installed PyCharm to /opt/pycharm , you can run the script using the following command:
You can create a symbolic link to the launcher script in a directory from the PATH environment variable. For example, if you installed PyCharm to /opt/pycharm and want to create a link named pycharm in /usr/local/bin , run the following command:
Since /usr/local/bin should be in the PATH environment variable by default, you should be able to run the pycharm command from anywhere in the shell.
Shell scripts generated by the Toolbox App
If you are using the Toolbox App to install and manage JetBrains products, it can create shell scripts for launching your IDEs from the command line.
Generate shell scripts
Open the Toolbox App and click in the top right corner.
In the Toolbox App Settings , enable Generate shell scripts .
If necessary, change the shell scripts location.

If you have several versions of the same IDE, the Toolbox App generates a shell script for each version with a unique name. You can change the name of the shell script for an IDE instance in the settings for this specific instance.
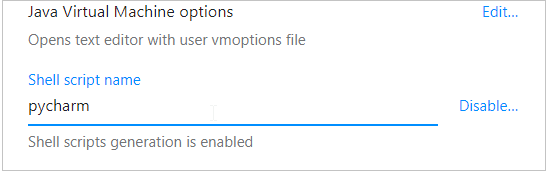
Change the name of the shell script
Open the Toolbox App.
Click next to the relevant IDE instance and select Settings .
At the bottom, change the Shell script name field.
By default, the Toolbox App puts shell scripts in a directory from the system PATH environment variable, so you can run the name of the script as a command to launch PyCharm from any working directory.
Command-line arguments
The launcher script accepts commands, options, and other arguments to modify its behavior:
| Argument | Description |
|---|---|
| No argument | Launch PyCharm. |
| Path to file or directory | |
| Options | |
| nosplash | Do not show the splash screen when loading PyCharm. |
| dontReopenProjects | Do not reopen projects and show the welcome screen. This can help if a project that was open crashes PyCharm for some reason. |
| disableNonBundledPlugins | Do not load manually installed plugins. This can help if a plugin that you installed crashes PyCharm for some reason. You will be able to start the IDE and either disable or uninstall the problematic plugin. |
| —wait | |
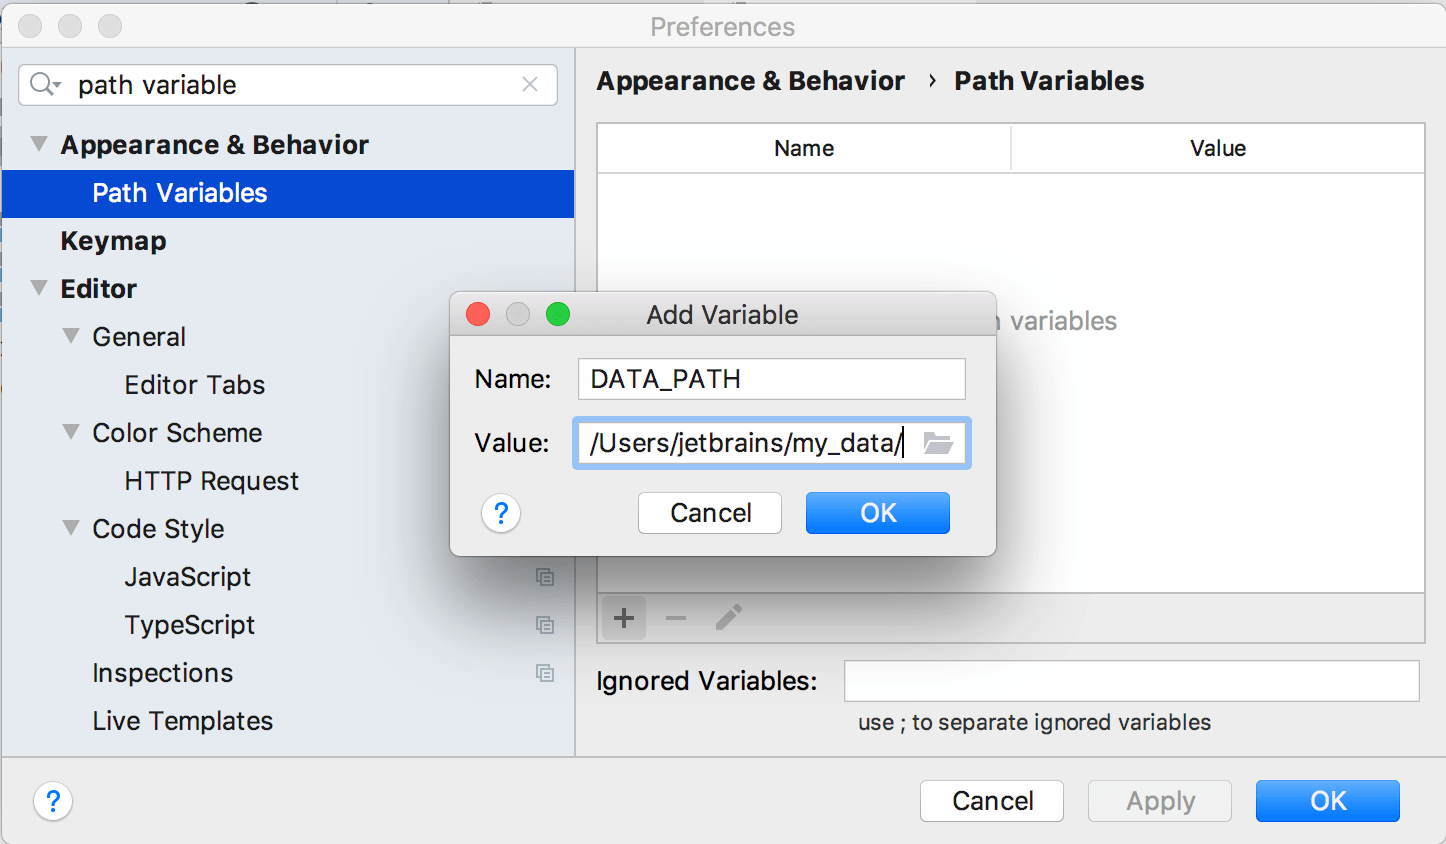
 After your teammates update their projects from VCS, they will change the DATA_PATH variable value so that it points to the data directory on their computers.


