- Shotwell
- Установка Shotwell в Ubuntu
- How to install the latest Shotwell – Photo Manager on Ubuntu 20.04
- Installing Shotwell on Ubuntu 20.04
- Step 1: Add PPA repository
- Step 2: Update your system’s APT repository cache
- Step 3: Install Shotwell’s latest version
- Step 4: Verify the version of Shotwell
- Step 5: Remove the PPA repository (Optional)
- Conclusion
- A beginners tour of Shotwell – Ubuntu’s new photo manager
- First run
- The Main window
- Editing
- Slideshow
- Exporting photos
- Preferences
- Shotwell Frequently Asked Questions (FAQ)
- Features
- Does Shotwell make permanent changes to my photos?
- Can I access a Shotwell library across a network, possibly from multiple machines?
- How can I move my photo files from one directory (or hard drive) to another?
- How can I copy my Shotwell library to a new computer?
- How does Shotwell rotate photos when they’re exported?
- Where are your Online Service Privacy Policies?
- How can I search for an existing ticket about a particular topic?
- I found a bug in Shotwell. How can I report it?
- I just imported a RAW photo into Shotwell and it looks overexposed or underexposed, why is this and how can I fix it?
- I’m importing thousands of photos and Shotwell is using a huge amount of memory. Why?
- When I’m viewing a lot of photos quickly, or Shotwell is renegerating a lot of thumbnails, Shotwell takes up a huge amount of memory. Why?
- Why do my published photos not contain any geolocation information?
- My mouse cursor is hanging every second or so when Shotwell is running. Why?
- Why doesn’t Shotwell update images after they’ve been edited by an external RAW editor?
- Something happened and now all my photos are missing, help!
- When I run Shotwell I see funny messages on the console.
- Shotwell doesn’t seem to be able to connect to my Fuji or Nikon camera. Why?
- I disabled startup scan but Shotwell still scans all my photos when I run it. Is this a bug?
- Backup
- How can I back up my Shotwell library?
- For Shotwell versions 0.12 and earlier
- For Shotwell 0.13 and later
- For custom library directories (-d command-line option)
- Version
- I upgraded to Shotwell 0.14.x and now I get bad video thumbnails. This used to work. What gives?
- Can I run Shotwell 0.11 on Ubuntu 10.10 (Maverick Meerkat)?
- Can I run Shotwell 0.9.3 on Ubuntu 10.04 (Lucid Lynx)?
- Why doesn’t the latest version of Shotwell run on my Ubuntu Long Term Support (LTS) release (for example, Lucid Lynx)?
Shotwell
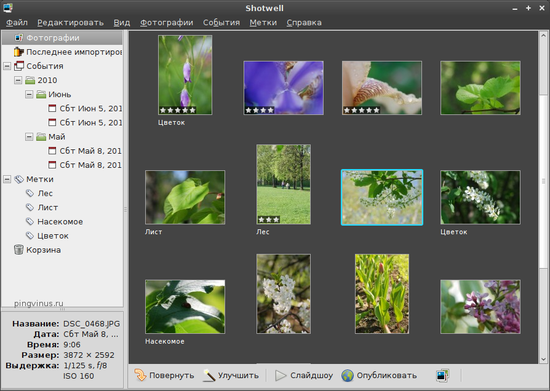
Shotwell — бесплатный простой фото менеджер для Linux. Поддерживает импорт фото, теги, сортировку по дате, простейшее редактирование фото, оценки. Имеет простой и понятный интерфейс.
Окно программы Shotwell состоит из двух частей. В левой части расположено окно навигации по фото. В ней создаются такие категории как События (Event), Теги (Метки, Tags), Корзина и другие для выборки фото. А справа отображаются непосредственно фотографии.
Фотографии в Shotwell можно импортировать, указав директорию, либо прямо с цифрового фотоаппарата, либо из программы F-Spot. После импорта фотографий, программа автоматически создает даты в категории События, которые соответствуют датам создания конкретного снимка. Каждой фотографии можно назначить тег, а потом выбрать фотографии принадлежащие этому тегу. Можно выставлять фотографиям оценки по пятибалльной шкале.
Также Shotwell поддерживает несколько инструментов для редактирования изображений. Можно вращать, обрезать изображения. Есть простой инструмент для уничтожения красных глаз. Можно также изменять экспозицию, насыщенность, окраску, цветовую температуру и уровни (levels).
Начиная с версии 0.8 поддерживается проигрывание видео в форматах Ogg, AVI, MP4, Quicktime, WMV. А также можно загружать видео на популярные видео-сервисы, такие как Facebook, Flickr, PicasaWeb.
Shotwell имеет инструмент для публикации фотографий в Facebook, Flickr, Picasa.
В Ubuntu 10.10 и Fedora 14 Shotwell входит в стандартную поставку софта.
Установка Shotwell в Ubuntu
Shotwell есть в репозиториях Ubuntu, но там может отсутствовать последняя версия программы. Чтобы установить свежую версию (она, кстати, русифицирована), выполните в командной строке следующие команды:
Источник
How to install the latest Shotwell – Photo Manager on Ubuntu 20.04
Shotwell is a very popular photo management application designed for GNOME Desktop Environment by Yorba Foundation, written in the Vala language. The default and pre-installed version of Shotwell, which is 0.30.8, have become very old for Ubuntu 20.04. The latest version of Shotwell is 0.30.10, and it can be installed by adding a third-party PPA repository; and we will learn how to install the latest version of Shotwell on Ubuntu 20.04. The new version has fixed the Youtube OAuth scope, modified web publishing, and included new translations.
Installing Shotwell on Ubuntu 20.04
The latest version of Shotwell can be installed in Ubuntu 20.04 by adding the PPA repository made by the Ubuntu Desktop team.
Step 1: Add PPA repository
To add PPA, fire up the terminal by using the shortcut (CTRL+ALT+T) and type the command given below.
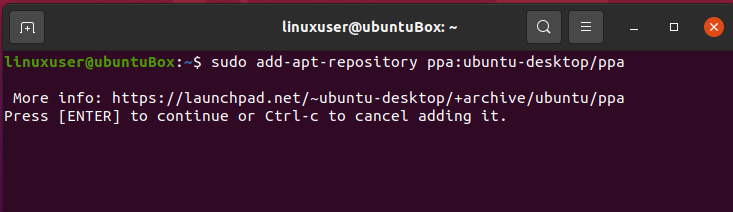
Press “Enter,” and the PPA repository will be added.
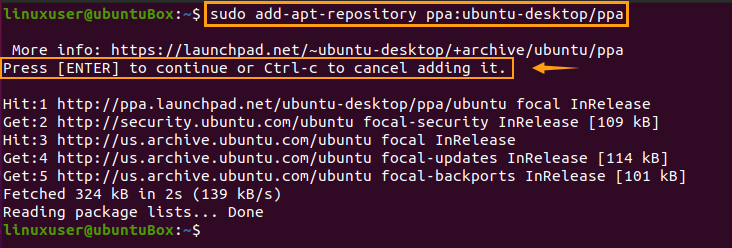
After successfully adding the Ubuntu Desktop team’s PPA repository to the sources list of your ubuntu system, update the APT repository cache of your Ubuntu system as well.
Step 2: Update your system’s APT repository cache
To update the system’s APT repository cache, type the command given below
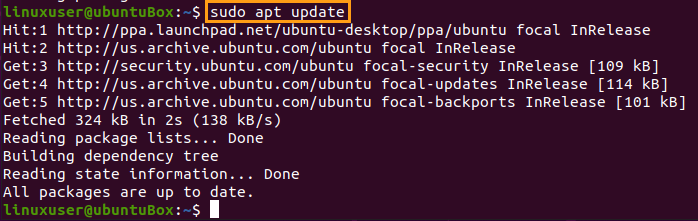
Once the system’s APT cache repository is updated successfully, Shotwell’s latest version is ready to be installed on Ubuntu 20.04 LTS system.
Step 3: Install Shotwell’s latest version
To install Shotwell, type the following simple command in the terminal and hit enter.
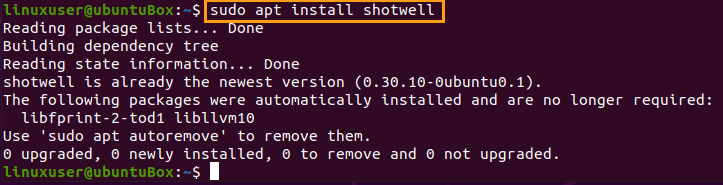
You will have the latest version of Shotwell installed on your Ubuntu 20.04 LTS system by running the installation command.
Step 4: Verify the version of Shotwell
You can verify the version of Shotwell by opening the application from the application menu and by going to the help > about.

You can witness in the screenshot that version 0.30.10 is successfully installed on Ubuntu 20.04.
Step 5: Remove the PPA repository (Optional)
Once the latest version is installed and working perfectly fine, there is no need to have the PPA in the sources list. You can easily remove the recently added PPA repository from the sources list by typing the command given below.

Again, press “Enter” and the PPA will be removed successfully.

The PPA repository of Shotwell is successfully removed from the sources list of your Ubuntu 20.04 as well.
Conclusion
This post contains the step-by-step and easy-to-understand guide on installing Shotwell’s latest version on Ubuntu 20.04 LTS system. Shotwell is used to organize pictures, import pictures from the cameras, and share pictures on different social media applications.
Источник
A beginners tour of Shotwell – Ubuntu’s new photo manager
Whilst we’ve featured Shotwell many times on OMG! Ubuntu! but, for many of you reading this, Maverick will be your first chance to get a close-up with the neat little tool.
With that in mind what better time for a brief run down of using Shotwell. We likely won’t squeeze in a mention for every options, setting and feature Shotwell has but we’ll do our best…
First run
You’re new to Shotwell and Shotwell knows that. To help develop your potential relationship Shotwell launches a handy ‘first-run’ dialogue to get you up and running. 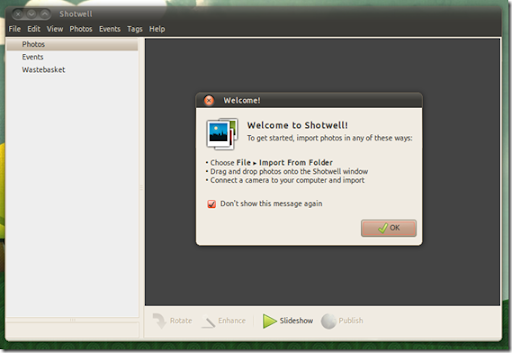
Photos can be imported via the ‘File’ menu, a camera or simply dragging and dropping images on to the Shotwell interface.
Importing photos from a camera
Shotwell, like F-Spot, can be made to auto-launch on the insertion of a digital camera. 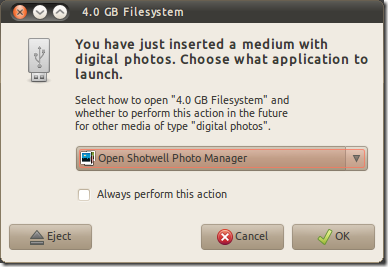 I plugged in my Kodak Zi8 – a HD video camera that can also take photos – to see what would happen.
The process was instant: I plugged in, the dialogue above opened, I clicked okay and there were my photos in Shotwell ready to be imported, edited and tagged. 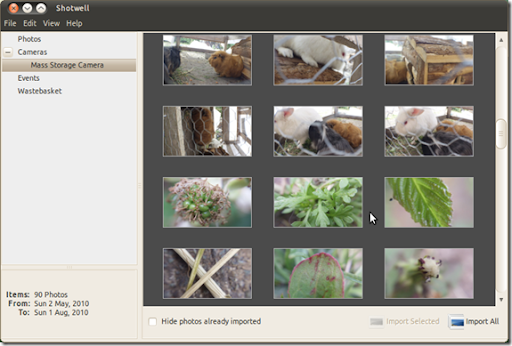
I didn’t want to import my entire collection of random photos to my Pictures folder (Shotwells default placing) but merely a couple.
Selecting a number other than ‘all’ would be a bit unintuitive for someone not versed in the handy CTRL+Click. I initially thought I could simply click on the ones I wished to import to select them, clicking them again to deselect, but no dice.
After selecting my photos for import using CTRL+Click I then used the right click menu to import them.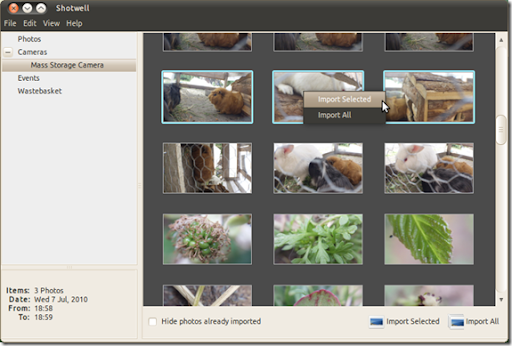
Yikes! After a successful import the following prompt popped up which, had I not paid attention, could easily have cost me my original photos! 
The Main window
One great thing about Shotwell is the consistency – you don’t have separate jarring designed windows for import, editing, etc – they all not only look pretty much the same but behave the same.
The main window can be zoomed into, you can right click on photos to duplicate photos and add tags.
Photos are grouped into ‘events’ based on the the date/time the photos was taken. These dates can be renamed to more meaningful titles such as ‘Day out with Benjamin’ or ‘UDS 2009′. Where there is no date available the event defaults to the date the photo was imported. 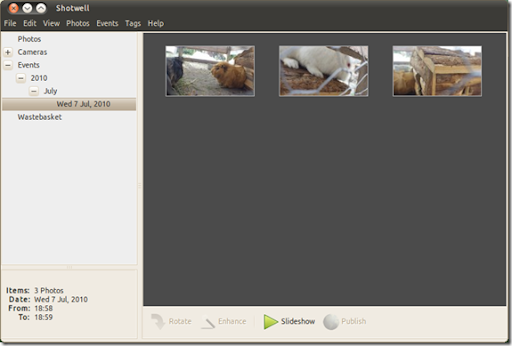
Tagging and Events
Adding tags makes sorting photos, at least in my opinion, easier. Want to find all photos with Aunt Thelma in? Tags all the pictures she’s in with ‘Thelma’ and hey presto – easy access.
Adding tags is done by selecting/right-clicking on the photo/s you wish to add a certain tag/s to and choosing ‘add tag’. Adjust time and date
We touched on ‘event’ data above but often this might not be accurate or your desired preference. You can adjust the time and date data of selected photos by right clicking on the photo(s) you wish to edit and choosing ‘Adjust time and date’. 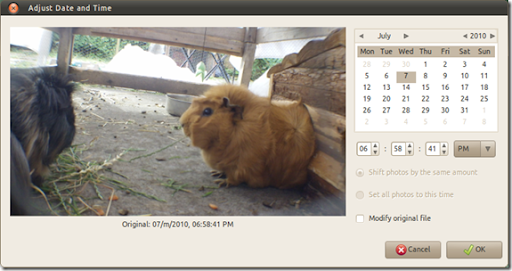
Editing
Shotwell comes packed with an impressive – nay comprehensive – array of editing and tweaking tools, helping touch up photos that are overly dark, washed out, need red eyes removed, etc. 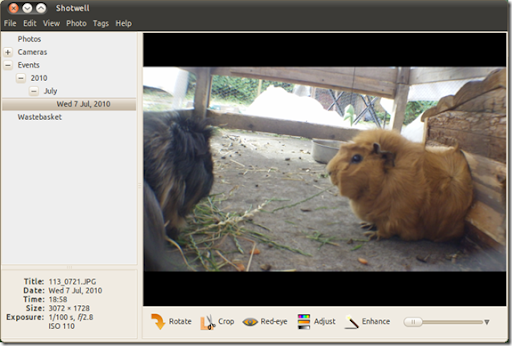
To edit a photo you simply need to double click on it. It will open up larger with the editing toolbar underneath. The main ‘editing’ tools present in Shotwell are: –
- Rotation
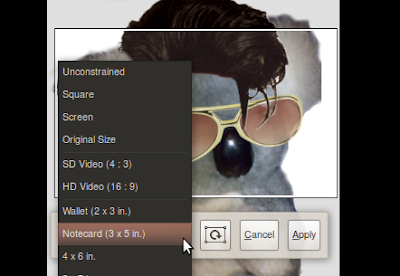
- Cropping (with auto-sizes etc)
- Red eye reduction
- Adjust exposure, saturation, tint, temperature and shadow
- Cne-click “enhance” feature
 Other features available, but only present in the ‘photo’ menu include mirroring, flipping and
One click enhance
The one-click ‘enhance’ feature is pretty hit and miss. Below sit two photos. The left is the original and the right has been “enhanced” using the one-click tool in shotwell.
Whilst the image does look better on the whole it is a bit overly light in places (for example the top of my thigh) but the best contrast is pretty decent for an ‘automatic’ method – but certainly not up to par with Google Picasa.


One doesn’t need to be in editor mode to apply the auto-enhance effect – just right-click on any photo & select ‘enhance’.
Slideshow
Shotwell boats a slideshow feature that is no worse �” or no better �” than that of any other image viewer or organizer. You can specify time between transition and manually hit the “next/previous” buttons to zip though.
Exporting photos
No desktop photo manager would be worth saying Cheese to if it lacked social-media exporting. Fans of F-Spot willing to give Shotwell a try will find that it also supports major online services such as: –
Preferences
Everyone loves a good preferences package and Shotwell has… well.. a few preferences. To be fair up until recently Shotwell had no preferences at all so this is a step in the right direction. 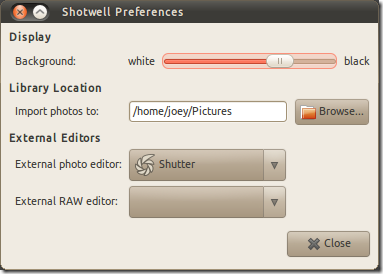 Here you can set the background colour (on a scale of white to dark), import location (defaults to the Pictures folder in your Home) and set external applications for advanced editing.

Home » Reviews » A beginners tour of Shotwell – Ubuntu’s new photo manager
Источник
Shotwell Frequently Asked Questions (FAQ)
Features
Does Shotwell make permanent changes to my photos?
In general, no, but there are important exceptions. See this page in our User’s Manual.
Can I access a Shotwell library across a network, possibly from multiple machines?
This is not recommended. Shotwell was not designed to support this use case, and the database can get into an inconsistent state. See this SQLite page on network access of a database file, in particular the problem of file sharing protocols not properly locking the database which can cause corruption.
Ticket #715764 tracks progress on making library network synchronization available in the future.
How can I move my photo files from one directory (or hard drive) to another?
Do not do this if you have RAW photos in your library
There are two ways this can be done:
If you’re moving all of your photos from your current library directory and you want all your future new photos to be imported to the new directory or hard drive, do the following:
First, make sure you’re running Shotwell 0.8.1 or greater. Earlier versions of Shotwell don’t support library monitoring, which is required for the following to work.
Quit Shotwell. Move your photos to the new directory or hard drive. Then start Shotwell. You’ll see all your old photos go into the “Missing File” bin.
Choose Edit -> Preferences. In the Preferences dialog you can select the library directory. Choose the directory where all your photos now reside. Then press the Close button.
If you’re only moving some of your photos but don’t want to change your library directory, do the following:
You’ll need to be running Shotwell 0.9.0 or greater. A bug in older versions of Shotwell (ticket #714148) prevents the following from working.
Quit Shotwell. Move your photos to the new directory or hard drive. Then start Shotwell. You’ll see the moved photos go into the “Missing File” bin.
Find the moved photos in Nautilus and drag them to the Shotwell window. (If you moved then all into a single directory, you can drag the directory instead. However, note that Shotwell will interpret this as meaning to import all photos in that directory, which may not be desirable.)
How can I copy my Shotwell library to a new computer?
If you want to copy your Shotwell library to a different computer, it’s a simple three step process:
If you’re running Shotwell 0.12.3 or earlier, copy the
/.shotwell directory. If you’re running Shotwell 0.13.0 or later, copy the
Copy your photo library or “Pictures” directory (see note below.)
Start Shotwell on the new computer, open Edit -> Preferences and make sure the pictures directory is correct.
Make sure to copy all subfolders of both the Pictures directory and the
/.shotwell directory (or the
/.local/share/shotwell directory for Shotwell 0.13.0 or later).
Note: Shotwell does not require your photos to be in a single directory. If the absolute paths are the same on the source and destination computers, Shotwell will recognize photos outside of the photo library (“Pictures”) directory. If the destination computer’s absolute paths are not identical Shotwell will mark those photos as missing; the easiest solution is to place the missing photos into the photo library directory.
How does Shotwell rotate photos when they’re exported?
Note that Shotwell is a non-destructive photo editor, so rotating a photo does not change the file immediately. However, when Shotwell exports a photo (with File -> Export or File -> Publish…) it does rotate the photo. It can do this in one of two ways, depending on the circumstances.
If the photo has not been transformed in any other way (no crop, color, or red-eye transformations) and the photo is being exported at its original size, Shotwell will not physically rotate the photo. Rather, it will set the Orientation field in the photo’s EXIF metadata header. This field is widely recognized by most software. It indicates which way the photo should be oriented when presenting it to the user (that is, the software will rotate it on-the-fly). By using this field, Shotwell avoids having to decode, rotate, and re-encode the photo. In the case of JPEG, where each re-encode is lossy, this prevents loss of detail and crispness.
If, however, the photo has been transformed in some way or it’s being exported at a reduced size, Shotwell has no choice but to re-encode the photo. It uses that opportunity to rotate the pixels as well.
Where are your Online Service Privacy Policies?
They are located here.
How can I search for an existing ticket about a particular topic?
I found a bug in Shotwell. How can I report it?
Please see Reporting a Bug for more information.
I just imported a RAW photo into Shotwell and it looks overexposed or underexposed, why is this and how can I fix it?
Shotwell renders RAW images by picking some default tone mapping curves that work in most cases, but not all. If you shoot RAW+JPEG or even just plain RAW, your camera probably produces its own JPEG development of your RAW photo at exposure time, either as an associated JPEG file (in the RAW+JPEG case) or embedded in the RAW file itself (in the plain RAW) case. Since your camera presumably knows more about its CCD and the lighting conditions under which your photo was taken than Shotwell does, it’s development will likely look better than Shotwell’s. To switch your RAW Developer to your camera, if available, open the image you want to work with in single-photo mode by double-clicking on it. Then, under the “Developer” submenu of the “Photo” menu choose “Camera.” Due to a known issue with Shotwell 0.11.x and 0.12.x, if “Camera” is already selected you might have to first switch the developer to “Shotwell” and then back to “Camera” again to force the change to take effect.
I’m importing thousands of photos and Shotwell is using a huge amount of memory. Why?
This was a known bug in Shotwell 0.7. Upgrading to Shotwell 0.8 or later should solve the problem.
When I’m viewing a lot of photos quickly, or Shotwell is renegerating a lot of thumbnails, Shotwell takes up a huge amount of memory. Why?
This was a known bug existing prior to Shotwell 0.20.1. Upgrading to Shotwell 0.20.1 or later should solve the problem.
Why do my published photos not contain any geolocation information?
By default, both Flickr and Picasa Web Albums remove geolocation information from uploaded photos for security reasons. To use geolocation information with these services, you have to explicitly enable gelocation support.
For Picasa Web Albums, do the following:
- Log into your Picasa Web Albums account.
- In the upper-right hand corner of the welcome page, click “Settings” then choose “Photos settings” from the drop down menu.
- Click the “Privacy and Permissions” tab.
- Ensure that the “Automatically map photos if they contain location data” checkbox in the “Location” section is checked.
For Flickr, follow these steps:
- Log into your Flickr account.
- Click “You” in the menu bar that runs across the top of the page, then choose “Your Account” from the drop-down menu.
On the account options page, click the “Privacy & Permissions” tab.
My mouse cursor is hanging every second or so when Shotwell is running. Why?
This appears to be a problem with VirtualBox and USB mice. The full (closed-source) edition of VirtualBox passes USB devices on to virtual machines, and some users running this edition have reported this mouse cursor problem. Switching to the open-source edition of VirtualBox may help. See the comments at https://bugs.launchpad.net/ubuntu/+source/shotwell/+bug/555408.
Why doesn’t Shotwell update images after they’ve been edited by an external RAW editor?
If you open a file in an external RAW editor and save the changes as a new JPEG file, Shotwell will not see or import the JPEG. You can import it manually, or check the Watch library directory for new files option in Preferences, which will cause Shotwell to automatically import new JPEG files from the library directory. However, the new JPEG file won’t be associated with the original RAW file.
Something happened and now all my photos are missing, help!
Assuming you didn’t delete (or unmount) your pictures folder, there’s a good chance you simply created a search filter and forgot about it. To see if this is the case, disable the search bar by hitting F8 or going to View -> Search Bar.
Note that the search bar is not persistent between Shotwell sessions in Shotwell 0.11 and above.
When I run Shotwell I see funny messages on the console.
You might see messages like these on the console when you run Shotwell:
There are others, but these are typical examples.
These messages are harmless. They come from Exiv2, the metadata library Shotwell uses to read EXIF/IPTC/XMP data from your photo files. Older versions of Exiv2 printed these messages whenever it encountered something odd or unexpected in the metadata it was parsing. There’s nothing wrong with your photos; these message give clues to how Exiv2 is interpreting them. However, there was no way to control their output until Exiv 0.21.
You can safely ignore these messages. However, if they bother you, you can upgrade to Exiv 0.21.1 and GExiv2 0.3.1. The messages are then rerouted to Shotwell’s log file.
Shotwell doesn’t seem to be able to connect to my Fuji or Nikon camera. Why?
This problem results from an interaction between some Fuji and Nikon models (most notably the Coolpix series) and gPhoto, a common Linux library Shotwell uses to access digital cameras. More information about this problem is available through gPhoto’s bug tracker issues
While there isn’t yet a solution to this problem, there is a workaround: simply remove the memory card from the camera and connect it to your computer through a card reader.
I disabled startup scan but Shotwell still scans all my photos when I run it. Is this a bug?
No. What’s disabled in Edit -> Preferences is “Watch library directory for new photos”. When enabled, Shotwell will auto-import new photo and video files when they’re added to your Library directory. However, even if disabled, Shotwell will still scan your disk. Why?
Shotwell scans your library to ensure that all your existing photos and videos are still in place. If they’ve been renamed or moved, Shotwell can detect this and update its internal library. If they’ve been deleted, Shotwell moves those items into “Missing Photos”.
To skip scanning and monitoring existing items entirely, run Shotwell from the console:
We’re considering making this option available in Preferences (ticket #717149).
Backup
How can I back up my Shotwell library?
There are two issues here: backing up your photos and backing up the Shotwell database.
Backing up photos is beyond the scope of this question due to the size and quantity of the files. Wherever you decide to back up your photos, if you need to restore them, it’s best if they are restored to the exact location they were in originally so Shotwell can locate them. Runtime monitoring in Shotwell (available in 0.8) will do its best to locate files that have moved, but it’s simply easiest to restore your photos to the place they came from.
Backing up the Shotwell database is easier. However, the location of the database changed at version 0.13.
For Shotwell versions 0.12 and earlier
By default, Shotwell creates its data directory in
/.shotwell (where the tilde represents your home directory). Inside this directory is the database file, thumbnails, and other files that Shotwell relies on for operation. If you have a large number of RAW files it can be large due to Shotwell generating mimics (JPEG files which can be used in place of decoding the RAW file).
To archive all these files, type this command in a console window:
This will create a shotwell-backup.tar.gz file in your home directory. If you run Shotwell from a different data directory (using the -d command-line option), replace the
/.shotwell with your custom directory.
This command will create a single file holding the entire contents of your Shotwell data directory. If you want to restore this backup (make sure it’s in your home directory), run this command:
Note that this will destroy your existing Shotwell library directory, so use with care.
For Shotwell 0.13 and later
Shotwell 0.13 and later stores the thumbnails in a separate location than the database, and additionally will regenerate them if they’re deleted, so they don’t need to be backed up. To backup the database:
This command will create a single file holding the entire contents of your Shotwell data directory. If you want to restore this backup (make sure it’s in your home directory), run this command:
Note that this will destroy your existing Shotwell library directory, so use with care.
For custom library directories (-d command-line option)
The above is for backing up Shotwell from the default data location. If you’re using a custom location for the database, you’ll need to modify the above steps to backup that location.
Version
I upgraded to Shotwell 0.14.x and now I get bad video thumbnails. This used to work. What gives?
Shotwell uses GStreamer, the standard Linux framework for multimedia support, to obtain video thumbnails. Shotwell 0.13.1 and earlier were based on GStreamer 0.10, whereas Shotwell 0.14 uses GStreamer 1.0. These two versions of GStreamer are substantially different, and they have different packages of plugins that determine what video formats they support. In general, GStreamer 1.0 is a step forward over GStreamer 0.10, but there are some exceptions, mostly having to do with patent-encumbered video formats. As a result, Shotwell 0.14 may not be able to generate thumbnails for certain videos that Shotwell 0.13.1 could. Furthermore, video thumbnails generated by Shotwell 0.14 may have visual problems like ghosting or artifacting. Many of these problems will disappear as GStreamer 1.0 evolves. If you encounter a situation in Shotwell 0.14 generates a bad video thumbnail, please report a bug about it by following the steps above.
Can I run Shotwell 0.11 on Ubuntu 10.10 (Maverick Meerkat)?
Shotwell 0.11 is not officially supported on Ubuntu 10.10, but a community member has packaged it here: https://launchpad.net/
Can I run Shotwell 0.9.3 on Ubuntu 10.04 (Lucid Lynx)?
Shotwell 0.9.3 is not officially supported on Ubuntu 10.04, but a community member has https://launchpad.net/
Why doesn’t the latest version of Shotwell run on my Ubuntu Long Term Support (LTS) release (for example, Lucid Lynx)?
Shotwell is under constant development to add new features and support for new technologies. Because of this, Shotwell often requires the latest libraries and desktop environment to build and run.
In contrast, Ubuntu’s Long Term Support (LTS) releases are not designed to be continually updated with the latest technologies. As the Ubuntu Wiki explains, an LTS is not:
Feature-Based Release: We will focus on hardening functionality of existing features, versus introducing new ones.
Cutting Edge: The benefit we gain from not introducing new bugs and/or regressions outweighs the new features and/or fixes.
In short, an LTS is not intended to be updated with all the latest software as time goes on. In fact, an LTS is designed for the opposite, to be stocked with long-tested software and only upgrading them with critical and security-related fixes.
Apps/Shotwell/FAQ (last edited 2020-10-08 08:35:28 by JensGeorg )
Источник


