- How to see all drives available on the computer
- See drives in Windows 10 and Windows 8
- OS & Primary Software (C:)
- DVD RW Drive (D:)
- See available drives in Microsoft Windows 7 and earlier
- 3 1/2 Floppy (A:)
- Local Disk (C:), New Volume (D:), and New Volume (E:)
- Compact Disc (F:)
- See drives in Windows 3.0, 3.1, and 3.11
- See drives in MS-DOS and the Windows command line
- Windows Vista, 7, 8, and 10 command line users
- Other Windows command line and MS-DOS version users
- Change drive letter
- Fdisk
- See drives in the Apple macOS
- See drives in Linux
- Show all drives in command prompt
- Filter drives by type
- List Hard Drives using Command Prompt & PowerShell in Windows 10
- List Hard Drives using Command Prompt
- List Hard Drives using PowerShell
- Hard Drive Not Showing Up or Detected in Windows? See How to Fix It
- Why Is My Hard Drive Not Showing Up in Windows
- Part 1. Fix (Old/New) Hard Drive Not Showing Up in Windows 10
- Fix 1. Change Disk Connection — Fix Hard Drive Not Showing Up in File Explorer
- Fix 2.В Format Hard Drive to NTFS -В Fix Not Showing Hard Drive with RAW or Corrupted File System
- Fix 3. Restore Data and Create New Partition — FixВ Not ShowingВ UnallocatedВ Hard Drive
- # 1. Recover Data from Unallocated Hard Drive
- #2. Create a New Partition to Make Hard Drive Show Up
- Fix 4. Change Hard Drive Letter -В Fix Not Showing Disk withВ DriveВ Letter Conflict
- Fix 5. Update Disk Drivers -В Fix Hard Drive Not Showing Up with OutdatedВ DiskВ DriverВ
- Fix 6. Initialize Disk, Create Volume, and EnableВ in BIOS — Fix New Hard Drive Not Showing Up
- Part 2. Fix ExternalВ Hard Drive Not Showing Up — 4 Fixes
- Fix 1. Change USB Cable, USB Port, ReconnectВ External Hard Drive
- Fix 2. Format External Hard Drive to NTFS/exFAT
- Fix 3. Reinstall Disk Drivers — Fix External Hard Drive Not Showing UP with Yellow Exclamation
- Fix 4. Update Outdated BUSВ Controller Drivers in External Hard Drive
- Part 3. Bonus Tips to Fix Hard Drive Not Showing Files
- The Ending Line
- FAQs About Hard Drive Not ShowingВ Up
How to see all drives available on the computer
This page provides information on how to determine which drives and drive letters your computer uses currently. It is not a list of all of the possible drive letters.
See drives in Windows 10 and Windows 8
If you’re running Windows 10 or Windows 8, you can view all mounted drives in File Explorer. You can open File Explorer by pressing Windows key + E . In the left pane, select This PC, and all drives are shown on the right. The screenshot shows a typical view of This PC, with three mounted drives.

OS & Primary Software (C:)
In our first example, the C: and F: drives are hard drives. Most computers only have a C: drive. The hard drive is the primary location where all files are stored on your computer. To open the drive, double-click the drive.
In our example, the drives are labeled «Local Disk» and «New Volume.» A hard drive can be labeled anything and may be different on your computer. For steps on changing the name of your drive, see: How to rename or label a disk drive.
All new computers no longer have a floppy drive (A: or B:) but still start with the C: drive by default. For the history of why a computer starts with the C: drive, see: Why is the hard drive the C: drive?
DVD RW Drive (D:)
The D: drive in this example is the optical disc drive installed in the computer. In most situations, the disc drive will be the last drive letter. If a disc is in the drive, the contents of that disc are shown if you double-click the drive icon.
If the drive AutoPlays the disc, right-click the drive and click Explore.
See available drives in Microsoft Windows 7 and earlier
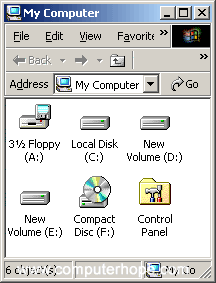
Microsoft Windows 7, Vista, XP, and earlier users can identify which drives Windows has detected by opening File Explorer and then My Computer, or pressing the Windows key + E shortcut key. The picture is an example of My Computer. As you can see in this example, three different drive types are listed.
In Windows 7 and earlier versions, you can access My Computer (Computer) by double-clicking the icon on the desktop. Or, open the Start menu, and select My Computer or Computer, depending on the version of Windows you’re using.
3 1/2 Floppy (A:)
If the computer has a floppy disk drive, this drive is visible and usually set as the A: drive. If any floppy diskette is in the computer and the A: drive is opened, its contents are shown.
All new computers no longer have a floppy drive (A: or B:) but still start with the C: drive by default. For the history of why a computer starts with the C: drive, see: Why is the hard drive the C: drive?
Local Disk (C:), New Volume (D:), and New Volume (E:)
Next, in our example, the C:, D:, and E: drives are hard drives or hard drive partitions on the computer. Most computers only have a C: drive. The hard drive is the primary location where all files are stored on your computer.
In our example, the drives are labeled «Local Disk» and «New Volume.» A hard drive can be labeled anything and may be different on your computer. For steps on changing the name of your drive, see: How to rename or label a disk drive.
Compact Disc (F:)
Finally, the F: drive in this example is the optical disc drive installed in the computer. In most situations, the disc drive is the last drive letter. If a disc is in the drive, the contents of that disc are shown if you double-click the drive icon.
If the drive AutoPlays the disc, right-click the drive, and click Explore.
See drives in Windows 3.0, 3.1, and 3.11
Windows 3.0, 3.1, and 3.11 users can open drives through the Windows File Manager. In the File Manager, click the drive icons shown above the folder and files. By default, the C: drive will be open. If you want to move to the floppy disk drive, click the A: drive icon. If you’re going to open the CD drive, click the D: CD-ROM drive icon.
See drives in MS-DOS and the Windows command line
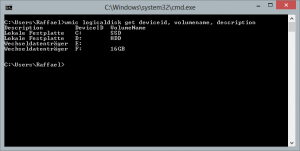
Windows Vista, 7, 8, and 10 command line users
If you’re using Windows Vista, 7, or 8, use the wmic command at the Windows command line to view available drives on the computer. At the prompt, type the following command.
Or, for a little more information, such as volume size, use this command:
- See our wmic command page for further information and examples on this command.
Other Windows command line and MS-DOS version users
Unfortunately, there is no easy way to list all available drives on the computer through the MS-DOS prompt with one command. Below are different recommendations for viewing drives.
Change drive letter
Change the drive to an alternate drive letter to determine if a drive is available and ready if no error message is received.
Fdisk
Running the fdisk command allows you to view how the hard drives are set up and configured on the computer. However, this command is only possible if you’re running a version of MS-DOS or Windows that supports fdisk.
- See the fdisk command page for additional information about this command.
Running the vol command on a drive displays the drive label and serial number if available. This command allows you to see what drives are detected.
- See the vol command page for additional information and help with this command.
See drives in the Apple macOS
From the menu bar, select Go, then select Computer, or press the Shift + Command + C keyboard shortcut.
You can also view all drives through the Finder application.
See drives in Linux
Linux users can use the fdisk command to see their partition and drive information.
Show all drives in command prompt
 If you work with the Windows command prompt and want to copy files from or to a USB flash drive, then you get a problem. So how to show all drives in the commandline (cmd) from Windows? Without a list of all the drives you won’t know the drive letter of the USB flash drive and without this you won’t be able to access it.
The cmd itself doesn’t provide a command for listing all available drives. However, you can get this task done by using wmic, a command line program, which provides you access to the WMI classes by command line. And so the solution to the question is quite simple.
To show all drives in the cmd use the following command:
Filter drives by type
If you want to show only drives of a particular type, the wmic command can be further expanded to include a where clause.
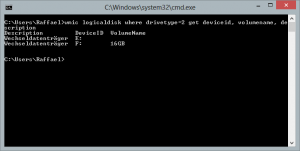
The above command shows, for example, all removable drives. To select a different type of drive, you have to use another value instead of the 2. An overview of the possible values/drivetypes can be found below:
- 0 => Unknown
- 1 => No Root Directory
- 2 => Removable Disk
- 3 => Local Disk
- 4 => Network Drive
- 5 => Compact Disc
- 6 => RAM Disk
If you need more information or want to solve harder tasks you can read on right over here or read one of the following books:[aawp box=”1512018139,1449320686,1536876194″ grid=”3″ > cmd list all drives in cmd wmi wmic
List Hard Drives using Command Prompt & PowerShell in Windows 10
If you frequently work with the Command Prompt or PowerShell, you may need to copy files from or to an external drive, at such, and many other times, you may need to display the drives within the console window. In this post, we will show you how you can list drives using Command Prompt or PowerShell in Windows 10/8/7.
List Hard Drives using Command Prompt
If you need to simply list the drives, you may use WMIC. Windows Management Instrumentation (WMI) is the infrastructure for management data and operations on Windows-based operating systems.
Open a command prompt, and type the following command:
Press Enter and you will see the list of Drives.
You can also use the following parameter:
Using the following will display Device ID and volume name as well:
Windows also includes an additional command-line tool for file, system and disk management, called Fsutil . This utility helps you list files, change the short name of a file, find files by SID’s (Security Identifier) and perform other complex tasks. You can also use fsutil to display drives. Use the following command:
It will show mapped drives too.
You can also use diskpart to get a list of drives along with some more details. The Diskpart utility can do everything that the Disk Management console can do, and more! It’s invaluable for scriptwriters or anyone who simply prefers working at a command prompt.
Open CMD and type diskpart . Next use the following command:
You will see that the console displays the Volume number and letter, label, formatting type, partition type, size, status, and other information.
List Hard Drives using PowerShell
To display drives using PowerShell, type powershell in the same CMD windows and hit Enter. This will open a PowerShell window.
Hard Drive Not Showing Up or Detected in Windows? See How to Fix It
Don’t worry if your hard drive is not showing up in Windows computers. Sometimes, it could be a connection issue, file system error, drive letter confliction or outdated drive driver, etc., errors that caused your internal, external, or new hard drive not detected by This PC or Disk Management. On this page, we’ve collected 10 fixes to help. Follow to bring your disk online and work normally again.
Table of Contents
About the Author
Reviews and Awards
- Reading Duration: 3-5 MinutesВ
- Applies to: Fix used and new hard drive not showing up, internal orВ external HDD/SSD not detectedВ on Windows PCs.
Are your hard drives, be it new or old, internal or external, not showing up in File Explorer or Disk Management?В Follow this guide, you’ll learnВ why is your hard drive not showing up and howВ to makeВ your hard driveВ showing up again in Windows 10/8/7 without losingВ data:
| Your Problems | Applicable Fixes | |||
|---|---|---|---|---|
| (New) Hard Drive Not Showing Up | ||||
| External Hard Drive Not Showing Up |
| Symptoms of Disk Not Showing Up | Causes of Hard Drive Not Showing Up |
|---|---|
|
|
Part 1. Fix (Old/New) Hard Drive Not Showing Up in Windows 10
Applies to:В FixВ internal or new hard drive not showing up, not recognized, or not detected errors in Windows 10/8/7.
In this part, we collected 6 ways for you to try. Pick up the right method according to the current state of your hard drive, and follow the tutorial to make your drive showing up again:
For the used hard drive, Fix 1, 2,3, 4, 5 are good for you to try. If your new hard drive is not showing up,В tryВ Fix 3 and Fix 6. Let’s start fixing the hard drive not showing up error on your own now.В
Fix 1. Change Disk Connection — Fix Hard Drive Not Showing Up in File Explorer
Applies to: FixВ internal hard drives or new hard driveВ is not showing up in File Explorer or Disk Management error.
Connection issues may result from a problematic cable or looseВ connection. Here’s how to change your hard drive connection and make it show up on your computer:
Step 1.В Check theВ cables. If the power cable or SATA cable is broken, change theВ cable with a new one.В
Step 2.В Unplug and replug in your hard drive via the SATA cable and power cable tightly.
Step 3.В Restart your PC to check if the hard drive shows up.
Fix 2.В Format Hard Drive to NTFS -В Fix Not Showing Hard Drive with RAW or Corrupted File System
Applies to:В Fix hard driveВ not showing up caused by an unsupported, RAW, or corrupted file system.В
When yourВ hard drive is displaying as RAW, or it shows as «*Others» in disk management, it means that your hard drive contains a file system error.
The best solution is to format the drive to a supported file system.В Here is how to do it:
Step 1.В In Windows 10/8,В Press Windows + X keys, click «Disk Management».
In Windows 7, right-click the Start icon, select «Search». TypeВ disk managementВ and click on it.
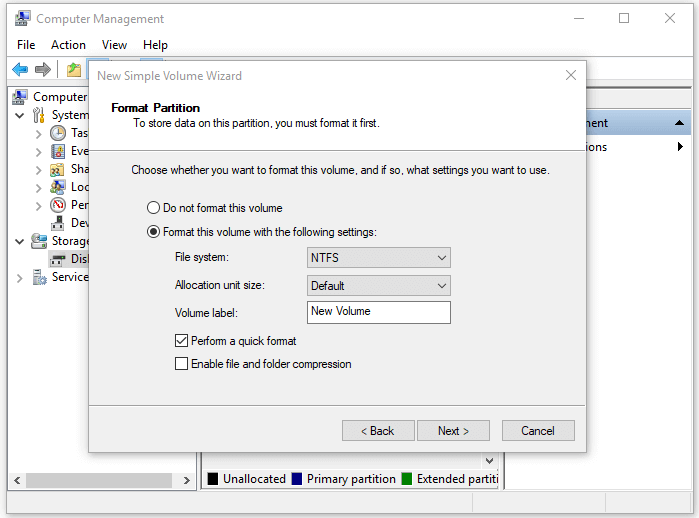
Step 2.В Find and right-click on yourВ hard drive, select «Format».
Step 3. Set the file system as NTFS, tick «Perform a quick format», and click «OK» to start formatting the drive.
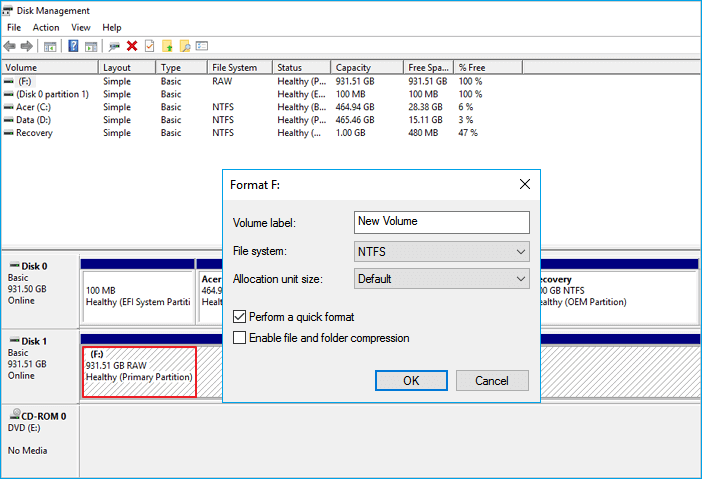
Note:В As formatting will cause data loss,В don’t forget to turn toВ data recovery softwareВ in Fix 3 to bring back all your hard drive data after making the drive show up.В В
Fix 3. Restore Data and Create New Partition — FixВ Not ShowingВ UnallocatedВ Hard Drive
Applies to: Fix hard drive not showing up but displays as unallocated or unknown, new hard drive show as not initialized in Disk Management.
If a used hard disk may suddenly becomeВ unallocated, it could be accidental deletion, virus attack, or other unknown reasons that cause partition loss on your disk.В
In this case, you should recover data from the unallocated space first. And then create a new volume(s) on the disk to make the hard drive show up.
# 1. Recover Data from Unallocated Hard Drive
Professional hard drive recovery software — EaseUS Data Recovery Wizard can fully scan aВ lost partition and bring backВ your filesВ from unallocated hard drive space.
It will markВ the unallocated space inВ your disk as a lost partition that you can directly select to scan and find everything on the drive:
Step 1. Select and scan hard drive.
On EaseUS Data Recovery Wizard, select the drive where you lose your data and clickВ «Scan». Wait patiently until this program finishes the scanning, it will find all your lost data on the drive.

Step 2. Find and preview found files on the selected drive.
Check «Deleted Files», «Lost Files» or use «Filter», «Search» to find the lost files on the selected hard drive. You can double-click to open and check the found files.

Step 3. Recover and save lost hard drive data.
Select all found lost hard drive files, click «Recover» and browse another secure location to save them. Click «OK» to confirm and finish the recovery process.

Remember to save the found files to another secure location before making the hard drive showing up, and safe to save files again.В
#2. Create a New Partition to Make Hard Drive Show Up
After retrieving all your precious files, now you can create a new partition to make yourВ hard disk show up and usable again on the computer.
Step 1. Right-click «This PC»,В choose «Manage», and clickВ «Disk Management».
Step 2. Right-click the unallocated space of your hard drive and choose «New Simple Volume. «.
Step 3. In New Simple Volume Wizard, click «Next» to continue.
Step 4. Set the volume size, assign a drive letter to the volume, and set NTFS as the file system by clicking «Next».
Step 5.В Click «Finish» when Disk Management shows it has created a new volume on your hard drive.
Fix 4. Change Hard Drive Letter -В Fix Not Showing Disk withВ DriveВ Letter Conflict
Applies to: Fix hard drive not showing up in File Explorer error caused by conflicted drive letter or hard drive has no drive letter.
When theВ drive letter of your hard drive is conflicted with another one on the computer, the hard drive will show as New Volume in Disk Management. As a result, it won’t show up in File Explorer.В
So the best way to make your hard drive show up is to change its drive letter. Here are the steps:
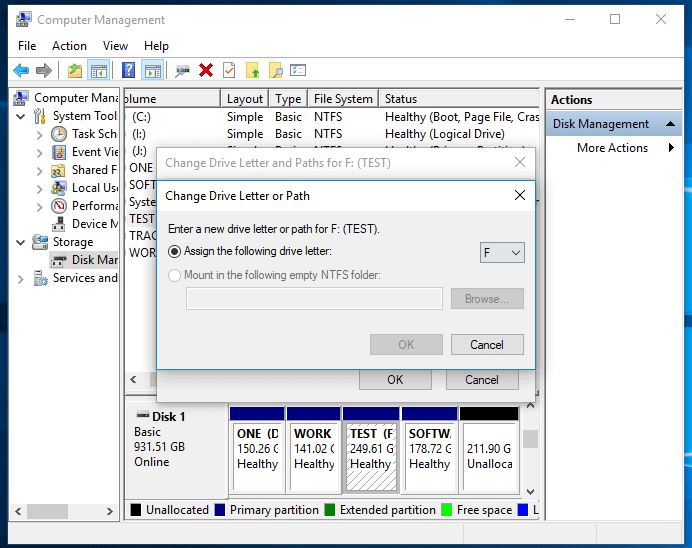
Step 1.В In Disk Management, right-click the hard drive marked as New Volume or the partition doesn’t have a drive letter.В
Step 2.В Select «Change Drive Letter and Paths». In the new window, click «Change».
Step 3.В Assign a new drive letter to your external or internal hard drive and click «OK».
Fix 5. Update Disk Drivers -В Fix Hard Drive Not Showing Up with OutdatedВ DiskВ DriverВ
Applies to: Fix hard drive not showing up in File Explorer, hard disk has a yellow exclamation markВ inВ Disk Management.
If your hard drive has a yellow exclamation mark in Disk Management under the Disk Driver section, it means that the drive driver is outdated. It will neitherВ showВ up in WindowsВ File Explorer nor in Disk Management.
The only solution isВ toВ update the device driver, and here are the steps for you to try:
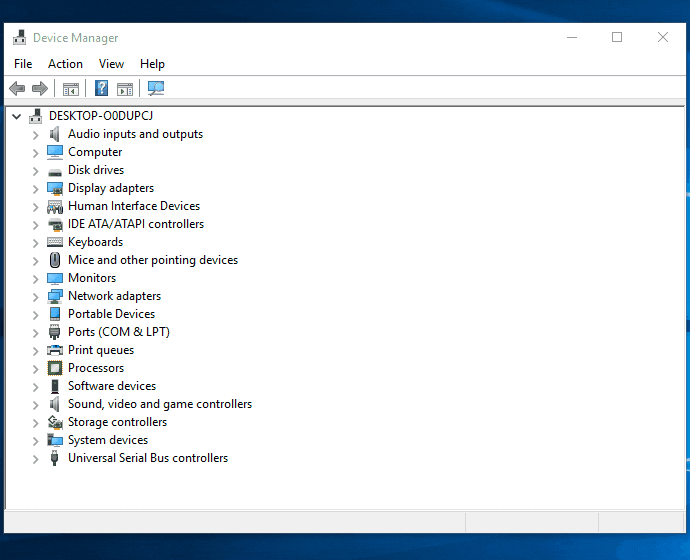
Step 1.В Right-click «This PC» and choose «Manage».
Step 2.В Click «Device Manager» then expand «Disk drives».
Step 3.В Find and right-click the problematic external or internal drive and select «Update driver».
Step 4.В Click «automatically search for driver software online».
Wait for the driver to be updated, then reboot your computer. Afterward, you can check whether the hard drive shows up or not.
Fix 6. Initialize Disk, Create Volume, and EnableВ in BIOS — Fix New Hard Drive Not Showing Up
Applies to: Fix new hard drive is not showing up in File ExplorerВ issue.
Mostly, if your hard drive is a brand new disk,В you need to initialize it first. Then create a new partition on it and enable it in BIOS.В By doing so, you’ll make your new hard drive showing up on Windows 10/8/7.
#1. Initialize DiskВ and Create Volume on New Hard Drive
Step 1. Right-click «This PC»В (in Windows 10) and choose «Manage».
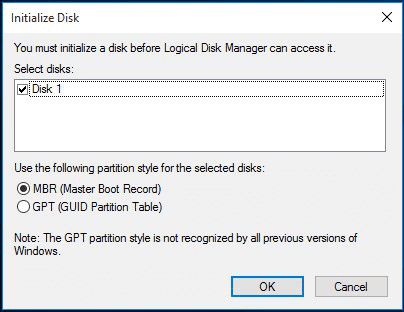
Step 2. Go to «Disk Management», right-click your new hard disk, and choose «Initialize Disk».
Step 3. Select the disk and choose MBR or GPT as its partition style, click «OK» to start.
Step 4.В Right-click on the unallocated space in your new hard drive and select «New Simple Volume. «.
Step 5.В Set the volume size, drive letter, and file system as NTFS to the new hard drive.
Step 6.В Click «Finish» when the process completes.
#2. Enable Hard Drive in BIOS
If theВ hard drive is disabled in BIOS, the OS won’t be able to detect it, not showing up in Windows. Hence, checking whether your hard drive is disabled in BIOS is also necessary.
Step 1. Restart your computer and press F2 or Del until you enter BIOS.
Step 2. Use the arrow keys on your keyboard to choose «Integrated Peripherals» and hit «Enter».
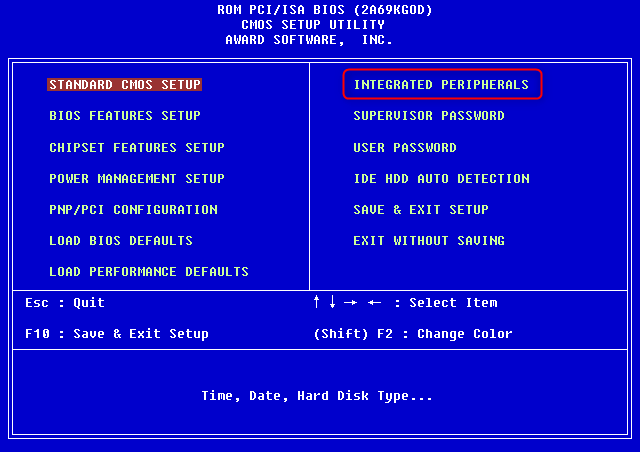
Step 3. Use the arrow keys to select «USB Controller».
If it is disabled, change the option to «Enabled».
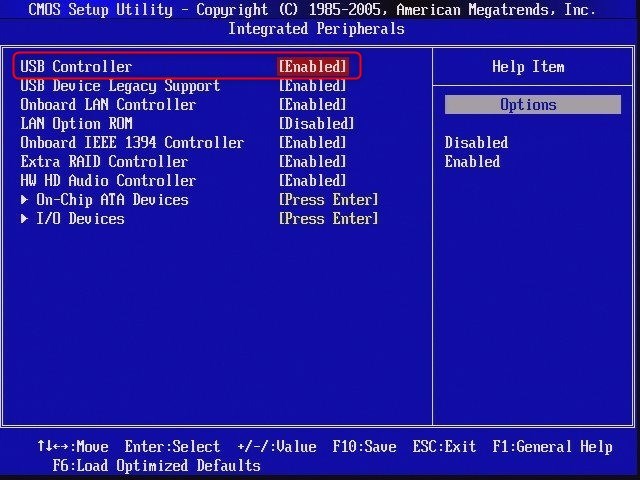
Step 4. Save and exit BIOS.
Afterward, restart your computer and see whether your hard drive is detected.В
You May Also Interest In:
If you are having a similar issue on a USB flash drive or external disk, the provided fixes above can all help. Or, you can also follow the links below for help.
Part 2. Fix ExternalВ Hard Drive Not Showing Up — 4 Fixes
Works to:В Fix externalВ hard drive not showing up or not detected by Windows PC error.
Mostly, when your external hard drive fails to show up on Windows 10/8/7, first, connectВ your new hard driveВ correctlyВ to your computers.
Then you can pick up the proper fix to make your externalВ hard drive show up on PC and work normally again:
So the solutions are quite clear now. Just follow the right method to make your new hard drive detestable and show up on your computer again.
Fix 1. Change USB Cable, USB Port, ReconnectВ External Hard Drive
Change the connection between the external hard drive and computer, you can make the external disk showing up.
Step 1.В Change a new USB cable if the old one is damaged and connect the drive to the PC.
Step 2. Change the USB port if the external hard drive doesn’t show up, and reconnect theВ drive to the PC.
Step 3.В Switch and connect the external hard drive to another computer.
If nothing shows up, it’s the external hard drive itself having a detection issue on your PC. Try the following 3 fixes to make the drive show up again.
Fix 2. Format External Hard Drive to NTFS/exFAT
If the external hard drive displays as RAW or «*Other», it won’t show up correctly on your computer.
Step 1.В Keep the external hard drive connected to the PC.
Step 2.В Open Disk Management and right-click the external hard drive with the RAW or unknown file system.
Step 3.В Select «Format» and set «NTFS» or «exFAT» for the external hard drive.В
Step 4.В Select «OK» to finish the formatting.
If you lost files after formatting the external hard drive, turn to EaseUS Data Recovery Wizard for help. Let it scan and find all your lost files.
Fix 3. Reinstall Disk Drivers — Fix External Hard Drive Not Showing UP with Yellow Exclamation
Applies to:В Fix external hard drive not showing up andВ has a yellow exclamation markВ inВ Disk Management.
When the external hard drive has an outdated drive driver, it won’t show up in File Explorer. It appears withВ a yellow exclamation under the disk driver section.
The only solution isВ to update the device driver, and here are the steps for you to try:
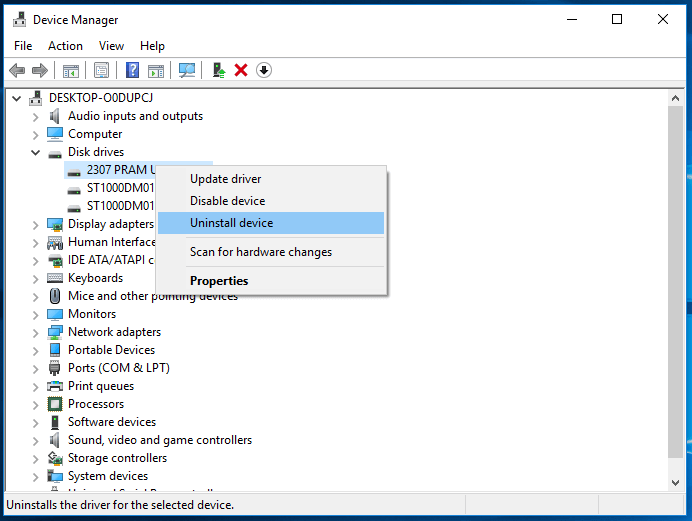
Step 1.В Right-click the Windows iconВ and choose «Device Manager».
Step 2.В Expand «Disk drives» and find your external hard drive.
Step 3.В Right-click the problematic externalВ drive and select «Uninstall device».
Step 4.В Click «OK» to confirm. Restart your computer and reconnect the external hard drive to your PC.
Fix 4. Update Outdated BUSВ Controller Drivers in External Hard Drive
Applies to: Fix external hard disk not showing up or not detected by Windows PC.
If you notice the external hard drive works with one computer while fails to be detected by another, you can try to update the USB Controller driver of the computer in which the hard drive is not showing up.
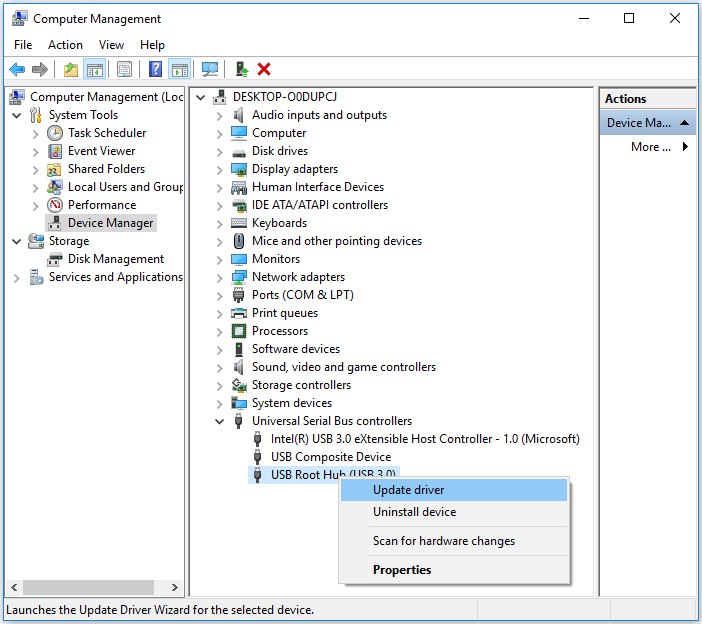
Step 1.В Right-click «This PC» and choose «Manage».
Step 2.В Click «Device Manager» then expand «Universal Serial Bus Controllers».
Step 3.В Right-click «USB Root Hub (USB3.0)» and select «Update driver».
Step 4.В Choose «Search automatically for updated driver software» and restart your computer.
Further Help:
If the above fixes can’t fully resolve your issue on the not showing up external hard disk, don’t worry. You may also get further help from the below-listed tutorial page.В Don’t hesitate and find your best solution here.

It happens that a Toshiba external hard drive is not working in Windows, be it not showing up, not recognized, or not showing files. Follow to identify your situation and fix your Toshiba hard drive.
Part 3. Bonus Tips to Fix Hard Drive Not Showing Files
Sometimes, a hard drive may not show files thoughВ they still exist. Note that the files that are missing on hard driveВ are stillВ recoverable. Files disappeared could be caused by the followingВ reasons:
- Files are hidden by malware or a virus
- Files are deleted accidentally
- The computer does not recognize the file system of the hard drive
To fix these issues, you can follow the steps below for help:
Step 1.В Recover hidden or removed files from the hard drive.
Reliable EaseUS Data Recovery Wizard can help you restore all the hard drive files in only 3 steps, as shown in Fix 3 Part 1.
Step 2.В Run antivirus or malware clear software to remove all viruses and malware.
Step 3.В Format the hard drive to restore its full capacity and set NTFS as its file system.
Now, you are good to use this drive and save files on it again.В For more details, read the article aboutВ the pen drive not showing filesВ for help.
The Ending Line
On this page, we explained why is your hard drive or external hard drive not showing up on Windows PC. We also provided solutions and fixes to help you make the used external or internal hard drive, and new hard drives show up again without losing any data.
Sometimes, you may also encounter the same issue on a USB drive, SD card, etc. These fixes are also applicable to fix this error on USB, SD card, etc., devices.
FAQs About Hard Drive Not ShowingВ Up
Besides new or used hard drive not showing up issue in File Explorer or Disk Management,В we will continue to unveil some top concerned questions on Google and leave a brief answer below each question.В
If you have the same doubts, read on, and find the answer here now:
1. What do I do if my internal hard drive is not detected?
As shown on this page, there are many ways that you can try to fix the internal hard drive not detected issue.
For a new hard drive, you can first initialize the disk and then create partitions on the drive.В
For a used hard drive, you can try these tips as shown on this page in Part 1:
- 1). Change the hard drive letter;
- 2). Recover lost partition data, and create new partitions;
- 3). Update hard drive driver;
- 4). Check hard drive connection, enable it in BIOS.
2. How do I get Windows 10 recognized a new hard drive?
Be it similar to the provided solutions on this page, when a new hard drive is not detected or recognized on Windows 10, and you may also mainly try the following tips:
Check new hard drive connection > Initialize new hard drive and create partition > Update drive letter > Enable it in BIOS.
3. Why is my hard drive not showing up on Mac?
Being it similar to hard drive not showing up on Windows computer, the reasons why your hard drive is not showing up on Mac are caused by the same issues.
Here is a list of why a hard drive is not showing up on Mac:
- Hard drive connection error
- Settings in Desktop, Finder
- USB port issue
- Hard drive corrupted
- macOS and firmware is outdated
- .
For a step-by-step guide, you may followВ Flash Drive Not Showing Up on MacВ to troubleshoot the hard drive not detected on Mac issue and make the drive detectable again.


