- How to Show Hidden Files in Windows 10
- Option 1 – From File Explorer
- Option 2 – From Control Panel
- Option 3 – Via Registry
- You Might Also Like
- Reader Interactions
- Comments
- Did this help? Let us know! Cancel reply
- Primary Sidebar
- Recent Posts
- Who’s Behind Technipages?
- Перечисление и запрос файлов и папок Enumerate and query files and folders
- Необходимые компоненты Prerequisites
- Перечисление файлов и папок в расположении Enumerate files and folders in a location
- Запрос файлов в расположении и перечисление соответствующих файлов Query files in a location and enumerate matching files
- Работа с файлами и папками Working with Files and Folders
- Получение списка файлов и папок, содержащихся в папке Listing All the Files and Folders Within a Folder
- Копирование файлов и папок Copying Files and Folders
- Создание файлов и папок Creating Files and Folders
- Удаление всех файлов и папок, содержащихся в папке Removing All Files and Folders Within a Folder
- Подключение локальной папки как диска Mapping a Local Folder as a drive
- Чтение текстового файла в массив Reading a Text File into an Array
How to Show Hidden Files in Windows 10
By Mitch Bartlett 10 Comments
By default, Microsoft Windows 10 hides certain files from view when you explore them on your hard drive. This protects important files from being deleted so that the system isn’t damaged. If you’re the geeky type, you’ll want to be able to view all files all the time. Follow these steps to show hidden files.
Option 1 – From File Explorer
- Select the “Start” button, then choose “File Explorer“.

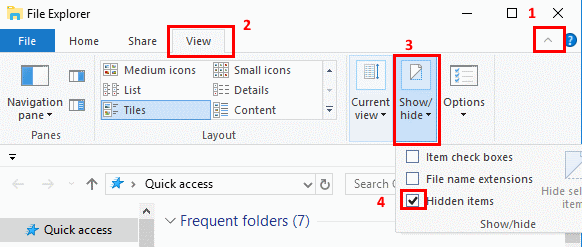
- Make sure the menu bar is expanded. You can toggle the menu bar by selecting the ^ at the upper right portion of the window.
- Select the “View” tab.
- Check the “Hidden items” check box to view hidden items.
- If you need more file viewing options, select “Options” > “View“.

Option 2 – From Control Panel
- Right-click the “Start” button, then select “Control Panel“.
- Go to “Appearance and Personalization“, then select “File Explorer Options“.
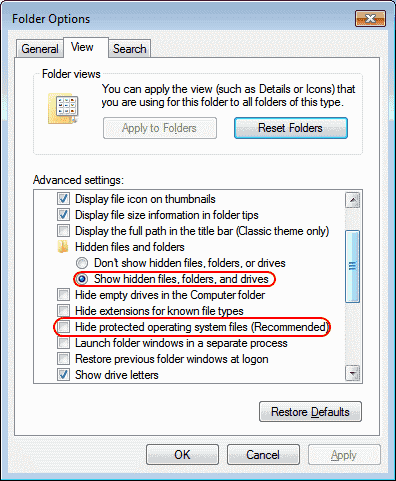
- Click the “View” tab.
- Scroll down a bit and change the “Hidden files and folders” setting to “Show hidden files, folders, and drives“. Optionally, you may wish to uncheck the “Hide protected operating system files” box as well.
Option 3 – Via Registry
- Hold the Windows Key and press “R” to bring up the Run dialog box.
- Type “regedit“, then press “Enter“.
- Navigate to the following location:
- HKEY_CURRENT_USER
- Software
- Microsoft
- Windows
- CurrentVersion
- Explorer
- Advanced
- Set the value for “Hidden” to “1” to show hidden files, folders, and drives. Set the value to “2” to not show hidden files, folders, and drives.
- Set the value for “ShowSuperHidden” to “1” to show protected operating system files. Set the value to “2” to not show protected operating system files.
You Might Also Like
Filed Under: Windows Tagged With: Windows 10
Reader Interactions
Comments
Kartik singh says
I have nokia lumia 520.
I want to convert it into android.I want to know that after installing the android. Will my sim card work and data connection.
Jan de Vos says
I have reinstalled the USB driver successfully. Though, Samsung dex did not recognize my device.
Neha Singh says
This one worked. Thanks for the guidance. It really helped me alot.
Ok, I just checked this out… here’s an example where the attrib method (below) will show files when the author’s method will not. To illustrate, configure Explorer to show all files as outlined in this article. Then,
1) Open a 2nd Windows Explore and navigate to C:\Users\\AppData\Roaming\Microsoft\Windows\Recent Items
2) Shift select and delete these files (or move them to a temp location; I think advanced “Disk Cleanup” tool will delete as well).
Also, note that all the advanced “show file” setting made earlier are still intact.
Next open a command prompt in the …\Recent Items folder. To do this:
1) Open a 3rd explorer window and navigate *in the left panel* to C:\Users\\AppData\Roaming\Microsoft\Windows
2) With your mouse over the “Windows” folder *still in the left panel*, hold down Left-Shift + Right Mouse Click to get the advanced context menu, click on “Open command window here”
3) In the …\Roaming\Microsoft\Windows> command prompt, key in: “cd recent”
4) Key in …\recent\> attrib *.*
You should see a bunch of files not shown in explorer.
Charles Davis says
The current version of Win 10 looks and works differently, so this just confused me.
I don`t have CurrentVersion in Windows from HKEY_CURRENT_USER, please help me!
No. Unable to change entry. Received notice “Cannot edit Hidden. Error writing the value’s new contents”.
This saved me so much time! Thank you!
This saved me so much time! Thank you!
Did this help? Let us know! Cancel reply
This site uses Akismet to reduce spam. Learn how your comment data is processed.
Primary Sidebar
Recent Posts
Who’s Behind Technipages?
 My name is Mitch Bartlett. I’ve been working in technology for over 20 years in a wide range of tech jobs from Tech Support to Software Testing. I started this site as a technical guide for myself and it has grown into what I hope is a useful reference for all.
Follow me on Twitter, or visit my personal blog.
Перечисление и запрос файлов и папок Enumerate and query files and folders
Доступ к файлам и папкам в таких расположениях, как папка, библиотека, устройство или расположение в сети. Access files and folders in either a folder, library, device, or network location. Для получения списка файлов и папок из расположения вы также можете создавать запросы файлов и папок. You can also query the files and folders in a location by constructing file and folder queries.
Рекомендации по сохранению данных приложения UWP приведены в классе ApplicationData. For guidance on how to store your Universal Windows Platform app’s data, see the ApplicationData class.
Необходимые компоненты Prerequisites
Общее представление об асинхронном программировании для приложений универсальной платформы Windows (UWP) . Understand async programming for Universal Windows Platform (UWP) apps
Описание процесса написания асинхронных приложений на C# или Visual Basic см. в статье Вызов асинхронных API в C# и Visual Basic. You can learn how to write asynchronous apps in C# or Visual Basic, see Call asynchronous APIs in C# or Visual Basic. Чтобы узнать, как создавать асинхронные приложения с помощью C++/WinRT, ознакомьтесь с разделом Параллельная обработка и асинхронные операции с помощью C++/WinRT. To learn how to write asynchronous apps in C++/WinRT, see Concurrency and asynchronous operations with C++/WinRT. Чтобы узнать, как создавать асинхронные приложения на C++/CX, ознакомьтесь с разделом Асинхронное программирование на языке C++/CX. To learn how to write asynchronous apps in C++/CX, see Asynchronous programming in C++/CX.
Права доступа к расположению Access permissions to the location
Например, коду в этих примерах требуется возможность picturesLibrary. Для вашего расположения может потребоваться другая возможность либо вообще не потребоваться никаких возможностей. For example, the code in these examples require the picturesLibrary capability, but your location may require a different capability or no capability at all. Дополнительную информацию см. в разделе Разрешения на доступ к файлам. To learn more, see File access permissions.
Перечисление файлов и папок в расположении Enumerate files and folders in a location
Обязательно объявите возможность picturesLibrary. Remember to declare the picturesLibrary capability.
В этом примере мы сначала используем метод StorageFolder.GetFilesAsync, чтобы получить все файлы в корневой папке KnownFolders.PicturesLibrary (не во вложенных папках) и перечислить имена всех файлов. In this example we first use the StorageFolder.GetFilesAsync method to get all the files in the root folder of the KnownFolders.PicturesLibrary (not in subfolders) and list the name of each file. Далее мы используем метод StorageFolder.GetFoldersAsync, чтобы получить все папки в PicturesLibrary и перечислить имена всех вложенных папок. Next, we use the StorageFolder.GetFoldersAsync method to get all the subfolders in the PicturesLibrary and list the name of each subfolder.
В языках C# или Visual Basic обязательно вставляйте ключевое слово async в объявления всех методов, в которых используется оператор await. In C# or Visual Basic, remember to put the async keyword in the method declaration of any method in which you use the await operator.
Также вы можете использовать метод StorageFolder.GetItemsAsync, чтобы получить все элементы (как файлы, так и вложенные папки) в определенном расположении. Alternatively, you can use the StorageFolder.GetItemsAsync method to get all items (both files and subfolders) in a particular location. В следующем примере используется метод GetItemsAsync для получения всех файлов и вложенных папок в корневой папке KnownFolders.PicturesLibrary (не во вложенных папках). The following example uses the GetItemsAsync method to get all files and subfolders in the root folder of the KnownFolders.PicturesLibrary (not in subfolders). Затем в примере перечисляются имена всех файлов и вложенных папок. Then the example lists the name of each file and subfolder. Если элемент является вложенной папкой, в примере к имени добавляется «folder» . If the item is a subfolder, the example appends «folder» to the name.
Запрос файлов в расположении и перечисление соответствующих файлов Query files in a location and enumerate matching files
В этом примере мы запрашиваем все файлы в KnownFolders.PicturesLibrary, сгруппированные по месяцам, и в этот раз пример выполняет рекурсию во вложенные папки. In this example we query for all the files in the KnownFolders.PicturesLibrary grouped by the month, and this time the example recurses into subfolders. Сначала мы вызываем StorageFolder.CreateFolderQuery и передаем значение CommonFolderQuery.GroupByMonth в метод. First, we call StorageFolder.CreateFolderQuery and pass the CommonFolderQuery.GroupByMonth value to the method. Благодаря этому получаем объект StorageFolderQueryResult. That gives us a StorageFolderQueryResult object.
Затем мы вызываем StorageFolderQueryResult.GetFoldersAsync, который возвращает объекты класса StorageFolder, представляющие виртуальные папки. Next we call StorageFolderQueryResult.GetFoldersAsync which returns StorageFolder objects representing virtual folders. В этом случае мы группируем по месяцам, поэтому каждая виртуальная папка представляет группу файлов с одинаковым месяцем. In this case we’re grouping by month, so the virtual folders each represent a group of files with the same month.
Результат работы программы выглядит примерно так: The output of the example looks similar to the following.
Работа с файлами и папками Working with Files and Folders
Просмотр содержимого дисков Windows PowerShell и управление хранящимися на них элементами аналогично управлению файлами и папками на физических дисках Windows. Navigating through Windows PowerShell drives and manipulating the items on them is similar to manipulating files and folders on Windows physical disk drives. В этой статье описывается выполнение конкретных задач по управлению файлами и папками с помощью PowerShell. This article discusses how to deal with specific file and folder manipulation tasks using PowerShell.
Получение списка файлов и папок, содержащихся в папке Listing All the Files and Folders Within a Folder
Извлечь все элементы непосредственно из папки можно с помощью командлета Get-ChildItem . You can get all items directly within a folder by using Get-ChildItem . Для отображения скрытых и системных элементов добавьте необязательный параметр Force . Add the optional Force parameter to display hidden or system items. Например, эта команда отображает непосредственное содержимое диска C Windows PowerShell (которое совпадает с содержимым физического диска C Windows): For example, this command displays the direct contents of Windows PowerShell Drive C (which is the same as the Windows physical drive C):
Эта команда выводит только элементы, содержащиеся на диске непосредственно, так же как и команда DIR оболочки Cmd.exe или команда ls оболочки UNIX. The command lists only the directly contained items, much like using Cmd.exe ‘s DIR command or ls in a UNIX shell. Для показа вложенных элементов необходимо также указать параметр -Recurse . In order to show contained items, you need to specify the -Recurse parameter as well. (Время выполнения этой операции будет очень велико.) Для вывода всего содержимого диска C введите: (This can take an extremely long time to complete.) To list everything on the C drive:
Командлет Get-ChildItem позволяет отфильтровать элементы с помощью параметров Path , Filter , Include и Exclude , но обычно осуществляется лишь фильтрация по имени. Get-ChildItem can filter items with its Path , Filter , Include , and Exclude parameters, but those are typically based only on name. Сложную фильтрацию на основе других свойств элементов можно выполнить с помощью Where-Object . You can perform complex filtering based on other properties of items by using Where-Object .
Следующая команда находит все исполняемые файлы в папке Program Files, которые были в последний раз изменены после 1 октября 2005 г. и размер которых не менее одного мегабайта и не более десяти мегабайт: The following command finds all executables within the Program Files folder that were last modified after October 1, 2005 and which are neither smaller than 1 megabyte nor larger than 10 megabytes:
Копирование файлов и папок Copying Files and Folders
Копирование выполняется с помощью командлета Copy-Item . Copying is done with Copy-Item . Следующая команда создает резервную копию C:\boot.ini в C:\boot.bak: The following command backs up C:\boot.ini to C:\boot.bak:
Если целевой файл уже существует, то попытка копирования завершается неудачей. If the destination file already exists, the copy attempt fails. Чтобы перезаписать имеющийся целевой файл, используйте параметр Force . To overwrite a pre-existing destination, use the Force parameter:
Эта команда работает, даже если целевой объект доступен только для чтения. This command works even when the destination is read-only.
Так же выполняется и копирование папок. Folder copying works the same way. Эта команда копирует папку C:\temp\test1 в новую папку C:\temp\DeleteMe рекурсивно. This command copies the folder C:\temp\test1 to the new folder C:\temp\DeleteMe recursively:
Можно также скопировать избранные элементы. You can also copy a selection of items. Следующая команда копирует все файлы TXT, содержащиеся в папке C:\data , в папку C:\temp\text : The following command copies all .txt files contained anywhere in C:\data to C:\temp\text :
Для копирования элементов файловой системы можно использовать и другие средства. You can still use other tools to perform file system copies. В Windows PowerShell по-прежнему работают команды XCOPY, ROBOCOPY и такие COM-объекты, как Scripting.FileSystemObject . XCOPY, ROBOCOPY, and COM objects, such as the Scripting.FileSystemObject, all work in Windows PowerShell. Например, можно воспользоваться COM-классом Scripting.FileSystem сервера сценариев Windows для создания резервной копии файла C:\boot.ini в файле C:\boot.bak : For example, you can use the Windows Script Host Scripting.FileSystem COM class to back up C:\boot.ini to C:\boot.bak :
Создание файлов и папок Creating Files and Folders
Создание новых элементов осуществляется одинаковым образом всеми поставщиками Windows PowerShell. Creating new items works the same on all Windows PowerShell providers. Если поставщик Windows PowerShell поддерживает более одного типа элементов (например, поставщик Windows PowerShell FileSystem различает каталоги и файлы), необходимо указать тип элемента. If a Windows PowerShell provider has more than one type of item—for example, the FileSystem Windows PowerShell provider distinguishes between directories and files—you need to specify the item type.
Эта команда создает папку C:\temp\New Folder : This command creates a new folder C:\temp\New Folder :
Эта команда создает пустой файл C:\temp\New Folder\file.txt . This command creates a new empty file C:\temp\New Folder\file.txt
При использовании параметра Force с командой New-Item для создания папки, которая уже существует, она не перезапишет и не заменит папку. When using the Force switch with the New-Item command to create a folder, and the folder already exists, it won’t overwrite or replace the folder. Будет просто возвращен имеющийся объект папки. It will simply return the existing folder object. Однако, если использовать New-Item -Force в уже имеющимся файле, файл будет полностью перезаписан. However, if you use New-Item -Force on a file that already exists, the file will be completely overwritten.
Удаление всех файлов и папок, содержащихся в папке Removing All Files and Folders Within a Folder
Удалить вложенные элементы можно с помощью командлета Remove-Item , однако он потребует подтверждения удаления, если элемент сам что-нибудь содержит. You can remove contained items using Remove-Item , but you will be prompted to confirm the removal if the item contains anything else. Например, при попытке удаления папки C:\temp\DeleteMe , которая содержит другие элементы, Windows PowerShell предварительно предложит подтвердить удаление этой папки: For example, if you attempt to delete the folder C:\temp\DeleteMe that contains other items, Windows PowerShell prompts you for confirmation before deleting the folder:
Если подтверждение для каждого вложенного элемента нежелательно, задайте параметр Recurse : If you do not want to be prompted for each contained item, specify the Recurse parameter:
Подключение локальной папки как диска Mapping a Local Folder as a drive
Отобразить локальную папку можно с помощью команды New-PSDrive . You can also map a local folder, using the New-PSDrive command. Следующая команда создает локальный диск P: , корневым каталогом которого является локальный каталог Program Files, отображающийся только в сеансе PowerShell: The following command creates a local drive P: rooted in the local Program Files directory, visible only from the PowerShell session:
Как и при использовании сетевых дисков, диски, отображенные в Windows PowerShell, немедленно становятся доступными оболочке Windows PowerShell. Just as with network drives, drives mapped within Windows PowerShell are immediately visible to the Windows PowerShell shell. Чтобы создать подключенный диск, отображающийся в проводнике, нужен параметр -Persist . In order to create a mapped drive visible from File Explorer, the parameter -Persist is needed. Но с этим параметром можно использовать только удаленные пути. However, only remote paths can be used with Persist.
Чтение текстового файла в массив Reading a Text File into an Array
Одним из наиболее общих форматов хранения текстовых данных является файл, отдельные строки которого рассматриваются как отдельные элементы. One of the more common storage formats for text data is in a file with separate lines treated as distinct data elements. Командлет Get-Content используется для чтения всего файла за один шаг, как показано далее: The Get-Content cmdlet can be used to read an entire file in one step, as shown here:
Командлет Get-Content сразу рассматривает данные, считанные из файла, как массив с одним элементом на строку содержимого файла. Get-Content already treats the data read from the file as an array, with one element per line of file content. Убедиться в этом можно, проверив свойство Length полученного содержимого: You can confirm this by checking the Length of the returned content:
Эта команда наиболее полезна для непосредственного ввода в Windows PowerShell информационных списков. This command is most useful for getting lists of information into Windows PowerShell directly. Например, можно хранить в файле C:\temp\domainMembers.txt список имен компьютеров или IP-адресов по одному имени на каждую строку файла. For example, you might store a list of computer names or IP addresses in a file C:\temp\domainMembers.txt , with one name on each line of the file. Вы можете использовать командлет Get-Content , чтобы извлечь содержимое файла и поместить его в переменную $Computers : You can use Get-Content to retrieve the file contents and put them in the variable $Computers :
Теперь переменная $Computers представляет собой массив, содержащий в каждом элементе имя компьютера. $Computers is now an array containing a computer name in each element.


