- 7 easy methods to check disk type (HDD or SSD) in Linux
- Check disk type (HDD or SSD)
- Method 1: Check if the disk is rotational
- Method 2: Using lsblk
- Method 3: Using disk model number
- Check disk interface types
- Method 1: Using lspci
- Method 2: Using lshw
- Why the bus info is SCSI when the disk interface type is ATA Disk?
- Method 3: Using hdparm
- Method 4: Using lsblk
- Conclusion
- Related Posts
- Записки IT специалиста
- Как узнать оставшийся ресурс SSD в Linux
7 easy methods to check disk type (HDD or SSD) in Linux
Table of Contents
In this article I will share different commands which can be used to check the hard drive (disk) type in your Linux environment. I have verified these commands on RHEL/CentOS Linux so if you are using a different distribution such as Ubuntu, Debian, etc then some of the commands may now work.
Check disk type (HDD or SSD)
There are different types of disk available out of which the most used are Hard Drive (HDD) and Solid State Drive (SSD). You can use the following methods to identify your disk type whether it is HDD or SSD
Method 1: Check if the disk is rotational
You should check the value of /sys/block/sdX/queue/rotational , where sdX is the drive name. If the value is 0, you’re dealing with an SSD, and 1 means plain old HDD.
These are the available disks on my Linux server:
Now we can check the rotational value of these individual disks:
As the value for both the disks are 1, it means my both the disks are HDD.
Method 2: Using lsblk
Here also we will use the concept of identifying the disks with rotational feature to check the disk type. Although here we are using lsblk to list all the available connected disk types and their respective rotational values:
So all the identified disks have rotational value as 1 so this means they all are part of HDD.
Here I have another setup with SSD disks:

Method 3: Using disk model number
We can get the model number of the disk using lsblk command:
If you are using any kind of RAID such as hardware or software raid then it is possible you won’t get the model number with above command. In such case we have to rely on some third party tools. For example on my HPE Proliant Blades we are using hardware and software raid so on those servers I get following output:
As you see instead of Model Number, I get » LOGICAL VOLUME » so here I rely on HPE third party software such as ssacli and HPE Array Configuration Utility (acu cli) to get the model number. First we need the physical drive location, which can be collected using:
Now that we have the Physical Drive location i.e. 1I:1:1, we can query the details for this PD:
As you see it gives us a bunch of information about the drive we are using along with the model number.
Now that we have the model number of both our disk, we can search for the specification guide of these disks. For example the above model number is for Smasung disk which as per their online specification guide is SSD
You can also use different commands to get the model number of the disks, such as
This can give you a long list of output but you can filter the model number from the output, sample below from my server:
Check disk interface types
Now that you are familiar with the type of disk you are using, you should know the type of disk interface you are using in your environment. The different types of available disk interface types are
- Advanced technology attachment (ATA)
- Integrated Drive Electronics (IDE)
- Serial ATA (SATA)
- Small Computer system interface (SCSI)
- Serial attached SCSI (SAS)
- Fibre Channel
Method 1: Using lspci
lspci is a utility for displaying information about PCI buses in the system and devices connected to them. We can grep for the specific interface type from the output of lspci
Method 2: Using lshw
lshw is a small tool to extract detailed information on the hardware configuration of the machine. It can report exact memory configuration, firmware version, mainboard configuration, CPU version and speed, cache configuration, bus speed, etc. on DMI-capable x86 or IA-64 systems and on some PowerPC machines. It currently supports DMI (x86 and IA-64 only), OpenFirmware device tree (PowerPC only), PCI/AGP, CPUID (x86), IDE/ATA/ATAPI, PCMCIA (only tested on x86), SCSI and USB
Here is a sample output with SCSI disk interface
Here is a sample output with SATA interface
Here is a sample output from NVME disks
Here is a sample output with ATA disk interface
Why the bus info is SCSI when the disk interface type is ATA Disk?
If you observe the above output, we have ATA as the disk interface while the bus info is SCSI. The bud info is SCSI because that is the subsystem that provides IO for these disks.
It basically means that even though the disk interface is ATA, the drivers interact to the next kernel layer (the generic disk driver) using SCSI. This isn’t actually true of all SATA drivers on all kernel versions with all kernel compile-time configurations, but it’s common. Even PATA devices can appear as SCSI at that level (again, that depends on the kernel version and kernel compile-time configuration, as well as whether the ide-scsi module is used).
Method 3: Using hdparm
hdparm provides a command line interface to various kernel interfaces supported by the Linux SATA/PATA/SAS «libata» subsystem and the older IDE driver sub-system. Many newer (2008 and later) USB drive enclosures now also support «SAT» (SCSI-ATA Command Translation) and therefore may also work with hdparm.
We can use -I with hdparm which will request identification info directly from the drive, which is displayed in a new expanded format. Here are some example outputs:
But hdparm works exclusively with devices which speak the ATA protocol, for disks with other protocols, you may get the following error:
Method 4: Using lsblk
This can be one of the most reliable method to get the disk interface type. lsblk lists information about all available or the specified block devices. Using -o with lsblk we can print additional columns. To get the disk interface type we can use «TRAN» which will print the device transport type.
For example on a server using Fibre Channel:
On a server using HDD, here both the disks are using SAS protocol.
On Virtual Box environment, the virtual disks are using SATA while the DVD is using ATA protocol:
Conclusion
In this tutorial we explored different commands and methods which can be used to check the disk type and the disk interface type used to detect the disks in the server. But before you use these commands, you should be familiar with all the different disk and interfaces available.
Related Posts: how to check my hard disk is ssd or hdd. how to check if you have a solid state drive. what kind of hard drive do I have. how to check ssd. how to check disk type hdd or ssd. how to check disk interface type in Linux.
Related Posts
Didn’t find what you were looking for? Perform a quick search across GoLinuxCloud
If my articles on GoLinuxCloud has helped you, kindly consider buying me a coffee as a token of appreciation.

For any other feedbacks or questions you can either use the comments section or contact me form.
Thank You for your support!!
Источник
Записки IT специалиста
Технический блог специалистов ООО»Интерфейс»
- Главная
- Как узнать оставшийся ресурс SSD в Linux
Как узнать оставшийся ресурс SSD в Linux
 В одной из наших прошлых статей мы поднимали вопрос надежности SSD, где делали упор на такие параметры, как гарантированный объем записи — TBW и допустимое количество перезаписей в день — DWPD. Для оценки оставшегося ресурса вашего накопителя нужно знать несколько параметров: суммарный записанный объем данных и суммарное время работы, что позволит вычислить необходимые показатели и оценить режим работы диска. В Windows это сделать достаточно просто — к вашим услугам масса утилит любой сложности, но что делать пользователям Linux? Сегодня мы расскажем об этом.
Следует понимать, что любая утилита, даже от производителя диска, не обладает никакими «тайными знаниями» и всего лишь выводит в удобочитаемой форме некоторые из параметров S.M.A.R.T. накопителя. Но не все так просто, в отличие от набора атрибутов S.M.A.R.T. для жестких дисков, твердотельные накопители не имеют единого стандарта и многое зависит от конкретного производителя. Однако, кроме самых запущенных случаев с китайскими полуподвальными «производителями», вся нужная информация так или иначе в S.M.A.R.T. содержится, поэтому будем учиться ее получать.
Прежде всего следует установить утилиту для работы с атрибутами S.M.A.R.T., если вы, конечно, не сделали этого раньше:
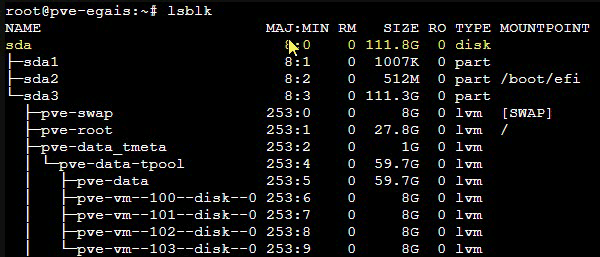
Теперь выясним какие дисковые устройства установлены в вашей системе, для этого выполните:
В выводе нас интересуют только устройства с типом disk, в нашем случае это sda:
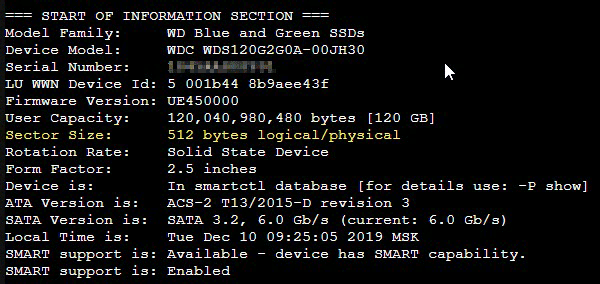
 Чтобы получить информацию из S.M.A.R.T. диска воспользуемся командой:
где /dev/sda — имя нашего диска, которое мы выяснили на предыдущем шаге.
В полученном выводе прежде всего изучим общие данные о диске, в частности обратим внимание на размер логического сектора:
 Потом спустимся немного вниз и изучим таблицу S.M.A.R.T.-атрибутов:
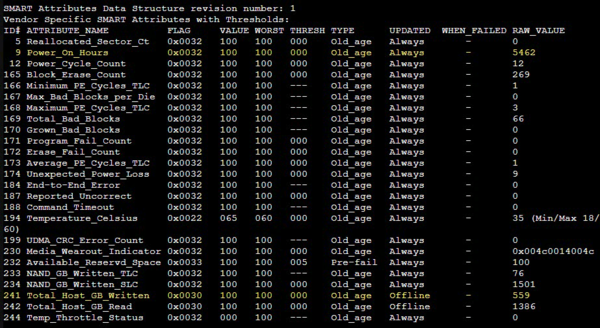 Колонки Value, Worst и Threshold содержат значения каждого из показателей в «попугаях»: Value — текущее значение, Worst — наихудшее за все время. RAW_value — колонка с абсолютными значениями показателя. Атрибуты могут быть двух типов: Old_age — это параметры, которые просто растут (изменяются) со временем, критический порог отсутствует, например, это время работы диска в часах; Pre-fail — это параметры имеющие критическое значение, которое указано в колонке Threshold и приближение к ним указывает на предаварийное состояние диска. На скриншоте выше к таким параметрам относится Available_Reservd_Space — доступная резервная область, снижение значения которой указывает на износ диска.
Но вернемся к показателям ресурса. Western Digital заботится о своих пользователях и выводит подробную информацию, в частности атрибут 241 Total_Host_GB_Written содержит количество записанной на диск информации в гигабайтах, а атрибут 9 Power_On_Hours хранит количество отработанных часов.
Также интересно изучить показатели 233 NAND_GB_Written_TLC и 234 NAND_GB_Written_SLC, где показано количество записи в TLC и SLC ячейки соответственно. Как видим, работа SLC-кеша у современных дисков построена эффективно, количество данных, записанных непосредственно в TLC крайне мало. Второй момент — это мультипликация записи, как мы уже знаем, нельзя просто так записать данные в занятую ячейку, ее предварительно нужно очистить, но очистить отдельную ячейку также невозможно, это можно сделать только для блока, поэтому на одну операцию записи внутри SSD может потребоваться несколько, что мы и видим в данном случае.
Но для оценки износа мы всегда должны принимать объем данных, записанный хостом (241 Total_Host_GB_Written), так как именно на это значение ориентируется производитель, указывая TBW, внутренние параметры представляют в основном академический интерес.
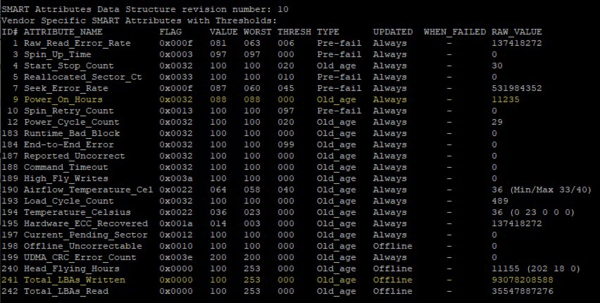
К сожалению, не все производители включают в S.M.A.R.T. подробные и удобочитаемые данные, во многих случаях вы найдете тот же самый атрибут, но несколько в ином виде 241 Total_LBAs_Written. Это наследство жестких дисков, RAW-значение этого атрибута показывает количество записанных LBA-секторов (ниже показан S.M.A.R.T. от HDD):
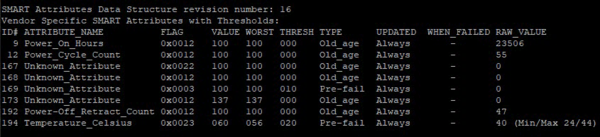
 Но даже этой информации может не быть, к примеру Toshiba A100 отличается предельной лаконичностью, сообщить еще что-либо кроме времени работы, количества включений и температуры посчитали излишним:
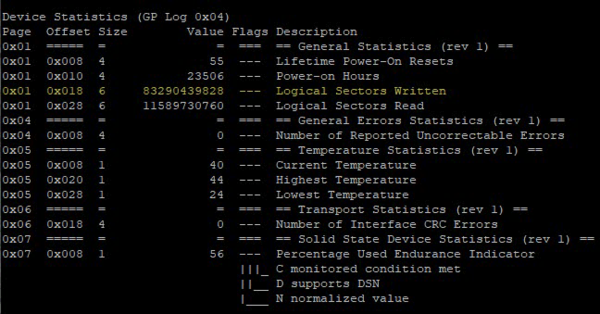
 Но не будем впадать в уныние, получим расширенный набор информации из S.M.A.R.T.:
В этот раз информации будет гораздо больше, в ней необходимо найти раздел Device Statistics в котором содержится искомый параметр Logical Sector Written, значение которого аналогично 241 Total_LBAs_Written и показывает количество записанных LBA-секторов:
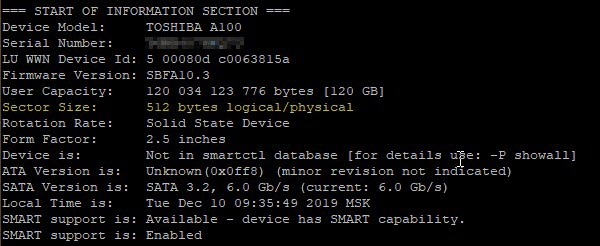
 Для дальнейших расчетов нам нужно знать размер логического сектора, его можно получить из общей информации о диске в самом начале вывода:
 А дальше нам поможет несложная математика уровня «дружим с калькулятором», для получения суммарного объема записанных данных умножим количество секторов на размер сектора:
Для размера сектора в 512 байт, как в нашем случае, результат также будет в байтах, для размера сектора в 4 КБ — в килобайтах. Для перевода в единицы более высокого порядка результат нужное количество раз нужно разделить на 1024:
Для показанного выше диска путем таких несложных вычислений мы получим значение:
Теперь можно оценить ресурс и условия эксплуатации диска, для данной модели TBW = 30 TB, а DWPD = 0.23. Как видим, гарантированный ресурс записи диск выработал, общее время работы составило 979 дней или 2,68 года, т.е. немного менее гарантийного срока. Ежедневный объем записи на диск составил 34,5 ГБ, а реальный DWPD равен 0,29. В целом условия эксплуатации диска можно назвать удовлетворительными, но на замену рекомендуется выбрать модель с более высоким TBW.
Как видим, ничего сложного в получении информации об оставшемся ресурсе SSD в Linux нет, даже в тех случаях, когда такую информацию производитель явно в S.M.A.R.T. не выводит, максимум что вам понадобится — это калькулятор.
Помогла статья? Поддержи автора и новые статьи будут выходить чаще:

Или подпишись на наш Телеграм-канал: 
Источник


