- Quickly Show/Hide Hidden Files on macOS Sierra, OS X El Capitan & Yosemite
- Updates
- The Quickest Way to Show/Hide Hidden Files
- Show/Hide Hidden Files the Long Way
- Show/Hide Hidden Files using Terminal Aliases
- Conclusion
- How to Show Hidden Files on MacOS with a Keyboard Shortcut
- How to Show Hidden Files on Mac with a Keyboard Shortcut
- How to Hide Hidden Files on Mac with Keyboard Shortcut
- Command + Shift + Period is the Keyboard Shortcut for Toggling Hidden Files in Mac OS
- How to Show or Hide Hidden Files or Folder on Mac OS X
- Way 1: Show and view hidden files or folder with shortcut keys
- Way 2: Show and view hidden files or folder with Terminal
- Way 3: Show and view hidden files or folder with third-party app
Quickly Show/Hide Hidden Files on macOS Sierra, OS X El Capitan & Yosemite
Updates
Added shortcut method available on macOS Sierra keyboard.
Method of showing/hiding hidden files tested and working on macOS Sierra.
Method of showing/hiding hidden files tested and working on Mac OS X El Capitan.
It seems like every day I search Google for the command to show hidden files on Mac OS X, not to mention Googling for the command to then hide those hidden files a few minutes later.
Today I decided to make a short and easy to remember alias to speed up the process. All I need do now is type showFiles and hideFiles whenever I need to show/hide OS X’s hidden files. Here’s how you can do it too.
The Quickest Way to Show/Hide Hidden Files
Since the release of macOS Sierra, when in Finder, it is now possible to use the shortcut:
Press once to show hidden files and again to hide them. If you’re using a version earlier than macOS Sierra, see Show/Hide Hidden Files using Terminal Aliases to setup a toggle command via terminal.
Thanks to Guido Schlabitz for making me aware of this new shortcut.
Show/Hide Hidden Files the Long Way
The long way to show hidden Mac OS X files is as follows:
- Open Terminal found in Finder > Applications > Utilities
- In Terminal, paste the following: defaults write com.apple.finder AppleShowAllFiles YES
- Press return
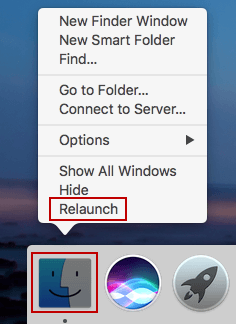
- Hold the ‘Option/alt’ key, then right click on the Finder icon in the dock and click Relaunch.
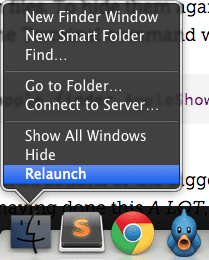
Relaunch Finder by right clicking the Finder Icon whilst holding the `option/alt` key
This will show all hidden files. To hide them again, follow the same steps but replace the Terminal command with:
It’s not the longest set of instructions or the biggest command to commit to memory but if you’re doing this a lot, it’s worth spending a few minutes now to save yourself a lot more time in the future.
Show/Hide Hidden Files using Terminal Aliases
A Terminal alias is a name or shortcut for one or multiple commands. Using an easy to remember alias, we can turn the above four step process into just one.
An alias can be made temporarily (just for the use of one terminal session) or permanently. As we want this to be a shortcut used now and in the future, let’s make it permanent:
- Open Terminal found in Finder > Applications > Utilities
- In Terminal, paste the following: sudo nano
/.bash_profile
Below that, paste the following: alias hideFiles=’defaults write com.apple.finder AppleShowAllFiles NO; killall Finder /System/Library/CoreServices/Finder.app’
/.bash_profile to refresh your profile and make the aliases available

Adding aliases to .bash_profile via Terminal
Now when you want to show hidden files, all you need type in Terminal is showFiles , then hideFiles when you want to hide them.
If you want to modify the behaviour or alias names, let’s take a closer look at the commands you just added:
alias tells Terminal we’re adding a new alias.
showFiles is the name of the alias. Change this to what you wish.
We then give the alias two commands. The first being:
This is the command to show hidden files and is ended with a semi-colon ; so we can then use the second command:
This will relaunch the Finder (to replicate the step of holding the ‘Option/alt’ key then right clicking the Finder icon in the dock).
Conclusion
With the aliases set up, all you need do in the future is type showFiles and hideFiles to show and hide Mac OS X’s hidden files respectively.
Aliases can be used to speed up your interaction with the Terminal. Set up an alias for navigating to your most used directories, to commit to a GitHub repo and so on.
Ian Lunn is a Front-end Developer with 12 years commercial experience, author of CSS3 Foundations, and graduate of Internet Technology. He creates successful websites that are fast, easy to use, and built with best practices.
Источник
How to Show Hidden Files on MacOS with a Keyboard Shortcut

Modern versions of Mac OS offer a super-fast and easy way to reveal invisible files on a Mac, all you need to use is a keyboard shortcut. With a simple keystroke, you can instantly show hidden files on a Mac, and with another strike of the same keyboard shortcut, you can instantly hide the hidden files again too. This is by far the fastest way possible to show and hide invisible files on a Mac. You won’t need to use the defaults command to show hidden files (though it still works), instead you can just use the handy keyboard shortcut anywhere in the Finder or a file access dialog.
To use the hidden files keyboard shortcut, you’ll need a modern version of Mac OS system software, including macOS Mojave, High Sierra, and macOS Sierra, anything beyond 10.12 should support the invisible files toggle keyboard shortcut.
If you’re unfamiliar with the concept, hidden files and hidden folders on a Mac are typically either system level items, configuration data, or some other file or folder which is usually hidden from the average end user for a reason. Thus, revealing hidden files is usually only necessary for more advanced Mac users, whether it’s to view, edit, or modify some particular invisible file or folder, or contents therein.
How to Show Hidden Files on Mac with a Keyboard Shortcut
Using the Show Hidden Files Keyboard Shortcut is incredibly simple, here’s how it works:
- From the Finder of Mac OS, navigate to any folder where there might be hidden files (for example, the Macintosh HD root directory, or a user Home folder)
Now press Command + Shift + Period to instantly toggle to show hidden files
Here is an example of what the Macintosh HD directory looks like after hidden files are made visible, and after hidden files are made invisible again, this is demonstrated in animated GIF format so that you can see the hidden files appearing and disappearing:
As you can see the hidden files and folders become visible and invisible as the keyboard shortcut is pressed.
The hidden files and folders, often marked as hidden via chflags command, setfiles, or by placing a . period as a name prefix, will instantly become visible. The now visible hidden files will be displayed as having slightly faded names and icons, to offer a visual indicator that the file or folder in question is usually hidden.
Note that with hidden files made visible, they will become visible in all folders on the Mac, just like what happens if you use the defaults command to show hidden files in Mac OS and Mac OS X. The big difference between modern Mac OS releases and earlier versions of system software is that now the Command + Shift + Period keyboard shortcut is available to show and hide invisible items in the Finder, whereas before you had to use the defaults write command in the Terminal to reveal or hide those files and folders. If you prefer the command line approach for whatever reason, it is still available to modern Mac OS releases.
How to Hide Hidden Files on Mac with Keyboard Shortcut
And of course you can quickly toggle to hide the hidden files again and make them no longer visible by using the same keyboard shortcut:
- Navigate anywhere in the Mac Finder and hit Command + Shift + Period again to hide invisible files
Toggling the hidden files keyboard shortcut will impact all folders on the Mac.
Command + Shift + Period is the Keyboard Shortcut for Toggling Hidden Files in Mac OS
Just remember that pressing down Command + Shift + Period in the file system of Mac OS will hide or show invisible files.
The visual indicator of hidden files and folders is fairly obvious. Here’s a folder (root Macintosh HD) with hidden files invisible, the default state:
And here’s that same folder with hidden files made visible via the keyboard shortcut, as you can see there are many more items in the same directory but they are hidden from the usual Finder view of the user. Each hidden file or folder is represented by the faded opaque icon and name:
If this keyboard shortcut sounds familiar to you and you’re a longtime Mac user, it’s probably because the Command Shift Period trick has long worked to toggle viewing of invisible items in Open and Save dialog boxes, it’s just that now that same keyboard shortcut can toggle the visibility of invisible items in the general Finder of Mac OS as well.
As mentioned before, you can still show and hide hidden files in Mac OS with a defaults command if you want to, or you can enable with a defaults command and hide them again with the aforementioned keystroke, but the defaults string syntax is simply no longer necessary to gain quick access to the hidden files.
Again, this keyboard shortcut trick only applies to modern MacOS releases, earlier versions of system software will need to use the command line method instead.
Whether you show or hide invisible files on the Mac is entirely up to you, but generally speaking having them made visible is most appropriate for advanced Mac users who need to access the hidden directories or files that are scattered throughout Mac OS. Absolutely do not remove, modify, or delete any hidden files without knowing what you’re doing, many of them are configuration files for various apps, programs, and functionalities, or are necessary components to Mac OS and software.
Источник
How to Show or Hide Hidden Files or Folder on Mac OS X
Want to view hidden files or folder on Mac OS X? Here three ways are available for you to choose, especially the first two are recommended to show hidden files or folder in Finder.
3 Ways to show or hide hidden files or folder on Mac OS X:
Way 1: Show and view hidden files or folder with shortcut keys
Get this way while you have the detailed location of hidden files or folder.
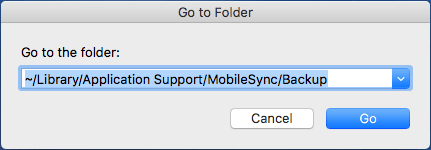
For example, when you need to view hidden iTunes backup on Mac, just press CMD + Shift + G and enter the backup location in pop-up Go to Folder dialog. Then click Go to open the hidden folder on Mac OS X.
Way 2: Show and view hidden files or folder with Terminal
Terminal would always work while you need to show or hide hidden files or folder on Mac OS X.
Command to show or hide hidden files via Terminal:
defaults write com.apple.Finder AppleShowAllFiles YES
defaults write com.apple.Finder AppleShowAllFiles NO
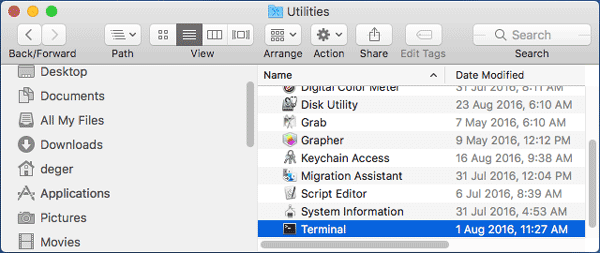
Step 1: Run Terminal on Mac OS X.
Open Finder Applications Utilities, and you could find Terminal there. Double-click it to run on Mac OS X.
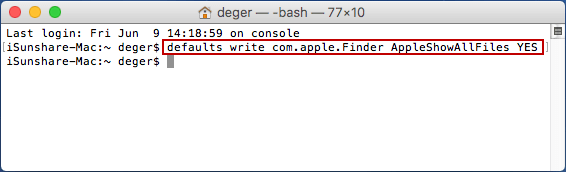
Step 2: Show hidden files on Mac with Terminal.
1. Enter or paste the following command in Terminal and press Enter.
defaults write com.apple.Finder AppleShowAllFiles YES
2. Hold on Option (Ctrl +Alt) and click Finder. Select Relaunch from pop-up menu to reopen Finder.
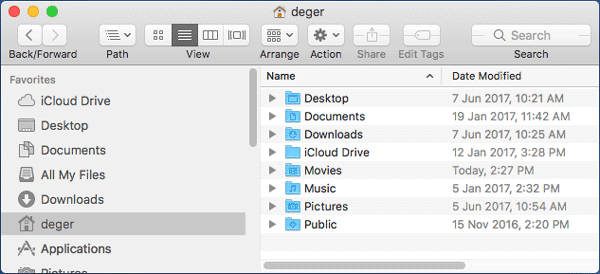
3. Go to the user «deger» and hidden files and folder are shown.
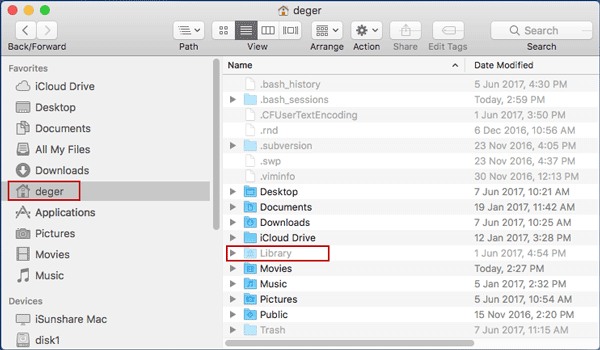
For example, you can see the Library that saves iTunes backup appears. You can open it to see iTunes backup file. As you know, when hidden files are not shown, you cannot open iTunes backup file with this method in Finder.

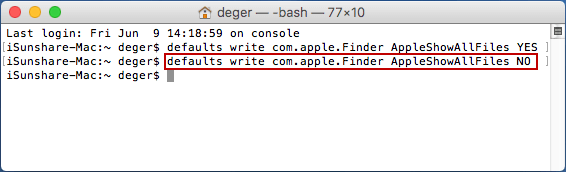
Step 3: Hide hidden files or folder with Terminal.
Go back to Terminal and type the following command. Press Enter and hidden files or folder would become hidden again after Finder relaunches.
defaults write com.apple.Finder AppleShowAllFiles NO
Compared to above feature provided by Mac to show or hide hidden files or folder, third-party app would work more easily, especially when you need to usually show and hide some files or folder. It is worth trying but the security of the apps cannot be promised or guaranteed.
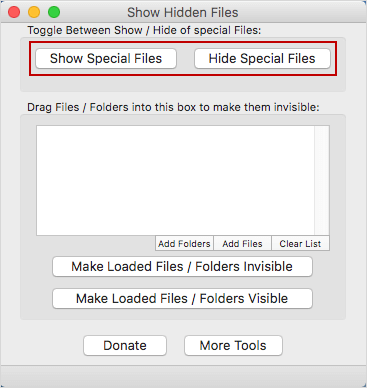
Way 3: Show and view hidden files or folder with third-party app
Choose one from them if you prepare to show or hide hidden files on Mac with third-party software.
Download the app and double-click the zip file you get. Then it would run on Mac OS X. With two buttons on the app, «Show Special Files» and «Hide Special Files», you will be able to show or hide hidden files easily. When all files are shown, and if you want to make some of them invisible, just need to drag them to the box on the app.
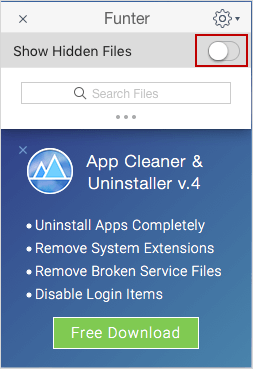
With only the option «Show Hidden Files» on Funder, you could show hidden files or hide files by turning it on or off.
Related Articles:

iSunshare is dedicated to providing the best service for Windows, Mac, Android users who are in demand for password recovery and data recovery.
Источник


