- How to View and Close Open Files in Windows Server SMB Share?
- View Open Files on a Shared Network Folder on Windows Server
- How to Find Out Who is Locking a File in a Shared Folder?
- How to Forcibly Close an Open File on a SMB Share?
- Get-SMBOpenFile: Find and Close Open File Handlers Using PowerShell
- How to Close Open Files on Remote Computer Using PowerShell?
- File sharing over a network in Windows 10
- Общий доступ к файлам Windows Windows file sharing
- Доступ к файлам с помощью общего доступа к файлам Windows Accessing your files using Windows file sharing
- Запуск и остановка сервера общего доступа к файлам Starting and stopping the file sharing server
- Отключение и включение сервера общего доступа к файлам при запуске Disabling and enabling the file sharing server on startup
How to View and Close Open Files in Windows Server SMB Share?
Windows file server administrators often have to force close the shared files that are open simultaneously by multiple users. This usually happens if the desktop software doesn’t work as expected, the user logs off incorrectly, or when the user opened a file and forgot to close it (went home, on vacation, etc.). In all these cases, the file on the shared network folder is still open (and locked) and cannot be modified by other users. Other users can see such a message when trying to open a locked file (depending on the application used): The document filename is locked for editing by another user. To open a read-only copy of his document, click…
In this article we’ll show you how to get the list of open files on a Windows file server, find out which user locked a file on a shared folder, and how to close (reset) file sessions to unlock open files.
View Open Files on a Shared Network Folder on Windows Server
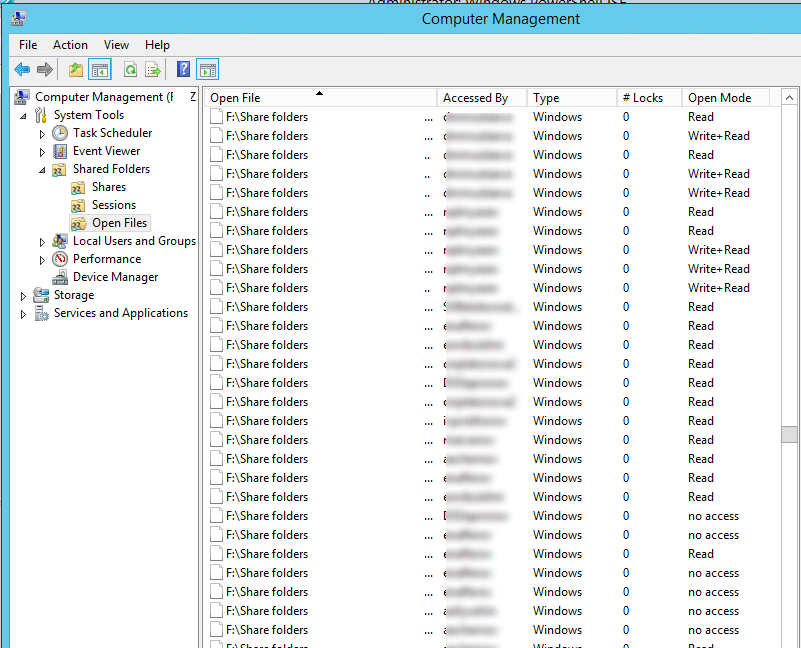
You can get the list of files opened by users on Windows file server using the built-in Computer Management ( compmgmt.msc ) graphic snap-in.
Open the Computer Management console on your file server (or connect to the server remotely from the management console running on your computer) and go to System Tools -> Shared Folders -> Open files. A list of open files on current SMB server is displayed on the right side of the window. The list contains the local path to the file, the name of the user account that opens the file, the number of locks and the mode in which the file is opened (Read or Write+Read).
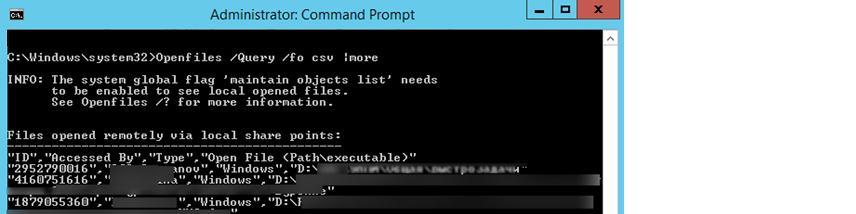
You can get the same list of open files using the built-in openfiles.exe console tool. For example, using the following command you can get the Session ID, username and full local path to the open file:
openfiles /Query /fo csv |more
You can display a list of open files on a remote server. For example, you need to list all open files in shared folders on the lon-fs01 host:
openfiles /Query /s lon-fs01 /fo csv
How to Find Out Who is Locking a File in a Shared Folder?
To identify the user who opened (locked) the filename.docx file on the shared network folder on the remote server lon-fs01, run this command:
openfiles /Query /s lon-fs01 /fo csv | find /i «filename.docx»
You can specify only a part of the file name. For example, you need to find out who opened an XLSX file containing “sale_report” in its name. Use the following pipe:
openfiles /Query /s lon-fs01 /fo csv | find /i «sale_report»| find /i «xlsx»
Of course you can find this file in the Computer Management GUI, but it’s less convenient (this console doesn’t provide search feature).
How to Forcibly Close an Open File on a SMB Share?
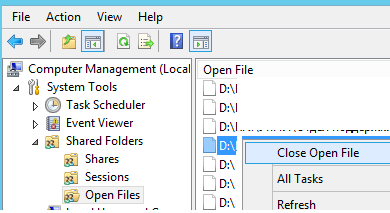
To close an open file, find it in the list of files in Open File section and select Close Open File in the context menu.
If there are hundreds of open files on your file server, it won’t be easy to find the specific file in the console. It is more convenient to use the Openfiles command line tool. As we have already told, it returns the session ID of the open file. Using this session ID you can force close the file by resetting the SMB connection.
First, you need to find the session ID of the open file:
openfiles /Query /s lon-fs01 /fo csv | find /i «farm»| find /i «.xlsx»
Disconnect the user from file using the received SMB session ID:
openfiles /Disconnect /s lon-fs01 /ID 617909089

You can forcefully reset all sessions and unlock all files opened by a specific user:
openfiles /disconnect /s lon-fs01/u corp\mjenny /id *
Get-SMBOpenFile: Find and Close Open File Handlers Using PowerShell
New cmdlets to manage shares and files on an SMB server appeared in PowerShell version for Windows Server 2012/Windows 8. These cmdlets can be used to remotely close network connections to an open file.
You can get a list of open files using the Get-SMBOpenFile cmdlet. Close-SmbOpenFile is used to close/reset the connection to a remote file.
To display a list of open files on the Windows SMB server, run the command:
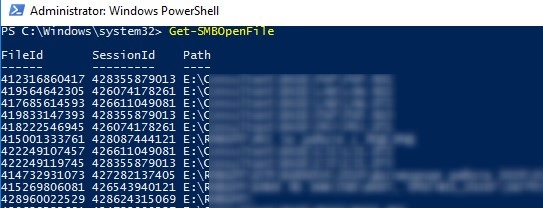
The command returns the file ID, session ID and full file name(path).
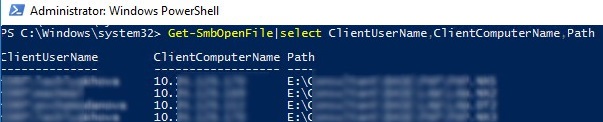
You can display a list of open files with user and computer names (IP addresses):
You can list all files opened by a specific user:
Get-SMBOpenFile –ClientUserName «corp\mjenny»|select ClientComputerName,Path
or from a specific computer/server:
Get-SMBOpenFile –ClientComputerName 192.168.1.190| select ClientUserName,Path
You can display a list of open files by pattern. For example, to list all exe files opened from the shared folder:
or open files with a specific name:
The Close-SmbOpenFile cmdlet is used to close the open file handler. You can close the file by ID:
Close-SmbOpenFile -FileId 4123426323239
But it is usually more convenient to close the file by name:
Get-SmbOpenFile | where <$_.Path –like "*annual2020.xlsx">| Close-SmbOpenFile -Force
With the Out-GridView cmdlet, you can make a simple GUI form for finding and closing open files. The following script will list open files. You should use the built-in filters in the Out-GridView table to find open files for which you want to reset the SMB sessions. Then you need to select the required files and click OK. As a result, the selected files will be forcibly closed.
Get-SmbOpenFile|select ClientUserName,ClientComputerName,Path,SessionID| Out-GridView -PassThru –title “Select Open Files”|Close-SmbOpenFile -Confirm:$false -Verbose

How to Close Open Files on Remote Computer Using PowerShell?
The Get-SMBOpenFile and Close-SmbOpenFile cmdlets can be used to remotely find and close open (locked) files. First, you need to connect to a remote Windows SMB server via a CIM session:
$sessn = New-CIMSession –Computername lon-fs01
The following command will find the SMB session for the open file pubs.docx and close the file session.
Get-SMBOpenFile -CIMSession $sessn | where <$_.Path –like "*pubs.docx">| Close-SMBOpenFile -CIMSession $sessn
Confirm closing of the file by pressing Y . As a result, you have unlocked the file. Now other users can open it.

With PowerShell, you can close SMB sessions and unlock all files that a specific user has opened (a user went home and didn’t release the open files). For example, to reset all file sessions of the user mjenny, run this command:
Get-SMBOpenFile -CIMSession $sessn | where <$_.ClientUserName –like "*mjenny*">|Close-SMBOpenFile -CIMSession $sessn
File sharing over a network in Windows 10
In Windows 10, some features of file and folder sharing over a network have changed, including the removal of HomeGroup. Read on for answers to common questions about other changes to file and folder sharing in Windows 10.
To share a file or folder in File Explorer, do one of the following:
Right-click or press a file, select Give access to > Specific people.

Select a file, select the Share tab at the top of File Explorer, and then in the Share with section select Specific people.

If you select multiple files at once, you can share them all in the same way. It works for folders, too—share a folder, and all files in it will be shared.
To stop sharing in File Explorer, do one of the following:
Right-click or press a file or folder, then select Give access to > Remove access.

Select a file or folder, select the Share tab at the top of File Explorer, and then in the Share with section select Remove access.

File Explorer shows the «Remove access» option («Stop sharing» in older versions of Windows 10) for all files, even those that aren’t being shared over a network.
Open File Explorer, then type \\localhost into the address bar.
Note: When you’ve shared a file from a folder in your user profile and you go to \\localhost, you’ll see your user profile and all its files there. This doesn’t mean that all of your files are shared—just that you have access to all your own files.
If you open File Explorer, go to Network, and see an error message («Network discovery is turned off….»), you’ll need to turn on Network discovery to see devices on the network that are sharing files. To turn it on, select the Network discovery is turned off banner, then select Turn on network discovery and file sharing.

To troubleshoot problems with sharing files or folders, follow the steps below on all computers from which you’re trying to share.
Make sure the computers are on the same network. For example, if your computers connect to the internet through a wireless router, make sure they all connect through the same wireless router.
If you’re on a Wi-Fi network, set it to Private. To find out how, read Make a Wi-Fi network public or private in Windows 10.
Turn on network discovery and file and printer sharing, and turn off password protected sharing.
Select the Start button, then select Settings > Network & Internet , and on the right side, select Sharing options.
Under Private, select Turn on Network discovery and Turn on file and printer sharing.
Under All Networks, select Turn off password protected sharing.
Make sharing services start automatically.
Press the Windows logo key + R.
In the Run dialog box, type services.msc, and then select OK.
Right-click each of the following services, select Properties, if they’re not running, select Start, and next to Startup type, select Automatic:
Общий доступ к файлам Windows Windows file sharing
Для перемещения файлов на устройство и с него можно использовать общий доступ к файлам Windows. You can use Windows file sharing to transfer files to and from your device.
Доступ к файлам с помощью общего доступа к файлам Windows Accessing your files using Windows file sharing
Сервер общего доступа к файлам на устройстве Windows IoT базовая запускается автоматически при загрузке. The file sharing server on your Windows IoT Core device starts automatically on boot. Для подключения к нему требуется IP-адрес устройства. In order to connect to it, you need the IP address of your device. IP-адрес можно найти в приложении по умолчанию, которое загружается при запуске устройства. You can find the IP address on the default app that boots when your device starts.

Получив IP-адрес, откройте проводник на компьютере и введите \\ \c$ , где — это имя или IP-адрес устройства Windows IOT базовая, а затем нажмите клавишу ВВОД. Once you have the IP, open up File Explorer on your computer and type \\ \c$ , where is either the name or the IP Address of your Windows IoT Core device, then hit Enter.
При появлении запроса введите имя пользователя и пароль администратора. Enter your administrator username and password if prompted. Имя пользователя должно иметь префикс с IP-адресом устройства Windows IoT базовая. The username should be prefixed with the IP Address of your Windows IoT Core device. Пример: username: 192.168.1.118\Administrator пароль:

- Теперь вы можете получить доступ к файлам на устройстве, используя общий доступ к файлам Windows. Now you can access the files on your device using Windows file sharing.
Запуск и остановка сервера общего доступа к файлам Starting and stopping the file sharing server
Подключитесь к устройству с помощью PowerShell или SSH. Connect to your device through PowerShell or SSH.
По умолчанию сервер совместного использования файлов запускается при загрузке устройства. By default the file sharing server is started when the device is booted.
Чтобы отключить сервер общего доступа к файлам, введите net stop Server /y To stop the file sharing server, type net stop Server /y
Чтобы запустить сервер общего доступа к файлам, введите net start Server To start the file sharing server, type net start Server

Отключение и включение сервера общего доступа к файлам при запуске Disabling and enabling the file sharing server on startup
Подключитесь к устройству с помощью PowerShell или SSH. Connect to your device through PowerShell or SSH.
По умолчанию сервер совместного использования файлов запускается при загрузке устройства. By default the file sharing server is started when the device is booted.
Чтобы отключить сервер совместного использования файлов, чтобы он не запускался при запуске устройства, введите reg add HKEY_LOCAL_MACHINE\SYSTEM\CurrentControlSet\services\lanmanserver /v Start /t REG_DWORD /d 0x3 /f To disable the file sharing server so that it does not start when the device starts, type reg add HKEY_LOCAL_MACHINE\SYSTEM\CurrentControlSet\services\lanmanserver /v Start /t REG_DWORD /d 0x3 /f
Чтобы включить сервер общего доступа к файлам, который запускается при запуске устройства, введите reg add HKEY_LOCAL_MACHINE\SYSTEM\CurrentControlSet\services\lanmanserver /v Start /t REG_DWORD /d 0x2 /f To enable the file sharing server, so that starts when the device starts, type reg add HKEY_LOCAL_MACHINE\SYSTEM\CurrentControlSet\services\lanmanserver /v Start /t REG_DWORD /d 0x2 /f


