- How to Change or Customize System Tray Icons on Windows 10
- Changing system tray icons
- Change System Tray Icons Using CustomizerGod
- Как отобразить все иконки в системном трее Windows 10
- Как показать все иконки в системном трее в Windows 10
- Показать все системные значки в трее
- windows 10 «show hidden icons» in system tray — icons too much space
- Replies (5)
- Always Show All Tray Icons in Windows 10
- About Sergey Tkachenko
- 3 thoughts on “ Always Show All Tray Icons in Windows 10 ”
How to Change or Customize System Tray Icons on Windows 10
The windows taskbar ribbon is divided into three sections – the start button section on the left, task bar area in the middle, and the system tray on the far right. These sections are characterized by different icons. The start button is on the far left, while the task bar consists of icons that have been pinned and icons belonging to programs that are running. On the far right is the system tray that houses notification icons like network icons, sound icons and battery meter icons. Of the three, the task bar icons are the easiest to change. The start button and the system tray icons need a different strategy to customize.
System tray icons are embedded in .dll files in the system folder. This makes it harder to customize unlike the program icons. The start button uses a visual style in Windows 10, different from system tray icons. For this reason, the method to change the Windows 10 start button orb is different from the method used to change the system tray icons.
Changing system tray icons
Since system tray icons are embedded in the system .dll files, you will need to read these files, change ownership to allow editing and then change those icons. Here are the locations of the system tray icons .dll files.
- To change the volume icon you must modify the file SndVolSSO.dll found in C:\Windows\system32.
- To change the network icon (both LAN and Wi-Fi) you must modify the file pnidui.dll found in C:\Windows\system32.
- To change the battery icon you must modify the file batmeter.dll found in C:\Windows\system32.
There is one thing to remember though; the system tray icons have several icons that work together for the same purpose. For example, the sound icon has an icon for the lowest volume all the way to the highest volume level. In the same way, there is an icon for the lowest Wi-Fi signal to the best Wi-Fi signal. Error icons are also used to complete all types of signals and notifications. You will therefore need icons to cover all these information that system tray icons offer.
Since it is not easy to change system tray icons, the best way to do it is to use third party applications that can read the icon information and allow you to change those icons. It is a good practice to back up your system or create a restore point before trying to modify your system .dll files. Here is the best way to change your Windows 10 system tray icons.
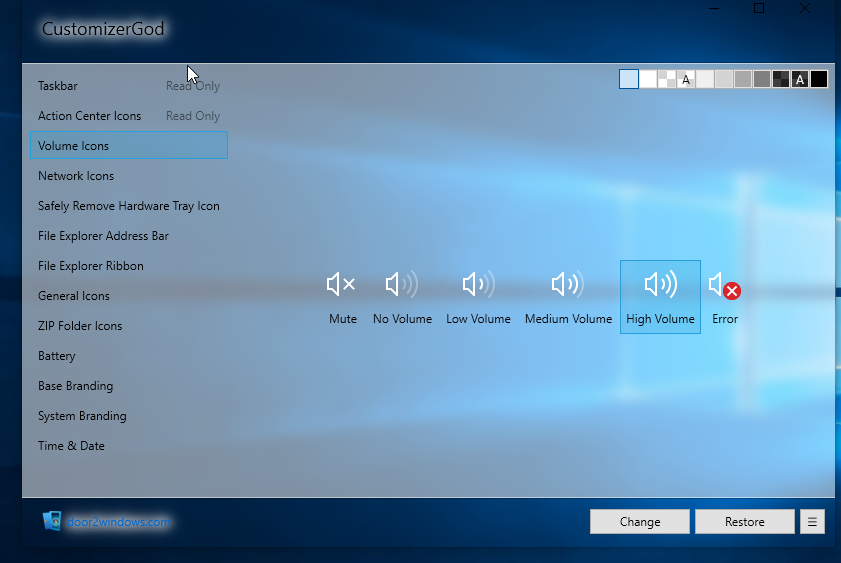
Change System Tray Icons Using CustomizerGod
CustomizerGod is basically a program you can use to change hundreds of default Windows icons. With CustomizerGod, you can change original system icons with ease, without having to take system file ownerships. The current version of CustomizerGod for Windows 10 supports changing the Start button icon on the taskbar as well as changing various other icons on the taskbar like Task View, Cortana, Touch Keyboard, volume icon, battery icon, network icons and Action Center icons. You can use the application to read and save the icons on a windows operating system and use them on another OS.
- You will need icons that you will use to replace your default system icons with. One of the best places to download new icons would be IconArchive accessible from here. Icon files usually have an .ico extension but you can use PNG, BMP and even JPEG file types and apply the icon.
- Download the CustomizerGod application from here. If you are using the online/web-based installer, be careful. Make sure you uncheck any auxiliary installations otherwise you will install a lot of unnecessary programs on your PC.
- Install and Run CustomizerGod as an administrator (right click on the application executable or shortcut and choose ‘run as administrator’)
- You will see two panels, one on the right and one on the left. The left one shows the categories while the right hand side panel will show the icons in the selected category.
- The first thing you will need to do is take a backup of your system files. If anything goes wrong, you can use the backup to restore your system. To do this, click on the category you want on the left and then on the bottom right corner, click on the hamburger button (button with three lines stacked on top of each other)
- On the section that draws up, click on ‘All files’ (for all categories) or ‘Current files’ (for the current category), under the ‘Retake backup’ section.
- Alternatively, you can make a system restore point (Press Windows + R, type sysdm.cpl and hit enter. Create a system restore point under the ‘System Protection’ tab)
- To copy your icons so that you can use them on another system, select a category, and then click on the hamburger button on the bottom right corner. On the section that draws up, click on ‘Export Resources’ under the ‘items’ section on the far left.
- To change the volume/sound icons, click on the ‘Volume icons’ on the left panel. Take a backup if you haven’t. Click on the icon you want to change (double clicking will give you details). Click on the Change button at the bottom of the window and you will be asked to select the new icon files that you wish to use. Navigate to your icon and select it then click open.
- To change the network icons, click on the ‘Network icons’ on the left panel. Take a backup if you haven’t. Here you will find icons for your Wi-Fi, LAN and Bluetooth. Click on the icon you want to change (double clicking will give you details). Click on the Change button at the bottom of the window and you will be asked to select the new icon files that you wish to use. Navigate to your icon and select it then click open.
- To change the battery icons, click on the ‘Battery’ on the left panel. Take a backup if you haven’t. Click on the battery icon you want to change (double clicking will give you details). Click on the Change button at the bottom of the window and you will be asked to select the new icon files that you wish to use. Navigate to your icon and select it then click open.
- After you apply most of the customization, you will have to restart your Windows explorer for the changes to take effect. To do this from the app, click on the hamburger button on the bottom right corner. On the section that draws up, click on ‘Restart’ under the ‘Explorer’ section. You should now see your changes. Your might have to restart Windows if the changes are not effected
Despite the app being foolproof, it is necessary to take a backup just in case. . In case of any problem you can restore your system files from a restore point or using CustomizerGod under the ‘Restore Backup’ section. This is a freeware application so be careful of the auxiliary applications it might install.
Как отобразить все иконки в системном трее Windows 10
Как показать все иконки в системном трее в Windows 10
Панель справа внизу — это небольшой раздел на панели задач, на котором отображаются системные значки, такие как значки динамика, сети и центра действий. Конечно, начиная с Windows 10, Microsoft не оставляет это место только для себя. Любое приложение может добавить значок в системный трей. И вы можете получить доступ к указанному приложению с помощью этого значка. Это если вы знаете как отобразить все иконки в системном трее.
Иногда приложения запускаются полностью в системном трее. А в других случаях их значки являются просто индикаторами, показывающими, что они работают.

Так как Системный трей должен быть небольшим разделом панели задач. И понятно, что не все может поместиться там. Его размер ограничен, и все значки, которые там не помещаются, отправляются в переполненное меню.
Вы можете перетащить значок из него и сделать так, чтобы он постоянно отображался в системном трее, но при этом поведение по умолчанию. Это отправка новых или дополнительных значков в меню переполнения. Если вы хотите изменить это поведение по умолчанию и показать все значки панели задач, вы можете изменить один маленький параметр.

Показать все системные значки в трее
Откройте приложение «Настройки» и перейдите в группу настроек «Персонализация». Перейдите на вкладку «Панель задач» и перейдите к разделу «Область уведомлений».
В этом разделе нажмите «Выбрать, какие значки отображаются на панели задач».

На следующем экране отобразится список приложения, которые могут отображать значки в системный трей. В самом верху этого списка находится переключатель Всегда показывать все значки в области уведомлений. Включите его, и системный трей автоматически развернется, чтобы показать вам каждый значок приложения. Включая значки в меню переполнения.

Это изменение также повлияет на новые приложения, которые будут установлены. Поэтому любые новые приложения, которые вы планируете открывать в системном трее, Или которые будут размещать в нем заначек, будут автоматически рядом с другими значками. Меню переполнения не теперь будет.
У этого есть недостаток, вы получаете меньше места для значков приложений на панели задач. Для некоторых приложений, таких как те, которые показывают температуру процессора или использование ОЗУ, необходимо постоянно отображать значок. Для других это не так.
Вы можете обрезать этот список, полностью скрыв ненужные значки в системном трее. В списке приложений отключите переключатель рядом с приложением, которое вы не хотите в системном трее. Все ваши значки будут присутствовать, но кроме тех, которые вам не нужны. Они будут скрыты в меню переполнения.
windows 10 «show hidden icons» in system tray — icons too much space
Since some time, the icon space between the icons in the tray bar is larger as usual:
Usually, it should be more narrow, like this:
To be 100% clear, I’m speaking about the sector with the white OneDrive Icon in it.
Not the Task or Tray Bar itself. The hidden Notification part («show hidden icons»)
I’ve seen other PCs with the same «error» (all Win 10 from 1803 to 1903).
I was wondering what could provoke such a behaviour, as I recently reinstalled a PC (after formatting. no upgrade) which already has this extra-space too.
I know at least 3 PCs with this extra space and I couldn’t yet figure out what does this.
As it’s not a real Error. More like optical issue, I don’t know where to continue searching.
Has anyone ever got this, and found out why?
And can tell me, how to change it back?
I’m very sure I have seen PCs on 1903 that don’t have the extra space after upgrade.
Its not version related for me.
I have seen several PCs with this now. I can say this in generel:
All PCs were on 1920*1080
Mostly newer HP Laptops
All 64bit
All are Win 10 Pro from 1803 to 1809 to 1903
All get Updated from Windows Update automaticly
I don’t know what to say else that could be related.
Thank you for every answer that could lead me to my goal.
Replies (5)
Thank you for writing to Microsoft Community Forums.
I appreciate your efforts and time in identifying the issue and bringing this to our notice. As you have mentioned that this issue is occurring on all the version of Windows 10, for further analysis of the issue I would require some information.
What is the exact model of the HP laptops?
What is the make and model of the graphics card?
Is there any Taskbar or Start Menu modification software installed on the PC?
Please get back to us with the detailed information to assist you further.
We await your response.
Microsoft Community – Moderator
Was this reply helpful?
Sorry this didn’t help.
Great! Thanks for your feedback.
How satisfied are you with this reply?
Thanks for your feedback, it helps us improve the site.
How satisfied are you with this reply?
Thanks for your feedback.

Thanks for your help.
1. most are ProBook 450 g4/5 or EliteBook 850 g5/6
My personal PC (Selfmade) has this effect too.
I reinstalled this System with a new Win10 Pro 1809 from a Win Media Creation Tool USB Stick about 1 month ago.
Once I saw a Microsoft Surface that has it too.
2. The HP have all Intel CPU with integrated GPU (Driver comes from HP Support Assistant)
Mine is a Nvidia GTX1060 6gb (updated some days ago)
3. A lot of them have Greenshot installed.
All Laptops got the HP Support Assistant (except the Surface wich uses 100% Win Update).
No Theme Modifications. All use the Windows Original Theme after install. Never modified. (Some use Explorer Dark Mode)
Not a real Taskbar Mod, but I think all of them use the FortiClient (VPN) in different versions (5.6 to 6.5 I think)
And all the original Windows Stuff, like Onedrive, Bitlocker.
No other special Tools installed.
There is really nothing else in Common (installed Tools) I could relate to this. thing.
Only (very speculative) thing else I could imagine to try:
I could never reinstall one of them that got this problem to see if its gone after new Win install, or if its hardware related.
Even if I’m 99,93% sure the Error is gone after reinstall. But you can never know before.
I’m very curious where this could come from.
I just looked my Tray Icons, and the space at this moment is normal:
Very misterious. I made no changes about the Taskbar (except some Date/Time Settings). I just shut down and started my PC some times (incl restart)
Always Show All Tray Icons in Windows 10
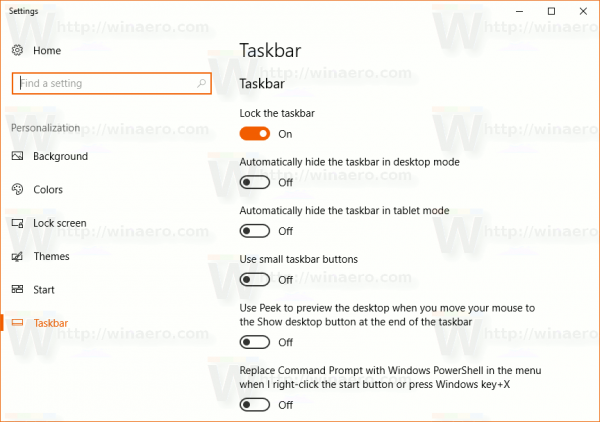
In Windows 10, many classic Control Panel options were moved to the Settings app. Options related to the taskbar were moved there as well. This is the case since at least build 14271, which is part of Windows 10 «Anniversary Update» (Redstone 1) branch. Let’s see how to make Windows 10 always show all tray icons on the taskbar using Settings.
If you have a wide screen or small number of icons, it will be useful to have them visible all the time.
There is a special option to make them visible. There are two methods to enable them.
To always show all tray icons in Windows 10, do the following.
- Open Settings.
- Go to Personalization — Taskbar.

- On the right, click on the link «Select which icons appear on the taskbar» under Notification area.
- On the next page, enable the option «Always show all icons in the notification area».
Tip: If you do not like using the Settings app, there still exists the ability to open the classic Notification Area Icons dialog. Press Win + R to open the Run dialog and type the following in the Run box:
Press the Enter key. The next window will be familiar to many users:
There, tick the option «Always show all icons and notifications on the taskbar».
Finally, it is possible to apply a Registry tweak to make all tray icons visible all the time. Here is how.
- Open Registry Editor (see how).
- Navigate to the following Registry key:
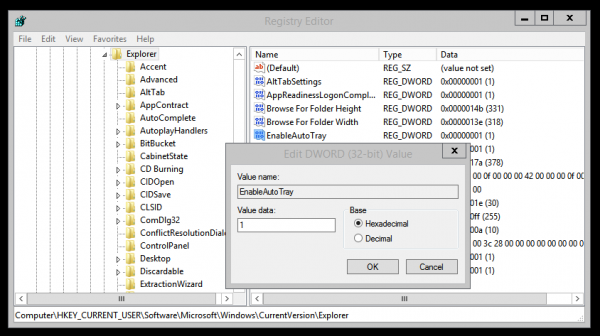
Set it to 0 to show all notification area icons on the taskbar.
A value data of 1 will hide new icons (this is by default).
Winaero greatly relies on your support. You can help the site keep bringing you interesting and useful content and software by using these options:
Share this post
About Sergey Tkachenko
Sergey Tkachenko is a software developer from Russia who started Winaero back in 2011. On this blog, Sergey is writing about everything connected to Microsoft, Windows and popular software. Follow him on Telegram, Twitter, and YouTube.
3 thoughts on “ Always Show All Tray Icons in Windows 10 ”
I followed these suggestions and every reboot several icons are missing from the tray, then I force a simple restart of windows explorer from task manager, then all icons appear again, until next reboot. I’ve got a feeling Kaspersky AV doesn’t play fair with WinPatrol icon, BlueTooth Icon, and system volume control icon. Up until last week I had to always reboot twice in order for Windows 10 x64 to recognize my dual monitor. Un F’ing real! I hope the rocket to Mars doesn’t use any computer systems from the planet Earth.
Настройки иконок области уведомлений периодически сбрасывается… Хотелось бы узнать, где они хранятся в реестре, чтобы проще восстанавливать из .reg-файла. Не подскажете? (Найденные в Инете советы для Windows 7 не актуальны.)
i tried the first sugestion. show all icons was already on.
i turned them off—————-no change
turned them back on——–everything started working right
thanks for the guidance to get to the right place


