- (WINDOWS 10) ‘Show Desktop’ shortcut not showing on bottom right of taskbar
- Replies (4)
- How to show Windows 10 version on the Desktop
- Show Windows version on Desktop
- Related Posts
- Desktop Background Group Policy is not applying in Windows 10
- How to set desktop wallpaper using Group Policy or Registry Editor
- Free Pixel or Screen Ruler software for Windows 10
- [email protected]
- Primary Sidebar
- How to Show “My Computer” (This PC) on the Desktop in Windows 10
- Steps to Display “My Computer” on Windows 10
- Pin My Computer Icon to Start Menu and Start List in Windows 10
- You Can Read Next
- How to Uninstall/Disable Cortana in Windows 10?
- How to Fix System Thread Exception Not Handled Error in Windows 10
- Top 7 Best Free Antivirus for Windows 10 and 8.1 in 2021
- What is ss2svc32.exe in Windows? Is it a Virus? Can I Remove It?
- Tips for Protecting the Security of your Windows Device in 2021
- 5 Ways to Auto Shutdown Windows 10 Computer
- 80 thoughts on “How to Show “My Computer” (This PC) on the Desktop in Windows 10”
- Find My Computer In Windows 10 And Show On Desktop
- How to show Windows 10 version on desktop
- To show Windows 10 version on desktop
- Show Windows version on desktop for all users
- Add Windows version info to desktop in command prompt
- For the current user only
- For all users
- Download batch files to add or remove Windows version desktop watermark
- Using Winaero Tweaker
- What information the desktop watermark shows
- About Sergey Tkachenko
(WINDOWS 10) ‘Show Desktop’ shortcut not showing on bottom right of taskbar
Replies (4)
Right click the Taskbar
Click Taskbar settings
Under Taskbar, make sure ‘Use Peek to preview the desktop when you move your mouse to the Show desktop button at the end of the taskbar’ is toggled on
If that does not work
Run the Start menu troubleshooter:
If that does not work:
Press Windows key + X
Click Task Manager
Select the Processes tab
Scroll down to Windows Explorer then select it
Click Restart
If that does not work:
uninstall your display driver:
Press Windows key + X
Click Device Manager
Expand Display adapters
Right click the current display adapter
Click Uninstall
Exit Device Manager
Restart
19 people found this reply helpful
Was this reply helpful?
Sorry this didn’t help.
Great! Thanks for your feedback.
How satisfied are you with this reply?
Thanks for your feedback, it helps us improve the site.
How satisfied are you with this reply?
Thanks for your feedback.
Right click the Taskbar
Click Taskbar settings
Under Taskbar, make sure ‘Use Peek to preview the desktop when you move your mouse to the Show desktop button at the end of the taskbar’ is toggled on
If that does not work
Run the Start menu troubleshooter:
If that does not work:
Press Windows key + X
Click Task Manager
Select the Processes tab
Scroll down to Windows Explorer then select it
Click Restart
If that does not work:
uninstall your display driver:
Press Windows key + X
Click Device Manager
Expand Display adapters
Right click the current display adapter
Click Uninstall
Exit Device Manager
Restart
I ended up dragging the taskbar to the right side of my screen and then to the bottom again by accident. This fixed my problem, but thank you for your help.
How to show Windows 10 version on the Desktop
There may be reasons that you would like to show the version of your Windows operating system on your desktop. Now if you want to display the version of your Windows 10/8/7 on your desktop, here is a simple registry hack that will help you do it.
Show Windows version on Desktop
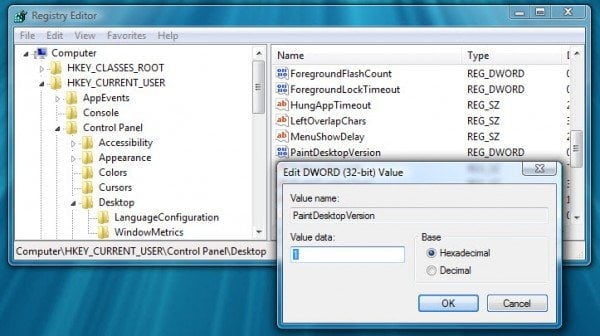
To do so, open regedit and navigate to the following key:
Double click on PaintDesktopVersion on the right side, and in the box that appears, change the value from 0 to 1.
Restart your Windows computer.
On restart, you will find the Windows version being displayed near the bottom right corner of your desktop.
Incidentally, you can also use our freeware Ultimate Windows Tweaker, to show the Windows version on the Desktop. There is a tweak there, under Customization > File Explorer which lets you do so with a click. Run UWT as administrator and execute this tweak.
This can be especially useful if you are running multiple virtual machines in differing states of service packs.
Date: July 7, 2019 Tags: Desktop
Related Posts
Desktop Background Group Policy is not applying in Windows 10
How to set desktop wallpaper using Group Policy or Registry Editor
Free Pixel or Screen Ruler software for Windows 10
[email protected]
Anand Khanse is the Admin of TheWindowsClub.com, a 10-year Microsoft MVP (2006-16) & a Windows Insider MVP. Please read the entire post & the comments first, create a System Restore Point before making any changes to your system & be careful about any 3rd-party offers while installing freeware.
Primary Sidebar
 report this ad
How to Show “My Computer” (This PC) on the Desktop in Windows 10
If you are searching for the “My Computer” icon on Windows 10 desktop, you will probably not find it except someone manually added it. It is one of the favourites and useful icon for all Windows users.
Follow the steps to show/display the missing “My Computer” (This PC) icon in the Windows 10 desktop. We have covered the identical steps for Windows 8.1/7.
This is an essential icon to access the local drives, USB disks, CD/DVD drives, and other files. Definitely, you will be surprised by not seeing this most frequently used icon on Windows Operating Systems. Nothing to worry, it is hidden and we need to enable it.
Steps to Display “My Computer” on Windows 10
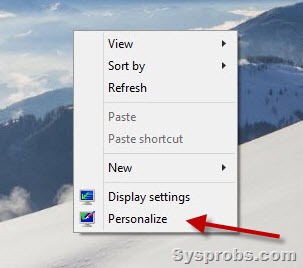
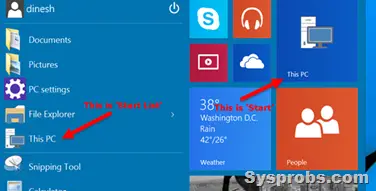
1) Right-click on the empty space of the desktop. Click on ‘Personalize’.
2) In Windows 10, it will take to the settings app. Click ‘Themes’ in the Personalization settings and ‘Go to desktop icon settings’ shown below.
In Windows 8.1, you will get the classic control panel to customize the icon set.
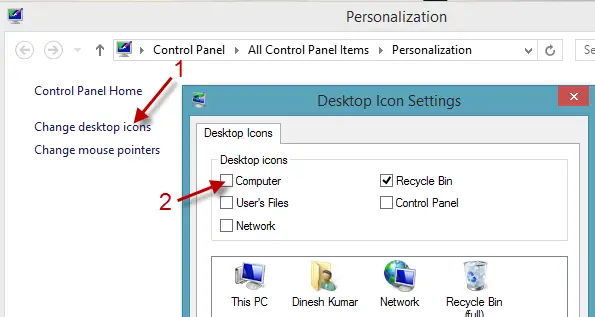
Tick the ‘Computer’ to show it on the desktop. Luckily the ‘Recycle Bin’ is already ticked, if you can’t see the Recycle Bin or it is missing from the Windows 10 desktop, this is the first place you have to check and enable it.
3) Now the ‘This PC’ or ‘My Computer’ icon would appear on the desktop.
To change This PC (Computer) name on Windows 10, you can follow this guide.
Pin My Computer Icon to Start Menu and Start List in Windows 10
As you know, start menu returned in Windows 10. By default, My Computer icon is not included in the start menu. You can follow the below method to pin it (This PC) icon to start menu and list.
4) Right-Click on the ‘This PC’ icon after you have enabled it to display on the desktop. Select Pin to Start List or Start.
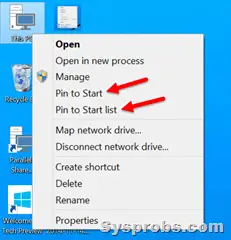
So, this is what happens when you select ‘Start’ and ‘Start List’.
If you want to hide all icons from the desktop in Windows 10, here is the way.
Right Click on the empty space in desktop, select View and remove ‘Show desktop icons’ to hide all icons from the desktop. You can enable back to show all icons on the desktop again.
Hope this guide is helpful in displaying My Computer and Recycle Bin icons on Windows 10 Desktop and start list.
Dinesh
Dinesh is the founder of Sysprobs and written more than 400 articles. Enthusiast in Microsoft and cloud technologies with more than 15 years of IT experience.
You Can Read Next
![]()
How to Uninstall/Disable Cortana in Windows 10?
![]()
How to Fix System Thread Exception Not Handled Error in Windows 10
![]()
Top 7 Best Free Antivirus for Windows 10 and 8.1 in 2021
![]()
What is ss2svc32.exe in Windows? Is it a Virus? Can I Remove It?
![]()
Tips for Protecting the Security of your Windows Device in 2021
![]()
5 Ways to Auto Shutdown Windows 10 Computer
80 thoughts on “How to Show “My Computer” (This PC) on the Desktop in Windows 10”
Still I cannot see my desktop icons. The screen showing is locked and unable to press right click. Desktop files are there in C drive but showing on screen. It is showing only quick links and useful tools.
my computer shutdown not warking
This is so great. This was the clearest instruction I have ever had for anything. And it was exactly as you said and now my “pc” is on the desk and as soon as I post this, I will tack it to the bottom. THANK YOU.
Worked for me. Thank you.
Suddenly ‘This PC’ disappeared. In the themes/desktop icon section, Computer is checked (along with Recycle Bin). I can check/uncheck all the other icons (including This PC). Apply shows/hides appropriate icons, except for the Computer icon. It refuses to appear on the desk top. BTW Win 10.
I have rebooted, checked/unchecked, etc. I can not get the computer icon to show on desktop. Am I heading into the registry to find issue? If so, where?
thank you very much it was great support
Thanks it is useful. I got it…………..
Solved the problem. Steps were very easy to comprehend. Thanks.
Tried so many suggestions and none worked. But yours DID. Fabulous. Thank you, thank you. You may publish my unsolicited name and address.
dinocerutt@aol.com.
Dino Cerutti
I can’t seem to find my problem anywhere. I have a new Dell (almost one year old now) with the most recent update of Windows 10. Everything was fine until I noticed that when I clicked on the Document folder (This PC) it took me to a second Document folder and THEN it went to all my documents. Trying to make things better (one of the worst things I ever do) I moved all the documents up to the higher level Document folder. (Can’t remember what I did with the document folder I moved everything OUT of!) Later on I realized that the only things not getting backed up by my account with iDrive was the Documents (they’d previously been there and always got backed up before I moved them). So in order to get them backed up, they are now sitting in my User account but they are the only things not showing up in This PC. I am going crazy trying to figure this out. Can you help?
Find My Computer In Windows 10 And Show On Desktop
My computer is the essential icon to be on the desktop, as preferred by most of the people. My computer in Windows 10 is termed as “This Pc”, this is the recent name as all the distribution in My computer and removable disk is now comes under in “This Pc”. Windows 10 has just replaced My computer and rename it as This Pc, this is the place where all the main and essential content is saved as windows itself is saved in This Pc distribution. Here you can access all your saved content and add up new content according to your space.
Windows 10 is the recent version of the windows which is highly upgraded and designed in a way to maintain the efficiency in working atmosphere. Microsoft has worked in a manner where they are providing the efficient windows version which is recently free to get updated and if you are aware of the recent version then you must have seen that desktop icons in windows 10 is also being maintained and if you have to access This pc then you have to follow some steps and see number of options to locate and access it.
Option 1: Search “My Computer” or “This Pc” in the search menu.

By searching this keyword you will get the same suggestion as best match and by clicking on This Pc you will be redirected to the This Pc folder where you can access all the distributions of memory which contains all your saved data and files, you can also have an access of removable disk.
Option 2: Open it using File Explorer.

Here in the windows menu you can easily redirect to the file explorer where you can easily access This pc shown in the below image.

This is the way where you can easily access This Pc as shown above and manage all the saved content in just two easy steps.
Option 3: Make it as desktop icon.
You will see the desktop icon settings in the settings window under themes tab.

Here in the right side you will be able to see Desktop icon settings, you have to click on it. A new desktop icon settings window will get opened just like the same image shown below.

Here you have tp mark on Computer and press OK which will make This Pc as a desktop icon form where you can access it easily. Desktop icon is the most feasible way to access This Pc as you can easily manage all your content and easily maintain data.
How to show Windows 10 version on desktop
Here’s how to show Windows 10 version on desktop.
In Windows 10, you can make the OS show the current Windows version and its build number as a watermark on the desktop. You can enable it for the current user, and for all users registered on your computer.
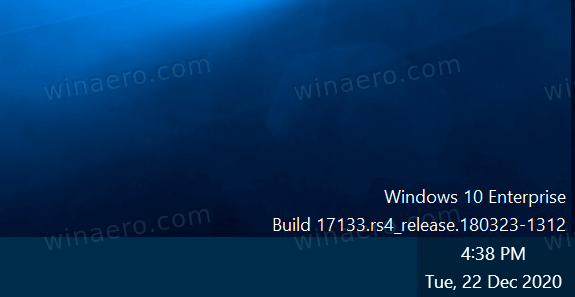
Having a Windows version on the desktop will allow you to find its version, edition and build number at a glance. It will appear as a watermark at the bottom right corner of the screen above the taskbar.
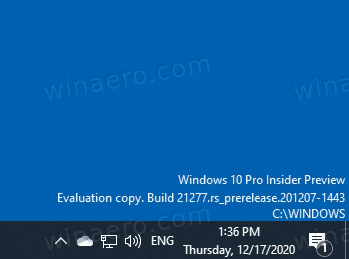
Note that none of the reviewed methods will allow you to disable the Windows Insider Preview waterkmark, or an evaluation watermark that appears for pre-release OS versions, or when Windows 10 is not activated. What we are reviewing only works in activated Windows 10, where the version info on desktop is hidden by default.
This post will explain you how to show the Windows version on the desktop in Windows 10.
To show Windows 10 version on desktop
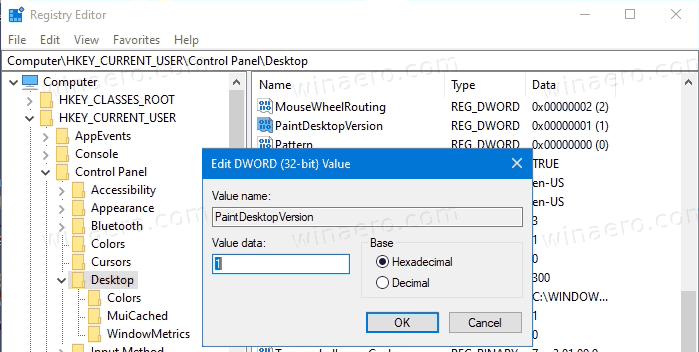
- Open the Registry Editor app.
- Go to the following key: HKEY_CURRENT_USER\Control Panel\Desktop . See how to open a Registry key with one click.
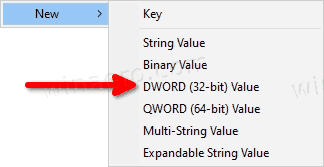
- On the right, modify or create a new 32-Bit DWORD value PaintDesktopVersion.

Note: Even if you are running 64-bit Windows you must still create a 32-bit DWORD value. - Set its value to 1 in decimals.
- To make the changes done by the Registry tweak take effect, you need to sign out and sign in to your user account. Alternatively, you can restart the Explorer shell.
You now have the Windows 10 version on your desktop. It will be only visible for your user account.
Note that there a «bug» in Windows 10. For versions like 1903 and 1909, and 2004 and 20H2 Windows 10 draws a wrong version in the desktop watermark. For example, in version 20H2, it incorrectly reports that it has the 19041 build number, while winver reports that it is build 19042 . You can’t do anything against it.
Alternatively, you can make Windows show the version watermark for all users. Here’ show it can be done.
Show Windows version on desktop for all users
- Open the Registry Editor app.
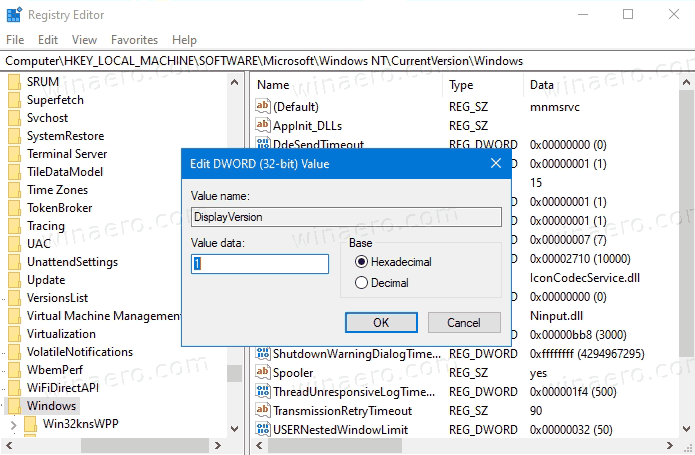
- Go to the following key: HKEY_LOCAL_MACHINE\SOFTWARE\Microsoft\Windows NT\CurrentVersion\Windows . See how to open a Registry key with one click.
- On the right, modify or create a new 32-Bit DWORD value DisplayVersion.
Note: Even if you are running 64-bit Windows you must still create a 32-bit DWORD value. - Set its value to 1.
- To make the changes done by the Registry tweak take effect, you need to sign out and sign in to your user account. Alternatively, you can restart the Explorer shell.
Windows 10 now shows its version info on desktop for all users.
In addition to the OS edition, version, and the build number it will also show the Windows directory path, which is most likely C:\Windows . This information is visible for all user accounts available on your computer.
Additionally, you can a couple of console commands to add or remove the OS version info from the desktop. They are useful for automation tasks.
Add Windows version info to desktop in command prompt
For the current user only
- Open a new command prompt.
- Type the following command and hit the Enter key: REG ADD «HKCU\Control Panel\Desktop» /V PaintDesktopVersion /T REG_DWORD /D 1 /F . This will add the Windows version info to desktop.
- To remove the version info watermark, issue this undo command: REG DELETE «HKCU\Control Panel\Desktop» /V PaintDesktopVersion /F
- Now, sign out and sign in to your user account. Alternatively, you can restart the Explorer shell.
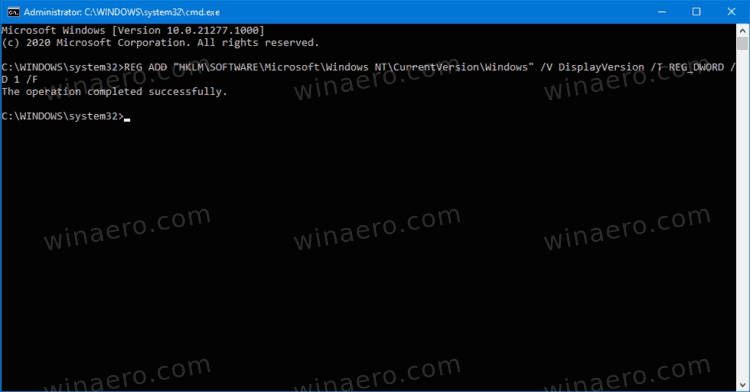
For all users
- Open a new command prompt as Administrator.
- Type the following command and hit the Enter key: REG ADD «HKLM\SOFTWARE\Microsoft\Windows NT\CurrentVersion\Windows» /V DisplayVersion /T REG_DWORD /D 1 /F . This will add the Windows version info to the desktop for all users.
- The undo command is REG DELETE «HKLM\SOFTWARE\Microsoft\Windows NT\CurrentVersion\Windows» /V DisplayVersion /F .
- Now, sign out and sign in to your user account, or restart the Explorer shell.

To save your time, you can download the following batch files. They automate the above task for you.
Download batch files to add or remove Windows version desktop watermark
- Download this ZIP archive: Download the file.
- Unblock the downloaded file.
- Extract its contents to any folder.
- Double-click on one of the included files:
- Add Windows Version Watermark On Desktop Of Current User.bat
- Remove Windows Version Watermark On Desktop Of Current User.bat
- Add Windows Version Watermark On Desktop Of All Users.bat
- Remove Windows Version Watermark On Desktop Of All Users.bat
- A command prompt will quickly flash, and the desktop will flicker because Explorer will be automatically restarted to apply the change.
Finally, you can use Winaero Tweaker to show or hide Windows version from the desktop.
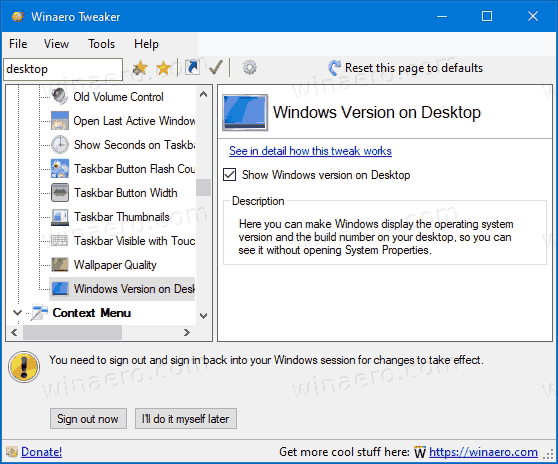
Using Winaero Tweaker
To show Windows version on desktop with Winaero Tweaker, do the following.
- Download Winaero Tweaker.
- Install and run the app.
- Navigate to Desktop and Taskbar > Show windows version on Desktop on the left.
- On the right, check (turn on) the Show Windows version on Desktop option.
- Sign out from your user account when prompted.
The version watermark will become visible on the desktop for the current user.
What information the desktop watermark shows
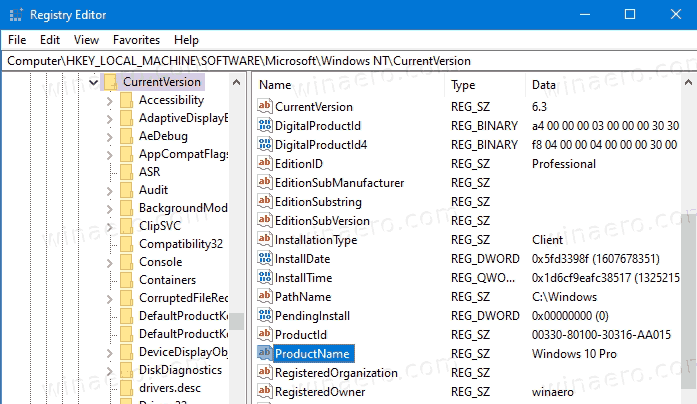
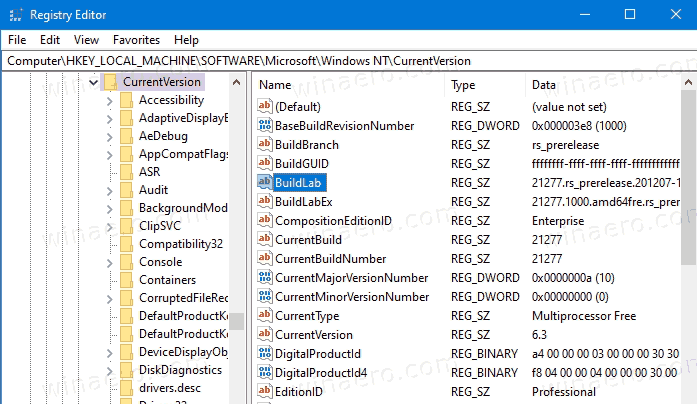
You might be wondering from where Windows 10 takes the information to show in the version watermark on desktop. Well, when the OS displays such a watermark, it reads a couple values from the HKEY_LOCAL_MACHINE\SOFTWARE\Microsoft\Windows NT\CurrentVersion key.
- The ProductName string (REG_SZ) value provides the OS name and its edition.
- The BuildLab string (REG_SZ) value is used to display the build number.
Winaero greatly relies on your support. You can help the site keep bringing you interesting and useful content and software by using these options:
Share this post
About Sergey Tkachenko
Sergey Tkachenko is a software developer from Russia who started Winaero back in 2011. On this blog, Sergey is writing about everything connected to Microsoft, Windows and popular software. Follow him on Telegram, Twitter, and YouTube.


