- How to Share a Screen on Zoom
- Show others your documents by sharing a screen
- How to Screenshare in Zoom
- How to Pause a Screen Share in Zoom
- How to Stop Sharing Your Screen
- How to Use Host Screen Sharing Menu Options
- How to Share Computer Sounds
- How to Share Videos in Zoom
- Zoom Help Center
- Search results
- Screen Sharing
- Sharing your screen, content, or second camera
- Overview
- Prerequisites
- Windows | macOS
- Sharing your screen or content
- Share screen menu
- Showing Zoom windows during screen share
- Using dual monitors
- Linux
- Sharing your screen or content
- Screen share menu
- Using dual monitors
- Android
- Sharing content
- Sharing your screen
- Sharing device audio
- iOS
- Sharing content
How to Share a Screen on Zoom
Show others your documents by sharing a screen
:max_bytes(150000):strip_icc()/Sally-headshot_CO-f90ac7e442204144961d82daa00d58ce.jpg)
Whether you use Zoom for work, school or just hanging out with friends and family, there are often occasions when you want to show others something that you have on your own computer. Instead of sending out links or attachments, you can use Zoom screen sharing to share your screen in real-time and discuss it with others.
Instructions in this article apply to both Windows and Mac computers. They were tested on a Windows 10 computer.
How to Screenshare in Zoom
Before you share your screen in Zoom, be certain that anything anyone can see on your computer is safe to see. For example, close any windows that might not be work-related if you’re sharing a screen during a business meeting. Once you’re set, follow these steps to start screensharing:
Both hosts and attendees can share screens in Zoom. However, the host can prevent participants from using the option. Free and Basic accounts are set to Only Host by default.
To see your Zoom menu option, hover your mouse over the Zoom meeting screen. At the bottom of the screen, you will see a menu. The Share Screen option sits near the middle.
Click Share Screen.
Do not click the tiny white up arrow, if you see one, to share your screen. Those are Host options addressed later in this article. Simply click Share Screen icon.
:max_bytes(150000):strip_icc()/001_Zoom_Screenshare-5c4b8422067c44aca8ff55d38bca5ccd.jpg)
In the menu window that appears, select the program or window you want to share. The screen you are currently using will appear with a bright blue background; all other screens will show white backgrounds. Use the scroll bar on the right to move through your options if you need to. Once you’ve select the window you want to share, click Share.
:max_bytes(150000):strip_icc()/002_Zoom_Screenshare-507e27a74b7d4afea4470d28f4bda3d6.jpg)
On your computer, check to be sure that a light blue highlight appears on the screen you selected. That indicates the window or program Zoom is going to show to others. If it’s incorrect, change your selection in the menu window.
:max_bytes(150000):strip_icc()/Zoomselectedwindowtoshare-ce0c1f2ca4b2435895e151ce73480387.jpg)
Once you’re confident that the correct screen is going to appear, click Share in the menu window.
:max_bytes(150000):strip_icc()/003_Zoom_Screenshare-4d0fbd8f708c44d5b600993da03ce5e6.jpg)
When you have successfully shared your window, the menu window will disappear and a new menu bar will appear at the top of your main screen. This menu bar offers tons of options, including a More drop-down menu. You can drag this bar around your monitor(s) to another location if you want to.
:max_bytes(150000):strip_icc()/004_Zoom_Screenshare-c5b50381d1854ff18d5d8dfc25a7d3e7.jpg)
Many of these options have nothing to do with sharing your screen. There are several, however, that you can use while screen sharing or while running a Zoom meeting as a host.
From the More menu, you can select the follow screensharing options:
- Allow (or not) participants to annotate on a shared screen.
- Show or hide the names of annotators as they use screenshare.
- Share computer sounds.
- Optimize sharing for full-screen video clips.
Zoom automatically switches to full-screen in order to optimize your sharing. If you don’t want that on your screen, click Exit Full Screen in the top-right of the menu at the top of your screen or press the Esc key.
How to Pause a Screen Share in Zoom
Sometimes you need to stop screensharing so you can see faces again and gauge reactions, have a discussion about something, or allow someone else to a share a screen. If you’re going to resume sharing the same screen again, however, there’s no need to stop sharing your screen completely. If you do, you’ll have to start from the very beginning when it’s time to show your screen again.
Instead, click Pause Share. This action does just what it says: It stops your screen from sharing but doesn’t entirely close the option. As soon as you click that option, the button renames itself to Resume Share.
:max_bytes(150000):strip_icc()/005_Zoom_Screenshare-e78726f4e83241b4b697fb7b1494b84e.jpg)
You’ll also see a bright orange-yellow bar warning that your screen sharing is paused.
When you’re ready to begin sharing again, just click Resume Share.
:max_bytes(150000):strip_icc()/006_Zoom_Screensahre-949f6377dd3d4786b9df21ed3fd8dbb6.jpg)
How to Stop Sharing Your Screen
To stop sharing your screen, locate the menu bar. It might still be at the top of the main screen you are using or you might have dragged it somewhere else.
Click Stop Share. Once that’s done, participants can no longer see your computer screen.
:max_bytes(150000):strip_icc()/007_Zoom_Screenshare-c4e989d74908415cb9f29463ce17c6d8.jpg)
How to Use Host Screen Sharing Menu Options
Hosts can limit screensharing to one person at a time or allow multiple participants to share at the same time. They can even limit screensharing so that only they can share a screen.
These features are all located in the Advancing Screen Sharing options menu. To open and use that menu, follow these instructions:
Hover your mouse over the Zoom meeting screen. At the bottom of the screen, you will see a menu.
Click the tiny white up arrow to the top right of the button that says Share Screen.
Be careful: You are not clicking the black arrow inside the bright green box (that opens the screensharing menu window); you are clicking the tiny whiter arrow to the right.
:max_bytes(150000):strip_icc()/008_Zoom_Screenshare-efa7f8e270b849fc8da11abe26c2bbcd.jpg)
Click Advanced Sharing Options.
In the menu window that appears, make selections based on what you want participants to do by clicking the desired option.
:max_bytes(150000):strip_icc()/Zoomadvancedscreensharemenu-cda888ad964f4358860702b99087861d.jpg)
When you’ve completed your selections, just click the X at the top right of the window.
The options you select will remain the default in your future meetings. If you don’t want to use these selections in every meeting, you’ll need to adjust them before your close out of the current meeting or when you log in as a host to your next meeting.
How to Share Computer Sounds
By default, Zoom does not share computer sounds. Most people don’t want to share computer sounds during Zoom calls but if you’d like to let others hear any sound your computer makes during a meeting, you can select that option when you start sharing your screen.
Simply select the box next to Share computer sound when you’re in the Zoom program or windows selection menu; then click Share.
:max_bytes(150000):strip_icc()/009_Zoom_Screenshare-4c28ccd88f1a4fa1b4f502772d64769c.jpg)
If you are decide to optimize screen sharing for video clips, computer sounds will be automatically shared.
How to Share Videos in Zoom
Since you can share any of your screens in Zoom, you can share whatever is running in them, including videos. If you want to share a video in full screen format, it’s a good idea to check the Optimize for full screen video clip option in the program or windows selection menu, then click Share.
If you’re not going to share the video in full-screen, don’t bother using this option. It can make the shared screen blurry.
Zoom Help Center
Search results
Screen Sharing
Sharing your screen, content, or second camera
Overview
While in a meeting, you can share the following content:
- Entire desktop or phone screen
- One or more specific applications
- A portion of your screen
- Whiteboard
- A locally stored video
- Device audio
- Content from a second camera
- iPhone/iPad screen
Notes:
- The host can disable participants’ ability to share their screen.
- For Free/Basic accounts, screen sharing is set to Only Host by default.
- In a webinar, only the host, co-hosts, and panelists can share their screen.
- If you’re using the desktop client, you can show Zoom windows during screen share.
Prerequisites
- Zoom desktop client for Windows, macOS and Linux, version 5.0.0 or higher
- Zoom mobile client for Android and iOS, version 5.0.0 or higher
Note: Linux sessions utilizing Wayland can only share an entire desktop or whiteboard. In order to share just a specific application, you will need to launch your Linux session with Xorg instead.
 Windows | macOS
 Windows |
  macOS
macOSSharing your screen or content
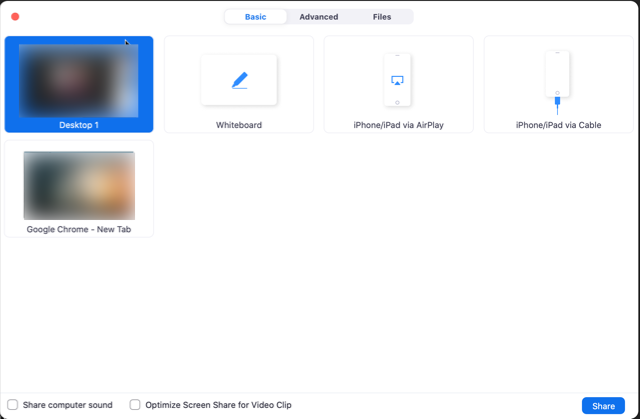
- Click the Share Screen button located in your meeting controls.
- Select one of these screen share options:
- Basic: Share your entire desktop, specific application window(s), whiteboard, or iPhone/iPad screen.
Note: Users can select multiple desktop programs at once, instead of sharing their entire desktop. Only the user employing this feature will need to be on version 5.4.3 or higher, while viewers can be connected with older versions. Hold the Shift key on macOS or the Ctrl key on Windows to select more than one application. - Advanced
- Slides / Powerpoint as Virtual Background: Allows you to utilize a slideshow presentation as your virtual background, providing a more immersive presentation.
- Portion of Screen: Share a portion of your screen represented by a green border. The border can be adjusted as needed during the share by clicking and dragging any side or corner.
- Computer Audio: Only share your computer’s audio (your selected speaker in your audio settings). Select the down arrow just to the right of Computer Audio option to view audio options and switch between Mono and Stereo (high fidelity) audio options.
- Video: Share locally stored video content through Zoom’s native video player.
- Content from 2nd Camera: Share a secondary camera connected to your computer; for example, a document camera or the integrated camera on your laptop.
- Files: Share a file from a third-party sharing service like Google Drive or Microsoft OneDrive. Follow the on-screen prompts to sign in to the third-party service and grant Zoom access.
Notes:- These options may be disabled by account Admins, so available options may vary.
- Alternatively, you can open the file in a web browser then share the browser window. For example, to share a Google Doc, open the Doc in Chrome, then share the Chrome window. The end result is the same as using the sharing options in the Files tab.
- Basic: Share your entire desktop, specific application window(s), whiteboard, or iPhone/iPad screen.
- (Optional) Enable these features, located in the bottom-left corner of the share window:
- Share sound: If you check this option, any sound played by your computer will be shared in the meeting. Select the down arrow just to the right of the Share Sound option to switch between Mono and Stereo (high fidelity) audio options.
- Optimize for video clip: Check this if you will be sharing a video clip in full screen mode. Do not check this otherwise, as it may cause the shared screen to be blurry.
- Click Share.
When the sharing process is started and 80% of devices acknowledge receiving the shared screen, you will see a notification banner stating Participants can now see your shared screen, or whatever you have chosen to share.

Notes:
- Zoom will automatically switch to fullscreen to optimize the shared screen view. To exit full-screen, click Exit Full Screen in the top-right corner or press the Esc key.
- To disable automatic full screen when viewing a shared screen, adjust the Window size when screen sharing behaviour in your desktop client settings.
- If you selected Content from 2nd Camera, click Switch Camera in the top-left corner to switch the shared camera.
Share screen menu
When you start sharing your screen, the meeting controls will move into a menu that you can drag around your screen.
Note: Some of the options detailed below may not be visible due to account admin restrictions or the feature is only visible to the meeting host or co-host.

- Mute/Unmute: Mute or unmute your microphone.
- Start/Stop Video: Start or stop your in-meeting video.
- Security: Access in-meeting security options.
- Participants: View or manage the participants (if the host).
- Click the down arrow ⌄ to access Invite, where you can invite others to join the meeting.
- Polling: Allows you to create, edit, and launch your polls. The options to create or launch polls will open up the Zoom web portal in your default browser. When the poll closes, you can view the results and can download the full poll report. If a poll has already been created, both host and co-host can launch the poll, but only the host can edit or add polls to the meeting.
- New Share: Start a new screen share. You will be prompted to select which screen you want to share again.
- Pause Share: Pause your current shared screen.
- Annotate: Display annotation tools for drawing, adding text, etc.
- More: Hover over more for additional options.
- Chat: Open the chat window.
- Record: Start recording locally or to the cloud.
- Meeting Info: Shows the current meeting’s ID, host, passcode, invite link, your participant ID, and encryption status.
- Closed Captio n / Live Transcript : (only available to the host): If you have enabled closed captioning and live transcription for your account, click here to access those options.
- Breakout Rooms: Start breakout rooms.
- Enable annotation for others: Allow or prevent the participants from annotating on your shared screen.
- Show/Hide Names of Annotators: Show or hide the participants’ name when they are annotating on a screen share. If set to show, the participant’s name will briefly display beside their annotation.
- Hide / Show video panel
- Hide / Show Floating Meeting Control
- Share Sound
- Optimize for video clip
Note: Do not enable this setting if you are not sharing a full screen video clip, as it will blur your screen share. This should be enabled/disabled before and after the video you wish to play. - Live on Facebook: Broadcast your meeting live on Facebook.
- Live on Workplace by Facebook: Broadcast your meeting live on Workplace by Facebook.
- Live onYoutube: Broadcast your meeting live on Youtube.
- Live on Custom Live Streaming Service: Broadcast your meeting live on a custom streaming platform.
- End Meeting: Leave the meeting or end the meeting for all participants.
Showing Zoom windows during screen share
By default, the Zoom window is not shared while sharing your screen. Showing the Zoom window during screen share can be useful if a participant is helping you use Zoom.
- Sign in to the Zoom web portal.
- In the navigation menu, click Settings.
- In the In Meeting (Basic) section, make sure Show Zoom windows during screen share is enabled. This setting will allow the setting to appear in the desktop client.
- Sign out of the Zoom desktop client and sign back in. Alternatively, you can exit the client and re-open it.
- Click your profile picture then click Settings.
- Click the Share Screen tab and make sure Show Zoom windows during screen share is enabled.
Using dual monitors
If you are using a dual-monitor setup, you can turn on the dual monitors feature to see the screen sharing on one monitor and participants on the second.
Note: On Mac OS 10.15 Catalina, you need to allow Zoom access to screen recording to share your screen. You can do this in your System Preferences. Select the Security & Privacy option, click the Privacy tab, scroll down to Screen Recording, and finally check the option for zoom.us.
Linux
 Linux
LinuxSharing your screen or content
- Click the Share Screen button located in your meeting controls.
- Select one of these screen share options:
- Basic: Share your entire desktop, specific application window, or whiteboard.
Notes:- Sharing from an iPhone/iPad is not supported on Linux.
- Linux sessions utilizing Wayland can only share an entire desktop or whiteboard. In order to share just a specific application, you will need to launch your Linux session with Xorg instead.
- Advanced
- Portion of Screen: Share a portion of your screen represented by a green border. The border can be adjusted as needed during the share by clicking and dragging any side or corner.
- Music or Computer Sound Only: Only share your computer’s audio (your selected speaker in your audio settings). Select the down arrow ˅ just to the right of Music orComputer Audio option to view audio options and switch between Mono and Stereo (high fidelity) audio options.
- Basic: Share your entire desktop, specific application window, or whiteboard.
- (Optional) E nable these features, located in the bottom-left corner of the share window:
- Share Computer Sound: If you check this option, any sound played by your computer will be shared in the meeting. Select the down arrow just to the right of the Share Computer Sound option to switch between Mono and Stereo (high fidelity) audio options.
- Optimize Screen Sharing for Video Clip: Check this if you will be sharing a video clip in full screen mode. Do not check this otherwise, as it may cause the shared screen to be blurry.
- Click Share.
When the sharing process is started, you will see a notification banner stating Participants can now see your shared screen, or whatever you have chosen to share.
Notes:
- Zoom will automatically switch to full screen to optimize the shared screen view. To exit full-screen, click Exit Full Screen in the top-right corner or press the Esc key.
- To disable automatic full screen when viewing a shared screen, adjust the Window size when screen sharing behaviour in your desktop client settings.
- If you selected Content from 2nd Camera, click Switch Camera in the top-left corner to switch the shared camera.
Screen share menu
When you start sharing your screen, the meeting controls will move into a menu that you can drag around your screen.
Note: Some of the options detailed below may not be visible due to account admin restrictions or the feature is only visible to the meeting host or co-host.
- Mute/Unmute: Mute or unmute your microphone.
- Start/Stop Video: Start or stop your in-meeting video.
- Security: Access in-meeting security options.
- Participants: View or manage the participants (if the host).
- Click the down arrow to access Invite, where you can invite others to join the meeting.
- New Share: Start a new screen share. You will be prompted to select which screen you want to share again.
- Pause Share: Pause your current shared screen.
- Annotate: Display annotation tools for drawing, adding text, etc.
- Polling: Allows you to create, edit, and launch your polls. The options to create or launch polls will open up the Zoom web portal in your default browser. When the poll closes, you can view the results and can download the full poll report. If a poll has already been created, both host and co-host can launch the poll, but only the host can edit or add polls to the meeting.
- More: Hover over more for additional options.
- Chat: Open the chat window.
- Record on this Computer: Start a local recording.
- Record to the Cloud: Start a cloud recording.
- Meeting Info: Shows the current meeting’s ID, host, passcode, invite link, your participant ID, and encryption status.
- Allow/Disable participants annotation: Allow or prevent the participants from annotating on your shared screen.
- Show/Hide Names of Annotators: Show or hide the participants’ name when they are annotating on a screen share. If set to show, the participant’s name will briefly display beside their annotation.
- Hide / Show video panel
- Audio Settings: Open the audio settings in the client.
- Video Settings: Open the video options in the client.
- Share Computer Sound
- Optimize Share for Full-screen Video Clip
Note: Do not enable this setting if you are not sharing a video clip, as it will blur your screen share. This should be enabled/disabled before and after the video you wish to play. - End Meeting: Leave the meeting or end the meeting for all participants.

Using dual monitors
If you are using a dual-monitor setup, you can turn on the dual monitors feature to see the screen sharing on one monitor and participants on the second.
Android
 Android
Notes:
- Some of these options can be disabled in your account settings, under Integrations.
- Screen sharing requires Android 5.0 or above.
Sharing content
- Tap Share in the meeting controls.
- Tap the type of content that you want to share.
- Tap one of the following options.
- Photos: Share a photo from your file manager or photo apps (e.g. Google Photos). Depending on the apps installed on your Android device, you may see different share options.
- Documents: Select a locally stored PDF or image to share it.
- Box, Dropbox, Google Drive, Microsoft OneDrive, or Microsoft OneDrive for Business: Select a file to share from the selected file sharing service. You will need to grant Zoom access to your account. Only PDFs and images are supported.
- Website URL: Enter a URL to open a browser and share the website.
- Bookmark: Share bookmarks stored in the Zoom app.
- Screen: Share a view of your phone’s entire screen.
- Camera: Allows sharing of your video camera or an attached webcam.
- Share Whiteboard: Share a whiteboard you can annotate on.

Sharing your screen
You can share your entire screen including any application on your Android device. Sharing your entire requires Android 5.0 or higher.
- Tap Share in the meeting controls.
- Tap Screen.
- The Android system will display a notification informing you of what the screen share will have access to. Tap Start Now to confirm.
- The screen share will start and Zoom will continue to run in the background. You can now chose the app that you would like to share.
- At the bottom of your screen, tap Annotate to open the annotation tools or tap Stop Share to stop sharing and go back to meeting controls.


Sharing device audio
While sharing your screen, you can also share device audio if your device meets the below requirements:
- Android 10 or higher
- Granted Zoom permission to record audio when prompted
- Sound generated by the app you’re sharing is allowed to be captured by non-system applications. Some apps may block sound from being shared for security and privacy reasons.
- Follow the instructions to begin sharing your screen.
- Tap the Share Audio option, found between the options to Annotate and Stop Share.
- Tap again to disable or tap Stop Share to end the share completely
iOS
On iOS, you can share:
- Screen (requires iOS 11 or later)
- Photos
- iCloud Drive
- Box, Dropbox, Google Drive, Microsoft OneDrive, or Microsoft OneDrive for Business: Select a file to share from the selected file sharing service. You will need to grant Zoom access to your account. Only PDFs and images are supported.
- Website URLs
- Bookmark
- Whiteboard — iPad only
Note that some of these options can be disabled in your Account settings, under Integrations.
If you need to share your entire screen on an older version of Zoom, see sharing iOS Applications.
Sharing content
- Tap Share Content in the meeting controls.
- Tap the type of content that you want to share.
- For example, if you select Google Drive, this will bring up a series of documents that can be shared. Select the document you want to share and then Share in the top right corner.
- The content is now shared into the meeting.


Note: You cannot annotate when sharing your entire screen into the meeting via iOS device. If you need to annotate when sharing an entire iOS screen, see sharing iOS Applications.


