- Как разбить диск на разделы в Windows 10
- Сжатие тома с помощью управления дисками Windows 10
- Сжатие тома из командной строки Windows
- Сжатие тома с помощью PowerShell
- How to change partition size in Windows 10
- Change partition size with Windows 10 Disk Management
- How to decrease partition size in Windows 10:
- How to increase partition size in Windows 10:
- Adjust partition size with partition editor
- Take care of data while resizing disk partition
- Shrink a basic volume
- Shrinking a basic volume
- To shrink a basic volume using the Windows interface
- To shrink a basic volume using a command line
- Additional considerations
Как разбить диск на разделы в Windows 10
Довольно часто мне приходится разбивать жёсткие диски на разделы, в основном, чтобы отделить пользовательские данные от системных и программ. Для Windows это весьма актуально, особенно если вам часто приходится, по разным причинам, переустанавливать систему и нет желания всякий раз заморачиваться с сохранением всего нажитого непосильным трудом на внешний жёсткий диск.
Встречается и обратная проблема, когда выделено недостаточно места на системном диске при наличие большого объёма не используемого пространства на соседнем томе.
Применять для разбивки дисков какие-то специализированные программы я особого смысла не вижу, тем более что в Windows 10 делается это довольно просто, хоть в графическом режиме, хоть из командной строки — кому что больше нравится. Давайте расскажу как сжимать тома в Windows 10 чтобы окончательно снять все возникающие затруднения.
Сжатие тома с помощью управления дисками Windows 10
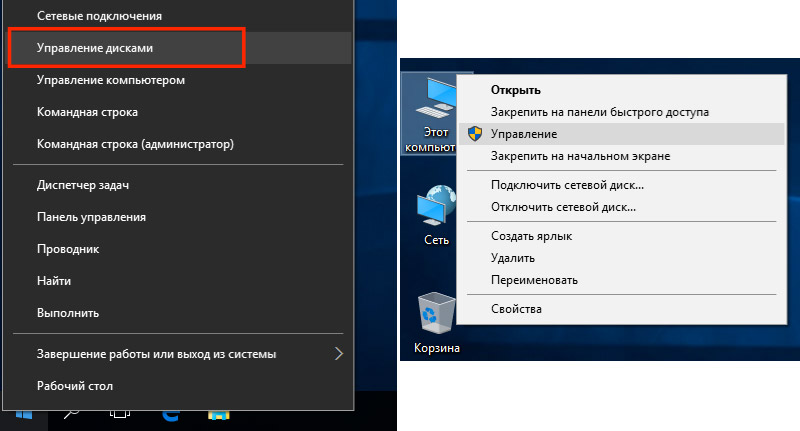
Для начала рассмотрим вариант с привычным графическим интерфейсом «Управление дисками», как самый популярный (командная строка многих пугает). Вызвать утилиту «Управление дисками» можно несколькими способами:
- кликнув правой кнопкой мыши меню «Пуск» и выбрав соответсвующий пункт в открывшемся списке;
- кликнув правой кнопкой мыши по значку «Этот компьютер», далее выбрав «Управление» перейти в «Управление дисками»;
- в строке поиска ввеcти команду diskmgmt.msc и нажать Enter.
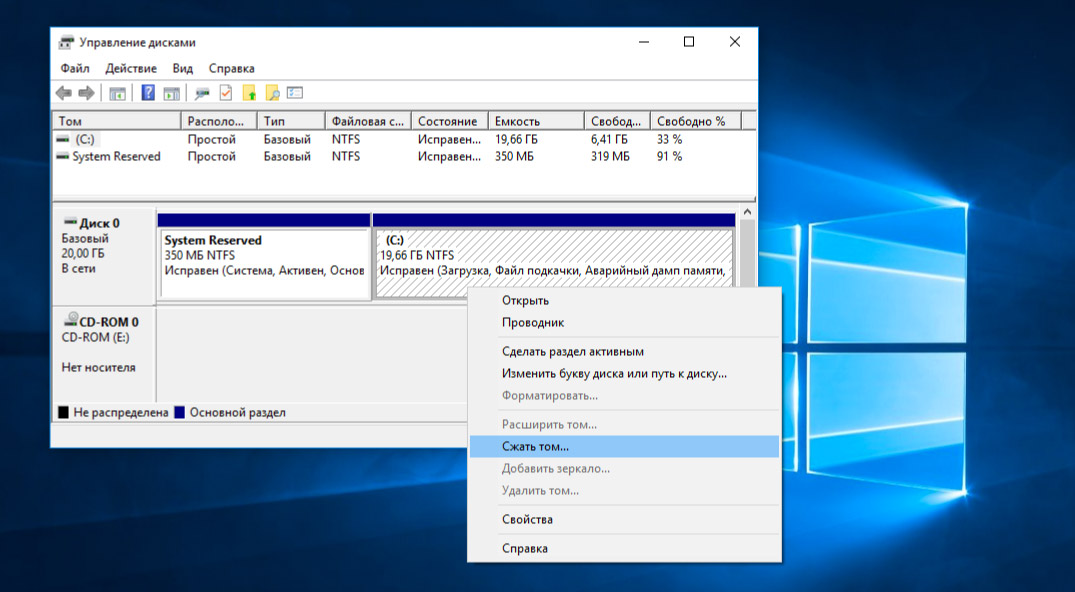
Теперь нужно определиться с диском (томом), размер которого будем изменять, высвобождая место для дополнительного раздела. Кликаем по нему правой кнопкой мыши и выбираем «Сжать том».
Открывается простой диалог с более подробной информацией о разделе диска (томе), но тут случаются непонятки, потому давайте немного поясню. В поле Доступное для сжатия пространство указано сколько всего свободного места есть на диске, а в поле Размер сжимаемого пространства от нас требуется ввести желаемый размер нового раздела в МБ, который, естественно, должен быть меньше оставшегося свободного места на диске.
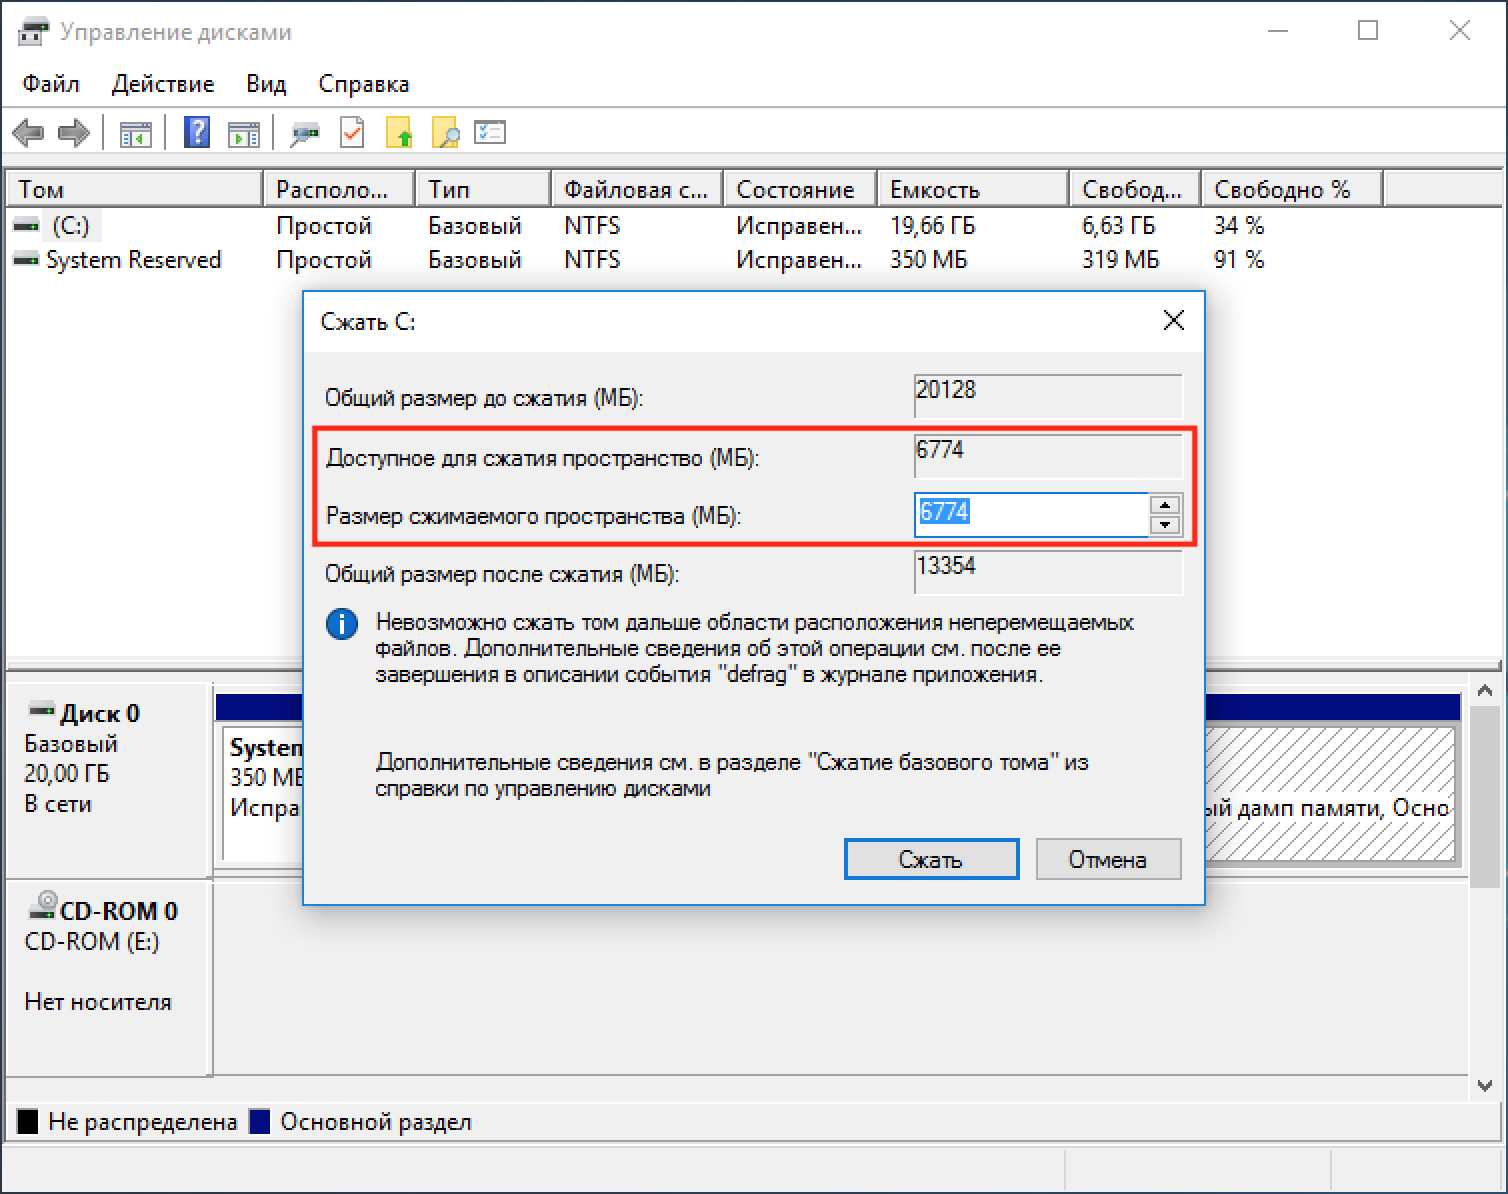
Выделяем место мы обычно в гигабайтах, потому при выделении точного объема под новый раздел обратите внимание что в 1ГБ содержится 1024МБ, то есть создавая 100ГБ раздел, в поле «Размер сжимаемого пространства» следует написать число 102400.
После того как мы, таким образом, выделили на диске нераспределённое место, для создания раздела остаётся кликнуть по нему правой кнопкой мыши и выбрать «Создать простой том».
Сжатие тома из командной строки Windows
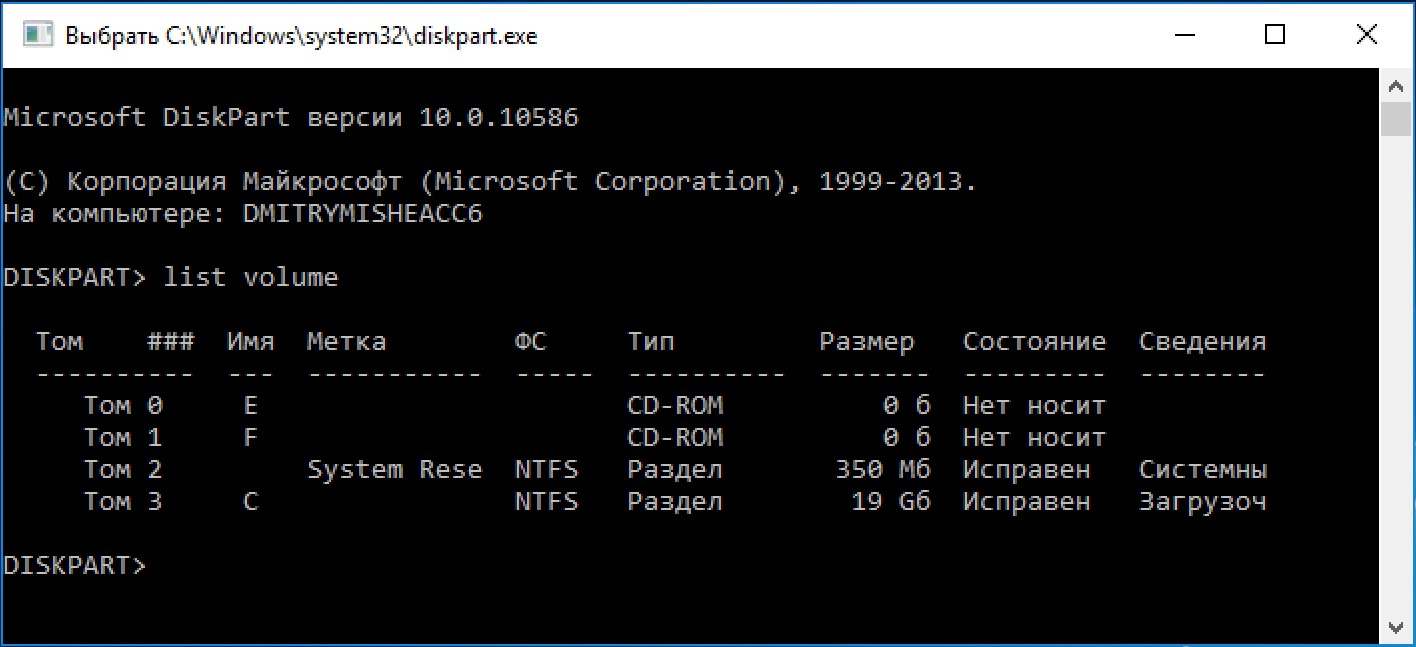
Запускаем командную строку (обязательно от имени администратора) и даём команду DiskPart. Далее выведем список разделов введя команду list volume:
DISKPART > list volume
Снова находим в списке нужный раздел, который будем сжимать, но теперь нам потребуется его номер (в моём примере это будет «Том 3»).
Командой select volume 3 выбираем этот раздел:
DISKPART > select volume 3
Команда shrink querymax поможет узнать свободное на диске (в байтах).
Непосредственно сжатие выбранного раздела производится командой shrink desired= , где — величина дискового пространства в МБ, на которую будет уменьшен раздел. По аналогии с первым вариантом, для создания незамеченной области размером 100 ГБ команда примет такой вид:
DISKPART > shrink desired=102400
Сжатие тома с помощью PowerShell
Работа с PowerShell подразумевает более высокий уровень пользователей, потому подробные разжёвывания о запуске оболочки и действиях от имени администратора опускаем. Осталось пояснить суть команд, которые вы видите на скриншоте:
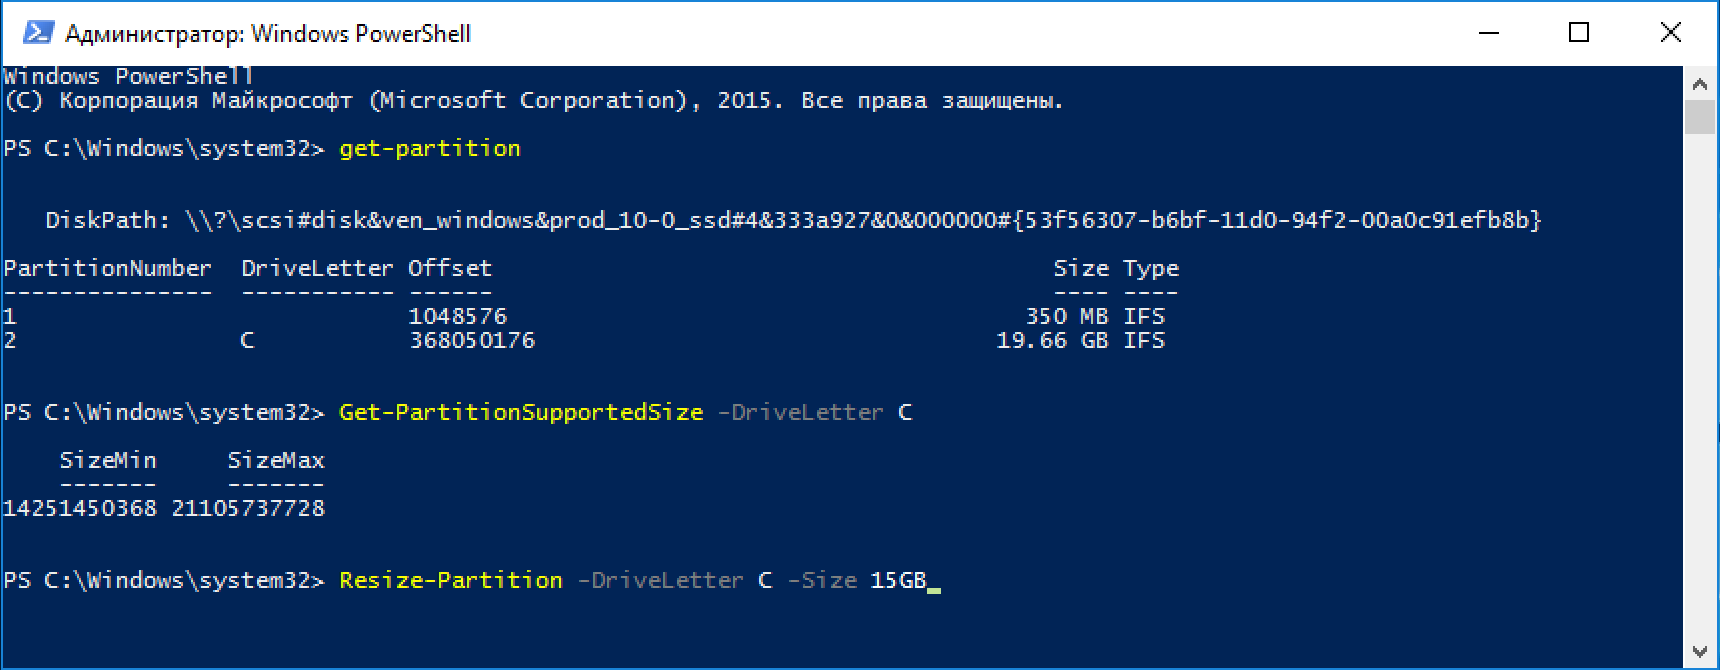
- Команда Get-Partition выводит список томов (нам понадобится буква тома, в примере диск C);
- Команда Get-PartitionSupportedSize -DriveLetter C показывает (в байтах) на сколько возможно минимально и максимально сжать выбранный том;
- Командой Resize-Partition -DriveLetter C -Size 15GB сжимаем раздел, указывая его размер после сжатия. Принципиальное отличие от первых двух методов заключается в указании нового размера исходного тома, а не того, для которого освобождается место. Кроме того, задавать размер можно в любом удобном виде, хоть в гигабайтах (GB), хоть и в мегабайтах (MB).
Если считаете статью полезной,
не ленитесь ставить лайки и делиться с друзьями.
How to change partition size in Windows 10
by Andy, Updated on: March 1, 2021
This article introduces how to change partition size for Windows 10 computer without losing data. Resize disk partition with native Disk Management and partition editor software.
When system C drive is running out of space, nobody wants to start from scratch, so many people search by Google to find a better way. In technical forums, many people have similar questions such as:
- Is it possible to change partition size in Windows 10 without reinstalling OS.
- Is it safe to re-size partition and which tool is better to change allocated partition size.
The answer is definitely yes. To change volume size in Windows 10 laptop and desktop, there are 2 options: Windows built-in Disk Management and third party partition editor software. Because of many shortages, Disk Management is not the best tool to change partition size.
Change partition size with Windows 10 Disk Management
Windows 10 Disk Management inherited Shrink Volume and Extend Volume functions from previous version. Shrink Volume can decrease the size of both system C drive and data volumes. Extend Volume can increase size of a drive when there is adjacent Unallocated space. Both functions are safe to change partition size in Windows 10 (32 & 64 bit).
However, if you want to extend a volume by shrinking another one, Disk Management cannot help you, learn why.
How to decrease partition size in Windows 10:
- Press Windows and X on the keyboard and select Disk Management from the list.
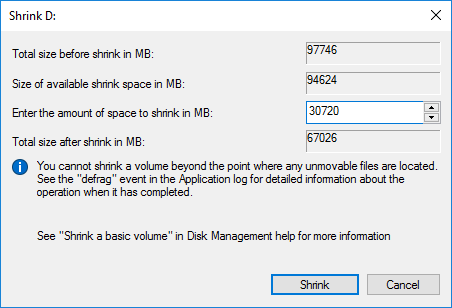
- Right click the drive you want to decrease and select Shrink Volume.
- Enter the amount of space (1024MB=1GB) and click Shrink to execute.
This drive will be shrunk within a short time in most cases.
Restrictions of Shrink Volume function:
- Only NTFS partition can be shrank, FAT32 and other types of volumes are not supported.
- Unallocated space can only be generated on the right side.
- Sometimes you can only shrink little space because of some unmovable files are located, even though there is large amount of free space in this drive.
How to increase partition size in Windows 10:
Only when your disk drive configuration meet the requirements below, Extend Volume is workable to increase partition size.
- There must be adjacent Unallocated space on the right side of the drive that you want to extend. If there’s no such Unallocated space, you must delete the right contiguous partition.
- The drive that you want to extend must be formatted with NTFS, FAT32 and other types of partitions are not supported.
- On MBR disk, the partitions to be deleted and extended must be the same Primary or Logical drive. Otherwise, you still cannot extend partition after deleting the right contiguous one.
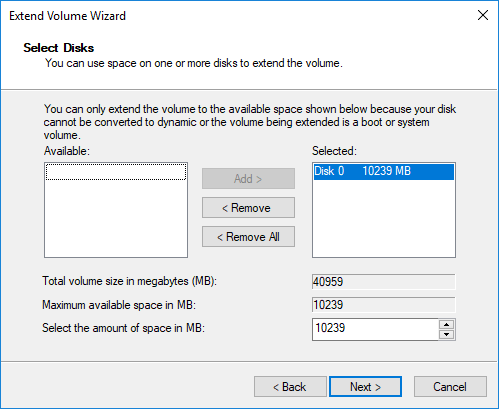
To increase volume size with Disk Management:
- Right click the NTFS partition that has right adjacent Unallocated space and select Extend Volume.
- Simply click Next in the pop-up Extend Volume Wizard window.
- Click Next to use default selected disk and space, or change manually.
- Click Finish to execute.
Adjust partition size with partition editor
Comparing with Windows 10 Disk Management, NIUBI Partition Editor has advantages while resizing partition, for example:
- Both NTFS and FAT32 partitions are supported to shrink and extend.
- Unallocated space can be made on either left or right when shrinking a drive.
- Partitions can be extended via 1 step with adjacent Unallocated space on either side.
- Unallocated space can be moved and combined to any nonadjacent partition on the same disk.
- If there is not plenty of space in the same disk, NIUBI can copy to a larger one and extend partition with extra space.
How to change partition size in Windows 10 with NIUBI Partition Editor:
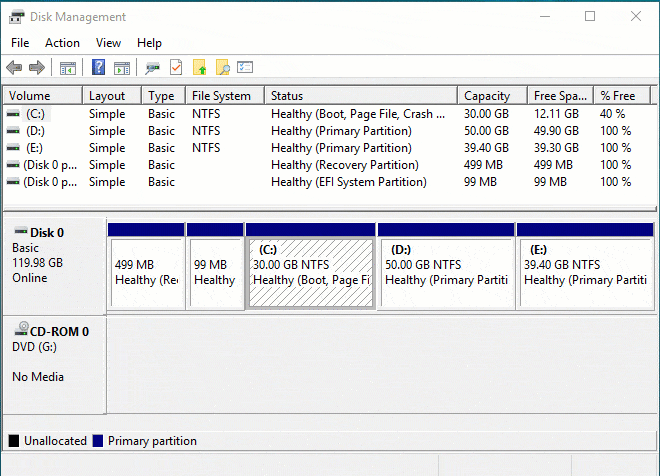
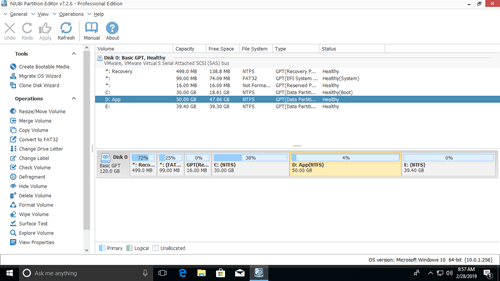
Download this program and you’ll see all disk partitions with structure and other information. In my test computer, there are drive C, D, E and system reserved partitions.
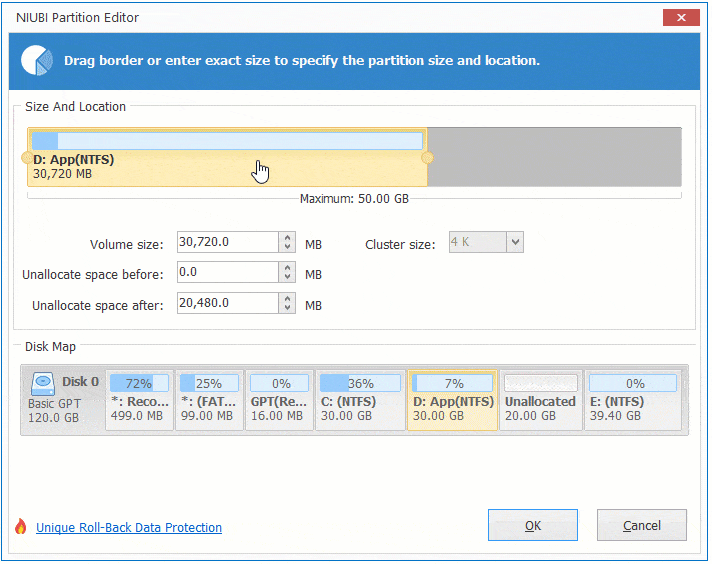
There are two options when decrease partition size, right click this partition (here is D:) and select «Resize/Move Volume».
Option 1: If you drag left border towards right in the pop-up window,
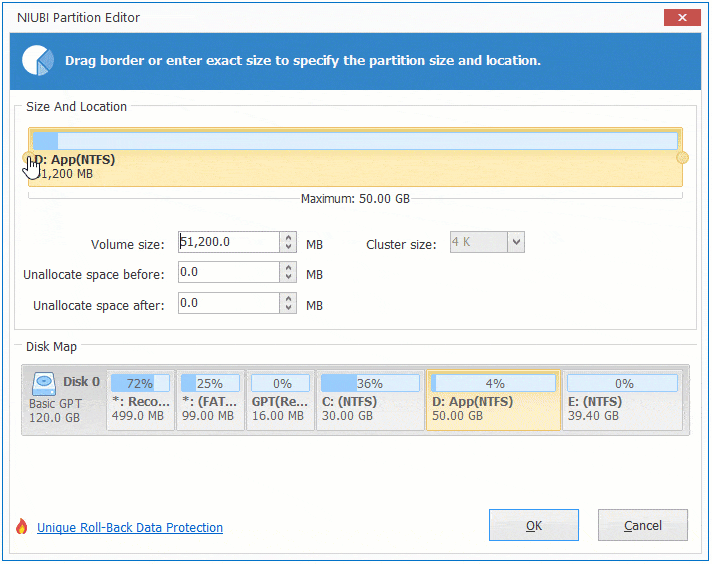
Then Unallocated space will be produced on the left side.
Option 2: If you drag right border towards left in the pop-up window,
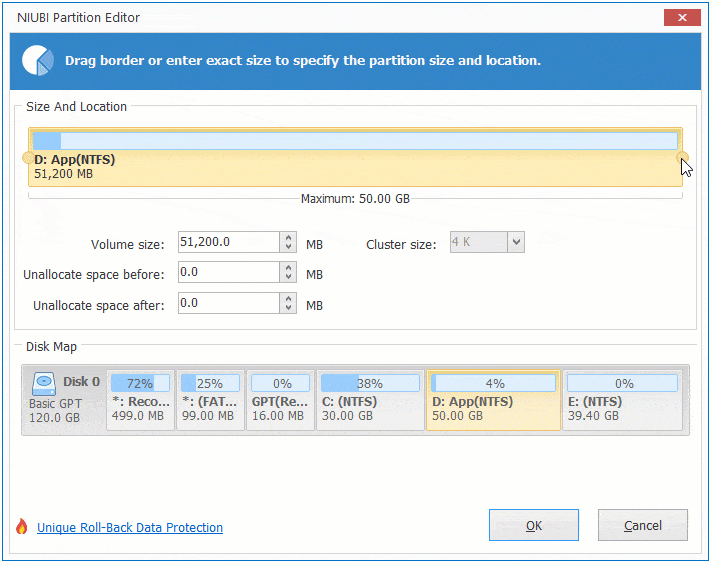
Then Unallocated space will be produced on the right side.
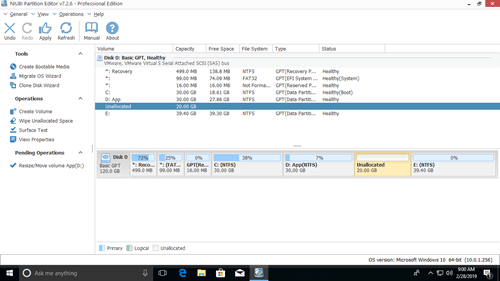
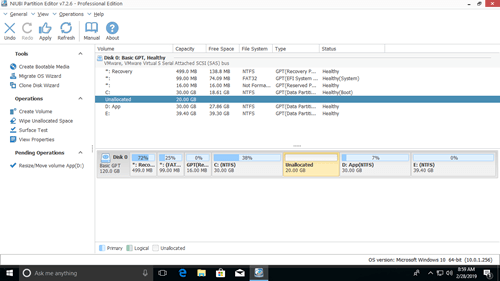
These Unallocated space can be used to create new volume or combine to other partition.
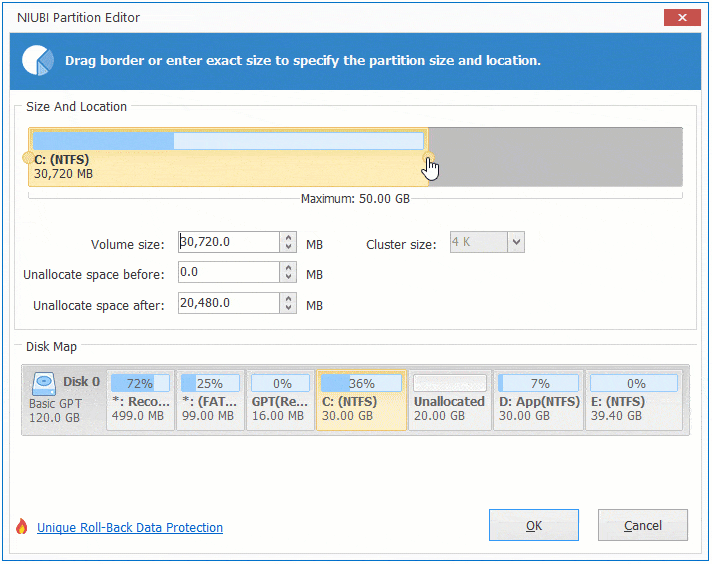
To increase size of partition C:
Right click C and select «Resize/Move Volume» again, drag right border rightwards to combine Unallocated space.
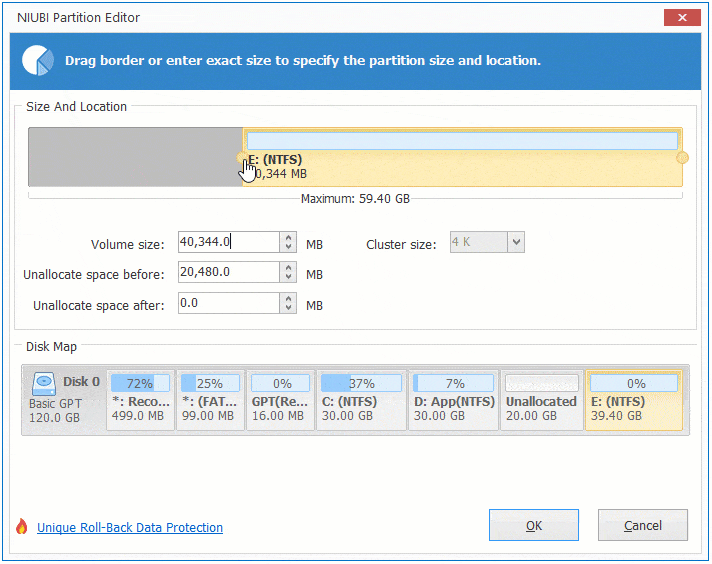
To increase size of partition E:
Right click E and select «Resize/Move Volume» again, drag left border leftwards to combine Unallocated space.
If you want to decrease E to increase C, follow Option 1 to make Unallocated space on the left side of E. Before adding Unallocated space to C drive, there is an additional step to move Unallocated space to left side of D. To do this, right click drive D and select «Resize/Move Volume», drag middle position towards right in the pop-up window.
Take care of data while resizing disk partition
There is potential system and data damage risk while change partition size for Windows 10 computer. So you’d better back up first and use safe partitioning software. Better than other software, NIUBI Partition Editor provides powerful 1 Second Rollback, Virtual Mode and Cancel-at-well technologies to protect system and data.
Besides changing partition size, it helps you do many other operations such as: merge, convert, defrag, copy, hide, wipe and scan partition. Initialize, convert, set read-only attribute to disk, etc.
Shrink a basic volume
Applies To: Windows 10, Windows 8.1, Windows Server (Semi-Annual Channel), Windows Server 2019, Windows Server 2016, Windows Server 2012 R2, Windows Server 2012
You can decrease the space used by primary partitions and logical drives by shrinking them into adjacent, contiguous space on the same disk. For example, if you discover that you need an additional partition but do not have additional disks, you can shrink the existing partition from the end of the volume to create new unallocated space that can then be used for a new partition. The shrink operation can be blocked by the presence of certain file types. For more information, see Additional considerations
When you shrink a partition, any ordinary files are automatically relocated on the disk to create the new unallocated space. There is no need to reformat the disk to shrink the partition.
If the partition is a raw partition (that is, one without a file system) that contains data (such as a database file), shrinking the partition might destroy the data.
Shrinking a basic volume
You must be a member of the Backup Operators or Administrators group, at minimum, to complete these steps.
To shrink a basic volume using the Windows interface
In Disk Manager, right-click the basic volume you want to shrink.
Click Shrink Volume.
Follow the on-screen instructions.
You can only shrink basic volumes that have no file system or that use the NTFS file system.
To shrink a basic volume using a command line
Open a command prompt and type diskpart .
At the DISKPART prompt, type list volume . Note the number of the simple volume you want to shrink.
At the DISKPART prompt, type select volume . Selects the simple volume volumenumber you want to shrink.
At the DISKPART prompt, type shrink [desired= ] [minimum= ] . Shrinks the selected volume to desiredsize in megabytes (MB) if possible, or to minimumsize if desiredsize is too large.
| Value | Description |
|---|---|
| list volume | Displays a list of basic and dynamic volumes on all disks. |
| select volume | Selects the specified volume, where volumenumber is the volume number, and gives it focus. If no volume is specified, the select command lists the current volume with focus. You can specify the volume by number, drive letter, or mount point path. On a basic disk, selecting a volume also gives the corresponding partition focus. |
| shrink | Shrinks the volume with focus to create unallocated space. No data loss occurs. If the partition includes unmovable files (such as the page file or the shadow copy storage area), the volume will shrink to the point where the unmovable files are located. |
| desired=desiredsize | The amount of space, in megabytes, to recover to the current partition. |
| minimum=minimumsize | The minimum amount of space, in megabytes, to recover to the current partition. If you do not specify a desired or minimum size, the command will reclaim the maximum amount of space possible. |
Additional considerations
When you shrink a partition, certain files (for example, the paging file or the shadow copy storage area) cannot be automatically relocated, and you cannot decrease the allocated space beyond the point where the unmovable files are located. If the shrink operation fails, check the Application Log for Event 259, which will identify the unmovable file. If you know the cluster(s) associated with the file that is preventing the shrink operation, you can also use the fsutil command at a command prompt (type fsutil volume querycluster /? for usage). When you provide the querycluster parameter, the command output will identify the unmovable file that is preventing the shrink operation from succeeding. In some cases, you can relocate the file temporarily. For example, if you need to shrink the partition further, you can use Control Panel to move the paging file or stored shadow copies to another disk, delete the stored shadow copies, shrink the volume, and then move the paging file back to the disk. If the number of bad clusters detected by dynamic bad-cluster remapping is too high, you cannot shrink the partition. If this occurs, you should consider moving the data and replacing the disk.
Do not use a block-level copy to transfer the data. This will also copy the bad sector table and the new disk will treat the same sectors as bad even though they are normal.
You can shrink primary partitions and logical drives on raw partitions (those without a file system) or partitions using the NTFS file system.


