- Talk:Dual boot with Windows
- Contents
- Use Cases
- MBR-BIOS
- Special notes
- Begin
- Alternative grub install
- Dedicated partition not needed to boot grub2 using bcdedit
- Restoring a Windows boot record
- Shrinking the Windows Partition
- Configure Internal HDD as External Drive
- Does Arch really need access to ESP partition during updates?
- Windows’ ESP default size is rather small
- How to Shrink Partition in Windows 10
- 3 Ways to Shrink Partition in Windows 10
- Method 1. Shrink Windows 10 Partition with EaseUS Partition Master
- Method 2. Shrink Partition with Windows 10 Built-In Disk Management
- Method 3. Shrink Partition in Windows 10 Using DiskPart
- Pick the Best Solution
Talk:Dual boot with Windows
Contents
Use Cases
Alad, i think you might be off base on that one, that entire GOAL of that excercise was nothing to do with laptop, but to Demystify arch dual boot. Can we PLEASE put this back, its my new GOTO for dual boot on any windows arch system, no matter the case, whenst i dont want to deal with UEFI and or GPT due to windows or hardware limitations. —Wolfdogg (talk) 23:11, 17 September 2015 (UTC)
Ahh, after further thkning on this, i probably misled the whole thing by the use case title having anything to with Laptops and HP, its not just a Use Case, its an ENTIRE revamp of the Dual Boot instructions, can we somehow incorporate it on the Dual Boot instructions page, labeling it how you will, so that those instructions are clear for any user to run through as a MBR-BIOS use case if necessary? The idea is it being some new official simple dual boot (as close to all encompassing for newbs) as can be, to where they can work off it how they choose, but as a simple foolproof starting point, pointing out places where its up to the user to make the choices necessary to apply it to their user? I need a good writer for that. —Wolfdogg (talk) 23:16, 17 September 2015 (UTC)
The whole instructions for setting up dual boot can be summarized as:
- make sure there are at least 2 partitions (described in Partitioning),
- make sure that Arch is installed on one partition (described in Installation guide) and the other OS on the other partition (cannot be described on the ArchWiki),
- (re)install the bootloader (described in Windows_and_Arch_dual_boot#Installation and specific pages for each boot loader)
There is no point in duplicating the instructions for all 3 steps on a single page. Also, your instructions consider only one possible scenario, they won’t apply for example if the other OS is already installed. — Lahwaacz (talk) 08:32, 18 September 2015 (UTC) Is there anything to add or can this be closed? — Alad (talk) 09:23, 2 September 2016 (UTC)
MBR-BIOS
Special notes
- This method uses parted exclusively for all partitioning
- I’ts assumed (if your bios permits) that you have it set to IDE or SATA/RAID, and not on AHCI mode
- In this scenario, the user additionally saved 1GB free space at the beginning of drive for later use (Later conversion to boot bios, GPT partition table, grub installations, anything really)
- FYI this was for HP laptop i3 generation Intel HP4520s#aba xt988ut
Begin
Get yourself a readied drive. You might want to check it out with smartmon tools first, once you trust it and its ready for wipeage then follow the exact procedure below (with as little deviation as possible except for partition sizes).
Note if your newer to parted, pay close attention to the B,MB,GB figures, those are intended to aid in aligning your partitions correctly. This setup may vary on yours, but its highly recommended to keep trying until they are aligned properly first.
- Using parted, create the following partitions, adjusting start points where you see fit. If you don’t want the free space, adjust the first start point to 1MB or something (success is not guaranteed on any partition adjustments, for this scenario)
- reboot with windows cd
- carefully selecting ONLY the 1st ntfs labeled-type partition you created above install windows (dont worry, it wont create the 2nd boot partition now, if it does, something went wrong try again)
- reboot into arch dvd
- follow arch install instructions per standard installation continuing up to the partition creation point, which you will now SKIP over.
- Start off with formatting with filesystem of your choice
- use arch install wiki to mount drives, adjust mirrors, connect network easiest way for now is to connect hard lan cable on dhcp avail network, then
- Follow arch install wiki for the following per norm;
- install pac base, genfstab, arch-chroot, set your hostname, set localtime and locale-gen, compile kernel, set password, then continue
- Install grub
- backup the boot record to a file named «mbr-backup» on your root
- Install grub onto your disk sdx, replacing sdx with the disk you are working with(be careful).
- run os-prober to find your windows install
- You can also edit your default boot order here in /etc/default/grub by changing the order from 0 to 1,2, etc..
- now compile a new grub boot config to finish things up..
- Now reboot, Success!
Alternative grub install
- Instead of overriding windows boot partition with grub as we just did above, you can alternatively use the windows boot partition to point to grub, ONLY if you install GRUB to the partition, and not the drive boot record. i.e. dev/sdx1 instead of /dev/sdx
- continue with bcedit in windows to point a second boot to the grubbed partition.. good luck with that..
— 02:12, 4 September 2015 Wolfdogg
Dedicated partition not needed to boot grub2 using bcdedit
Since Dual_boot_with_Windows#Using_Windows_boot_loader involves creating linux.bin and putting it onto C: , there’s no need to create a FAT32 partition or even install grub (either to MBR or a partition boot sector). When installed to MBR, the role of that 512 byte block is to load core.img embedded to the MBR gap. When installed to partition boot sector, its role is to load the file core.img residing in /boot/. The thing is: Windows Boot Manager loads the whole file, even if it’s larger than 512 bytes. This allows to embed core.img into that file and put it to C:. Good news grub ships with a special boot sector that does not try to load core.img, but assumes that it’s already loaded — lnxboot.img. Here’s what you do:
Hell, you don’t even need to boot Linux, just extract those files from your Linux partition using some free tool and concatenate them.
—This unsigned comment is by Basinilya (talk) 18:34, 30 June 2016. Please sign your posts with
Restoring a Windows boot record
Doesn’t this situation refer to a MBR type installation? UEFI boot of windows requires a GPT type partitioning not MBR. Theking2 (talk) 18:24, 1 September 2016 (UTC)
Shrinking the Windows Partition
The wiki mentions
«All systems pre-installed with Windows XP, Vista or 7 32-bit, irrespective of Service Pack level, bitness, edition (SKU) or presence of UEFI support in firmware, boot in BIOS/MBR mode by default.»
So preinstalled systems are taken into account. But in all pre-installed systems, Windows usually occupies the full partition.
This wiki page contains information on how to reduce the size of the partition from Windows when using safe boot. I believe that some information from this section would be very helpful in this page. I’m not adding it because of my lack of experience with this, but perhaps someone else would like to adapt and add.
—This unsigned comment is by Ddshore (talk) 16:31, 11 August 2018. Please sign your posts with
Configure Internal HDD as External Drive
In Dual_boot_with_Windows#Disable_Fast_Startup_and_enable_hibernation there’s a Note stating «You can avoid this issue for a drive by mounting a drive as an external drive in Windows and ejecting the drive in Windows before hibernating.» Does anyone have more details on this? Some questions I have:
- Can this be set for a shared partition on the same disk? For example a partition schema like [Recovery, ESP, C-Drive NTFS, D-Drive NTFS, Archlinux] is somewhat common partition schema for using the the «D-Drive» partition to share data between Windows and Linux. Can D: be configured as «an external drive»?
- Is the «ejecting» step before hibernation something that must be done manually or does Windows do that automatically?
- Can the ESP partition be marked as External so that Windows doesn’t leave the partition mounted during Hibernate?
Bobpaul (talk) 16:31, 28 May 2020 (UTC)
Does Arch really need access to ESP partition during updates?
In Dual_boot_with_Windows#Fast_Startup_and_hibernation most of the concern with Windows/Linux hibernating seems to be due to the shared use of the EFI System Partition. And if one is using systemd-boot or another boot loader which requires the Kernel lives on the ESP, then absolutely, one needs to share the ESP between Windows and Linux.
But many Bootloaders, such as GRUB, only require the Bootloader lives on the ESP. And I believe for GRUB, the only time Arch needs to write to the ESP is when the `grub-install` command is executed (which is not implicit during a GRUB package update).
It seems that, at least for GRUB, it should be sufficient to define the ESP in /etc/fstab , but configure it for noauto to prevent it from mounting on startup. One could then cautiously mount it (after ensuring Windows is not hibernated) before running grub-install , which should be rare.
Does this sound like a reasonable configuration or am I making some incorrect assumptions? Bobpaul (talk) 16:51, 28 May 2020 (UTC)
I just did a Dual-Boot installation following https://www.youtube.com/watch?v=C3D_qzw94v8, where he creates a second EFI partition for Linux. Seems to work. This should also solve the problem with hibernation, no? Mauro3 (talk) 07:28, 6 September 2020 (UTC)
Windows’ ESP default size is rather small
It seems that per default, Windows creates a ESP that is just 100M big. This is below the size recommended by this wiki and I already had some problems with this being rather small. Would it be reasonable to add a warning that one should consider increasing this size manually when installing and partioning windows? N31415 (talk) 11:41, 1 July 2020 (UTC)
Please feel free to add. — Blackteahamburger (talk) 02:59, 3 August 2020 (UTC)
How to Shrink Partition in Windows 10
Shrinking a partition is needed when you want to create a new volume or extend another volume on the same disk. In most cases, you can shrink the partition directly without worrying about data loss. For coping with this hassle, we hold three solutions to shrink volume in Windows 10.
3 Ways to Shrink Partition in Windows 10
Generally, users use three ways to shrink Windows 10 partition, third-party software, Disk Management, or DiskPart.В Any of them can help you do the Windows 10 shrink partition. So, which method is best?
ForВ seeking an easest way, EaseUS Partition Master is the «One Size Fits All» solution for you, which allows you to shrink volume flexibly, even shrink the non-adjacent space. While Disk Management and Diskpart still run well, but adopting Diskpart may eat up your time than the third-party software. And the Windows built-in tool also holds limits. Stay hereВ and pick a meaningful tool!
Method 1. Shrink Windows 10 Partition with EaseUS Partition Master
Suppose you prefer to shrink a partition in Windows 10 by the most straightforward step like dragging and dropping, in that case,В the partition resizingВ tool — EaseUS Partition Master allows you to escape the redundant process. Whether you want to shrink or extend a partition, you can directly drag the volume to the size you want instead of entering the size in number.
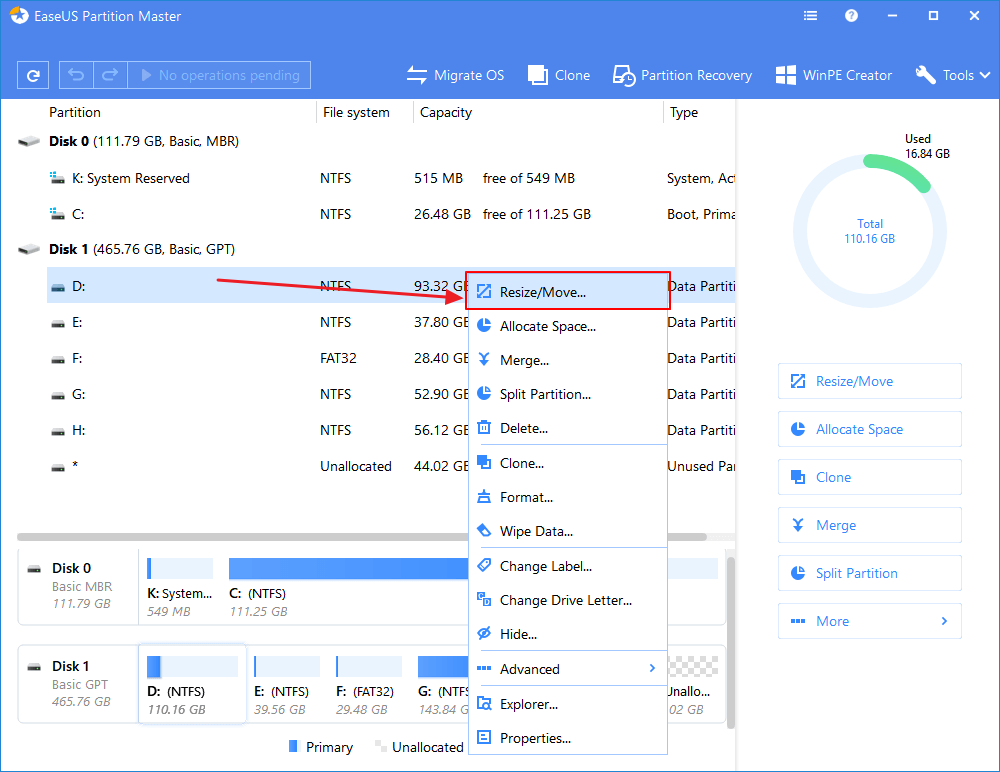
Step 1: Locate and select target partition to shrink
On the main window, right-click on the partition that you want to shrink and select «Resize/Move».
Step 2: Adjust to shrink partition
Use your mouse to drag one of its ends to shrink partition space.
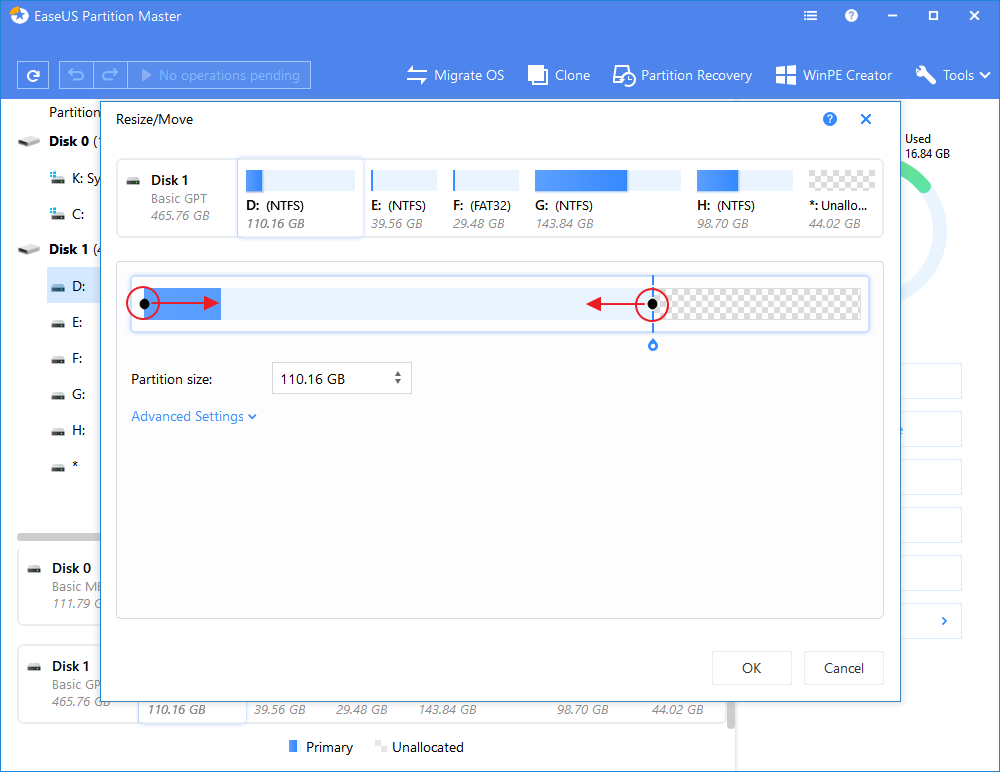
You can also adjust the partition size box to shrink the target partition. Once done, click «OK» to continue.

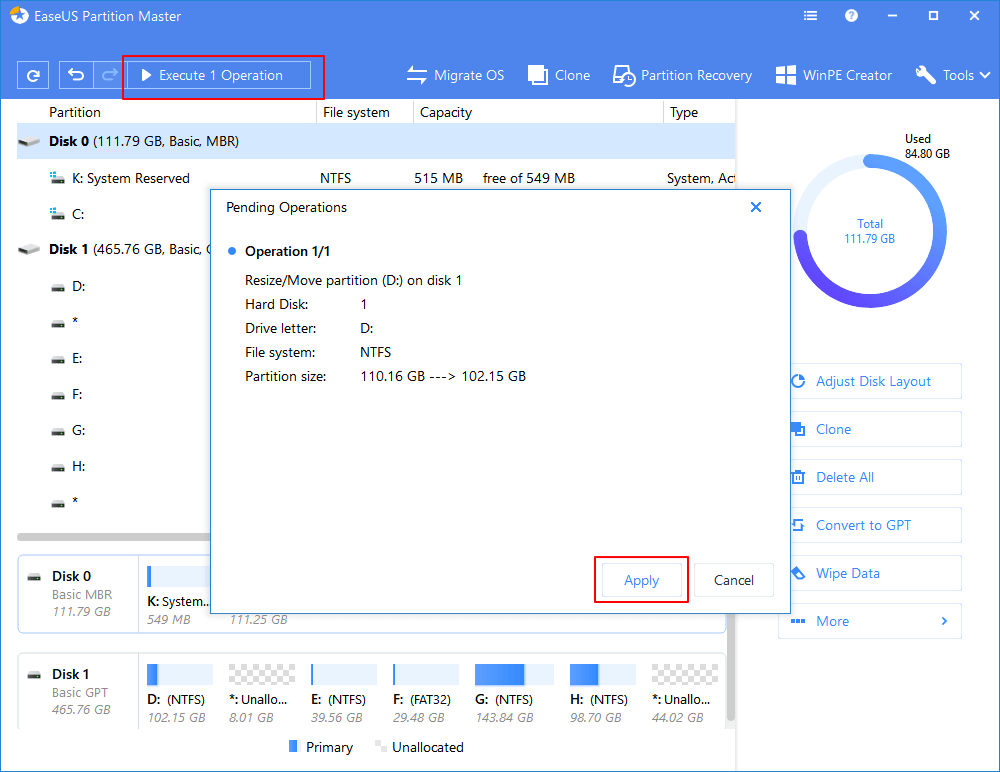
Step 3: Execute operation
Click the «Execute Operation» button and «Apply» to keep all changes.
EaseUS Partition Master is the professional partition management software to extend or shrink Windows 10 partition without data loss. It also has other disk management features like merging partitions, formatting partitions, converting MBR to GPT disk,В and more.

How to extend C drive or system partition in Windows 10? Powerful partition manager — EaseUS Partition Master can easily resize/move/merge/split partition in Windows 10.

Method 2. Shrink Partition with Windows 10 Built-In Disk Management
Windows 10 built-in Disk Management enables you to view and manage your disk drives. It can shrink volume and extend volume. However, itВ doesn’t support the shrink operation on your non-adjacent space.
Step 1. Right-click on «This PC», choose «Manage», and choose «Disk Management» in the pop-up window.
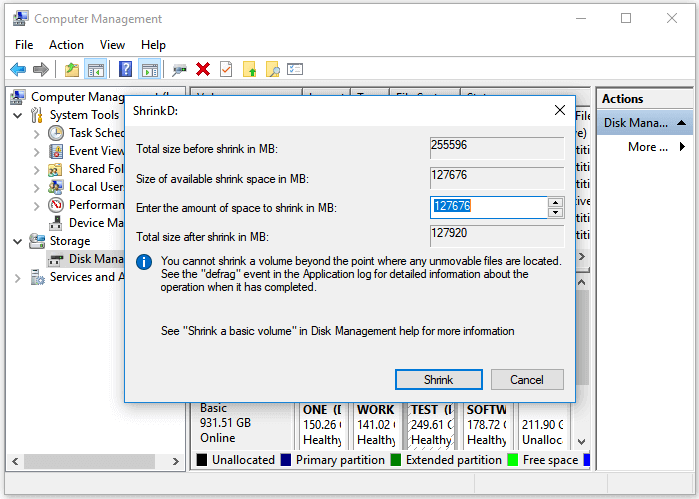
Step 2. Then you need to right-click on the partition which you want to shrink, and choose «Shrink Volume. «
Step 3. In the dialog box, set the amount of space to shink and click «Shrink».
Step 4. After shrinking the partition, you will create more free space on your disk. Then you can create a new volume or extend a partition as you like.
Method 3. Shrink Partition in Windows 10 Using DiskPart
Although using DiskPart to shrink Windows 10 volume is practical, it’s a relatively complicated method among the three. In case you need it, we also detail the steps here as an alternative way.
Step 1. Click the «Start» button and type cmd.
Step 2. Right-click «Command Prompt» and choose «Run as administrator». In the prompt, click «Yes» to continue.
Step 3. To shrink a Windows 10 partition, enter the following commands in order:
- diskpart
- list volume
- select volume 1 (the volume number of the partition you want to shrink)
- shrink desired=123464 (the amount of space in megabytes you want to shrink your partition to)
Pick the Best Solution
As you can see from the details above, using EaseUS partition toolВ and Disk Management is much easier than using DiskPart. However, there are limits on the partition you can resize while using Disk Management. Thus, EaseUS Partition Master can meet the needs of more users.
Besides, after the shrink operation, most of you will create a new partition or extend an existing partition. If you want to extend a partition with a non-adjacent space, using a third-party tool is your only choice because Disk Management doesn’t support such operations.


