About Side-by-Side Assemblies
A Windows side-by-side assembly is described by manifests. A side-by-side assembly contains a collection of resources—a group of DLLs, Windows classes, COM servers, type libraries, or interfaces—that are always provided to applications together. These are described in the assembly manifest.
Typically, a side-by-side assembly is a single DLL. For example, the Microsoft COMCTL32 assembly is a single DLL with a manifest whereas the Microsoft Visual C++ development system run-time libraries assembly contains multiple files. Manifests contain metadata that describes side-by-side assemblies and side-by-side assembly dependencies.
Side-by-side assemblies are used by the operating system as fundamental units of naming, binding, versioning, deployment, and configuration. Every side-by-side assembly has a unique identity. One of the attributes of the assembly identity is its version. For more information, see Assembly Versions.
Starting with WindowsВ XP, multiple versions of side-by-side assemblies can be used by applications running at the same time. Manifests, and the assembly version number, are used by the loader to determine the correct binding of assembly versions to applications. Side-by-side assemblies and manifests work with applications and the side-by-side manager as illustrated in the following figure.

In the preceding example, both Comctl32.DLL version 6.0 and Comctl32.DLL version 5.0 are in the side-by-side assembly cache and available to applications. When an application calls to load the DLL, the side-by-side manager determines whether the application has a version dependence described in a manifest. If there is no relevant manifest, the system loads the default version of the assembly. For WindowsВ XP, version 5.0 of Comctl32.DLL is the system default. If the side-by-side manager finds a dependence on version 6.0 stated in a manifest, that version is loaded to run with the application.
Several key system assemblies are being made available from Microsoft as side-by-side assemblies. For more information, see Supported Microsoft Side-by-side Assemblies. Application developers can also create their own side-by-side assemblies. For more information, see Guidelines for Creating Side-by-side Assemblies. In many cases it is possible to update existing applications to use side-by-side assemblies without having to change the application code.
Developers are encouraged to use side-by-side assemblies to create isolated applications, and to update existing applications into isolated applications for the following reasons:
- Side-by-side assemblies reduce the possibility of DLL version conflicts.
- Side-by-side assembly sharing enables multiple versions of COM or Windows assemblies to run at the same time.
- Applications and administrators can update assembly configuration on either a global or per-application configuration basis after deployment. For example, an application can be updated to use a side-by-side assembly that includes an update without having to reinstall the application.
Show windows side by side in windows 10
I’ve always right clicked on the taskbar and selected «Show windows side by side.» Now on my Windows 10 laptop, the two windows display very narrow and only on one half of the screen. Is there something I can do to make two documents display across the entire width of the screen?
***Post moved by the moderator to the appropriate forum category.***
Aero Snap is one of the interesting features of Windows 10 that automatically arrange windows by tiles or side by side. Here are the different methods on how you can customize your windows view on your desktop using Aero Snap:
Method 1: Side by side windows.
This method will make each window take half of the computer screen allowing you to arrange it side by side.
1. Press and hold Windows logo key.
2. Press the left or right arrow key.
Method 2: Vertical Snap
You can also use Aero Snap to maximize or minimize the open windows on your desktop.
1. Press and hold Windows logo key + Up arrow key to snap the window to the top halves of the screen.
2. Press and hold Windows logo key + Down arrow key to snap the window to the bottom halves of the screen.
3. Press Windows logo key + Up arrow key twice to maximize the window.
4. Press Windows logo key + Down arrow key twice to minimize the window.
Method 3: 2×2 Snap
2×2 Snap will let you put up to 4 windows on your desktop using a combination of the Windows logo key + left/right/up/down arrow key.
Don’t hesitate to reach out if you have other questions.
256 people found this reply helpful
Was this reply helpful?
Sorry this didn’t help.
Great! Thanks for your feedback.
How satisfied are you with this reply?
Thanks for your feedback, it helps us improve the site.
How satisfied are you with this reply?
Thanks for your feedback.
Based on this thread and another in a different forum, the problem with side by side and stacked windows not working is due to a bug whereby various apps come up and appear to be on the desktop. When you do a side by side, you might have only 2 windows you see — everything else is minimised — but after the operation you wind up with screen real estate as if you were sharing with 2 3 4 or more shadow apps that do not show up.
If you use task manager, you will see phantom apps — e.g. calculator, calendar, skype, all of these come from C:\Program Files\WindowsApps. You might also see SystemSettings. If you kill these, you will generally find that Side-By-Side and Stacked windows behave as expected. Rarely, you may also have to stop/start (re-cycle explorer).
A guaranteed fix is to logoff (not reboot — just logoff) and login. Things work ok until you use a few modern apps and then they start to leak and screw things up.
Randomish8 (from other forum) may have reduced the problem to ApplicationFrameHost.exe as opposed to the mix of Apps I have stumbled across. I have not run into it yet but his solution may be more comprehensive.
I use Cygwin and I have a script that looks for processes in C:\Program Files\WindowsApps or named Systemsettings and kills those. If that is not sufficient I have another script that also recycles Explorer. So far that has always fixed things. I will try to look for ApplicationFrameHost.exe instead to see if that works.
In any event, you are not going nuts. The windows arrangement features works expected and as they always did when you log in and eventually degenerate as apps start to leak. Microsoft is definitely on the hook to fix this but in the meantime, there are ways of coping.
spench.net
Site Contents
Navigation
Search
User login
Windows Side-by-Side Assemblies (WinSxS)
Before Windows Side-by-Side Assemblies, or WinSxS, (introduced with Windows XP in the Windows\WinSxS directory) the world was plunged into «DLL Hell». That is to say run-time DLLs would all need to be copied into a path (such as System or System32) that is in the global application loader module search path. Commonly people publishing software would also include copies of these DLLs in the local application directory just to be safe, in case the client did not have the necessary runtime already installed, or there was a version mismatch.
MFC 8 & 9, through VS 2005 & 2008 respectively, makes use of WinSxS (future releases will likely continue in this vein, e.g. VS 2010). It embeds a manifest into the compiled application which describes the runtime it requires to operate properly. For example, the following is taken from VS 2005 and describes a debug build making use of version 8 of the C run-time and MFC:
The application loader will read this manifest and attempt to locate the correct files based on the information inside (described shortly), instead of looking for the name of the DLL in the available search paths. If you’re missing the MFC 8 runtime then the loader will complain that the correct application environment has not been established and the program will not load (here are some tips for diagnosing the problem). The old quick fix of copying the runtime into the local application directory will not fix this because the loader looks for the runtime DLLs (described by the manifest) in the Windows\WinSxS directory only (unless a manifest file is explicity included whose name matches that of the required assembly). Therefore it is to the WinSxS directory that the runtime must be copied! Luckily no additional ‘registration’/registry editing is required! (Note: this is not true in certain circumstances! Read on. )
The following example deals with the MFC 8 and VC 2005 Debug runtime (look here for the Release build):
In addition to the DLLs, the relevant files and directories from the ‘Manifests’ and ‘Policies’ directories must also be copied to the computer requiring the runtime. The directory structure must be maintained! The operative strings are:
Once all the files have been copied, all MFC 8/VC 2005 applications will be loaded! (Whether the applications run perfectly depends on their own code. )
For an example of the directories and files that need to be copied, see this. It could be inflated upon the Windows directory while maintaining its structure.
For the offical Microsoft rundown entitled «Visual C++ Libraries as Shared Side-by-Side Assemblies», visit their MSDN page. This includes a comprehensive file list.
The New Old Quick Fix
The ‘copy the missing DLL to the application directory’ trick can still work. For example, imagine an application requires version 8 of the C run-time and it needs to be run regardless of whether the appropriate Side-by-Side assembly is installed. One can copy msvcr80.dll to the applications directory, but this is not enough as the loader must be instructed to use it. Therefore an additional manifest file Microsoft.VC80.CRT.manifest must also be placed next to the DLL. Its contents causes the local DLL to be used:
New developments with VS 2008
With the introduction of Side-by-Side linking for C++ applications written with Visual Studio, a new file crtassem.h (found in the VC include directory C:\Program Files\Microsoft Visual Studio 9.0\VC\include) has appeared that describes the manifest information the linker embeds in the compiled output.
For VS 2008 it contains:
As you can see, there are two C run-time assembly versions available. By default the older one (9.0.21022.8) is selected. It is possible to customise the version by defining your own values (e.g. setting _CRT_ASSEMBLY_VERSION). To use the latest version, it is easier to place the following at the very top of your stdafx.h file (before any header that includes any of the C run-time headers, which eventually include crtassem.h):
Or, in the C++ compiler settings, add _BIND_TO_CURRENT_VCLIBS_VERSION=1 to the preprocessor definitions.
However there is a curious twist. As it turns out, you can specify any assembly version you like but the application loader may not honour it. Just because you have certain versions of the C run-time assembly installed, you cannot simply select the one you want your application to use by setting the appropriate information in the embedded manifest. In the end it comes down to certain settings in the registry, namely the Side-by-Side Winners, which are found at:
As our example, let’s assume that we have defined _BIND_TO_CURRENT_VCLIBS_VERSION=1 and so the manifest is written with version 9.0.30729.1, which can be seen here:
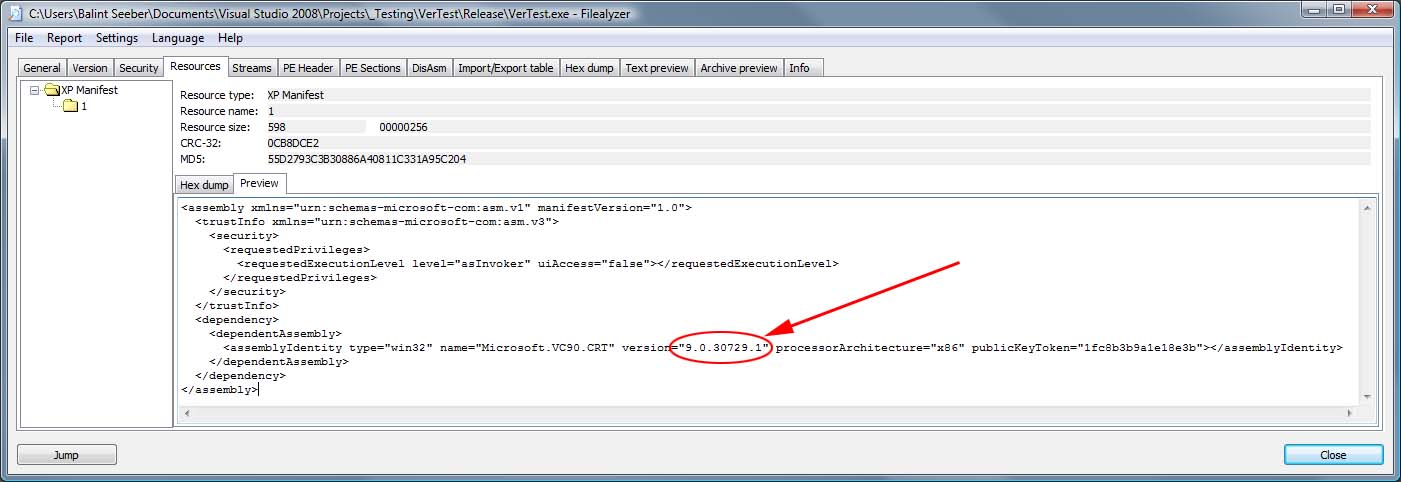
Opening the executable in Dependency Walker reveals something unusual though: the C run-time DLL being loaded is:

Its version is 9.0.30729.4148 (found directly after the public key value encoded in the above path). This is higher than was specified in the manifest! Both versions (and older ones) are installed on my system, so why is the loader choosing a different version? The answer lies in the Winners key for this particular assembly (notice the directory and key name have different values after ‘none’):
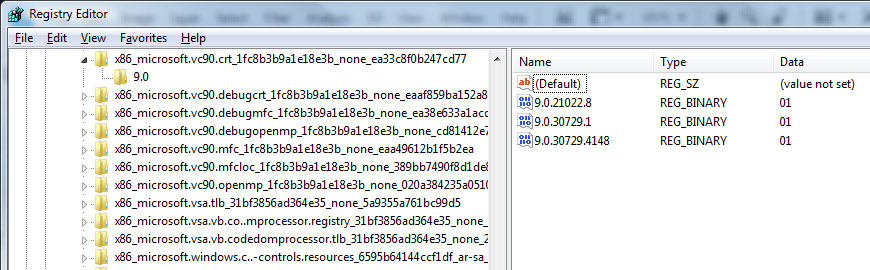
There are three REG_BINARY values present, each with a value of 01 (meaning enabled; 00 means disabled).
Therefore as the highest version (9.0.30729.4148) is registered as an enabled Winner, the loader automatically picks it, regardless of the version in the manifest. In a way it makes sense, as if you distribute an application linked to an older version of the assembly that you don’t have installed (let’s assume you have only the latest version of everything) it would be nice if it still worked off the bat, and didn’t require you downloading that specific version of the assembly. Therefore backward compatibility is maintained (and we all know that Microsoft prides itself on this).
Power windows
The power windows are operated using the control panels in each respective door. The driver’s door has controls for operating all windows and also to activate the child safety locks.

Driver’s door control panel.


The power windows are equipped with pinch protection. If any fault arises with the pinch protection, a reset sequence can be tested.
Warning
Children, other passengers or objects may be trapped by the moving parts.
- Always operate the windows with caution.
- Do not allow children to play with the controls.
- Never leave children alone in the car.
- Remember to always switch off the power supply to the power windows by setting the car’s electrical system in ignition position 0 , and then take the remote control key with you when leaving the car.
- Never put an object or part of the body through the windows, even if the car’s electrical system is fully disconnected.


