- View a page at a time, side by side
- Jump quickly to the page you want
- A better Side-by-Side document view for Windows and Mac
- Windows 10
- Split into four windows
- MacOS Split View
- Split Screen Into Three (View 3 Applications Side-by-Side) on Windows 10
- Replies (6)
- Windows 10 «side-by-side»
- Replies (7)
- How to split screen on Windows 10 and view apps side by side
- First thing first: About Snap and Snap Assist in Windows
- Enable Split screen (Snap) and related settings like Snap Assist in Windows 10
- How to view two applications side by side in Windows 10
- How to snap windows to the four corners of the screen using the keyboard in Windows 10
- How to snap windows to the four corners using the mouse in Windows 10
- How to split screen when using multiple monitors in Windows 10
- How many apps do you use with split screen in Windows 10?
View a page at a time, side by side
Sometimes you’d rather page through a document more like a book, instead of continuous scrolling. Use the Side to Side command ( View tab), to flip through pages with your finger. If you don’t have a touch screen, use the horizontal scroll bar or your mouse wheel to move through the pages.
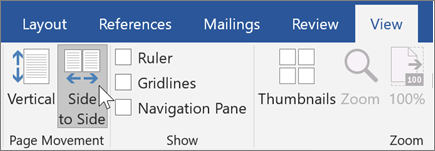
Side-to-side page movement switches off your ability to pick a zoom setting. To be able to zoom again, choose Vertical page movement.

Note: This feature is only available if you have a Microsoft 365 subscription. If you are a Microsoft 365 subscriber, make sure you have the latest version of Office.
Jump quickly to the page you want
While you’re paging through the document, thumbnails give you a quick peek of all the pages so you can jump to the one you want. Just choose Thumbnails as the Zoom setting.
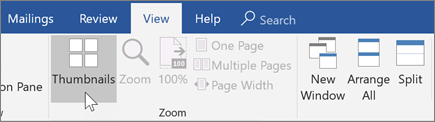
Tip: You don’t need to go to the ribbon to switch between viewing a page and viewing thumbnails. With a mouse, press Ctrl and use your mouse wheel. On a touch screen, pinch to zoom out to thumbnails.
A better Side-by-Side document view for Windows and Mac
We highlighted Word 365’s Side to Side view but there’s another side-by-side viewing trick that works for any two windows on either Windows or Mac.
Side by Side or Split View is great for many situations. No fussing about switching between windows or getting lost with all the open application. For example, Word on one side and Excel on another, or Word and a web browser, two Word documents or PowerPoint and a PDF.
Windows 10
Windows 10 can display programs either side-by-side, top and bottom or even four windows with one in each corner.
There are various ways to do it (see below) but the easiest & fastest is pressing the Windows key with one of the four arrow keys. Win + to the right.

Change the half n half proportions by dragging the vertical edge of one window, a bar with handle will appear. The other window will shrink.
There are other ways to get the ‘side-by-side’ look.
- Drag a window (from the title bar) to the left or right of the screen. A discreet box will appear on that side, release the mouse and the window will snap to that side.
- Thumbnails of the other windows will appear, click one to see that on the other side of the screen.
- Right click on the taskbar and choose ‘Show windows side-by-side’. If you have many programs open, the result can be an unholy mess. Happily, you can right-click the taskbar again to click an Undo option.
Split into four windows
Windows can also show four windows, one in each corner.

Drag a window to a corner (a discreet box appears in a quarter of the screen). Release the mouse and the window will snap to that corner/quarter of the screen.
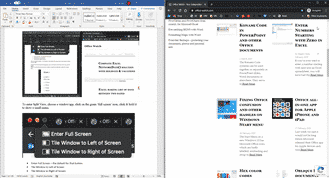
MacOS Split View
On the Mac it’s called Split View.

To enter Split View, choose a window/app, click on the green ‘full screen’ icon, click & hold it to show a small menu.

- Enter Full Screen – the default for that button.
- Tile Window to Left of Screen
- Tile Window to Right of Screen
That’s in macOS Catalina. In El Capitan, click and hold the green button, then drag the window to left or right.
In Split View the top menu bar disappears because it’s in Full Screen mode, move your mouse near the top of the screen and it’ll appear.
There’s a vertical line between the two windows, drag that bar left/right to adjust the window sizes. See image above.
Split Screen Into Three (View 3 Applications Side-by-Side) on Windows 10
Replies (6)
Hello. If you’re trying to do this > https://imgur.com/nDjA0LF
All you have to do is bring the Screen to the side as you would to split it in half left and right. Pull the window off the side and then you can edit it to be whatever you want by grabbing the corner and editing the size from there.
11 people found this reply helpful
Was this reply helpful?
Sorry this didn’t help.
Great! Thanks for your feedback.
How satisfied are you with this reply?
Thanks for your feedback, it helps us improve the site.
How satisfied are you with this reply?
Thanks for your feedback.
9 people found this reply helpful
Was this reply helpful?
Sorry this didn’t help.
Great! Thanks for your feedback.
How satisfied are you with this reply?
Thanks for your feedback, it helps us improve the site.
How satisfied are you with this reply?
Thanks for your feedback.
You have to manually do that, Windows Snap currently does not support that layout.
You can press Windows key + up, down, right or left arrows to manipulate how the windows appear on screen.
If you would like to see this improved, please send in your comments and suggestions using the Feedback Hub:
Note: This is a non-Microsoft website. The page appears to be providing accurate, safe information. Watch out for ads on the site that may advertise products frequently classified as a PUP (Potentially Unwanted Products). Thoroughly research any product advertised on the site before you decide to download and install it.
39 people found this reply helpful
Was this reply helpful?
Sorry this didn’t help.
Great! Thanks for your feedback.
How satisfied are you with this reply?
Thanks for your feedback, it helps us improve the site.
How satisfied are you with this reply?
Thanks for your feedback.
All you have to do is bring the Screen to the side as you would to split it in half left and right. Pull the window off the side and then you can edit it to be whatever you want by grabbing the corner and editing the size from there.
I’m trying to put the three screens side-by-side (left to right), not up and down. Thank you for your help, though. 🙂
14 people found this reply helpful
Was this reply helpful?
Sorry this didn’t help.
Great! Thanks for your feedback.
How satisfied are you with this reply?
Thanks for your feedback, it helps us improve the site.
How satisfied are you with this reply?
Thanks for your feedback.
In an ideal world, that would be great. However, I don’t have room for that. Thank you for your help, though. 🙂
8 people found this reply helpful
Was this reply helpful?
Sorry this didn’t help.
Great! Thanks for your feedback.
How satisfied are you with this reply?
Thanks for your feedback, it helps us improve the site.
How satisfied are you with this reply?
Thanks for your feedback.
You have to manually do that, Windows Snap currently does not support that layout.
You can press Windows key + up, down, right or left arrows to manipulate how the windows appear on screen.
If you would like to see this improved, please send in your comments and suggestions using the Feedback Hub:
Note: This is a non-Microsoft website. The page appears to be providing accurate, safe information. Watch out for ads on the site that may advertise products frequently classified as a PUP (Potentially Unwanted Products). Thoroughly research any product advertised on the site before you decide to download and install it.
Thank you for your help. 🙂
12 people found this reply helpful
Was this reply helpful?
Sorry this didn’t help.
Great! Thanks for your feedback.
How satisfied are you with this reply?
Thanks for your feedback, it helps us improve the site.
Windows 10 «side-by-side»
Original title: Windows 10 desktop
Windows 10 will not allow me to show Windows «side-by-side». I usually have two windows open. With Windows 10, they do not resize so that each takes about 1/2 of the screen, rather they take about 1/3 each. Today, both windows became very small as if I had about 8 open instead of only 2, and I had to manually resize them. Can anyone offer a suggestion; it’s annoying.
Replies (7)
![]()
Thanks for posting your query to Microsoft forum. I will certainly help you with this.
Method 1:
Step 1: Change the resolution
- Press Windows key on the keyboard
- Click on System
- Go to Display
- Click on Advance display settings
- Change the resolution (1280×1024 recommended)
Step 2: Enable Show windows side by side
Make sure that you have at least two windows open.
- Then right-click anywhere on the taskbar and select Show windows side by side.
- The windows are resized according the number of windows to be displayed. You should note that windows that are minimized are not shown through this side by side interface.
- When you are done you can close the side by side interface. You can do this by right-clicking on the taskbar and selecting Undo Show all windows side by side
Additional information : Applies to Windows 10 too.
The video cannot be played here. Click here to view this video.
Method 2: Update display adapter driver.
Step 1: Check for the latest display driver update through Windows Updates.
- At the Start screen, type Windows Update.
- Click or tap Settings on the right side of the screen, and then select Install optional updates from the left results.
- When the Windows Update control panel opens, click on “Check for Updates” on the top left corner to receive a fresh list of updates.
Step 2: Follow the steps below to update the Bluetooth drivers.
- Press Windows + X key on the keyboard.
- Go to device manager.
- Right-click your display/graphic devices.
- Click Update Driver Software and then follow the steps in the wizard that appears.
Restart the computer and check.
Let us know if you need further assistance. We will be glad to help you further.
How to split screen on Windows 10 and view apps side by side
The Windows 10 split screen feature is excellent for multitasking, especially if you’re using a large display. You can view apps in Windows 10 side by side, on top of each other, or both, since it’s possible to snap up to four app windows on the screen at the same time. And with Snap Assist, getting each window right where you want it is easier than ever. Here is how to split screen on Windows 10 and view apps side by side:
First thing first: About Snap and Snap Assist in Windows
Snap is the official name for the Windows split screen feature, and it has been around since Windows 7. In earlier Windows versions, Snap allowed users to arrange two windows side by side, each taking up half of the screen, which is especially helpful when comparing two documents or when moving files from one place to another.
In Windows 10, the split screen has been upgraded. You can now also snap three or four app windows on your screen (one for each corner), and you can accomplish this using either your mouse, keyboard, or finger (if you have a touch screen). This lets you compare or copy and paste data without the hassle of switching windows and losing track of what you were doing.
As the name implies, Snap Assist is a feature that assists users in snapping windows side by side. If enabled, once you snap a window into place, Snap Assist lets you choose between your other open windows for the one you want to fit on the remainder of the screen.
Some apps cannot be used in split screen mode at all. Others, like the Photos app, can only be minimized to a certain extent while still being useful. Therefore, depending on your display, they might not resize automatically as you’d expect when snapping them to take up a quarter of your screen.
Enable Split screen (Snap) and related settings like Snap Assist in Windows 10
The Windows 10 split screen and its related settings should be enabled by default, but you can always make sure they are turned on. Open the Settings app by simultaneously pressing Win + I on your keyboard, and access System.
On the left-hand side, scroll if you need to, and access the Multitasking tab. The split screen settings are displayed on the right-hand side. To use Snap and Snap Assist efficiently, all the options in the “Work with multiple windows” section should be enabled. Make sure the Snap windows switch is On, and the three boxes underneath are checked.
How to view two applications side by side in Windows 10
The fastest way to use split screen and snap app windows is with keyboard shortcuts. Go to one of the windows you want to snap and press the Win + Left arrow keys simultaneously, to snap it to the left side of the screen, or Win + Right arrow to move it to the right half. If you prefer using the mouse or your touch screen to snap, click or press on the title bar of a window to grab it and drag it to the left or right edge of the screen. A transparent overlay appears, showing a preview of the window’s placement. Release the mouse button or take the finger off the screen to snap the window into the indicated space.
Whether you’re using your mouse or your keyboard, Snap Assist shows up on the empty half of the screen as soon as the first window is into place. Click or tap on the window you want to take up the other half of your screen. You can also use the arrow keys to move between the shown window previews and press Enter to choose the one you want taking up the remainder of the screen.
To exit Snap Assist without snapping a second app window, press the Esc key (or click or tap anywhere else on the screen). The snapped app window stays in place, and the other windows return to their initial position. Use the mouse or the keyboard shortcut corresponding to the free half of your screen if you want to snap a second window manually later on.
NOTE: You can easily resize the two side-by-side windows by clicking (or tapping on a touch screen, but it takes a few tries) on the dark divider line between them and dragging it to either side of the screen. Since they are snapped together, the windows resize simultaneously.
Hovering your cursor over the edge between the app windows highlights the divider line and makes it easier to click.
TIP: If you are using Tablet mode, there is an additional way to split your screen between two windows. For more details, read Windows 10 Tablet mode: Learn all about it and how to use it!
How to snap windows to the four corners of the screen using the keyboard in Windows 10
If you have a large display and you need to access more than two windows, you can use Corner Snap to fit three or four windows on your screen at the same time. If you prefer keyboard shortcuts, it’s easiest to first split your screen into two halves, as seen in the previous section, before using Corner Snap. Select one of the two windows snapped into place and use the keyboard shortcut Win + Up arrow, to move it to the upper corner of its half of the screen, or Win + Down arrow to reposition it in the lower corner.
As soon as the window is moved, Snap Assist pops up, asking you to select one of the other open windows to fill the empty part of your screen. Use the arrows to navigate between the previews and press Enter to select a third window to display on your screen.
Your screen is now split between three windows.
To show four apps, you can select the window that takes up half of your screen and repeat the process. First, press Win + Up arrow or Win + Down arrow to snap the window to one of the remaining corners, and then use Snap Assist to select another window for the empty corner showing the previews.
You now have four app windows displayed on your screen at the same time.
If you want to start setting up your split screen corner windows from scratch, and you want to do it using keyboard shortcuts, the process is a bit more complicated. Select a window and use Win + Right/Left arrow to first move it to a side of the screen. Then, without releasing the Windows key, use Win + Up/Down arrow to move it to the desired corner. Releasing the Windows key before the app is in a corner makes Snap Assist pop up, and your screen just gets split in half. If this happens, press Esc to exit Snap Assist, and continue with the second keyboard shortcut.
Once one corner is full, open another app window and use the same shortcuts to snap it into another corner. If you snap the first two windows on top of each other, Snap Assist pops up to fill the other half. But you can place them in opposite corners to avoid it. Keep in mind that Snap Assist appears only when there is no doubt over which part of your screen needs filling up.
You can use the same method to snap a third window into place. Snap Assist can no longer be avoided in this case and eagerly shows up to help with the remaining corner. Choose a fourth window to snap, and you are done.
How to snap windows to the four corners using the mouse in Windows 10
When it comes to fitting app windows into a quarter of the screen, the mouse is the best way to do it. Press the app’s title bar to grab it and drag it to one of the four corners of your screen to make the transparent overlay appear. Release the mouse button when you are happy with the placement preview.
You can then open another window you want to use and do the same. The Snap Assist pops up to help you when either the left or right half are free or when or a quarter of the screen remains empty. If you have a touch screen, you can also use your finger to drag and drop apps to the corner of the screen with this method. However, it might take several tries, because the overlay doesn’t always show up when it comes to Corner Snap.
How to split screen when using multiple monitors in Windows 10
Snapping windows side by side works pretty much the same in Windows 10 when you have two monitors or more. To learn more, read: How to snap Windows apps side by side and split the screen on two monitors.
How many apps do you use with split screen in Windows 10?
We like the split screen feature in Windows 10, but we generally use it with two windows only. Adding more apps makes them too small on our monitors, and we end up wasting time trying to find the info we need. What about you? Is your monitor big enough to fit four app windows on it? Do you use the split screen feature for work or fun? Let us know in the comments section below.


