- Installing Vinyl Siding Around Windows
- Cutting and Installing the Molding
- Cutting and Installing the Siding
- Installing Vinyl Siding in These 23 Steps
- Step 1: Soffit and Fascia
- Step 2: Soffit and Fascia
- Step 3: Soffit and Fascia
- Step 4: Soffit and Fascia
- Step 5: Siding the Walls
- Vinyl Siding Installation
- Getting Started
- Materials
- Sheathing/Backerboard
- Sheathing Nailability
- Water-resistive Barrier
- Flashing
- How to Measure
- Estimating Required Materials
- Estimating Worksheet
- Fastener Choices
- Nails
- Figure 15.
- Fastening Procedure
- Figure 16.
- Figure 17.
- Figure 18.
- Figure 19.
- Screw Fasteners
- Staples
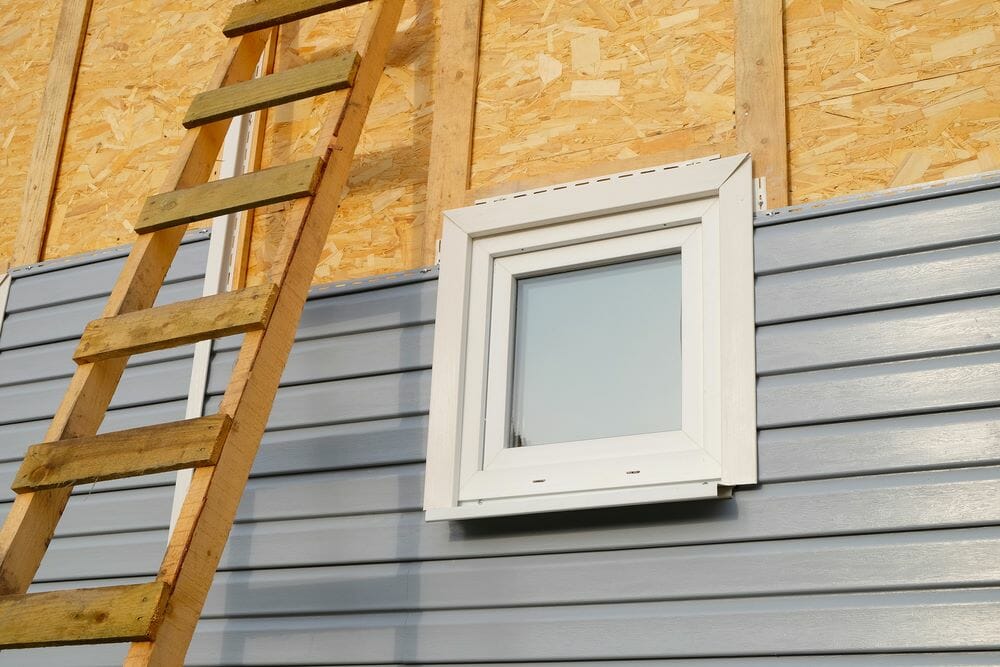
Installing Vinyl Siding Around Windows
In both the construction and real estate sectors, vinyl siding is the most preferred by both contractors and homeowners. It comes in different shapes and colors, making it customizable to the satisfaction of the homeowner. Apart from being attractive, vinyl siding is also durable, and its maintenance costs are also very pocket-friendly.
Vinyl siding is also easy to install, meaning that you can opt for DIY. However, this might not be easy when you are installing the vinyl around the windows. When working around the windows, there is always the desire to waterproof it. Sticking to the recommended procedures, you will be able to seal out water to get professional-standards results in the place that the window trim meets the siding. If you have some problems give Ideal Siding services a call.
Cutting and Installing the Molding
The first step involves inspecting the flashing and the building wrap around the window.
On the vertical sides of the window, the flashing should be able to overlap the bottom flashing by at least two inches. Just above the window, you should ensure that the building paper overlaps the flashing by two inches.
The second step involves the use of tin snips which will help you cut the length of the J molding. Ensure that the molding is two inches longer than the width of the window. Use a utility knife to cut 1-inch notch off the J molding on both ends across the top side. You should then cut in from the tin snips ends along the corner. Snap off the resulting piece.
In the third step, you will be installing the J molding. You should do this on the bottom edge of the window. Proceed to drive in roofing nails using a hammer. Ensure that you push them eight inches in the middle of the nailing slot. Loosely do the nailing such that the J molding can slide back and forth to provide room for expansion and contraction.
In the fourth step, you will have to cut two lengths of the J molding. Ensure that the lengths are two inches longer than the height of the window. Trim out an inch from either side. You can then nail the J molding loosely along the sides of the window. Ensure that the notched section is overlapping the piece that you initially placed at the bottom of the window.
In the fifth step, you will be creating the top piece. You can achieve this by cutting a length of the J molding two inches longer in comparison to the width of the window. Use the tin snips to cut an inch of either side. Ensure that you don’t snap the piece too much to leave a tab. In this step also, you will nail the J molding loosely on top of the window. Proceed to fold the flaps created. These folds should overlap the vertical pieces.
Cutting and Installing the Siding
Step 1: Place the piece of siding you intend to install underneath the window along the bottom edge. Hold it horizontally along the wall. At the Вј inch on both sides, mark the siding. This provides room for expansion.
Step 2: Measure the distance from the inside top of the J channel up to the locking tab of the course below and subtract the Вј inch. Put a marking on the siding to indicate where you intend to cut. Proceed to notch out the siding on the created marks. For vertical cuts, you should use tin snips while the straight edge should be cut using a utility knife.
Step 3: Lock locking the siding into place. You should ensure that it can fit in the J channel. In case you made a wider and horizontal cut on the siding’s profile, then the siding will fit firmly in the J channel. If it fails to fit aptly, remove the notched piece. Into the J channel, install the undersill trim. Fit the top edge of your notched siding into this undersill trim. The notched siding should be nailed into its place loosely.
Step 4: Proceed with the installation of the courses of the siding along window sides. You should ensure that you leave Вј inch spaces in the J channel at the end of every piece. This gives room for expansion. Place a mark then proceed to cut and notch the top piece. It will fit into the J channel. Here also, you should leave Вј inch space for expansion. Snap it into place then proceed tom loosely nail it.
Mark, cut and notch the top piece so that it fits into the J channel, again leaving 1/4-inch space for expansion. Snap it into place and nail it loosely.
These steps will help you install your vinyl along with the window expertly.
If you are living in Victoria, call us for getting high-quality service of siding in Victoria.
Copyright В© 2019-2020 Ideal Siding Franchising.
All Rights Reserved.
Installing Vinyl Siding in These 23 Steps

While vinyl can be a great alternative to regular house paint, and it does a good job of dressing up problem walls, there is a tradeoff. Although it looks like conventional siding from a distance, the illusion falters at corners, windows, doors and wall-mounted utility equipment.
Part of the design dilemma is that vinyl expands and contracts a good deal with changes in temperature. A standard 12-ft. length can be 1/2 to 5/8 in. shorter on a very cold day as compared to a very hot day. For this reason, vinyl must be cut short and nailed loose. In fact, you should be able to slide every full length side to side at least 1/2 in. after it’s installed. The trimpieces made to conceal the ends accommodate these variations quite well, but not without some compromise in appearance.
Materials and tools
While you can expect differences among manufacturers, siding systems generally include 12-ft. lengths of siding, window/door trim channel, J-channel, utility channel, corner moldings and metal starter strips. In addition, vented and unvented soffits, as well as fascia covers, are available.
The siding must be installed over a flat surface, so unless you’re siding a new home, or have removed the old lap siding, you’ll need to line the wall with sheets of rigid-foam board, usually 1/2 in. thick. While rigid foam offers some insulation, its primary function is to provide a flat nailing surface. Both the rigid foam and siding can be nailed in place with galvanized shingle nails.
Vinyl siding comes in several styles and in a variety of colors. We chose a Dutch lap style, which has the look of tongue-and-groove car siding, because of its distinctive profile.
All vinyl siding and vinyl soffit and fascia can be cut with tin snips, a circular saw with a plywood blade or by scoring it with a knife and breaking it.
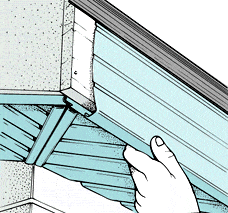
Step 1: Soffit and Fascia
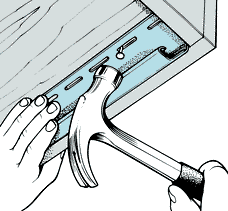
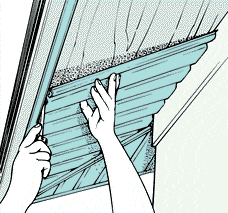
Starting with the soffit, nail lengths of J-channel against the inner edge of the fascia board. This channel conceals the cut edges of the soffit lengths as they meet the fascia. All siding and soffit pieces have nail slots. Nail at the slot centers to allow for expansion and hold the heads out 1/32 to 1/16 in. Don’t nail anything tight.
If your home has a box soffit or a hip roof, nail a second band of J-channel along the soffit edge as it meets the house. If your home does not have a boxed soffit return, but has soffit plywood nailed to the bottoms of the ceiling joists, you may be able to omit the inner channel. In this case, the ends of the soffit lengths can be concealed later by the utility trim of the siding. The angle of the soffit makes the difference here, but when in doubt, it’s best to channel both edges.
Step 2: Soffit and Fascia
If the soffit on your home wraps around a corner, as with a hip roof, you’ll need to make some provision for the soffit material’s change in direction at the corners. To accommodate this change, nail two J-channels diagonally between the corner of the house and the corner of the roof. Then, cut the first soffit sections to fit this angle and install subsequent sections in both directions. Where existing soffit vents are located, remove the vents and install vented soffit material.
Step 3: Soffit and Fascia
Because the soffit pieces come in 12-ft. lengths, you’ll need to custom-cut each piece to fit the span. With the diagonal corner pieces installed, cut the remaining lengths of soffit material 1/4 in. short of the maximum span, and press them into the channel. Either bend the soffit pieces to fit or carefully pry the channel back to gain the needed access.
Step 4: Soffit and Fascia
With the soffit installed, remove the gutter and slide preformed lengths of fascia cover under the gutter apron. Carefully nail the upper portion of the fascia with 4d galvanized or prepainted nails. But don’t overdo it. A nail every few feet will do. When joining fascia pieces in the corners, run slightly past the original eave fascia and butt the intersecting gable fascia against this overrun. Finally, replace the gutter.
While this fascia installation works for many homes, complicated or decorative trim is best left to a professional who can custom-make and fit aluminum components.
Step 5: Siding the Walls

Begin by loosening or taking off all easily removable obstacles, such as porch lights, address plates, handrails and self-storing clothesline reels.
Then, measure from the eave to the bottom of the existing siding. If this distance is divisible by 8 in.—the finished width of a piece of siding—you’re in luck. The utility trim you’ll install under the eave will accept the top edge of the last full-width row of siding. In the case of Dutch lap siding, which looks like two courses of siding in each single panel, you’ll have two opportunities—at 4- and 8-in. Intervals.
If raising or lowering the starter edge an inch or two will make the top pieces fall where you want them, by all means, do so. If you have to cut the top row of siding, then use J-channel at the top instead of utility trim. To keep this last cut row from collapsing against the house, nail a 3-in. strip of 1/2-in. plywood against the J-channel to hold it out.
When you’ve determined the best height for the metal starter strip, mark this position on the walls and snap a reference chalkline around the entire house. Then, nail a 3 1/2-in. strip of 1/2-in. plywood above this line to hold out the bottom of the first row of siding, and nail the starter strip to this plywood.
Vinyl Siding Installation
Getting Started
Materials
Sheathing/Backerboard
Vinyl siding should be applied over a sheathing that provides a smooth, flat surface. Consult local building codes for sheathing requirements. Vinyl siding must never be applied directly to studs without sheathing. As an alternative, installation of specific types of drop-in contoured foam underlayments for various styles of vinyl siding are available. Some manufacturers of vinyl siding do not recommend the use of drop-in backers with certain vinyl siding configurations.
Sheathing Nailability
Vinyl siding can be installed over common wood sheathings such as plywood, oriented strand board (OSB), or other materials (e.g., foam plastic insulating sheathing). The thickness of wood sheathing counts toward the total thickness that the fasteners must penetrate into nailable material, usually 1 1/4” (32mm). But foam plastic sheathing does not contribute toward holding the fastener, so its thickness cannot be counted toward the total. In this case, the fastener would have to be long enough to penetrate through the sheathing and 1 1/4” (32mm) into the wood framing.
Water-resistive Barrier
Vinyl siding should be installed over a continuous water-resistive barrier to stop the intrusion of incidental water. Refer to Important Notes for more information on water-resistive barriers. Check your local building code for requirements in your geographic area.
Flashing
Code-compliant flashing should be integrated with the water-resistive barrier and applied around windows, doors, and other openings. Flashing should also be applied to inside and outside corners, and the intersection of walls and roofing to prevent water infiltration.
How to Measure
Estimating Required Materials
- All houses can be broken down into shapes of rectangles or triangles, or a combination of both.
- The area to be sided can be determined by measuring the height and width of the house, including windows (Fig. 11).
- Total all of the measurements for the areas to be sided. Windows and doors are not usually deducted. Including them will provide an allowance factor for waste. If the windows and doors are extremely large (such as a garage or sliding glass doors), some deductions can be made (Fig. 12-14).
- To estimate the amount of starter strip required, measure the linear feet around the entire base of the house.
- Add siding to all material estimates to allow for waste, depending on the pitch of the roof and other house-specific factors.
- To estimate the total pounds of fasteners required, multiply the total square feet of siding by 0.005 for aluminum nails and 0.01 for roofing nails, staples, and screws.
- Every 100 square feet (9.29 square meters) is called a “square” for ordering purposes.
Height (feet/meters)
x width (feet/meters)
= (square feet/meters)
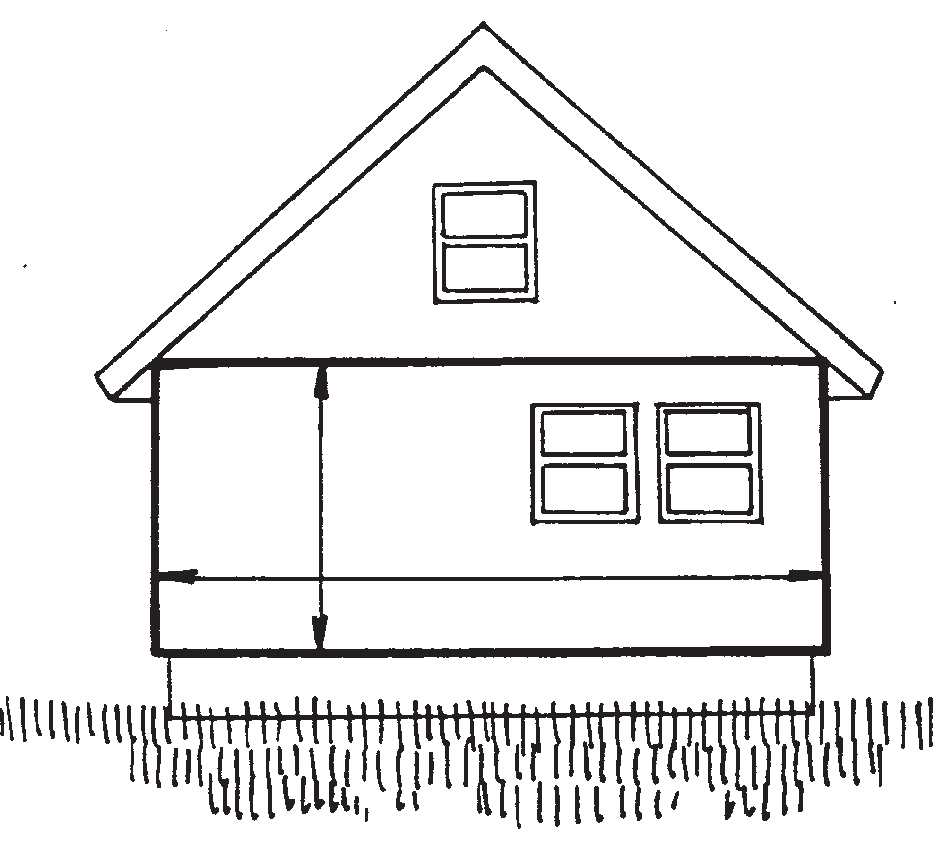
Figure 11. Wall Areas
½ Height (feet/meters)
x width (feet/meters)
= (square feet/meters)

Figure 12. Gable Areas
- Every 100 square feet (9.29 square meters) is called a square for ordering purposes.
½ (A + B) x C + ½ B x D
= total area of gable (square feet/meters)
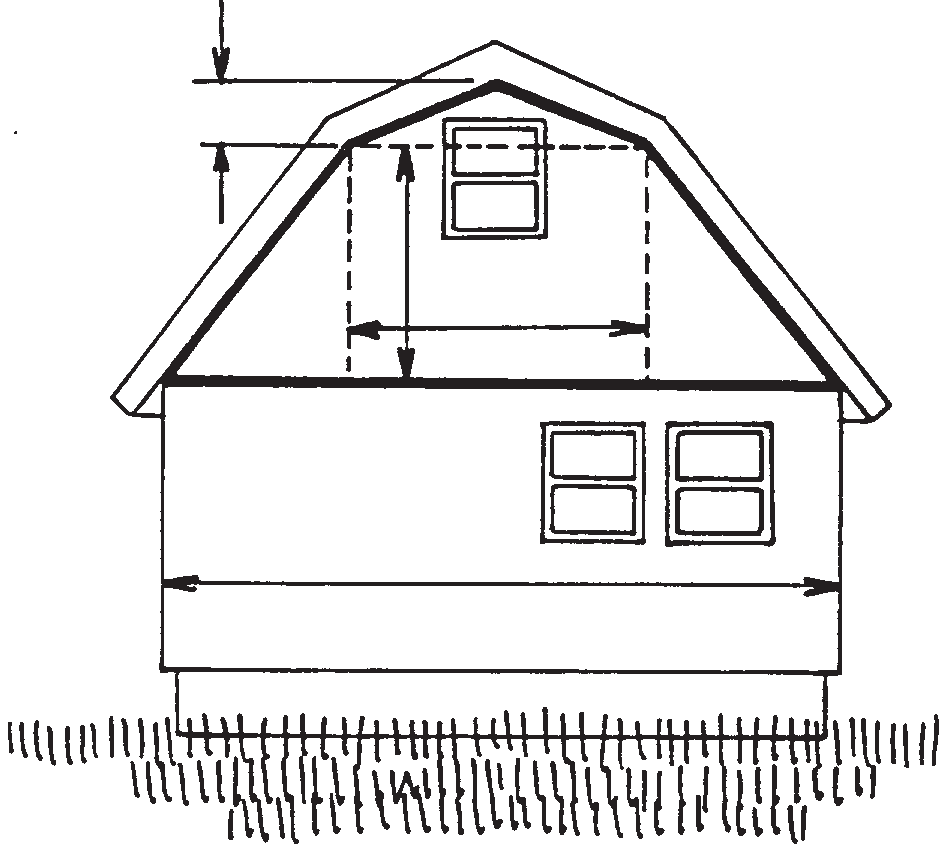
Figure 13. Gable Roof House
½ Height (feet/meters)
x width (feet/meters)
= (square feet/meters)
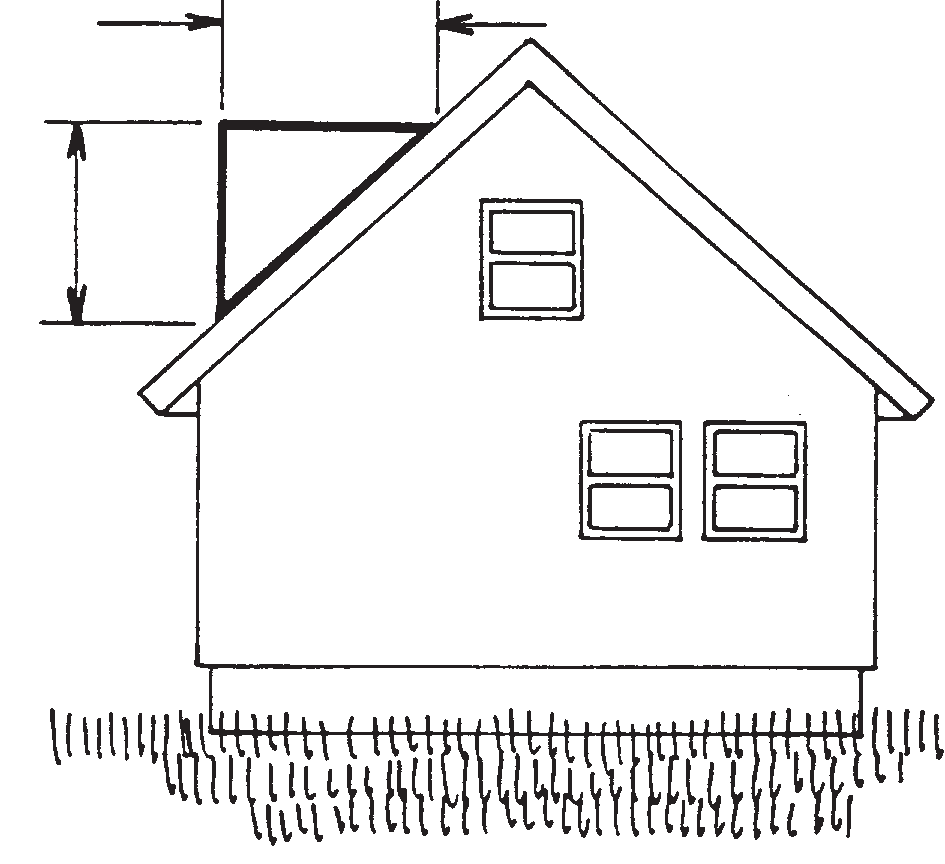
Figure 14. Dormer Areas
Estimating Worksheet
Download the estimating worksheet here.
Fastener Choices
Use aluminum, galvanized steel, or other corrosion-resistant nails, staples, or screws when installing vinyl siding. Aluminum trim pieces require aluminum or stainless steel fasteners. All fasteners must be able to penetrate a minimum of 1 1/4” (32mm) into nailable material, such as wood sheathing and framing (Fig. 15).
When the fastener must penetrate through a non-nailable material such as foam sheathing, the thickness of that material does not count toward the total. In such cases, the fastener will need to be long enough to penetrate through the non-nailable material and then 1 1/4” (32mm) into wood framing or other nailable material. (Review the siding manufacturer’s instructions and your local building codes for variations that may apply to specific siding or geographic areas.)
Nails
Nail heads should be 5/16” (7.9mm) minimum in diameter. Shank should be 1/8” (3.2mm) in diameter (Fig. 15).
Figure 15.
Fastening Procedure
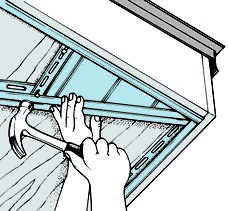
Vinyl siding can expand and contract 1/2” (12.7mm) or more over a 12’ 6” (3.81m) length during normal, year-round changes in temperature. Whether using a nail, screw, or staple to fasten the siding, the following basic rules must be followed:
- Make sure the panels are fully locked along the length of the bottom, but do not force them up tight when fastening.
- Do not drive the head of the fastener tightly against the siding nail hem. Allow approximately 1/32” (0.8mm) clearance (the thickness of a dime) between the fastener head and the vinyl. Tight nailing, screwing, or stapling will cause the vinyl siding to buckle with changes in temperature (Fig. 16).
- When fastening, start in the center of the panel and work toward the ends.
- Center the fasteners in the slots to permit expansion and contraction of the siding (Fig. 17).
- Drive fasteners straight and level to prevent distortion and buckling of the panel (Fig. 18).
- Space the fasteners a maximum of 16” (406mm) apart for horizontal siding panels, every 12” (305mm) for vertical siding panels, and every 8” to 12” (203mm to 305mm) for accessories. These distances may be increased if the manufacturer permits greater spacing based on wind load testing. Start fastening vertical siding and corner posts in the top of the uppermost slots to hold them in position (Fig. 19). Place all other fasteners in the center of the slots.
- If a nail slot does not allow centering/securing into a nailable surface, use a nail hole slot punch to extend the slot and allow centering of the fastener.
Figure 16.
Figure 17.
Figure 18.
Figure 19.
Screw Fasteners
Screw fasteners can be used if the screws do not restrict the normal expansion and contraction movement of the vinyl siding panel on the wall. Screws must be centered in the slot with approximately 1/32” (0.8mm) space between the screw head and the vinyl. Screws must be able to penetrate no less than 1 1/4” (32mm) into framing or furring and should be:
- Size #8, truss head or pan head
- Corrosion-resistant, self-tapping sheet metal type
Staples
If staples are being used instead of nails or screws, consult your local building codes. The manufacturer may permit the use of staples as an alternative to nails. Be sure to observe any limitations with respect to the wind load design pressure rating when the siding is installed with staples. The staples must (Fig. 20):
- Not be less than 16-gauge semi-flattened to an elliptical cross- section.
- Penetrate not less than 1 1/4” (32mm) into framing or furring, or as specified in the manufacturer’s instructions.
- Be wide enough in the crown to allow free movement of the siding (approximately 1/32” [0.8mm] away from the nailing hem).


