Cellular settings in Windows 10
Some Windows 10 devices have a SIM card or eSIM in them that lets you connect to a cellular data network, so you can get online in more places by using a cellular signal.
If your Windows 10 device doesn’t have a SIM card or eSIM, you can still connect to a cellular network by plugging in an external cellular device (also called a cellular modem or mobile broadband device). Either way, you must have a data plan from a mobile operator to connect.
Connect to a cellular data network for the first time
Select the Network icon ( or or ) on the lower right corner of the taskbar, and then select the cellular network icon that appears in the list. Often, you’ll see the name of your mobile operator next to the cellular network icon.
If the Let Windows keep me connected check box is cleared, select Connect. If the check box is selected, you’ll get connected to cellular data automatically when you’re not connected to another type of network, such as Wi-Fi or Ethernet.
If prompted, type your user name, password, and the access point name (APN).
If necessary, check the info that might have come with your Windows 10 device, SIM card, or cellular device for more info about what settings to use.
If the status text under the cellular network name says «Mobile operator locked,» insert a SIM card from your mobile operator to connect.
If you select the Network icon (  or
or  ) in the taskbar and the Cellular quick action is turned off, select it to turn it on. When it’s off, the cellular radio is turned off, and you can’t connect to a cellular network.
Use Cellular settings for connection issues
If your cellular data connection is working correctly, you shouldn’t need to change the cellular settings. However, if you’re having cellular connection problems, changing one or more settings may help.
The following is a list of the cellular settings that you can use to try and fix cellular connection problems. Settings vary by Windows 10 device model and mobile operator.
Let Windows manage this connection
Determines if your Windows 10 device will automatically connect to the cellular data network when it’s available. Clear the check box if you want to manually connect each time you want to use your cellular data connection. Select it if you want Windows to manage the connection for you. When selected, you’ll connect to cellular data automatically when you’re not connected to another kind of network.
To find this setting, select the Start button, then select Settings > Network & Internet > Cellular > Let Windows manage this connection. This setting is available when you’re disconnected from the cellular data network, and it’s applied when you select Connect.
Use this SIM for cellular data
Determines which SIM or eSIM profile is used for your cellular data connection. To help control costs, you can choose the cellular network connection to use for cellular data. For example, you might choose one SIM or eSIM profile over another because data costs less. This setting only appears on Windows 10 devices that have both a SIM and an eSIM. For more about using an eSIM, see Use an eSIM to get a cellular data connection on your Windows 10 PC.
To find this setting, select the Start button, then select Settings > Network & Internet > Cellular > Use this SIM for cellular data.
Data roaming options
Determines if your cellular data connection stays on when your Windows 10 device is outside your mobile operator’s network. Selecting Don’t roam can help prevent data roaming charges.
If you do allow roaming, you can use cellular data when your Windows 10 device is in a roaming area. Depending on your data plan, you might pay more for data you use when roaming.
To find this setting, select the Start button, then select Settings > Network & Internet > Cellular > Data roaming options.
Use cellular instead of Wi-Fi
Sometimes you might be connected to a slower Wi-Fi network, or you might be in an area where using cellular data would be faster than Wi-Fi. In cases like this, Windows can connect you to the best network based on your current location if you select When Wi-Fi is poor or Always. When cellular data is used, it will use data from your data plan and you may incur charges.
To find this setting, select the Start button, then select Settings > Network & Internet > Cellular .
Choose apps that can use your cellular data
To help control your data usage, you can choose which apps can or can’t use cellular data. For example, if you have an app that uses a lot of data, but you don’t use it often when you’re on the go, you might not want that app to use cellular data.
To find this setting, select the Start button, then select Settings > Network & Internet > Cellular > Choose apps that can use your cellular data. On the Cellular data screen, do one or more of the following:
If you don’t want any apps to be allowed to use cellular data, turn off Let apps use my cellular data. Apps won’t be allowed to use cellular data. They’ll only send and receive data when you’re connected to another kind of network.
If you don’t want a specific app to use cellular data, find the app under Choose apps that can use your cellular data, and then turn off cellular data for that app.
Appears when roaming and determines which cellular network connection is used. The default setting is Automatic.
If you try to connect to a cellular network and see a message that the selected network isn’t available, you can choose Search for networks, and then select another cellular network.
To find this setting, select the Start button, then select Settings > Network & Internet > Cellular > Advanced options.
Displays the name of the cellular network that you’re using.
To find this setting, select the Start button, then select Settings > Network & Internet > Cellular > Advanced options.
Set as a metered connection
A metered connection is an Internet connection that has a data limit associated with it. By default, cellular data connections are set as metered. Some apps might work differently on a metered connection to help reduce your data usage. Also, some updates for Windows won’t be installed automatically.
If you set a data limit in Data usage settings for your cellular data connection, Windows can help you stay under your data limit and set the metered connection setting for you. For more info about how to set a data limit, see Set your data limit.
If you can’t change the metered connection setting and want to, see Why can’t I change the metered connection setting?
To find this setting, select the Start button, then select Settings > Network & Internet > Cellular > Advanced options.
The Internet access point name (APN) is the address your Windows 10 device uses to connect to the Internet when using your cellular data connection. Usually, the Internet APN is set automatically.
If your cellular data connection isn’t working and you can’t connect to the Internet, type a new Internet APN based on your location and mobile operator. If you can connect to a Wi‑Fi network on your Windows 10 device or have a phone handy, try searching online to find the Internet APN settings for your mobile operator.
Select the Start button, then select Settings > Network & Internet > Cellular > Advanced options > Add an APN.
Next, do one or more of the following:
In the Profile name box, type a name for the APN profile.
In the APNbox, type the address for the APN to use.
In the User name box, type the user name for your mobile account.
In the Password box, type the password for your mobile account.
Select Type of sign-in info, and then select the authentication method that’s used.
Select IP type, and then select the type of IP address to use.
Select APN type, and then select Internet.
Select the Apply this profile check box if you want the APN profile to be used right after you save it.
Select Save > OK.
To go back and view the list of APN profiles you have, select Back, and look under Internet APN.
This displays information about your SIM and cellular data connection. For example, you can find your IMEI number here.
Select Copy to copy the information to paste into an email or elsewhere. This can be helpful if you’re having connection problems and need to send information to your mobile operator or support person.
To find this Properties setting, select the Start button, then select Settings > Network & Internet > Cellular > Advanced options.
Determines if you want to use a PIN for the SIM in your Windows 10 device to help prevent other people from using the cellular data connection when they’re not authorized. After you’ve set up your SIM PIN, you’ll be prompted to type the SIM PIN when you try to connect.
When prompted, type your SIM PIN. If this is the first time using it, type the default SIM PIN. If you don’t know the default SIM PIN, visit your mobile operator’s website to see if they list it there. You must restart your Windows 10 device for your cellular data connection to be locked with a SIM PIN.
If you’ve already set up a PIN for the SIM, type your SIM PIN when prompted, and then select OK.
To find this SIM PIN setting, select the Start button, then select Settings > Network & Internet > Cellular > Advanced options > Use SIM PIN under the Security section.
This appears when you’re using a SIM PIN. If you’re using a SIM PIN and decide you don’t want to use a PIN anymore, select Remove SIM PIN, type your current SIM PIN, and then select OK.
To find this SIM PIN setting, select the Start button, then select Settings > Network & Internet > Cellular > Advanced options > Remove SIM PIN under the Security section.
This appears if you’re using a SIM PIN. To change your SIM PIN if you’re using one, select Change SIM PIN, type your current SIM PIN in the Current SIM PIN box, type a new SIM PIN in the New SIM PIN box, type the same new SIM PIN in the Confirm new SIM PIN box, and then select OK.
To find this setting, select the Start button, then select Settings > Network & Internet > Cellular > Advanced options > Change SIM PIN under the Security section.
Unblock SIM PIN
This appears if you’re using a SIM PIN and the incorrect PIN was entered three times. When this happens, the SIM will be blocked and can’t be used until you unblock it. To unblock it, you’ll need to contact your mobile operator for the PIN Unblocking Key (PUK) code.
Next, select Unblock SIM PIN, and then type the PUK code. If an incorrect PUK code is entered too many times, your SIM card will be permanently blocked, and you’ll need to get a new SIM card from your mobile operator.
To find this setting if your SIM is blocked, select the Start button, then select Settings > Network & Internet > Cellular > Advanced options > Unblock SIM PIN under the Security section.
Как проверить, поддерживает ли ваш ноутбук eSIM: инструкция для Windows 10
ESIM позволяет подключаться к Интернету через сотовую сеть передачи данных. С eSIM вам не нужно получать SIM-карту от вашего оператора мобильной связи, и вы можете быстро переключаться между операторами мобильной связи и тарифными планами.
Например, у вас может быть один тарифный план сотовой связи для работы, а другой план — у другого оператора мобильной связи для личного пользования. Если вы путешествуете, вы можете подключиться в других местах, найдя операторов мобильной связи с планами в этой области.
Вот что вам нужно:
- ПК под управлением Windows 10 версии 1703 или более поздней. Чтобы узнать, какая версия Windows 10 используется на вашем устройстве, выберите « Пуск». кнопку, затем выберите Настройки >Система >Информация
- ПК с eSIM в нем. Вот как вы можете определить, есть ли на вашем компьютере eSIM:
- S избирают Start кнопку, затем выберите Настройки >Сеть и Интернет >Сотовая связь,
- На экране «Сотовая связь» найдите ссылку внизу страницы с надписью « Управление профилями eSIM». Если эта ссылка появляется, ваш компьютер имеет eSIM.
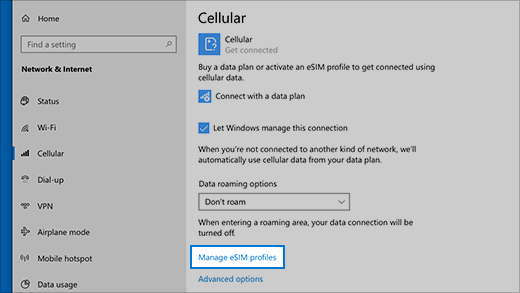
Некоторые устройства имеют как eSIM, так и физическую SIM-карту. Если вы не видите « Управление профилями eSIM», но видите « Использовать эту SIM-карту для данных сотовой связи» в верхней части экрана «Настройки сотовой связи», выберите другую SIM-карту в раскрывающемся списке и посмотрите, появляется ли ссылка «Управление профилями eSIM».
Вам нужно будет добавить профиль eSIM, чтобы получить подключение к Интернету с использованием данных сотовой связи.
Если у вас есть компьютер из вашей организации, профиль eSIM может быть уже добавлен на ваш компьютер. Если вы выберете « Управление профилями eSIM» и увидите профиль eSIM для оператора мобильной связи, которого вы ожидаете найти, вы можете пропустить эту процедуру и перейти к следующему, чтобы подключиться.
- Выберите Пуск кнопку, затем выберите Настройки >Сеть и Интернет >Сотовая связь>Управление профилями eSIM .
- Под профилями eSIM выберите Добавить новый профиль .
- Для поиска доступных профилей или использования кода активации, полученного от оператора мобильной связи, выполните одно из следующих действий:
- Поиск доступных профилей
- Выберите Поиск доступных профилей >Далее .
- Когда нужный профиль будет найден, выберите « Загрузить» .
- Введите код подтверждения от вашего мобильного оператора в соответствующем поле, затем выберите Загрузить .
- После загрузки и установки профиля выберите « Продолжить», чтобы найти другие профили, которые вам могут потребоваться, а затем повторите предыдущие шаги.
- Выберите Закрыть, когда вы загрузили нужные профили.
- Используйте код активации, который вы получили от своего мобильного оператора
- Выберите Позволить мне ввести код активации от моего оператора мобильной связи >Далее .
- Если у вас есть QR-код для сканирования кода активации, выберите, какую камеру использовать на вашем ПК, а затем отсканируйте QR-код.
- Код активации должен появиться в соответствующем поле Код активации . Выберите Далее .
- Для диалогового окна, которое спрашивает , хотите ли вы загрузить этот профиль? введите код подтверждения от своего оператора мобильной связи в соответствующее поле и выберите « Загрузить» .
- Выберите Закрыть .
- Поиск доступных профилей
- Необязательно: Чтобы дать профилю понятное имя (например, «Рабочий» или «Личный»), чтобы помочь вам запомнить его, выберите профиль, выберите « Изменить имя» , введите имя, которое вы запомните, а затем нажмите « Сохранить» .
Для подключения к сотовым данным с помощью профиля eSIM
- Выберите Пуск кнопку, затем выберите Настройки >Сеть и Интернет >Сотовая связь>Управление профилями eSIM .
- Под профилями eSIM выберите нужный профиль, а затем выберите « Использовать» .
- Выберите Да, чтобы использовать сотовые данные из вашего тарифного плана и может потребовать оплату. Вы хотите продолжить?
Вы будете подключены к сотовой сети передачи данных и готовы к работе.
Если на вашем компьютере установлено более одного профиля, вы можете переключаться между профилями, чтобы использовать другого оператора мобильной связи и тарифный план.
- Выберите Пуск кнопку, затем выберите Настройки >Сеть и Интернет >Сотовая связь>Управление профилями eSIM .
- Под профилями eSIM выберите профиль, который вы хотите прекратить использовать, а затем выберите Прекратить использование .
- Выберите Да, чтобы отключиться от этой сотовой сети. Продолжить?
- Выберите другой профиль, который вы хотите использовать, затем выберите Использовать .
Удалить профиль
Если вы больше не хотите использовать профиль, вы можете удалить его со своего ПК. Если вы удалите профиль и захотите добавить его позже, вам потребуется снова загрузить профиль и, возможно, обратиться к своему оператору мобильной связи.
- Выберите Пуск кнопку, затем выберите Настройки >Сеть и Интернет >Сотовая связь>Управление профилями eSIM .
- Под профилями eSIM выберите профиль для удаления, а затем выберите Удалить .
- В ответ на предупреждение о том, что профиль будет удален навсегда, выберите Да .
Если у вас есть компьютер из вашей организации, вы не сможете удалить профиль eSIM из-за политики, установленной вашей организацией.


