- Simple screen recorder linux ���������
- About
- Maarten Baert’s website
- Main page
- What is SimpleScreenRecorder?
- Features
- Download
- License
- Feedback, bugs, feature requests .
- How to Record Programs and Games Using ‘Simple Screen Recorder’ in Linux
- Introducing and Installing Simple Screen Recorder
- On Debian/Ubuntu and Mint
- On Fedora/CentOS and RHEL
- How to Use Simple Screen Recorder
- Summary
- If You Appreciate What We Do Here On TecMint, You Should Consider:
- Related Posts
- 12 thoughts on “How to Record Programs and Games Using ‘Simple Screen Recorder’ in Linux”
- Got something to say? Join the discussion. Cancel reply
Simple screen recorder linux ���������
SimpleScreenRecorder is a screen recorder for Linux. Despite the name, this program is actually quite complex. It’s ‘simple’ in the sense that it’s easier to use than ffmpeg/avconv or VLC :).
There is a separate repository for SimpleScreenRecorder packages: https://github.com/MaartenBaert/ssr-packages

GNU GPL v3 — read ‘COPYING’ for more info.
Important: If you have already installed SSR using the package manager of your distribution, you should uninstall it first before continuing!
First install the required dependencies (see below). After you have done that, you can compile and install SSR by running:
In order to use OpenGL recording for 32-bit applications on a 64-bit system, you need to compile a 32-bit version of libssr-glinject.so . The script will do this automatically if your system is 64-bit. Unfortunately some distributions (older versions of Debian, Ubuntu, Linux Mint, . ) don’t properly support compiling 32-bit libraries on a 64-bit system, which results in errors related to missing libraries (usually libGL, libGLU) even when those libraries have in fact been installed. The problem is caused by the fact that the required symlinks are included in the -dev packages, but the 32-bit -dev packages can’t be installed. The simplest solution is to skip compilation of the 32-bit GLInject library, which can be done by running:
You can then use SSR without the 32-bit library, or you can use the precompiled 32-bit library provided by your distribution.
If you actually want to compile the 32-bit library, you have to manually create the missing symlinks in the 32-bit library directory:
The OpenGL library libGL.so is a special case, because on some distributions (Ubuntu, Linux Mint, . ) it is installed in a different location depending on which driver you are using. If your distribution has installed the file libGL.so.1 in the regular 32-bit library directory /usr/lib/i386-linux-gnu (e.g. Debian), then run this:
Otherwise you need to figure out where the library is installed first, and then manually create symlinks from the regular 32-bit library folder to this file. Note that doing this may interfere with OpenGL functionality if you ever switch to a different driver, or even just update the driver (in the case of NVIDIA). In that case you will need to manually remove the symlinks and (optionally) recreate them.
If you are using a combination of open-source and proprietary drivers (e.g. for laptops with Intel + NVIDIA GPUs a.k.a. ‘Optimus’), follow only the steps for the open-source drivers.
If you are using one of the open-source drivers (i915, radeon, nouveau), then run this:
If you are using the proprietary AMD driver, first figure out where the fglrx directory is located, this can be /usr/lib32 or /usr/lib/i386-linux-gnu . Then go to the relevant folder and create the symlinks:
If you are using the proprietary NVIDIA driver, first figure out where the fglrx directory is located, this can be /usr/lib32 or /usr/lib/i386-linux-gnu . Then go to the relevant folder and create the symlinks:
Note that the full name of the ‘nvidia’ subdirectory includes the driver version number, so you will need to fix these symlinks whenever the driver has been updated.
If you want to compile step-by-step (without simple-build-and-install ), you can use the following steps:
Note that you may need to specify additional options depending on which Linux distribution and CPU architecture you have. The simple-build-and-install script detects the correct options automatically, you can run it to see which options you need.
You don’t need to install the program to use it, but installing will give you a desktop entry and an icon. Also, if you don’t install the program, you will need to specify where the GLInject libraries are located with LD_LIBRARY_PATH when using OpenGL recording.
Most of these issues are avoided when using simple-build-and-install , but you may run into them if you run cmake directly.
FFmpeg vs Libav confusion
Libav is a fork of FFmpeg that was created in 2011 as a result of a conflict between the developers. Some Linux distributions (including Debian and Ubuntu) switched to Libav because the package maintainers were among the Libav developers, while others stuck to FFmpeg. In order to deal with this situation, SSR supports both FFmpeg and Libav. In 2015 Debian and Ubuntu decided to switch back to FFmpeg for technical reasons, which means that these days very few SSR users are still using Libav. Although Libav is theoretically still supported by SSR, I am no longer doing any testing with it. As of 2020 Libav is effectively no longer being developed, so Libav support may be dropped entirely at some point in the future.
Since the FFmpeg and Libav APIs have changed significantly over time, SSR checks which version of the libraries is being used to determine which features are safe to use. Although the FFmpeg and Libav API are almost identical, there are some minor differences, mostly related to the version numbering scheme. Unfortunately SSR can not determine automatically whether you are using FFmpeg or Libav, so you have to specify this manually when running cmake , using the ENABLE_FFMPEG_VERSIONS option, which defaults to TRUE (i.e. FFmpeg). If you are using Libav, you should add the option ENABLE_FFMPEG_VERSIONS=FALSE . If you forget this, you will likely get various error messages during compilation related to missing functions, structures or fields.
You can check whether you are using FFmpeg or Libav by running the following command:
This command should print either This file is part of FFmpeg or This file is part of Libav .
When compiling with Qt 4 on some newer distributions, you may get the following error message from AutoMoc:
This is caused by a Qt bug which has been fixed in Qt 5, but has not been backported. The file path reported in the error message is wrong, the actual problem is triggered by line 52 in /usr/include/sys/sysmacros.h . To work around the bug, add the following option when running cmake :
Alternatively, if your distribution provides Qt 5 packages, you can also use these instead. For Debian and Ubuntu, you would do this by installing qt5-qmake , qtbase5-dev and libqt5x11extras5-dev . The simple-build-and-install script will detect and use these automatically. If you run cmake yourself, you should add the option -DWITH_QT5=TRUE to use Qt 5 instead of Qt 4.
You will need the following packages to compile SimpleScreenRecorder:
- GCC (>= 4.6)
- cmake
- pkg-config
- Qt4 (4.8 or newer) or Qt5 (5.7 or newer)
- ffmpeg or libav (libavformat, libavcodec, libavutil, libswscale)
- ALSA library
- PulseAudio library (optional, disable with -DWITH_PULSEAUDIO=FALSE)
- JACK library (optional, disable with -DWITH_JACK=FALSE)
- libGL (32 and 64 bit)
- libGLU (32 and 64 bit)
- libX11 (32 and 64 bit)
- libXfixes (32 and 64 bit)
- libXext
- libXi
- libxinerama
- video4linux2 (V4L2) library
If you have a 64-bit system and you want to compile the 32-bit GLInject library, you have to install some 32-bit libraries as well. Otherwise the regular packages are sufficient.
For newer versions (with Qt5):
For older versions (with Qt4):
Extra dependencies for 32-bit GLInject on 64-bit systems:
This list is incomplete but usually sufficient:
Some packages (e.g. ffmpeg) are not in the official repository, but can be installed from the Packman repository. You can add the Packman repository with this command:
Extra dependencies for 32-bit GLInject on 64-bit systems:
Some packages (e.g. ffmpeg) are not in the official repository, but can be installed from the RPM Fusion repository. You can add the RPM Fusion repository with this command:
Extra dependencies for 32-bit GLInject on 64-bit systems:
Other files you may want to read
notes.txt contains notes about the design of the program. It’s a good idea read this first if you want to make changes to the code.
todo.txt contains a list of things that I still need to do. This file changes a lot of course.
About
SimpleScreenRecorder, a screen recorder for Linux
Источник
Maarten Baert’s website
Game Maker / C++ projects
Navigation
Log in


Last modified: Mon, 9 Nov 2020
Refresh
Main page
What is SimpleScreenRecorder?
SimpleScreenRecorder is a Linux program that I’ve created to record programs and games. There were already a few programs that could do this, but I wasn’t 100% happy with any of them, so I created my own.
My original goal was to create a program that was just really simple to use, but as I was writing it I started adding more and more features, and the result is actually a pretty powerful program. It’s ‘simple’ in the sense that it’s easier to use than ffmpeg/avconv or VLC, because it has a straightforward user interface.
The input selection page:
Features
Graphical user interface (Qt-based).
Faster than VLC and ffmpeg/avconv.
Records the entire screen or part of it, or records OpenGL applications directly (similar to Fraps on Windows).
Synchronizes audio and video properly (a common issue with VLC and ffmpeg/avconv).
Reduces the video frame rate if your computer is too slow (rather than using up all your RAM like VLC does).
Fully multithreaded: small delays in any of the components will never block the other components, resulting is smoother video and better performance on computers with multiple processors.
Pause and resume recording at any time (either by clicking a button or by pressing a hotkey).
Shows statistics during recording (file size, bit rate, total recording time, actual frame rate, . ).
Can show a preview during recording, so you don’t waste time recording something only to figure out afterwards that some setting was wrong.
Uses libav/ffmpeg libraries for encoding, so it supports many different codecs and file formats (adding more is trivial).
Can also do live streaming (experimental).
Sensible default settings: no need to change anything if you don’t want to.
Tooltips for almost everything: no need to read the documentation to find out what something does.
Download
SimpleScreenRecorder should work on any Linux distribution, and in most cases can be installed from the official repositories. The list below is incomplete.
Simply install ‘simplescreenrecorder’:
Add this if you want to record 32-bit OpenGL applications on a 64-bit system:
If you are using Debian 9 or newer, you can install the ‘simplescreenrecorder’ package from the official repositories. You can install it with:
Add this if you want to record 32-bit OpenGL applications on a 64-bit system:
You should copy-paste these commands to a terminal line by line rather than all at once, otherwise it won’t work.
SimpleScreenRecorder is available in the RPM Fusion reposity. RPM Fusion can be activated with this command:
After that, SimpleScreenRecorder can be installed with this command:
SimpleScreenRecorder is now included in the main repository. You can install it with:
SimpleScreenRecorder is avaliable in the official repository, the name of the package is ‘simplescreenrecorder’.
Install simplescreenrecorder from the Core Release repository using urpmi or the Mageia Control Center.
You can install SimpleScreenRecorder with the following command:
The same command should also work on any other distribution provided that the Nix package manager is installed.
Install ‘simplescreenrecorder’ from the Packman repository. If you want to record 32-bit OpenGL applications on a 64-bit system, you should also install ‘libssr-glinject-32bit’. This package was created by Dmitriy (DAP-DarkneSS).
Install ‘ssr’ from the official repository:
Red Hat Enterprise Linux,
CentOS,
Scientific Linux
Packages for SimpleScreenRecorder are available in the Nux repositories.
A SlackBuild is available here.
If you are using Ubuntu 17.04 or newer, SimpleScreenRecorder can be found in the official repositories. You can install it with:
Add this if you want to record 32-bit OpenGL applications on a 64-bit system:
You should copy-paste these commands to a terminal line by line rather than all at once, otherwise it won’t work.
If you are using an older version of Ubuntu, or you want to get the latest version of SimpleScreenRecorder immediately without waiting for the next Ubuntu release, you can also get the package(s) from the SimpleScreenRecorder PPA:
Add this if you want to record 32-bit OpenGL applications on a 64-bit system:
For distributions that don’t have official packages, you have to compile it yourself for now. It’s not that hard, and there are instructions in the readme file. You can find the source code on GitHub:
https://github.com/MaartenBaert/ssr
If you’re not familiar with git and you just want a .tar.gz file, download this:
https://github.com/MaartenBaert/ssr/archive/master.tar.gz
If you are using a different distribution and you have created a package for SimpleScreenRecorder, please contact me so I can add it to the list :).
License

SimpleScreenRecorder is distributed under the terms of the GNU General Public License.
Feedback, bugs, feature requests .
You can report bugs and submit feature requests on GitHub:
https://github.com/MaartenBaert/ssr/issues
If you don’t want to create a GitHub account, you can also send an email to:

If you don’t get a reply within a week, your message was probably eaten by the spam filter. If that happens, try sending the message again from a different address.
Источник
How to Record Programs and Games Using ‘Simple Screen Recorder’ in Linux
One of the best ways to learn a particular subject is by explaining it to others. Needless to say, each time I write an article I am first also teaching the topic to myself and making sure I am conveying it in a way that will be easy to understand and follow. Doing screencasts is a magnificient way to accomplish this goal.
![]() Simple Screen Recording in Linux
Simple Screen Recording in Linux
At the same time, recording in video the steps you took to get something done will be a nice remainder should you need to perform the same operation in the future. In addition, you can also upload that file to video-sharing sites like YouTube to share with the community and the world.
Introducing and Installing Simple Screen Recorder
Simple Screen Recorder is a fantastic piece of software that was initially developed by its author to record output of programs and games. In time it became everything but ‘simple’, keeping its name not because of a lack in functionality but due to its easy-to-use interface.
Follow these steps to install Simple Screen Recorder:
On Debian/Ubuntu and Mint
The installation in Debian / Ubuntu / Linux Mint is pretty straightforward:
Add the repository to your sources.list:
Resynchronize the package index files from their sources and install:
Within a matter of minutes, the program will be ready to launch:
![]() Simple Screen Recorder Launcher
Simple Screen Recorder Launcher
On Fedora/CentOS and RHEL
In Fedora and derivatives (CentOS 7/RHEL 7, for example), several dependencies have to be installed first:
1. Add the ATRPMS repository (a generic 3rd party repository used for system and multimedia tools):
In /etc/yum.repos.d/atrpm.repo:
2. And the EPEL repository as well:
3. Then install the rest of the dependencies:
4. Clone the developer’s GitHub repository for Simple Screen Recorder:
5. And finally, execute the installation script. Make sure you do this as a regular user (other than root), otherwise you will encounter permissions issues later down the road:
If the installation does not create a launch icon in the Applications menu, you can start Simple Screen Recorder from the terminal.
Or create a symbolic link as a shortcut in your Desktop:
How to Use Simple Screen Recorder
Once you have launched SSR, in the initial screen click Continue:
![]() Simple Screen Recorder Setup
Simple Screen Recorder Setup
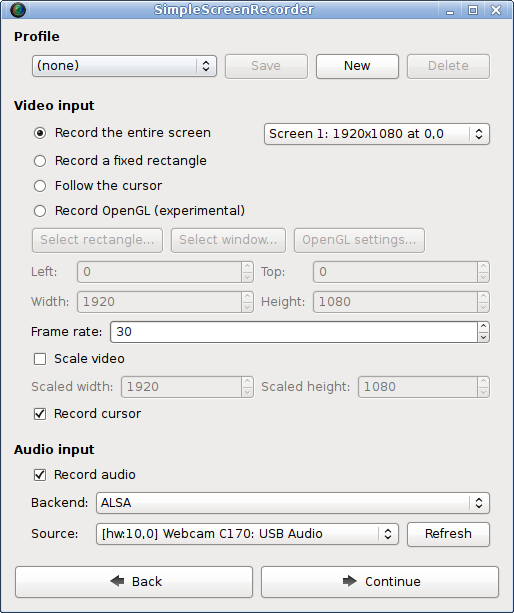
In the next screen you will choose options such as whether to record the entire screen, a fixed rectangle, or a specific window. To use any of this options, move the cursor away from the Simple Screen Recorder interface and select an area of the screen or click on a window of your choosing, respectively. You can also choose to record audio and include the cursor in the screencast (or not). Once done, click Continue:
![]() Simple Screen Recorder Settings
Simple Screen Recorder Settings
Now it’s time to define the video output format and the location. Feel free to look around to find the settings that may be more adequate for your case (the settings below are just for your reference, and ensure that the video recording tools installed by default in the operating system will be able to play the recording), then click Continue again:
![]() Set Video Format and Location
Set Video Format and Location
Finally, choose a keyboard shortcut to manage the user interface and click Start recording. When you’re done, save the video by clicking Save recording:
![]() Linux Desktop Screen Recording
Linux Desktop Screen Recording
Alternatively, you can minimize Simple Screen Recorder so that it will not interfere with the screen cast, and start / stop the recording using the key combination selected earlier.
In our example let’s see what happens when we press Ctrl + R:
![]() Control Desktop Screen Recording
Control Desktop Screen Recording
Then to pause the recording press the key combination again. The red circle will turn grey and you can finally stop the recording and save the file by clicking on it and choosing the corresponding menu:
![]() Screen Recording On/OFF Settings
Screen Recording On/OFF Settings
Please keep in mind that the above trick will work as long as Simple Screen Recorder is running – it can be minimized but it has to be running.
Summary
At this point you must have already installed and try out what many Linux users out there consider the best screencrasting tool. Regardless of the reasons why you have chosen to do so, I can assure you you will never look back.
I highly recommend you take a look at the developer’s web site for further ideas and suggestions for improving your videos. Of course, you can also always reach us if you have questions or comments about this article or if you need help to set up Simple Screen Recorder in your computer and run into any issues, using the form below.
Finally, let me tell you how I first found out about this program. A couple of weeks ago I posted a question on Linuxsay.com, and within a couple of hours several community members offered their feedback very fast. You can do so, too, if you have any questions about Linux or Open Source Software in general. We are all here to help you!
If You Appreciate What We Do Here On TecMint, You Should Consider:
TecMint is the fastest growing and most trusted community site for any kind of Linux Articles, Guides and Books on the web. Millions of people visit TecMint! to search or browse the thousands of published articles available FREELY to all.
If you like what you are reading, please consider buying us a coffee ( or 2 ) as a token of appreciation.

We are thankful for your never ending support.
Related Posts
![]()
![]()
![]()
![]()
![]()
![]()
12 thoughts on “How to Record Programs and Games Using ‘Simple Screen Recorder’ in Linux”
Thanks for sharing this useful information for the readers. I’m AOL Customer Support adviser if you face any types of issue then contact our tech Support team.
![]()
Hi, really nice article thanks for sharing, now I can easily record by Desktop.
![]()
[[email protected] ssr]$ ./simple-build-and-install
Detecting x86/x64 …
x86/x64 = –enable-x86-asm
Detecting ffmpeg/libav …
Detected ffmpeg.
Configuring …
../configure: line 2075: config.log: Permission denied
../configure: line 2085: config.log: Permission denied
../configure: line 2120: 5: Bad file descriptor
../configure: line 2122: 5: Bad file descriptor
../configure: line 2280: confdefs.h: Permission denied
../configure: line 2284: confdefs.h: Permission denied
../configure: line 2288: confdefs.h: Permission denied
../configure: line 2292: confdefs.h: Permission denied
../configure: line 2296: confdefs.h: Permission denied
../configure: line 2300: confdefs.h: Permission denied
../configure: line 2304: confdefs.h: Permission denied
../configure: line 2479: 5: Bad file descriptor
checking for a BSD-compatible install… ../configure: line 2513: conftest.one: Permission denied
../configure: line 2514: conftest.two: Permission denied
mkdir: cannot create directory `conftest.dir’: Permission denied
/usr/bin/install: target `/opt/screenrecord/ssr/build/conftest.dir’ is not a directory
../configure: line 2547: 5: Bad file descriptor
../build-aux/install-sh -c
../configure: line 2558: 5: Bad file descriptor
checking whether build environment is sane… ../configure: line 2581: conftest.file: Permission denied
../configure: line 424: $4: Bad file descriptor
configure: error: ls -t appears to fail. Make sure there is not a broken
alias in your environment
../configure: line 424: $4: Bad file descriptor
configure: error: newly created file is older than distributed files!
Check your system clock
../configure: line 83: 5: Bad file descriptor
[[email protected] ssr]$
![]()
Where do the files actually save after you finish your recording?
That is explained in the article. Look for “Now it’s time to define the video output format and the location…”.
![]()
Error: don’t run this script as root, this will mess up file permissions
Please login as normal user and execute the build command, it will work without any errors…
![]()
try
yum install alsa-lib-devel.x86_64 pulseaudio-libs-devel.x86_64 jack-audio-connection-kit-devel.x86_64
![]()
not work in my debian
sudo add-apt-repository ppa:maarten-baert/simplescreenrecorder
Please check DeamonMV’s comment above. That should do the trick. If not, don’t hesitate to let us know.
![]()
error while executing
./simple-build-and-install
checking alsa/asoundlib.h usability… no
checking alsa/asoundlib.h presence… no
checking for alsa/asoundlib.h… no
configure: error: required header missing
@chetan,
If you run into dependency errors, install the required packages (may vary from distribution to distribution and from version to version). Use your package management system (apt-get / aptitude or yum, for example) or Google to search the packages that provide the missing files as indicated by running the installation script and you’ll be good to go.
Got something to say? Join the discussion. Cancel reply
This site uses Akismet to reduce spam. Learn how your comment data is processed.
Источник


