Maarten Baert’s website
Game Maker / C++ projects
Navigation
Log in


Last modified: Mon, 9 Nov 2020
Refresh
Main page
What is SimpleScreenRecorder?
SimpleScreenRecorder is a Linux program that I’ve created to record programs and games. There were already a few programs that could do this, but I wasn’t 100% happy with any of them, so I created my own.
My original goal was to create a program that was just really simple to use, but as I was writing it I started adding more and more features, and the result is actually a pretty powerful program. It’s ‘simple’ in the sense that it’s easier to use than ffmpeg/avconv or VLC, because it has a straightforward user interface.
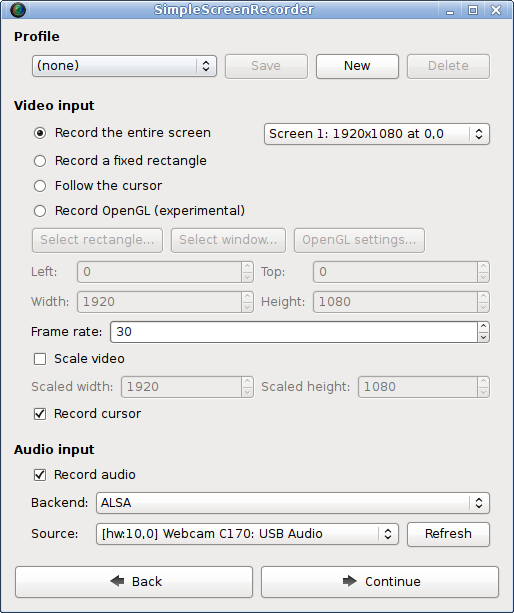
The input selection page:
Features
Graphical user interface (Qt-based).
Faster than VLC and ffmpeg/avconv.
Records the entire screen or part of it, or records OpenGL applications directly (similar to Fraps on Windows).
Synchronizes audio and video properly (a common issue with VLC and ffmpeg/avconv).
Reduces the video frame rate if your computer is too slow (rather than using up all your RAM like VLC does).
Fully multithreaded: small delays in any of the components will never block the other components, resulting is smoother video and better performance on computers with multiple processors.
Pause and resume recording at any time (either by clicking a button or by pressing a hotkey).
Shows statistics during recording (file size, bit rate, total recording time, actual frame rate, . ).
Can show a preview during recording, so you don’t waste time recording something only to figure out afterwards that some setting was wrong.
Uses libav/ffmpeg libraries for encoding, so it supports many different codecs and file formats (adding more is trivial).
Can also do live streaming (experimental).
Sensible default settings: no need to change anything if you don’t want to.
Tooltips for almost everything: no need to read the documentation to find out what something does.
Download
SimpleScreenRecorder should work on any Linux distribution, and in most cases can be installed from the official repositories. The list below is incomplete.
Simply install ‘simplescreenrecorder’:
Add this if you want to record 32-bit OpenGL applications on a 64-bit system:
If you are using Debian 9 or newer, you can install the ‘simplescreenrecorder’ package from the official repositories. You can install it with:
Add this if you want to record 32-bit OpenGL applications on a 64-bit system:
You should copy-paste these commands to a terminal line by line rather than all at once, otherwise it won’t work.
SimpleScreenRecorder is available in the RPM Fusion reposity. RPM Fusion can be activated with this command:
After that, SimpleScreenRecorder can be installed with this command:
SimpleScreenRecorder is now included in the main repository. You can install it with:
SimpleScreenRecorder is avaliable in the official repository, the name of the package is ‘simplescreenrecorder’.
Install simplescreenrecorder from the Core Release repository using urpmi or the Mageia Control Center.
You can install SimpleScreenRecorder with the following command:
The same command should also work on any other distribution provided that the Nix package manager is installed.
Install ‘simplescreenrecorder’ from the Packman repository. If you want to record 32-bit OpenGL applications on a 64-bit system, you should also install ‘libssr-glinject-32bit’. This package was created by Dmitriy (DAP-DarkneSS).
Install ‘ssr’ from the official repository:
Red Hat Enterprise Linux,
CentOS,
Scientific Linux
Packages for SimpleScreenRecorder are available in the Nux repositories.
A SlackBuild is available here.
If you are using Ubuntu 17.04 or newer, SimpleScreenRecorder can be found in the official repositories. You can install it with:
Add this if you want to record 32-bit OpenGL applications on a 64-bit system:
You should copy-paste these commands to a terminal line by line rather than all at once, otherwise it won’t work.
If you are using an older version of Ubuntu, or you want to get the latest version of SimpleScreenRecorder immediately without waiting for the next Ubuntu release, you can also get the package(s) from the SimpleScreenRecorder PPA:
Add this if you want to record 32-bit OpenGL applications on a 64-bit system:
For distributions that don’t have official packages, you have to compile it yourself for now. It’s not that hard, and there are instructions in the readme file. You can find the source code on GitHub:
https://github.com/MaartenBaert/ssr
If you’re not familiar with git and you just want a .tar.gz file, download this:
https://github.com/MaartenBaert/ssr/archive/master.tar.gz
If you are using a different distribution and you have created a package for SimpleScreenRecorder, please contact me so I can add it to the list :).
License

SimpleScreenRecorder is distributed under the terms of the GNU General Public License.
Feedback, bugs, feature requests .
You can report bugs and submit feature requests on GitHub:
https://github.com/MaartenBaert/ssr/issues
If you don’t want to create a GitHub account, you can also send an email to:

If you don’t get a reply within a week, your message was probably eaten by the spam filter. If that happens, try sending the message again from a different address.
Источник
Simple screen recorder linux mint
SimpleScreenRecorder is a screen recorder for Linux. Despite the name, this program is actually quite complex. It’s ‘simple’ in the sense that it’s easier to use than ffmpeg/avconv or VLC :).
There is a separate repository for SimpleScreenRecorder packages: https://github.com/MaartenBaert/ssr-packages

GNU GPL v3 — read ‘COPYING’ for more info.
Important: If you have already installed SSR using the package manager of your distribution, you should uninstall it first before continuing!
First install the required dependencies (see below). After you have done that, you can compile and install SSR by running:
In order to use OpenGL recording for 32-bit applications on a 64-bit system, you need to compile a 32-bit version of libssr-glinject.so . The script will do this automatically if your system is 64-bit. Unfortunately some distributions (older versions of Debian, Ubuntu, Linux Mint, . ) don’t properly support compiling 32-bit libraries on a 64-bit system, which results in errors related to missing libraries (usually libGL, libGLU) even when those libraries have in fact been installed. The problem is caused by the fact that the required symlinks are included in the -dev packages, but the 32-bit -dev packages can’t be installed. The simplest solution is to skip compilation of the 32-bit GLInject library, which can be done by running:
You can then use SSR without the 32-bit library, or you can use the precompiled 32-bit library provided by your distribution.
If you actually want to compile the 32-bit library, you have to manually create the missing symlinks in the 32-bit library directory:
The OpenGL library libGL.so is a special case, because on some distributions (Ubuntu, Linux Mint, . ) it is installed in a different location depending on which driver you are using. If your distribution has installed the file libGL.so.1 in the regular 32-bit library directory /usr/lib/i386-linux-gnu (e.g. Debian), then run this:
Otherwise you need to figure out where the library is installed first, and then manually create symlinks from the regular 32-bit library folder to this file. Note that doing this may interfere with OpenGL functionality if you ever switch to a different driver, or even just update the driver (in the case of NVIDIA). In that case you will need to manually remove the symlinks and (optionally) recreate them.
If you are using a combination of open-source and proprietary drivers (e.g. for laptops with Intel + NVIDIA GPUs a.k.a. ‘Optimus’), follow only the steps for the open-source drivers.
If you are using one of the open-source drivers (i915, radeon, nouveau), then run this:
If you are using the proprietary AMD driver, first figure out where the fglrx directory is located, this can be /usr/lib32 or /usr/lib/i386-linux-gnu . Then go to the relevant folder and create the symlinks:
If you are using the proprietary NVIDIA driver, first figure out where the fglrx directory is located, this can be /usr/lib32 or /usr/lib/i386-linux-gnu . Then go to the relevant folder and create the symlinks:
Note that the full name of the ‘nvidia’ subdirectory includes the driver version number, so you will need to fix these symlinks whenever the driver has been updated.
If you want to compile step-by-step (without simple-build-and-install ), you can use the following steps:
Note that you may need to specify additional options depending on which Linux distribution and CPU architecture you have. The simple-build-and-install script detects the correct options automatically, you can run it to see which options you need.
You don’t need to install the program to use it, but installing will give you a desktop entry and an icon. Also, if you don’t install the program, you will need to specify where the GLInject libraries are located with LD_LIBRARY_PATH when using OpenGL recording.
Most of these issues are avoided when using simple-build-and-install , but you may run into them if you run cmake directly.
FFmpeg vs Libav confusion
Libav is a fork of FFmpeg that was created in 2011 as a result of a conflict between the developers. Some Linux distributions (including Debian and Ubuntu) switched to Libav because the package maintainers were among the Libav developers, while others stuck to FFmpeg. In order to deal with this situation, SSR supports both FFmpeg and Libav. In 2015 Debian and Ubuntu decided to switch back to FFmpeg for technical reasons, which means that these days very few SSR users are still using Libav. Although Libav is theoretically still supported by SSR, I am no longer doing any testing with it. As of 2020 Libav is effectively no longer being developed, so Libav support may be dropped entirely at some point in the future.
Since the FFmpeg and Libav APIs have changed significantly over time, SSR checks which version of the libraries is being used to determine which features are safe to use. Although the FFmpeg and Libav API are almost identical, there are some minor differences, mostly related to the version numbering scheme. Unfortunately SSR can not determine automatically whether you are using FFmpeg or Libav, so you have to specify this manually when running cmake , using the ENABLE_FFMPEG_VERSIONS option, which defaults to TRUE (i.e. FFmpeg). If you are using Libav, you should add the option ENABLE_FFMPEG_VERSIONS=FALSE . If you forget this, you will likely get various error messages during compilation related to missing functions, structures or fields.
You can check whether you are using FFmpeg or Libav by running the following command:
This command should print either This file is part of FFmpeg or This file is part of Libav .
When compiling with Qt 4 on some newer distributions, you may get the following error message from AutoMoc:
This is caused by a Qt bug which has been fixed in Qt 5, but has not been backported. The file path reported in the error message is wrong, the actual problem is triggered by line 52 in /usr/include/sys/sysmacros.h . To work around the bug, add the following option when running cmake :
Alternatively, if your distribution provides Qt 5 packages, you can also use these instead. For Debian and Ubuntu, you would do this by installing qt5-qmake , qtbase5-dev and libqt5x11extras5-dev . The simple-build-and-install script will detect and use these automatically. If you run cmake yourself, you should add the option -DWITH_QT5=TRUE to use Qt 5 instead of Qt 4.
You will need the following packages to compile SimpleScreenRecorder:
- GCC (>= 4.6)
- cmake
- pkg-config
- Qt4 (4.8 or newer) or Qt5 (5.7 or newer)
- ffmpeg or libav (libavformat, libavcodec, libavutil, libswscale)
- ALSA library
- PulseAudio library (optional, disable with -DWITH_PULSEAUDIO=FALSE)
- JACK library (optional, disable with -DWITH_JACK=FALSE)
- libGL (32 and 64 bit)
- libGLU (32 and 64 bit)
- libX11 (32 and 64 bit)
- libXfixes (32 and 64 bit)
- libXext
- libXi
- libxinerama
- video4linux2 (V4L2) library
If you have a 64-bit system and you want to compile the 32-bit GLInject library, you have to install some 32-bit libraries as well. Otherwise the regular packages are sufficient.
For newer versions (with Qt5):
For older versions (with Qt4):
Extra dependencies for 32-bit GLInject on 64-bit systems:
This list is incomplete but usually sufficient:
Some packages (e.g. ffmpeg) are not in the official repository, but can be installed from the Packman repository. You can add the Packman repository with this command:
Extra dependencies for 32-bit GLInject on 64-bit systems:
Some packages (e.g. ffmpeg) are not in the official repository, but can be installed from the RPM Fusion repository. You can add the RPM Fusion repository with this command:
Extra dependencies for 32-bit GLInject on 64-bit systems:
Other files you may want to read
notes.txt contains notes about the design of the program. It’s a good idea read this first if you want to make changes to the code.
todo.txt contains a list of things that I still need to do. This file changes a lot of course.
About
SimpleScreenRecorder, a screen recorder for Linux
Источник
9 Best Screen Recorders For Linux
Last updated May 7, 2020 By Munif Tanjim 88 Comments
Brief: In this article, we’ll list the best screen recorders for Linux. This list also includes software that lets you record your Linux desktop as a gif .
Often we need to record our desktop screen for various purposes, like broadcasting gaming sessions online, making video tutorials, etc. Today, we’re going to present some screen recording applications for Linux.
In this list, you will find options to
- Record screen as a video
- Recording screen as gif as well
All the software mentioned here is free and open-source (FOSS). You could actually call it a list of free screen recorders, in fact.

Before we see the list of the best screen recorders, I would like to mention asciinema. It’s a desktop tool that lets you record your terminal session and upload it to its website. You can grab the URL and send it to friends. The best thing is that the commands in the recorded terminal session can be copied. That will help a lot if you used a lot of commands – there’s no need to enter them manually.
So, if you just wanted to record your terminal screen, asciinema should do a fine job.
Note: The list below is in no particular order of ranking. I’ve mostly mentioned installation instructions for Ubuntu but this doesn’t make it a list of Ubuntu screen recorders – most of the applications mentioned are available in the official repositories of other distributions.
Best Screen Recorders for Linux
1. Kazam
Kazam is a minimal and nifty tool for screencasting. It includes screenshot support too. Kazam is most suitable for beginners and for getting the task done quickly without getting too caught up in different options.
Источник


