Frequently asked questions
Q: I launch MicroSIP but nothing happens.
A: Check for MicroSIP icon in system tray.
Q: How to setup account?
A: Right click on MicroSIP icon in system tray (near clock:).
Q: How to add contact?
A: Right click on blank white area in Conacts tab.
Q: How to specify different SIP port?
A: If you use SIP proxy — append «:port» to proxy only. If not, append «:port» to «SIP server» AND «Domain». Format: «proxy:port» OR («server:port» AND «domain:port»).
Q: How to achieve best voice quality?
A: Voice quality depends on audio codec that was selected in negotiation for current call session. In extended mode MicroSIP will show you, what codec was selected for session.
Codecs by quality:
Codecs without compression: Linear [email protected],16,44kHz
Notice 1. VoIP provider can route your voice session to external destination through low-quality audio codec. In this case you cannot achieve high quality. Key to quality lays in hands of your VoIP provider.
Notice 2. VoIP provider can limit set of allowed codecs.
Notice 3. For incoming calls use force codec option in MicroSIP settings.
Finally try [email protected] between two MicroSIPs. You can call by local IP, to exclude SIP server restrictions. You’ll know what means high quality.
Sound latency caused by set of dynamic buffers on the path of audio. Average value — 200 ms (one way). There is no way to reduce latency significantly.
Q: I use MicroSIP without registration on SIP server. How to specify address of my SIP gateway?
A: You can fill «Domain» in account page OR enter number in format @ .
Q: How to set up MicroSIP for point to point without a SIP server between 2 laptops?
A: Minimum what need to do — install microisp. Now you can make and receive calls. To make call enter number in format: «sip:192.168.1.33» or just «192.168.1.33», where «192.168.1.33» — IP address of callee. If you want make IP-to-IP calls simultaneously with active SIP account, additionaly you must enable local account in Settings.
Sip клиент windows microsip


MicroSIP — open source portable SIP softphone based on PJSIP stack for Windows OS.
It allowing to do high quality VoIP calls (person-to-person or on regular telephones) via open SIP protocol. From cloud of SIP providers you can choose best for you, register account and use it with MicroSIP. You’ll get free person-to-person calls and cheap international calls.
Main in MicroSIP:
- small footprint (>2.5MB) and RAM usage (>5MB) — written in C and C++ with minimal possible system resources usage
- usability — user friendly in daily usage
- functionality — voice; video H.264 and H.263+, VP8; SIMPLE messaging (RFC 3428) and presence (RFC 3903, 6665); DTMF In-band, RCF2833, SIP-INFO.
- compatibility — conform to SIP standards
- voice quality — supports best voice codecs: Opus, G.711 A-law and μ-law, G.722, G.721.1, G.723, G.729, GSM, AMR, AMR-WB, iLBC, Speex, SILK and Linear PCM mono/stereo.
- WebRTC echo cancellation algorithm and voice activity detection
- privacy — configurable encryption TLS / SRTP for control and media
- portability — has no additional dependencies and stores setting in ini file
- multilanguage and RTL support, localization for brazilian, bulgarian, chinese, dutch, estonian, finnish, french, german, hebrew, hungarian, italian, korean, norwegian, polish, russian (микросип), spanish, swedish, ukrainian, .
- can be used by people with visual impairments using screen reader software such as NVDA
MicroSIP online help
General
After automatic startup or when you close the main window MicroSIP will be minimized to the system tray.
MicroSIP does not require the installation of additional libraries, runtimes or frameworks.
Dialpad
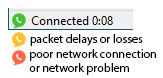
There is sound quality indication:
Contacts

To add a contact, right-click in an empty area of the Contacts page. Only the Number field is required and it is unique in the list. Number can be specifind in various input formats, see above.
You can enable Presence Subscription to see contact availability status, use BLF functionality and pickup calls. This may require additional configuration of your SIP server. For some types of servers (not Asterisk), you must enable «Publish Presence» in the «Account» window to share your availability status for other contacts. After successfully setting up the presence, the entries in your contacts will turn colored.
When a contact receives an incoming call, its icon will blink. To answer the incoming call (directed call pickup), double click on it or use the context menu item — «Call Pickup».
Pickup code is hardcoded: «**». For example, to configure call pickup for Asterisk, add to extensions.conf:
exten => _**.,1,Pickup($
Messages
Account

- SIP server
Your account SIP server. - SIP proxy
Your account SIP proxy or a chain of proxies. Examples: 192.168.1.1, 192.168.1.1:5070, 192.168.1.1 192.168.15.1, 192.168.1.1;hide, «;hide» parameter can solve impossibility of registration or calls due to server configuration. - Username
Your account username. - Domain
Your account domain. - Login
Username for authentication. If empty, will be used Username. - Password
Your account password. - Display name
Your name, remote party will see it in incoming calls and messages. - Dialing Prefix
International calling prefix for numbers in local format (must begin with «+» or «00»); or a simple prefix for each dialing phone number. - Dial Plan
Transforms dialing number according to pattern. Numbers that do not match any patterns are blocked. Patterns are separated by a pipe symbol: |. The entire value can be enclosed in brackets ().
x «x» represents any character [sequence] Enter characters within square brackets to create a list of accepted digits.
Numeric range: enter 8 to allow the user to enter any one digit from 2 through 9.
Numeric range with other characters: enter [16-9*] to allow the user to enter 1, 6, 7, 8, 9, or *.Replaces one sequence with another. Or inserts some sequence inside a number:
Example 1 : xxxxxxx
If user dials 81234567, the system transmits 15551234567.
Example 2 : xxxxxxxxxx
If user dials 1234567890, the system transmits 11234567890.. (period symbol) Represents zero or more entries of the previous digit. Example, 01. => 0, 01, 011, 0111, . ; x. => matches any dialed number. Example: Replace + with 00, allow any other numbers. - Voicemail Number
Voicemail access number. If empty, microsip will try to determine it automatically. - Media encryption (remark 1)
Disabled — never use encryption, Optional — use encryption when remote party supports encryption, Mandatory — use encryption always. Recommend value: Optional. - Transport
The value depends on the configuration of your SIP server. Failsafe value: UDP. Best value: TLS. TCP is good, but is may not work with your router/NAT due to SIP ALG enabled. «UDP+TCP» is a mix of UDP (for small request) and TCP (for large). - Public address
Can be used to solve call flow and media delivery issues when you don’t have dedicated public IP address. You can manually specify IP address or hostname for Via, Contact and SDP. It can point to one of the interface address OR it can point to the public address of a NAT router where port mappings have been configured. For automatic public address detection and rewrite you can use Allow IP rewrite feature or use STUN server. - Local port
By default MicroSIP tries to listen on standard SIP port — 5060. If port is busy by other application, MicroSIP will listen on random port. You can manualy change port to any. - Publish presence
Sends on SIP server publish query, it means that other subscribed contacts can see your status and can pickup your incoming calls (BLF functionality). Besides, often you must specify which contacts have right to see your presence information — you can done this for example via SIP provider webpage. Your SIP server must support this feature. - ICE (remark 1)
Helps to find shortest way for media streams and reduce media latency. It is usefull when posible direct P2P connection without SIP provider mediagate. Enabling ICE can cause problems with in media delivery if SIP server configured incorrecly. - Allow IP rewrite
Can be used to solve call flow and media delivery issues when you don’t have dedicated public IP address. If enabled, MicroSIP will keep track of the public IP address from the response of REGISTER request. Public IP will be used in later SIP queries in Via, Contact and SDP.
See also: Public address, STUN. - Disable Session Timers
Specify the usage of Session Timers. Try to disable Session Timers if your calls dropps after XX minutes. Recommended value: unchecked.
Settings
512 kbit/s), otherwise picture quality will fall down.
Auto: MicroSIP will use RFC2833 for DTMF relay by default but will switch to in-band audio DTMF tones if the remote side does not indicate support of RFC2833 in SDP. Note: in-band method will not work properly with every audio codec due to compression algorithms.
MicroSIP will play short tone and popup when call auto accepted. SIP header — when receiving the «Call-Info: Auto Answer» or «Call-Info: answer-after=0» or «X-AUTOANSWER: TRUE» in SIP header.
Helps to block unwanted or spam incoming calls. Different user/domain/user-domain means that callee data do not match data in your account window. Different remote domain means that caller domain do not match domain in your account window.
Enter URL to obtain contacts from external source via HTTP(s). JSON and XML responses are supported. Use UTF-8 encoding.
To change the frequency of automatic refresh use «refresh» property or HTTP header «Cache-Control: max-age=3600», where 3600 — value in seconds. If zero or not specified will be used default value 3600 seconds.
STUN server
Helps to make direct way for media streams without SIP provider media gate when NAT used. It open UDP ports on NAT server for incoming connections. Exists different NAT types (full cone NAT, (address) restricted cone NAT, port restricted cone NAT and symmetric NAT). You can use STUN only if your NAT is not symmetric! Otherwise you will have problems — you can not hear and can not hears you — remove it from settings. Default value — empty.
MicroSIP (PC WINDOWS)
Скачайте и установите программу с сайта https://www.microsip.org/. Установите, используя стандартные настройки.

Версия приложения может отличаться от указанной на скриншоте.


После установки приложения перейдите в меню «Добавить аккаунт».


Данные для авторизации находятся в личном кабинете SIPUNI https://sipuni.com/tree. Выберите учетную запись сотрудника (или создайте новую). Нажмите на короткий номер рядом с именем. Откроется окно редактирования.
Приложение может использовать настройки по умолчанию — SIP — телефон или отдельное устройство — Программа на ПК (MAC/PC).

Для добавления отдельного устройства перейдите в меню «Конструктор» и нажмите на имя сотрудника.

Далее удалите устройство «SIP- телефон».


Добавьте новое устройство через кнопку «Добавить устройство».

Выберите тип использования «Программа на ПК (MAC/PC)» и нажмите кнопку «Сохранить»

Перейдите в свойства нового устройства нажав на название.

Данные для настройки находятся под ссылкой « Информация для SIP подключения ».

Заполните данные для авторизации по образцу ниже и нажмите «Сохранить».

При правильной настройке индикатор телефона должен загореться зеленым цветом.

Для выбора звукового устройства перейдите в меню «Настройки».

Если Вы используете гарнитуру и внешние колонки, то в настройках можно указать отдельные устройства для вызовов и для разговора.
Устройство для вызова — колонки. Динамик и Микрофон — гарнитура.


