- How to take and annotate screenshots on Windows 10
- Take a screenshot
- Annotate snips with Snip & Sketch
- How I Started Using Sketch App In Windows
- Important Edit
- About Sketch
- Sketch And Windows?
- How To Install OS X and Sketch
- Viewing Sketch files in Windows
- Как создавать скриншоты в Windows 10 с помощью «Фрагмент и набросок»
- Как делать скриншоты с помощью Snip & Sketch
- Использование приложения «Фрагмент и набросок»
- Использование быстрой кнопки Action Center
- Использование кнопки Print Screen
- Как включить кнопку Print Screen для Snip&Sketch
- Как комментировать скриншоты Snip & Sketch
How to take and annotate screenshots on Windows 10
Sometimes the easiest way to make a copy of something is to take a snapshot of your screen. While you can already capture your screen using your keyboard’s PrtScn button, you can now press Windows logo key + Shift + S to open the new modern snipping experience (also called the snipping bar), then drag the cursor over the area you want to capture.
Here are some common ways to take and annotate screenshots in Snip & Sketch on Windows 10.
Take a screenshot
Option 1: Using the Snip & Sketch app
Press the Start button and enter Snip & Sketch in the search field.
Press the New button to start snipping with the snipping bar.
The snipping bar allows you to capture the following types of snips:
Rectangular snip. Drag the cursor around an object to form a rectangle.
Free-form snip. Draw a free-form shape around an object.
Full-screen snip. Capture the entire screen.
Once you snip an area of your screen — the snipped image is added to your clipboard and you can paste it immediately in another app. A screen prompt will also allow you to annotate, save or share it using the Snip & Sketch app.
Option 2: With the Print Screen key
While the PrtScn key already captures your full screen and sends it to your clipboard, opening the snipping bar provides you with more snipping tools you can use for precise snipping. For better control of your screen capturing options, you can opt to have your PrtScn key open the new snipping bar instead of having to type Windows logo key + Shift + S.
To turn on the new snipping feature keyboard shortcut Select Start > Settings > Ease of Access > Keyboard
Option 3: With the Window logo key + Shift + S shortcut
Pressing the S key + Windows logo + Shift keys down initiates the snipping bar at any time.
Annotate snips with Snip & Sketch
Opening images for editing with Snip & Sketch
To open an image from Snip & Sketch, select Open File or drag and drop an image from apps like File Explorer or Photos in the Snip & Sketch window.
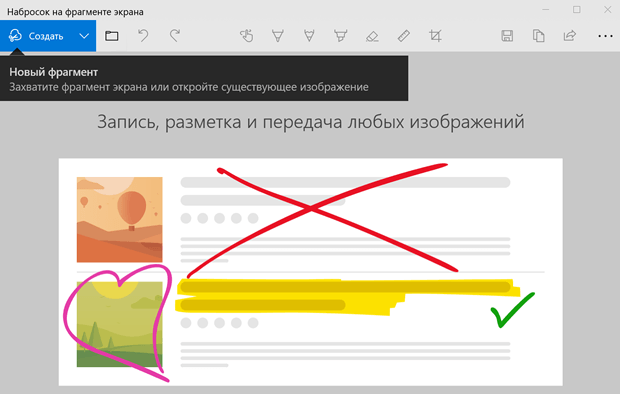
Annotating images with Snip & Sketch
Snip & Sketch provides a few tools for annotating images, namely pen, pencil and highlighter. Once you click a tool to select it, you can click it again to change its color or thickness.
The tools work better with a pen device, but they can also be used with mouse or touch if you select the Touch Writing button icon.
Use the Eraser tool to remove specific strokes or click it twice to get the option to erase all ink.
Use the ruler or protractor tools and draw straight lines or arches.
Press the ruler/protractor button again to hide the ruler/protractor
Reside or rotate the ruler/protractor by using two finger touch gestures (if the Touch Writing button is selected) or with the mouse wheel.
Use the crop tool to crop the annotated image.
To undo cropping, select the crop tool again and press Cancel to restore the image to its full original area.
Panning the view
Some of the images you annotate might be larger than the size of the Snip & Sketch window. You can use the scroll bars to pan the view, but you can also pan the view with touch input (if the Touch Writing button is not selected) or by dragging with your mouse button while holding the Ctrl key down.
Zoom in and out of screenshots to make them easier to mark up using the magnifying glass icon. You can also zoom in and out of screenshots by pressing the Ctrl key down and tapping the + or — buttons.
Sharing and saving snips
Snip & Sketch copies the annotated snip to your clipboard when you open it and every time you make edits. Snip & Sketch allows you to save the annotated image to a file, share it or open with another app, or print it on paper or to a pdf file.
Using keyboard in Snip & Sketch
While annotating is best done using a pen or mouse — Snip & Sketch provides a lot of keyboard shortcuts you can use. Access keys are activated if you press and hold the Alt key.
How I Started Using Sketch App In Windows

This is my first story and it won’t be a long one. Actually it’s more of a heads up/tutorial to people who want to use Sketch but are bound to their Windows operating systems.
Important Edit
Before you read on I want to make sure everyone is getting the most out of this article. This story is about getting Sketch on Windows, and this part won’t change that. But as Sketch has been on the market for quite some time now, there are some new applications that enable you to at least view the Sketch files on your Windows pc. If you want to know how to get Sketch on your Windows pc, read on. If you want to know more about these applications, scroll down to the section “Viewing Sketch files in Windows”.
About Sketch
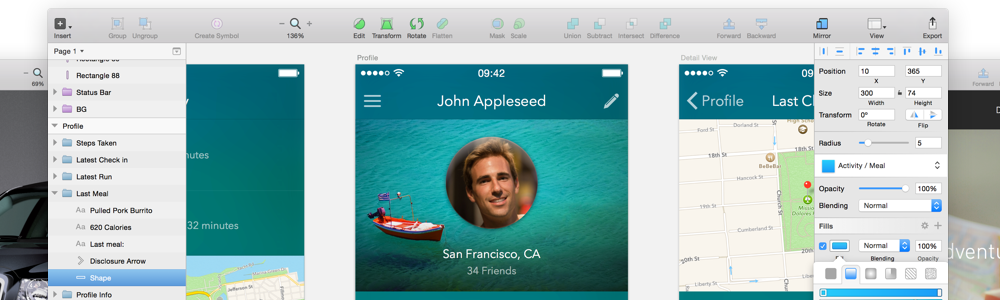
As a Windows 10 user I am one of the many designers who cry when someone comes up with the term “Sketch”. If you don’t, then you have no idea what Sketch is. Sketch is an amazing app for Mac that allows you to easily create stunning designs, mostly for UI and UX designers. As Bohemian Coding (creators of Sketch) states:
Sketch gives you the power, flexibility and speed you always wanted in a lightweight and easy-to-use package. Finally you can focus on what you do best: Design.
The program itself costs $99 and only takes up about 25 MB of storage space. It uses vector graphics so your files should not be enormous like Photoshop’s. By the way, it is not really fair to compare Sketch with Photoshop, although a lot of people do (and I used Photoshop too for webdesign). Photoshop was not built to cope with webdesign even though the newest updates include artboards and a so called “Design Space”.
Adobe’s closest program to that “genre” was Fireworks which isn’t supported anymore. What I’m trying to say is that Photoshop is not a bad program, but when working with bigger files, it lacks speed and control. Things that Sketch does have and maybe Project Comet: Adobe’s new competitor, but that’s not for this article. On that note, let’s move on!

Sketch And Windows?
But if you say that Sketch is a Mac only app, how can you run it on Windows? Is there a hack or something?
Unfortunately not. I would like to see a windows version or some kind in the future but there will not likely be one. Sketch is super lightweight because it uses a lot of OS X’s core features, that can be seen in its interface. That means the entire app would have to be rewritten for it to work on Windows or any other operating system.
How To Install OS X and Sketch
But how do you get it to work? Let’s get on with it!
Okay, the solution is fairly simple: get Mac on your Windows machine. Either get yourself a Hackintosh or do it my way and use a virtual machine (VMPlayer) to run OS X. I know it’s not the best solution, but it works really well. I’m on an Asus laptop with 8 GB of RAM, and an SSD (a VM works faster on an SSD, obviously), and I can say it works like a charm. Also my laptop uses an Intel i7 and a Nvidia graphics card (GTX 650m). Intel tends to work better with an Apple operating system.
I do need to say that this method is not my idea. I read it on a forum and decided to find out more about OS X on a VM. Besides, I’m not really sure if the entire process is legal, so be aware of that. I saw this video (new link) on YouTube and it worked for me, so I thought : “Why not share it on Medium?”. Edit: I know the links don’t work anymore, they keep getting removed from YouTube. Therefore I encourage you to carefully research and find other sources, the method stays the same of course.
I know it’s kind of an anti-climax but actually the only thing you have to do is watch the video and do what the instructor does, then you’re good to go. I can go through every step like he does, but then I’m just copying someone who has done a very well job of explaining the process. The only thing next to do, is to buy and install sketch (a free trial is available here).

This is a solution that has certainly worked for me, I’m now able to enjoy working with Sketch and have Windows open at the same time. You can even have a shared folder that both OS’s can access.
Thanks a lot for reading this. I hope you enjoyed it and perhaps are able to use this technique to enrich you designs by Sketch’s simplicity in Windows!
I know the original YouTube link does not work anymore and the files on my pc are over 9 gigabytes, so sending them isn’t really an option. There are many other links online that will get you OS X El Capitan 10.11 on your Windows PC. I have updated the YouTube link with another one that does almost the same. I am not, however, taking any responsibilities towards anyone installing VMware.
Viewing Sketch files in Windows
So, if you don’t want to or are not able to install Sketch via VMWare there are ways to only view Sketch files in Windows. It’s definitely not the same as editing, but it can be a useful tool to have, especially for developers. There are, as we speak, quite a few tools available. I’ll be listing 3 of them, with each one of them doing things a bit differently.
Как создавать скриншоты в Windows 10 с помощью «Фрагмент и набросок»

Начиная с обновления за октябрь 2018 года, Windows 10 модернизирует работу по созданию снимков экрана с новым приложением «Фрагмент и набросок», которое сочетает в себе устаревший инструмент Snipping Tool с «Эскиз экрана» (ранее входившим в Windows Ink Workspace).
В результате вы получаете возможность создавать и комментировать скриншоты рабочего стола, приложений и игр без необходимости использования сторонних инструментов, а также приложения, которые будут часто обновляться через Microsoft Store.
В этом руководстве по Windows 10 мы расскажем, как начать работу с новым приложением «Фрагмент и набросок», чтобы делать снимки экрана с обновлением за октябрь 2018 года.
Как делать скриншоты с помощью Snip & Sketch
Используя приложение «Фрагмент и набросок», мы получаем в Windows 10 как минимум три способа создавать скриншоты:
Использование приложения «Фрагмент и набросок»
Самый простой способ получить доступ к инструментам – запустить приложение «Фрагмент и набросок», выполнив следующие действия:
- Откройте Пуск.
- Найдите «Фрагмент и набросок», нажмите на совпадающий результат.
- Нажмите кнопку Создать в верхнем левом углу.
- Прямоугольная вырезка.
- Вырезка произвольной формы.
- Полноэкранный снимок.
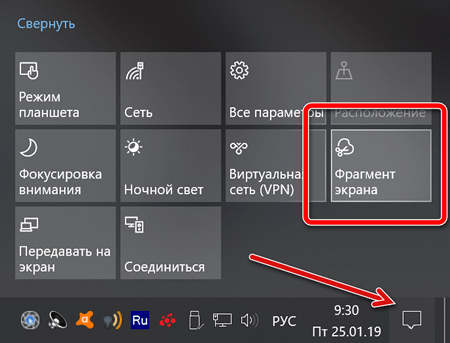
Использование быстрой кнопки Action Center
Если вы хотите сделать скриншот для вставки в документ, вы можете использовать новую кнопку Снимок экрана , выполнив следующие действия:
Откройте Центр действий.
Совет: используйте сочетание клавиш Win + A или нажмите кнопку Центра действий в области уведомлений, чтобы открыть интерфейс.
- Прямоугольная вырезка.
- Вырезка произвольной формы.
- Полноэкранный снимок.
Использование кнопки Print Screen
Если вы включили эту опцию, вы можете делать снимки экрана в Windows 10 с помощью клавиши Print Screen .
Нажмите кнопку Print Screen .
Совет. В качестве альтернативы вы можете использовать сочетание клавиш Win + Shift + S , чтобы открыть панель инструментов.
- Прямоугольная вырезка.
- Вырезка произвольной формы.
- Полноэкранный снимок.
В отличие от прямого запуска приложения Snip & Sketch, при использовании кнопки «Снимок экрана» или клавиши «Печать экрана», снимок экрана будет скопирован в буфер обмена. Если вы хотите аннотировать фрагмент или сохранить его в файл, вам нужно щелкнуть уведомления Snip & Sketch в Центре действий.
Как включить кнопку Print Screen для Snip&Sketch
Вы также можете вызывать инструмент создания скриншотов экрана, используя кнопку Print Screen на клавиатуре, но этот параметр необходимо включить вручную, выполнив следующие действия:
- Откройте Параметры.
- Нажмите на Специальные возможности .
- Откройте вкладку Клавиатура.
- В разделе «Сочетание клавиш: Print Screen» активируйте Используйте кнопку Print Screen, чтобы запустить создание фрагмента экрана .

После выполнения этих шагов вы можете нажать клавишу Print Screen на клавиатуре, чтобы сделать снимки экрана в Windows 10.
Как комментировать скриншоты Snip & Sketch
Помимо возможности быстро делать снимки экрана в Windows 10, приложение включает в себя ряд инструментов для аннотирования изображений практически любым удобным для вас способом.
После того, как вы сделали снимок экрана изображение откроется в Snip & Sketch. В процессе работы вы можете использовать ряд инструментов для комментирования скриншота, включая шариковую ручку, карандаш и маркер. Для всех вы можете настроить цвет и толщину.

Кроме того, есть ластик для удаления одной или всех надписей со скриншота. Вы можете использовать цифровую линейку для рисования прямых линий, и есть инструмент обрезки, чтобы обрезать лишнее.
Эти инструменты были оптимизированы для работы с помощью стилуса на устройстве с сенсорным экраном, но они также работают с клавиатурой и мышью.
В дальнем правом углу вы найдете варианты сохранения фрагмента в формате PNG. Вы также можете использовать кнопку копирования, чтобы скопировать изображение в буфер обмена, а затем можно вставить в любой документ.
Наконец, есть кнопка «Поделиться», которая позволяет отправлять снимки экрана другому человеку с помощью электронной почты, совместного доступа или другого поддерживаемого приложения.


