- Using Layers
- Understanding regular and shared layers
- Creating and deleting layers
- Adding or moving content to a layer
- Toggling visibility and locking layers
- Changing a layer’s type
- Presenting Your LayOut Document
- Creating and Saving a LayOut Document
- Choosing a template in the Welcome dialog box
- Modifying paper and unit settings
- Paper settings
- Units settings
- Saving a LayOut document
Using Layers
In LayOut, layers enable you to control the entities on your document pages as follows:
- Shared or nonshared: Regular layers don’t share entities among pages, but shared layers do.
- Draw order: Entities on a top layer are displayed over top of entities on a lower layer.
- Visibility: A layer (and thus its entities) can be visible or hidden.
- Locked or unlocked state: You can’t accidentally (or intentionally) edit a layer’s entities if the layer is locked.
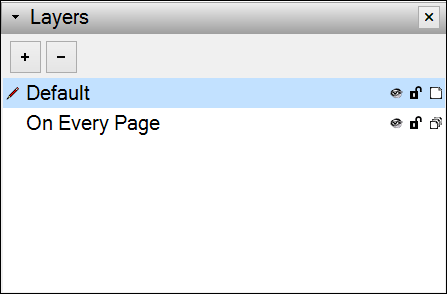
You create, navigate, and manage layers on the Layers panel, shown in the following figure (as the panel appears in Microsoft Windows). To open the Layers panel, click its name in the panel tray or, if it’s not on-screen, select Window > Layers. In the far-right column, a single-page icon indicates a regular layer; a four-page icon indicates a shared layer.
In the sections that follow, find out how to create and navigate among a LayOut document’s layers and use all the features in the Layers panel.
Table of Contents
Understanding regular and shared layers
In Layout, regular layers (also called nonshared layers) enable you to control the visibility of document content. For example, if you want to separate text from SketchUp model entities, you can place each type of entity on its own layer. If you’re using regular layers, you just need to remember to create or move each entity type to its respective layer on every page.
Shared layers display content on every page. When you need to display a logo, title, or other element on every page of your document, put it on a shared layer and you need to place the element only once.
Creating and deleting layers
When you create a layer, you have access to the layer on every page in your LayOut document, including new pages that you add. To create a new regular or shared layer, follow these steps:
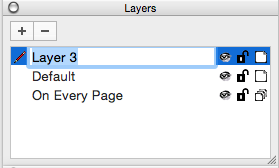
- In the Layers panel, click the Add New Layer button (the plus sign). A new, regular layer appears in the Layer’s panel’s list of layers, and becomes the active layer, which the red pencil icon indicates.
- Double-click the new layer’s name to open the name for editing or select it and press Enter, as shown in the following figure (as the panel appears in Mac OS X).
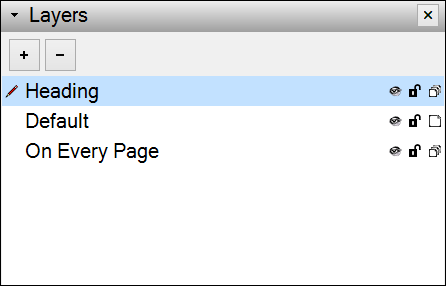
- Type a name for the layer and press Enter. For example, if you want the layer to hold all the headings at the top, Heading is an intuitive name.
- (Optional) To make the layer a shared layer, click the single-page icon in the layer’s far right column, and the icon changes to a four-page icon, indicating a shared layer.
If you ever need to delete a layer, select the layer in the Layers panel and click the Delete Selected Layer icon (the minus sign).
Adding or moving content to a layer
Until you select a different layer, all the content you add to a LayOut document appears on the Default layer. When you select a layer in the Layers panel, it becomes the active layer, and content is added to that layer instead.
To move any entity to a different layer, follow these steps:
- In the Layers panel, select the layer that you want to contain the entities. This layer becomes the active layer.
- With the Select tool (
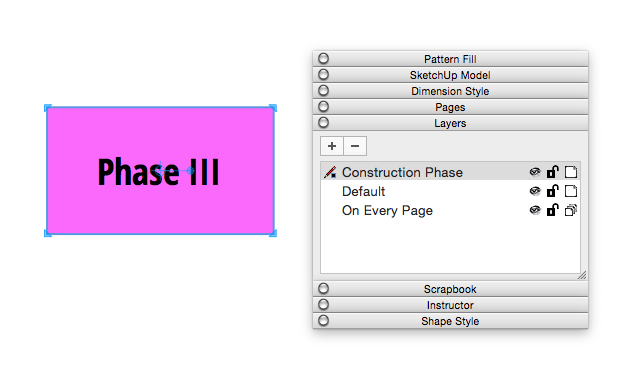
 ), select the entities that you want to move. In the Layers panel, a blue dot appears next to the selected content’s current layer.
 - Context-click your selection, and choose Move to Current Layer on the menu that appears. The entities now appear on the active layer.
- Context-click your selection, hover over Move to Layer on the menu that appears, and select Current from the flyout menu. Alternatively, you can select any unlocked layer from the flyout menu. If you use this option, you don’t have to select the layer first, as noted in Step 1. The entities now appear on the layer you selected.
 ), select the entities that you want to move. In the Layers panel, a blue dot appears next to the selected content’s current layer.
If a group is selected during the move command, all entities within that group will be moved to the same layer as well.
Toggling visibility and locking layers
When you organize content on a layer, you can toggle the content’s visibility or lock entities on a layer.
- To toggle a layer’s visibility, click the Visibility icon (the eye). When a layer isn’t visible, the Visibility icon is gray instead of black. Click the Visibility icon again to see the layer’s contents. Whether a layer is a regular or shared layer, the visibility setting applies only to the current page. So, for example, you can use a shared layer to display an entity on every page except a cover page by changing the visibility only on the cover page.
- To lock a layer so its contents can’t be edited, click the Lock icon. When a layer is locked, its padlock icon is closed. Click the Lock icon again to unlock the layer and open the padlock. Whether you lock a regular or a shared layer, the layer becomes locked on every page.
Changing a layer’s type
You can change a regular layer to a shared layer, or vice versa.
- When a regular layer becomes a shared layer, you’re asked to choose whether the layer contains entities on multiple pages: You can include only the entities from the current page, or collect entities from all pages. To perform this magic, simply click the layer’s single-page icon in the far right column of the Layers panel. The icon changes to a four-page icon, which indicates a shared layer, and the layer’s content appears on every page.
- When a shared layer becomes a regular layer, you have to decide how you want the change to affect the layer’s contents. To put the transformation in motion, click the shared layer’s four-page icon. In the dialog box that appears, select Keep Contents on This Page Only or Copy Contents to All Pages and click the Apply button.
Источник
Presenting Your LayOut Document
If, like most people, you feel jittery about giving a presentation and public speaking in general, hopefully, LayOut’s simple-to-use, interactive presentation features can help to put you at ease.
To access LayOut’s presentation features, select View > Start Presentation or click the Start Presentation tool ( ) on the default toolbar. Your document becomes full screen, and you have access to the following presentation features:
- Navigate among the pages in your presentation. You can use the arrow keys or your mouse to navigate among the pages. See the following table for details.
- Draw annotations. When you’re in presentation mode, the Freehand tool () is active so that you can call attention to key features as you present your project by drawing right on the presentation page.
- Change the view of inserted SketchUp model entities. You can orbit, pan, zoom, and use other Camera tools just as you can in the LayOut drawing area. See Editing a SketchUp Model’s View and Style Settings in LayOut for details.
- Play animations. If your SketchUp model entity contains an animation, you can play it within your LayOut presentation. Double-click the SketchUp model entity, context-click the model, and select View Animation from the menu that appears. See Working with SketchUp Models in LayOut for details about viewing scenes in LayOut. See Animating Sections and Scenes in the SketchUp area of the Knowledge Center for details about animations in SketchUp models.
 ) is active so that you can call attention to key features as you present your project by drawing right on the presentation page.
| To Go Here | Keyboard | Three-Button Mouse | One-Button or Mac Magic Mouse |
|---|---|---|---|
| Next page | Right arrow | Click | Click |
| Previous page | Left arrow | Right-click | n/a |
| First page | Up arrow | n/a | n/a |
| Last page | Down arrow | n/a | n/a |
To leave presentation mode, press the Esc key. If you made annotations, LayOut asks whether you’d like to save them. If you click Yes to save your annotations, LayOut saves them on a new layer, named with the date and time of your presentation. (For an introduction to LayOut’s layers feature, see Using Layers.)
To change your Presentation preferences, follow these steps:
- Select Edit > Preferences (Microsoft Windows) or LayOut > Preferences (Mac OS X).
- In the LayOut Preferences dialog box that appears, select Presentation in the sidebar on the left.
- From the available options, select one of the following:
- Same Monitor As Window: Your presentation appears in the same monitor that contains most of the LayOut document window. This option is the default setting.
- Primary Monitor: If your system uses multiple monitors, selecting this option tells LayOut to display the presentation on the monitor that’s designated the primary monitor. Check your system’s display settings if you’re not sure which monitor is the primary monitor.
- Secondary Monitor: This setting tells LayOut to open presentation mode on your secondary monitor. On Microsoft Windows, this monitor may be labeled your number 2 monitor in the display settings. On Mac OS X, the secondary monitor is the display without the menu bar across the top.
- When you’re done, click Close.
Источник
Creating and Saving a LayOut Document
When you first open LayOut, by default you see the Welcome dialog box.
In the Welcome dialog box, you choose a template for your LayOut document. Every LayOut document is based on a template. The most basic templates set your document’s paper size and orientation. LayOut also includes templates for storyboards and title blocks, which appear on every page of your LayOut document. If you have a special design in mind for your LayOut document, you can also create your own template.
After you select a template, you can open the Document Setup dialog box to check and modify more specific whole-document settings, such as the exact paper size and margins and the units used to specify the paper size and measurements.
After you set up your LayOut document, you can save it to a specific location on your hard drive and give it a name.
Table of Contents
Choosing a template in the Welcome dialog box
If you’re creating a new LayOut document, either by launching LayOut or selecting File > New, you need to choose a template in the Welcome dialog box, shown in the following figure. Don’t worry too much about whether your selected template is exactly what you want, because you can also change the template settings later.
Welcome Window — Windows 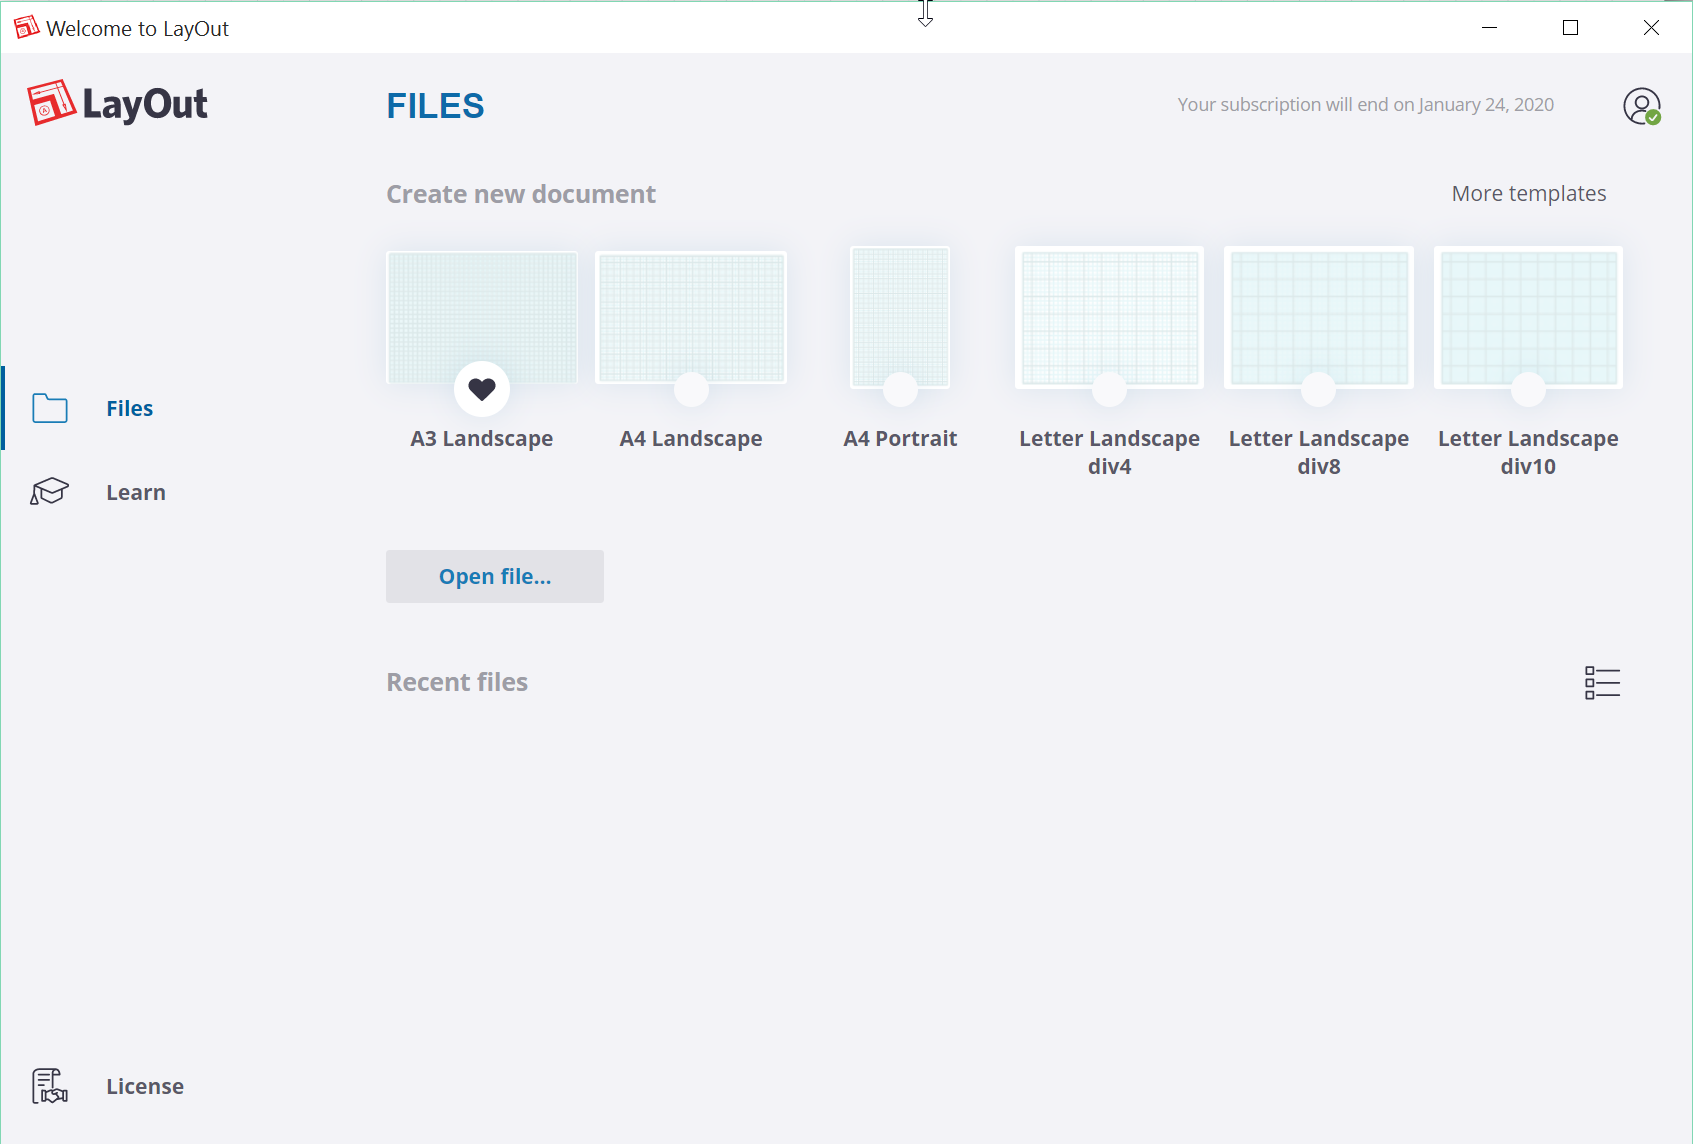 Welcome Window — Mac
The following list explains all your options in the Welcome dialog box:
- Select a default template: If you’re new to LayOut, this option is an easy way to get started. In the Create new document section, choose one of the more popular options, or click More templates in the top right corner. In the Templates window, the default templates are organized into three categories:
- Paper: Select a template based on common paper sizes, such as Letter Landscape or A4. Each paper size includes a template for portrait or landscape orientation. You can also choose between grid paper or plain paper.
- Storyboard: If you’re creating a storyboard, check out these templates, which have three preset boxes on each page for showing different angles, features, or views of a 3D model. You can choose from three different box widths.
- Titleblock: You can choose from several title block styles, such as Modern, Rounded, Simple, or Traditional.
- Select one of your own templates: In the top right corner, , select More Templates, and then select the My Template tab. If you haven’t created any templates or favorited an existing template, you’ll see a blank template.
- Open file: When you click the Open file button, a dialog box appears where you navigate to your file and select it to open it in LayOut. Or, if you’ve opened the document recently, look in the Recent files section, select your document’s thumbnail, and click Open.
Modifying paper and unit settings
After you create a new document in LayOut, you may want to check and adjust your Paper or Unit settings in the Document Setup dialog box.
Paper settings
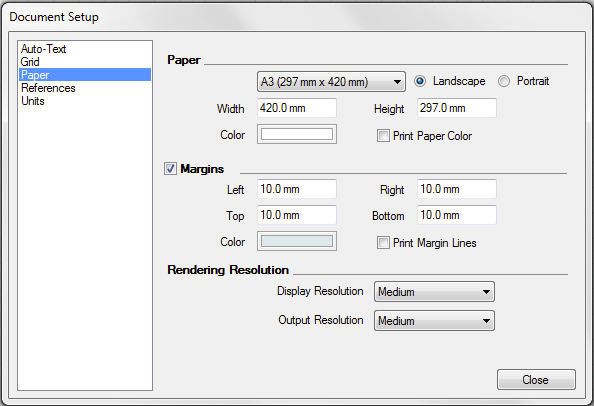
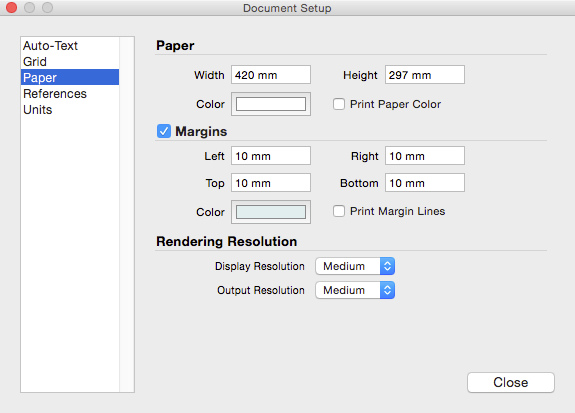
The Paper settings enable you to configure the document area’s size, orientation, margins, color, and rendering quality.
To see your Paper settings, select File > Document Setup and select Paper in the sidebar on the left, as shown in the following figure.
Here’s a quick introduction to your options:
- In the Paper area, you can type a value for the paper width and height. On Microsoft Windows, you can also use the drop-down list to select from a wide range of standard paper sizes, and select either the Landscape or Portrait radio buttons to set the orientation. The default paper color is white, but you can click the Color swatch to open a color picker, where you can select a custom color. (See Choosing Colors for details about using the color picker.) By default, the color only appears on-screen, but you can select the Print Paper Color checkbox if you want the paper color to appear in a printout or PDF or image export. (When the checkbox is deselected, the document background is transparent when you print or export your project.)
- In the Margins area, you can customize the display and size of your document’s margins. By default, margin lines are hidden, but selecting the Margins checkbox tells LayOut to display them. Enter values for the left, right, top, and bottom margins in their respective text boxes. To change the default color for the margin lines, click the Color swatch to open a color picker, where you can select a new color. To print margin lines, select the Print Margin Lines checkbox.
- In the Rendering Resolution area, you can change the on-screen and output resolutions for pixel-based LayOut documents. (Vector graphics don’t have resolution.) To adjust the on-screen resolution, select an option (Low, Medium, or High) from the Display Resolution drop-down list. The High setting increases the resolution of your models and images, but slows LayOut’s performance. The Output Resolution drop-down list enables you to adjust the quality of printouts or exports. The drop-down list options are same as the on-screen options: Low, Medium, or High.
Units settings
The Units settings affect what coordinate units you see in the Measurements box as you hover a tool around the document area. These settings also affect the measurements on the Paper panel in the Document Setup dialog box. (If you’re looking to change dimension units, see Marking Dimensions.)
To see these settings, select File > Document Setup to open the Document Setup dialog box and then select Units in the sidebar, as shown in the following figure.
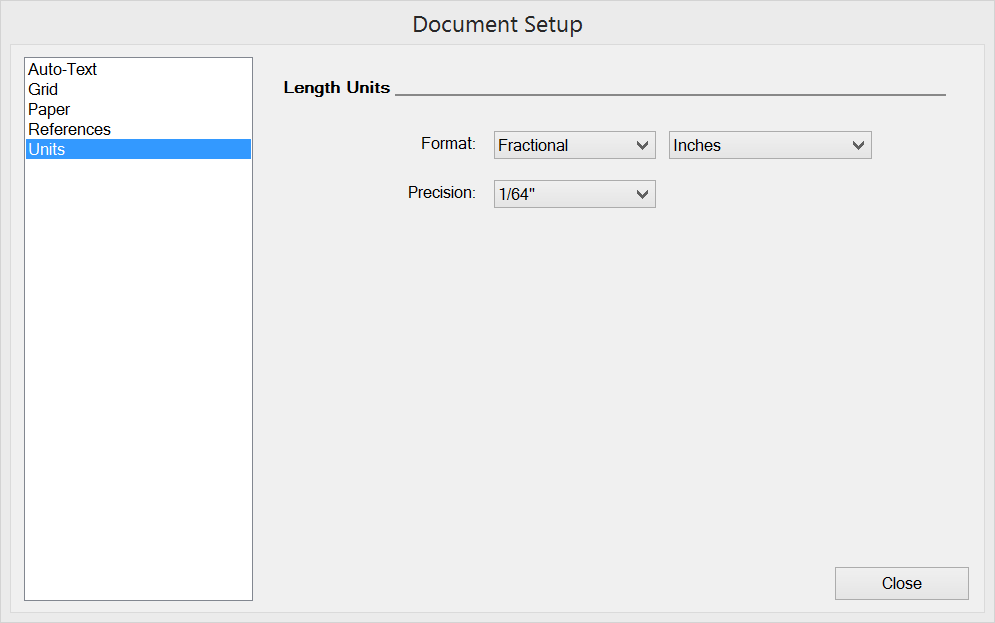
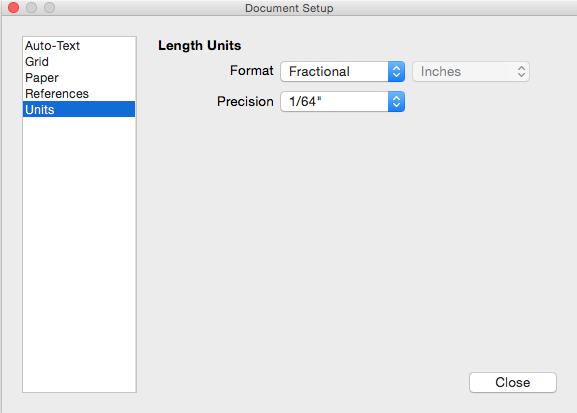
To change the document units, follow these steps:
- From the Format drop-down list, select Fractional or Decimal. If you’re working in metric units, you want to select Decimal.
- Select a unit of measurement, such as inches, feet, or meters, from the second Format drop-down list.
- From the Precision drop-down list, select how precise you want the units to be. Fractional unit precision can be set from 1“ to 1/64”. Decimal unit precision can be set in numbers of decimal places beyond zero.
Saving a LayOut document
Before you put too much work into a LayOut document, save it with a unique name and location. Saving a LayOut document is much like saving any other document, as you see in the following steps (which reflect your current operating system):
- Windows
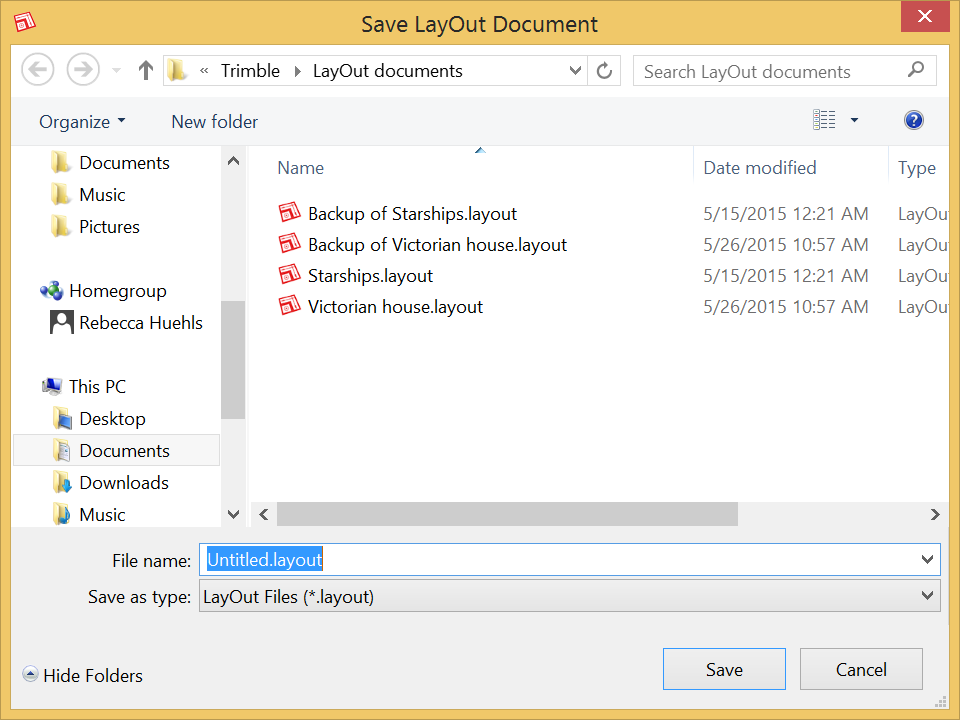
- If this is the first time saving your document, select File > Save or File > Save As. Either way, you see a Save LayOut Document dialog box, as shown in the following figure. If you’ve already saved your document once, selecting File > Save As enables you to save a copy of your LayOut document under a new name, and selecting File > Save simply saves your document without opening a dialog box.
- Navigate to the location on your hard drive where you want to save the document.
- In the File Name box, type a name for your document.
- From the Save As Type drop-down list, leave LayOut Files (*.layout) selected to save in the most current .layout file format. If you need the file to be compatible with an earlier version of LayOut, select that version from the drop-down list.
- MacOS
- If this is the first time saving your document, select File > Save or File > Save As. Either way, you see a save dialog box, as shown in the following figure. If you’ve already saved your document once, selecting File > Save As enables you to save a copy of your LayOut document under a new name, and selecting File > Save simply saves your document without opening a dialog box.
- Navigate to the location on your hard drive where you want to save the document.
- In the Save As box, type a name for your document.
- From the File Format drop-down list, leave LayOut Document selected to save in the most current .layout file format. If you need the file to be compatible with an earlier version of LayOut, select that version from the drop-down list.
- Click Save and your LayOut file is saved in the location you selected.

The File menu also has commands for saving templates and scrapbooks. For details about saving templates, see Creating Templates. For an introduction to saving scrapbooks, check out Working with Scrapbooks of Reusable Entities.
Источник


