- WindowBlinds
- Customize the look and feel of your taskbar window frames and more.
- Features
- Stylize
- Visual styles
- Alternative skins
- Customize
- Modify skins
- Fonts
- Transparency
- Colors
- Textures
- Explorer Backgrounds
- Apply
- Easy set-up
- Presets
- Randomized skins
- Per application skinning
- Create
- Design your own skins
- Easy to use
- Skins для windows blinds
- Система ⇒ Stardock WindowBlinds 10.87
- WindowBlinds 7.4
WindowBlinds
Customize the look and feel of your taskbar window frames and more.
- Apply custom skins to your desktop
- Add backgrounds, textures and colors to skins
- Choose your own skin fonts
- Design your own skins with SkinStudio
Features
WindowBlinds enables you to make your desktop interface uniquely yours! Customize the Start menu*, taskbar, window frames and control buttons! WindowBlinds enables users to customize desktop interface themes called skins to personalize the look and feel of their desktop.
Download additional animated wallpapers from our WinCustomize.com community.


Stylize
Visual styles
Select from the many skins included with WindowBlinds or choose from thousands of skins available for download at WinCustomize.com
Alternative skins
Select skins have multiple sub-styles that can be applied to suit your personal tastes. You can also save your style combinations as presets for quick access later.
Customize
Modify skins
Personalize any of the default Windows themes or any skins downloaded from WinCustomize.com
Fonts
Easily change which fonts your skins use.
Transparency
Make your skins the center of attention or allow them to blend into your backgrounds.

Colors
Find a great skin, but want to change the color scheme? WindowBlinds enables instant color changes from its configuration menu.
Textures
Personalize any skin by applying one of the textures included with WindowBlinds or use one of your own creations.
Explorer Backgrounds
Tired of looking at those boring white Explorer windows? Customize them with unique Explorer backgrounds.
Apply
Easy set-up
We have simplified the configuration menu to make personalizing your desktop quick and intuitive. Instantly preview your selections and adjustments before you apply them to your desktop.
Presets
Once you are happy with the changes you have made to your skin, save it by creating a preset. Presets enable you to access previous customizations and apply them to a skin quickly. Love tweaking your creations? Presets can be updated and deleted.


Randomized skins
WindowBlinds enables you to change skins randomly at timed intervals. Your desktop will never be boring again when you are greeted with a new skin every time you logon.
Per application skinning
Choose skins for each of your application types. For example, WindowBlinds enables your word processing software to use a different skin than your design programs. Exclude applications from WindowBlinds or choose other compatibility settings to fit your style.
Create
Design your own skins
Each purchase includes SkinStudio, the powerful companion application for WindowBlinds that enables you to create your own skins. Edit controls, Start menu*, taskbars, Explorer windows, fonts, colors backgrounds and more with SkinStudio.
Easy to use
Customize only the parts of the Windows interface you want to change and SkinStudio will do the rest. This makes it easy for inexperienced users to create a great skin quickly. Advanced users can still enjoy designing every aspect of the Windows interface.
Skins для windows blinds

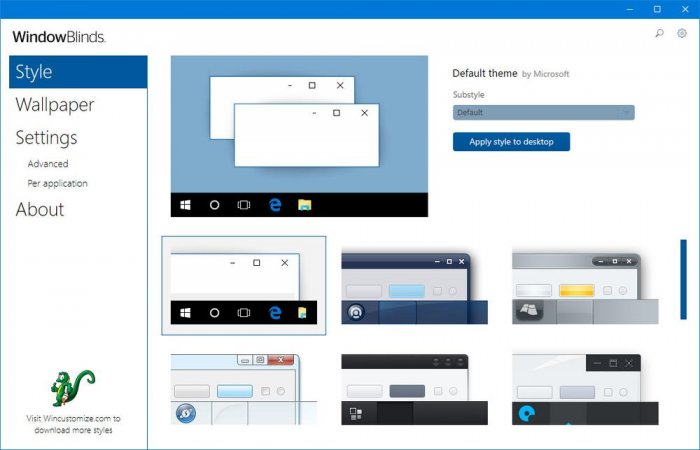
WindowBlinds skins are selected from the My Skins section of the WindowBlinds Advanced Configuration. This screen also provides options to add skins to the system (whether downloaded as .WBA/.ZIP files or directly from skin libraries like WinCustomize.com on the Internet), delete skins, sort the default views of the skin listings, chose a compound skin (if the selected skin includes compound skin elements), and colorizing of skins which include support for color masks.
To change a skin, simply select it from the listbox click Apply Changes (at left) or Apply this skin now. This will load the skin and immediately apply it to all open and new windows on the system. You can also select the Windows Classic skin to unload WindowBlinds and use the default Windows look.
The listing of skins installed is refreshed when you install/delete a skin or when you change the sorting with the following option.
Install skin from disk
After downloading a WindowBlinds skin from the Internet (it will be contained in a .WBA or .ZIP file), press this button to bring up a File Open dialog. Select the downloaded .WBA or .ZIP file in question and press Open to install the skin.
Tip: WindowBlinds skins downloaded from the Internet that have a .WBA file extension can be installed by double-clicking on them with the left mouse button in Explorer. Note that systems using ZipMagic will need to rename .ZIP skin downloads to .WBA and double-click on them to install (ZipMagic treats the .ZIP’s as folders and prevents WindowBlinds from installing them correctly).
Skins will be installed to a subdirectory off the WindowBlinds directory. The name of the subdirectory must match the name of the .UIS file included in the .WBA/.ZIP skin package for the skin to show up in the list.
Tip: There are over 2100 WindowBlinds skins available from the skin libraries at WinCustomize.com! New skins are being uploaded all the time. Be sure to check out SkinStudio (available standalone and as part of ObjectDesktop.net) to aid you in creating your own skins!
Install skin from web
Selecting this option to open a browser window to the WindowBlinds skin library section at WinCustomize.com. Browse the libraries there and click the download link to automatically download and install .WBA skins. Some skins may be packaged as .ZIP files. Save these to your local machine and them follow the instructions under Install skin from disk above.
Find another skin

This button will bring up a dialog to help you search for a specific installed skin. Enter the first few letters of the skin name and press Enter to search.
Filter the skin list

Use this dialog to select alternative sorting options for listing the available skins. The list may be sorted by skin name, skin author, and the date the skin was installed. The checkboxes for the various categories can be disabled to suppress skins from those categories from being displayed. Please note that this is a new feature and not all skins will have category information embedded to allow this option to work.
Edit in SkinStudio
Use SkinStudio (available from http://www.skinstudio.net) to create your own skins or modify existing ones! The enhanced versions for registered users contains a library of GUI Widgets that you can use to mix and match elements from different skins.
Change skin colour *

Skins designed for WindowBlinds may include support for changing the color of the skin. Enable the support via the checkbox on the dialog shown above and select a blending percentage with the slider. Use the Change skin colour button to bring up a color selection window to chose the color you would like to use.
You can enable the Force the skin to have the colour checkbox to attempt to apply the color features even to skins which have not specifically included support for it. Be aware that it may look funny trying to force this feature on skins that have not been designed with that in mind).
* This option is disabled in the public shareware version. Ordering WindowBlinds or a subscription to ObjectDesktop.net will provide access to an enhanced version of WindowBlinds for registered users with this feature enabled.
Set skin category
Manually set the skin categorization for skins that do not include that information.
Delete this skin
Remove the currently selected skin and its associated files.
WindowBlinds supports «skin substyles» or «compound skins» which may include several different variations or looks packaged together as one skin. If supported by the skin, use the dropdown selection to chose the flavor you would like.
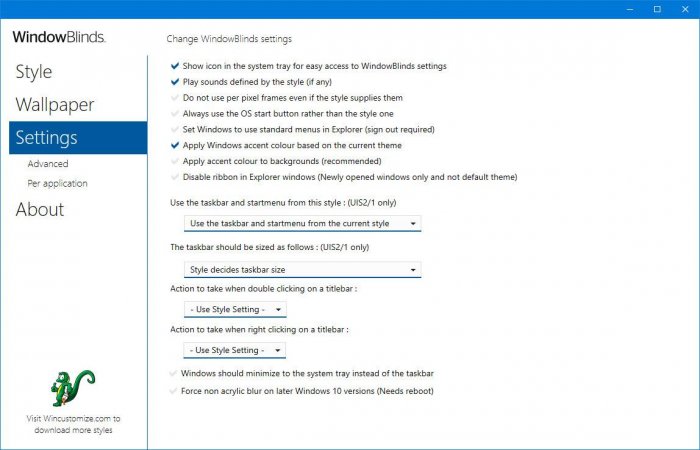
WindowBlinds Advanced Configuration Window Controls
Apply any changes to settings you have made.
Brings up a dialog with version information about this build of WindowBlinds.
Unload WindowBlinds from memory.
Tip: WindowBlinds can be unloaded by right clicking on the WindowBlinds icon in the system tray and selecting Unload WindowBlinds. You can also create a shortcut to the WBLOAD.EXE file in the WindowBlinds directory and use add a parameter of UNLOAD to send a message to WindowBlinds to unload.
Tip: When WindowBlinds is not loaded, it is not changing or modifying anything on your system.
Close the WindowBlinds Advanced Configuration window. Selecting this option will not unload WindowBlinds or apply any settings changes you may have made.
Система ⇒ Stardock WindowBlinds 10.87
|