- How to take and annotate screenshots on Windows 10
- Take a screenshot
- Annotate snips with Snip & Sketch
- How to skip the Windows login screen using these two methods
- How to remove the login screen in Windows 10
- Solution 1: Use netplwiz
- Solution 2: Use Group Policy
- How to Skip Login Screen on Windows 10 PC
- 2 Methods to Skip Login Screen on Windows 10 PC
- 1. Skip Login using User Account Settings
- 2. Editing the Group Policy
- 2 Ways to Automatically Skip Windows 10 Login Screen with Password
- Way 1: Skip Windows 10 login screen with netplwiz
- Way 2: Bypass Windows 10 login screen with local group policy editor
How to take and annotate screenshots on Windows 10
Sometimes the easiest way to make a copy of something is to take a snapshot of your screen. While you can already capture your screen using your keyboard’s PrtScn button, you can now press Windows logo key + Shift + S to open the new modern snipping experience (also called the snipping bar), then drag the cursor over the area you want to capture.
Here are some common ways to take and annotate screenshots in Snip & Sketch on Windows 10.
Take a screenshot
Option 1: Using the Snip & Sketch app
Press the Start button and enter Snip & Sketch in the search field.
Press the New button to start snipping with the snipping bar.
The snipping bar allows you to capture the following types of snips:
Rectangular snip. Drag the cursor around an object to form a rectangle.
Free-form snip. Draw a free-form shape around an object.
Full-screen snip. Capture the entire screen.
Once you snip an area of your screen — the snipped image is added to your clipboard and you can paste it immediately in another app. A screen prompt will also allow you to annotate, save or share it using the Snip & Sketch app.
Option 2: With the Print Screen key
While the PrtScn key already captures your full screen and sends it to your clipboard, opening the snipping bar provides you with more snipping tools you can use for precise snipping. For better control of your screen capturing options, you can opt to have your PrtScn key open the new snipping bar instead of having to type Windows logo key + Shift + S.
To turn on the new snipping feature keyboard shortcut Select Start > Settings > Ease of Access > Keyboard
Option 3: With the Window logo key + Shift + S shortcut
Pressing the S key + Windows logo + Shift keys down initiates the snipping bar at any time.
Annotate snips with Snip & Sketch
Opening images for editing with Snip & Sketch
To open an image from Snip & Sketch, select Open File or drag and drop an image from apps like File Explorer or Photos in the Snip & Sketch window.
Annotating images with Snip & Sketch
Snip & Sketch provides a few tools for annotating images, namely pen, pencil and highlighter. Once you click a tool to select it, you can click it again to change its color or thickness.
The tools work better with a pen device, but they can also be used with mouse or touch if you select the Touch Writing button icon.
Use the Eraser tool to remove specific strokes or click it twice to get the option to erase all ink.
Use the ruler or protractor tools and draw straight lines or arches.
Press the ruler/protractor button again to hide the ruler/protractor
Reside or rotate the ruler/protractor by using two finger touch gestures (if the Touch Writing button is selected) or with the mouse wheel.
Use the crop tool to crop the annotated image.
To undo cropping, select the crop tool again and press Cancel to restore the image to its full original area.
Panning the view
Some of the images you annotate might be larger than the size of the Snip & Sketch window. You can use the scroll bars to pan the view, but you can also pan the view with touch input (if the Touch Writing button is not selected) or by dragging with your mouse button while holding the Ctrl key down.
Zoom in and out of screenshots to make them easier to mark up using the magnifying glass icon. You can also zoom in and out of screenshots by pressing the Ctrl key down and tapping the + or — buttons.
Sharing and saving snips
Snip & Sketch copies the annotated snip to your clipboard when you open it and every time you make edits. Snip & Sketch allows you to save the annotated image to a file, share it or open with another app, or print it on paper or to a pdf file.
Using keyboard in Snip & Sketch
While annotating is best done using a pen or mouse — Snip & Sketch provides a lot of keyboard shortcuts you can use. Access keys are activated if you press and hold the Alt key.
How to skip the Windows login screen using these two methods


Since Windows 10 is very security-oriented operating system, it requires you to enter a password of your Microsoft account before login, just like it was the case in Windows 8.x.
But, if you’re the only person using the computer, this can become annoying over time, and you might want to start your computer automatically. So, if you belong to this category, we have a solution.
This action is actually very simple and it doesn’t require any registry hacks or tweaks, all you need to do is to change a couple of settings in your User Account.
How to remove the login screen in Windows 10
Solution 1: Use netplwiz
Here’s exactly what you need to do to prevent Windows 10 from requesting a password of your Microsoft account every time you turn your computer on:
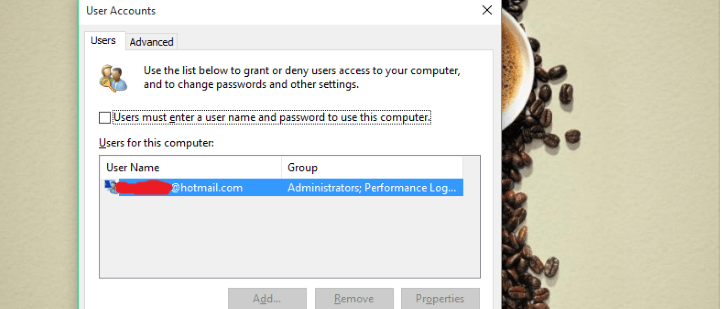
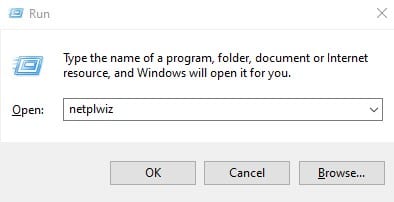
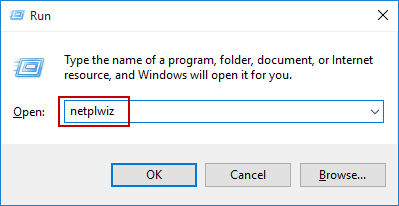
- Go to Search, type netplwiz and hit Enter
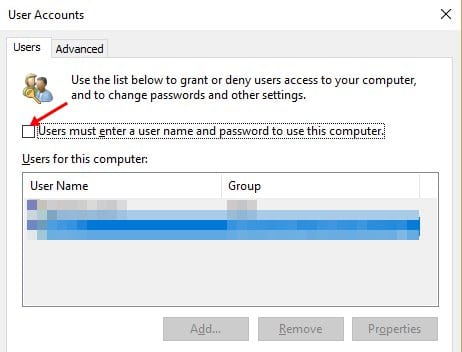
- Uncheck Users must enter a username and password to use this computer

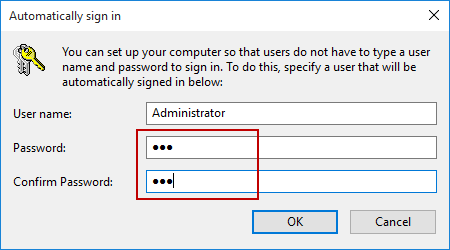
- Enter and repeat your password and click OK
- Restart your computer and it should sign in automatically, without requesting a password
If you change your mind and decide to turn on password request at login again, you just repeat the process, so go to netplwiz and check ‘Users must enter a username and password to use this computer’ again. Simple and easy.
We advise you to perform this action only if you’re one hundred percent sure that no one else will use your computer, because it will leave it completely unprotected, so if you’re using Windows 10 at work, keeping your computer safe is the better idea for sure.
This method also works in Windows 8, so if you’re still using that operating system, you now know how to get rid of password request at login.
Solution 2: Use Group Policy
Another way to get rid of the Windows 10 login screen is to disable this feature directly from the Group Policy Editor. Here’s how to do that:
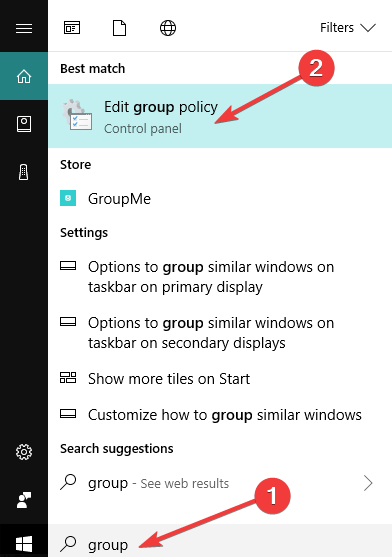
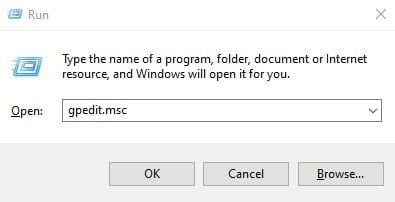
- Go to Start > type ‘group policy‘ > double click on the feature ‘Edit Group Policy‘ to launch it
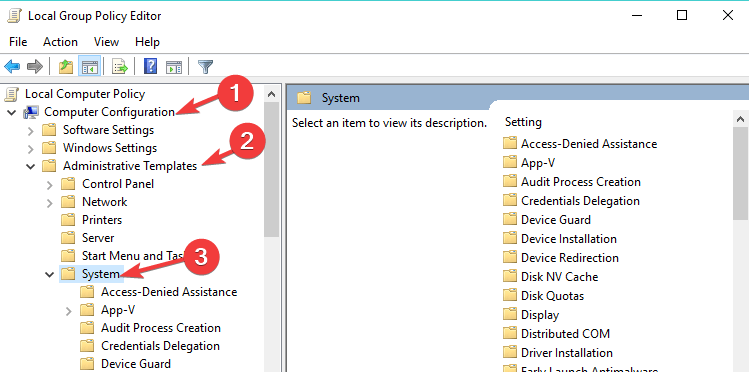
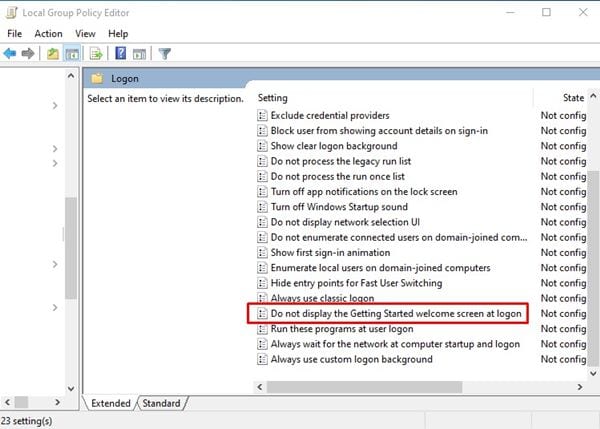
- Navigate to Computer Configuration > Administrative Templates > System
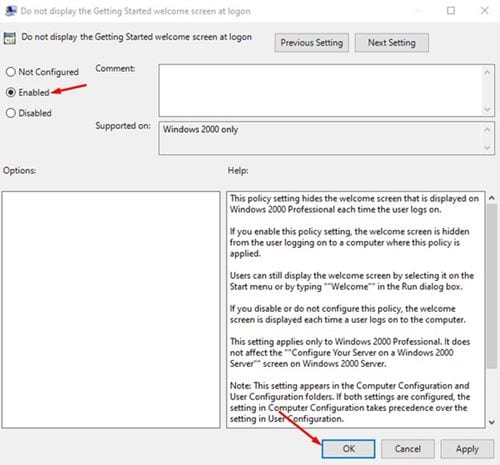
- Now, locate the option ‘Logon’ > go to ‘Don’t display the Getting Started welcome screen at logon”.
- All you need to do is enable this option and the login screen will no longer appear when you start your computer.
So, this is how you can skip the Windows 10 welcome screen when logging in.
If you have any other Windows 10-related problems, you can search for the solution in our Windows 10 Fix section.
RELATED GUIDES TO CHECK OUT:
How to Skip Login Screen on Windows 10 PC
Two best methods to skip login screen on Windows 10!
Well, Windows 10 is the best operating system when it comes to the desktop. The operating system is right now powering most desktop computers and laptops. Windows 10 offers more customization options, security features, and privacy options compared to every other desktop OS.
If you have been using Windows 10 for a while, you might know that the operating system requires a password to login for the sake of computer security. Every time your computer gets into sleep mode, you are asked to enter the password. Although it’s a good security measure, the login screen becomes unnecessary if you are the only one using the system.
At times, this could be annoying as well. Fortunately, Microsoft allows Windows 10 users to skip the login screen in Windows 10. If you choose to do so, you will no longer be required to enter the password every time you attempt to login.
2 Methods to Skip Login Screen on Windows 10 PC
In this article, we will share the two best methods to skip the login screen in Windows 10 operating system. Let’s check out.
Note: The login screen in Windows 10 is an important feature. If your computer is shared with others, you should never disable this security feature. If you disable the login screen, anyone would be able to use your computer without going through any security steps.
1. Skip Login using User Account Settings
While logged into Windows 10, you need to make few changes to the User Account settings of Windows 10 to skip the login screen. Follow some of the simple steps given below to bypass a Windows login screen.
Step 1. First of all, press Windows Key + R key on your computer to open the RUN dialog box.
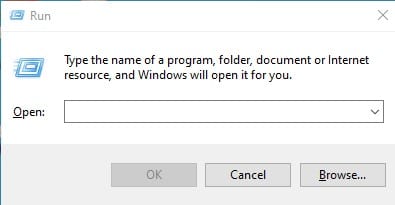
Step 2. On the RUN dialog box, enter ‘netplwiz‘ and hit the Enter button.
Step 3. This will take you to the User Accounts page.
Step 4. On the User Accounts page, uncheck the option ‘User must enter a user name and password to use this computer’ and click on the ‘Ok‘ button.
That’s it! You are done. Now you will no longer see the Windows 10 login screen.
2. Editing the Group Policy
In this method, we will make some changes to the Local Group Policy editor to skip the login screen on Windows 10. Follow some of the simple steps given below.
Step 1. First of all, press Windows Key + R on your computer to open the RUN dialog box.
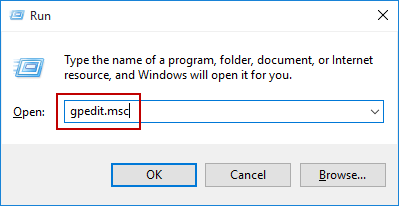
Step 2. On the RUN dialog box, enter ‘gpedit.msc’ and hit the Enter button.
Step 3. This will open the Local Group Policy Editor.
Step 4. Head to the Computer Configuration > Administrative Templates > System > Logon.

Step 5. On the right pane, scroll down and double click on the “Don’t display the Getting Started welcome screen at logon” option.
Step 6. On the next page, select ‘Enabled‘ and click on the ‘Ok‘ button.
Note: The two methods shared in the article might not work on the latest version of Windows 10. Also, if you are using the Preview builds of Windows 10, it may not work.
This article is all about how to skip the login screen in Windows 10 operating system. I hope this article helped you! Please share it with your friends also. If you have any doubts about this, let us know in the comment box below.
2 Ways to Automatically Skip Windows 10 Login Screen with Password
Generally, Windows 10 system requires password to login for sake of computer security. But if you are the only person who owns the computer for home use, you can try to skip Windows 10 login screen. Then when you start the computer, login screen is bypassed and you enjoy fast Windows 10 startup.
Here are two ways for you to skip or bypass Windows 10 login screen automatically.
Before do it, please make sure there is no system password set for computer and you can access computer. If you forgot login password, take Windows 10 Password Genius to directly remove or bypass Windows 10 login password for logon.
Way 1: Skip Windows 10 login screen with netplwiz
Command «netplwiz» could help to open user account settings dialog that is not shown in Control Panel.
1. Press Win + R to open Run box, and enter «netplwiz«. Click OK to open User Accounts dialog.
2. Uncheck «User must enter a user name and password to use the computer».
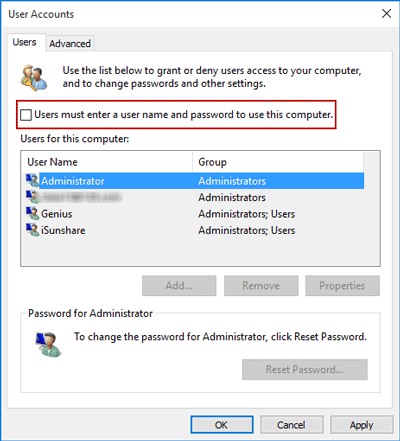
3. Click Apply and if there is pop-up dialog, please confirm the user account and enter its password. The specified user will be used to automatically sign in Windows 10.
Restart computer and it will bypass windows 10 login screen and automatically login with user account you enter password for.
Way 2: Bypass Windows 10 login screen with local group policy editor
Similarly, you can type «gpedit.msc» in Run box to open Local Group Policy Editor, where you can manage all Windows system settings.
1. Click on Computer Configuration Administrative Templates System Logon in the left window of Group Policy Editor.
2. In the right side, double click the setting «Don’t display the Getting Started welcome screen at logon».
3. Check «Enabled» in pop-up dialog to bypass welcome screen when you start Windows 10 computer next time.


