- Skype share screen mac os
- Asked by:
- Question
- All replies
- How to Share Screen on Skype for Mac
- Step 1: Download Skype
- Step 2: Launch Skype
- Step 3: Share Screen
- Как показать экран в Скайпе на Mac
- How to Share Your Screen on Skype
- Show friends or co-workers what’s on your screen
- What to Know About How to Share a Screen on Skype
- How to Share Screen on Skype for Windows, macOS, and Linux
- How to Share Screen on Skype for Business for Windows and macOS
- How to Share Snapshots on Skype for Android and iOS
- Troubleshoot Skype Screen Sharing
Skype share screen mac os
This forum has migrated to Microsoft Q&A. Visit Microsoft Q&A to post new questions.
Asked by:
![]()
Question
![]()
![]()
Skype for Business Version — 16.28.130 & above
This is happening basically on macOS Mojave 10.14.6
Error Message — Change your settings to allow Desktop Sharing. Go to the privacy pane of Security & Privacy and enable Screen Recording for Skype for Business.
All replies
![]()
![]()
What do you do before this issue appearing?
Does this issue persist all the time?
Do you try to find the “Screen Recording” item under Privacy pane in System Preferences?
In my research, there is a workaround for your reference. If you have a single monitor, using full-screen will work.
Moreover, you can try to get the older version of Skype for Business to roll back to 16.128.0.120 as the following link:
Best Regards,
Sharon Zhao
Please remember to mark the replies as answers if they helped. If you have feedback for TechNet Subscriber Support, contact tnsf@microsoft.com.
- Proposed as answer by sharon_zhao Microsoft contingent staff Thursday, December 5, 2019 9:26 AM
- Edited by sharon_zhao Microsoft contingent staff Tuesday, December 10, 2019 5:47 AM
![]()
![]()
We are seeing the same behaviour. Any time screen sharing is attempted this error is returned:
«! Change your settings to allow desktop sharing. Go to the Privacy pane of Security & Privacy and enable Screen Recording for Skype for Business.
In macOS 10.14 there is no «Screen Recording» in the Privacy pane in Security & Privacy preferences. It may be a key in a .plist .xml file. Could you find out about that so we might manually set, or use an MDM to set it for multiple clients?
D. Scott Beach Sr Desktop Solution Specialist
Rogers Communications 1 Mount Pleasant Road, 4th Floor Toronto, ON M4Y 2Y5 o 647.426-0943 m 416.258-0721
![]()
![]()
To all here, thank you!! This has been driving me crazy — and my management — ever since the update to 16.28.130. Not sure why no one else is having the issue but your responses did the trick. My additional comments below, if it will help Microsoft fix the bug in the next release (FYI, I use a two monitor set-up with the main screen being my laptop and the secondary monitor, positioned above the laptop.)
- The problem does not happen in non-full screen mode right after a system reboot. But it happens over time (can’t say how long)
- I had an instance yesterday, in the later part of my workday, when I attempted to share my desktop and, to my surprise, it worked
- As D. Scott Beach indicates, the prompt is weird because Mojave (10.14) does not have a ‘Screen Recording’ setting in the Security pane; this was only introduced with Catalina (10.15). My guess is a programatic change was made so that if an error is encountered, that prompt comes up. Wrong prompt for the OS, Microsoft friends. Trail that logic back and amend the app accordingly
Recommended fixes from here
Rolling back would probably do the trick but it also forces you to reload prefs and contacts and groups (if I recall correctly)
I tried joining a meeting, going full screen, and found these happy results:
- Desktop sharing worked fine
- Taking the meeting window out of full screen allowed the screen sharing to continue working
- Quitting the meeting and rejoining it (non-full screen), then turning on screen sharing worked
- I opened up a completely different meeting from earlier in the week (non-full screen), turned on screen sharing, and it works
So, it looks like we have some good workarounds here, which also seem to last for at least 10 minutes, so far.
Источник
How to Share Screen on Skype for Mac
It gets very frustrating when you’re working online and trying to describe what you’re doing, but the other person can’t visualize what you’re telling them. That’s what Skype’s screen sharing function is great for: it lets you share your screen rather than trying to verbally explain what’s happening on your computer screen.
Share Screen is a function that allows all participants in a Skype conference to view one person’s screen in real-time. This helps put everyone on the same page faster and disseminates information in a more efficient manner. However, if you’ve never used this feature, you may not know how to get started.
I am going to show you three simple steps for screen-sharing on Skype for Mac.
Note: Share Screen can only be initiated from a desktop or laptop computer. Mobile users can view the shared screen but are unable to initiate it with others.
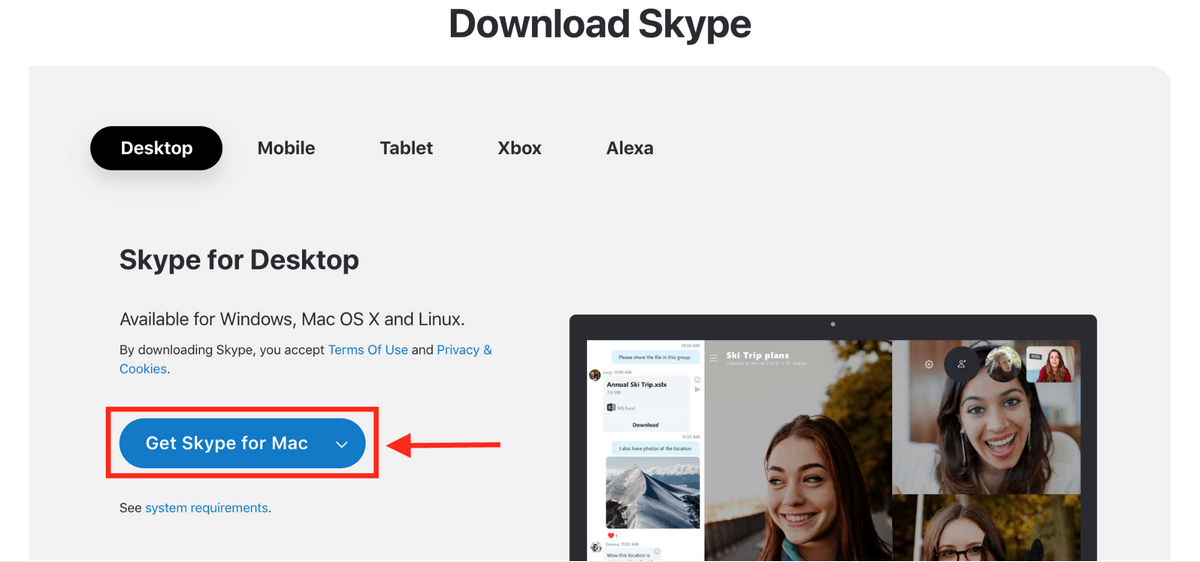
Step 1: Download Skype
I’m stating the obvious here, but you need to have the Skype application on your Mac before you do anything else. If you don’t already have it, head on to https://www.skype.com/en/get-skype/ to get the download. Make sure that you select the Mac version of Skype.
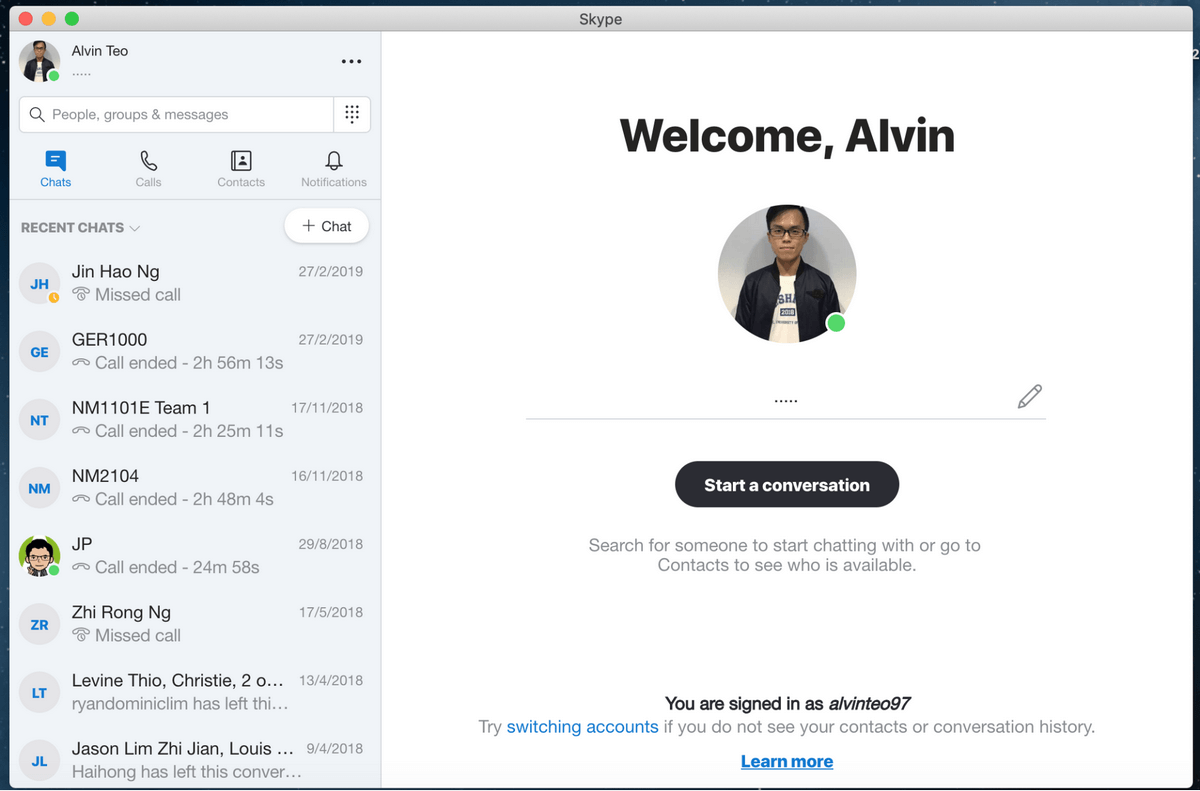
Step 2: Launch Skype
After downloading, launch the Skype application. Sign in–or if you don’t have an account yet, make one. You will be directed to an interface that lists all of your contacts.
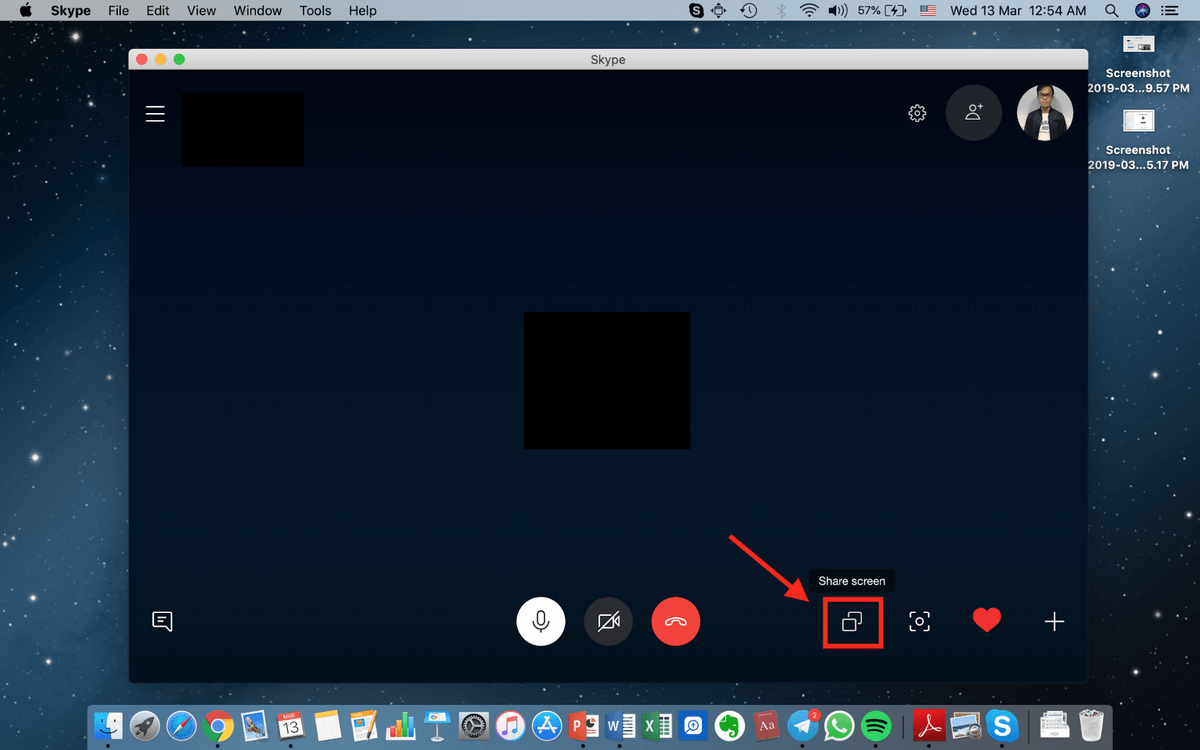
Step 3: Share Screen
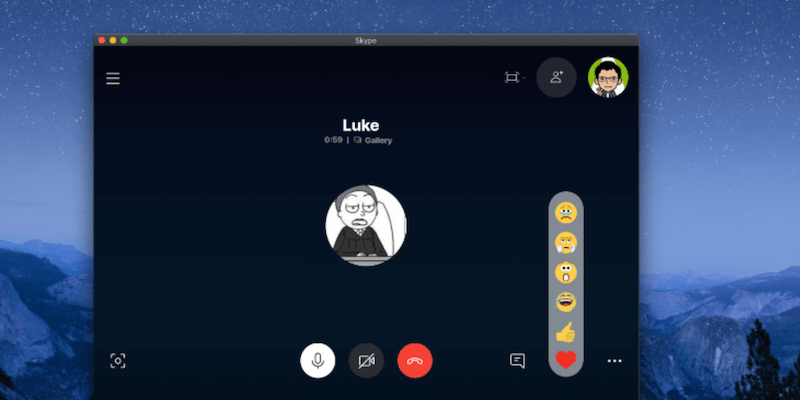
After initiating a conversation with a contact, you should see many different icons hovering at the bottom of the conference window. The Share Screen function is the icon where the square box partly overlaps another square box. It’s shown in the image below.
Hit that icon and you will be prompted once to share your screen. Simply hit Start Sharing and your screen will be displayed for everyone in the conference.

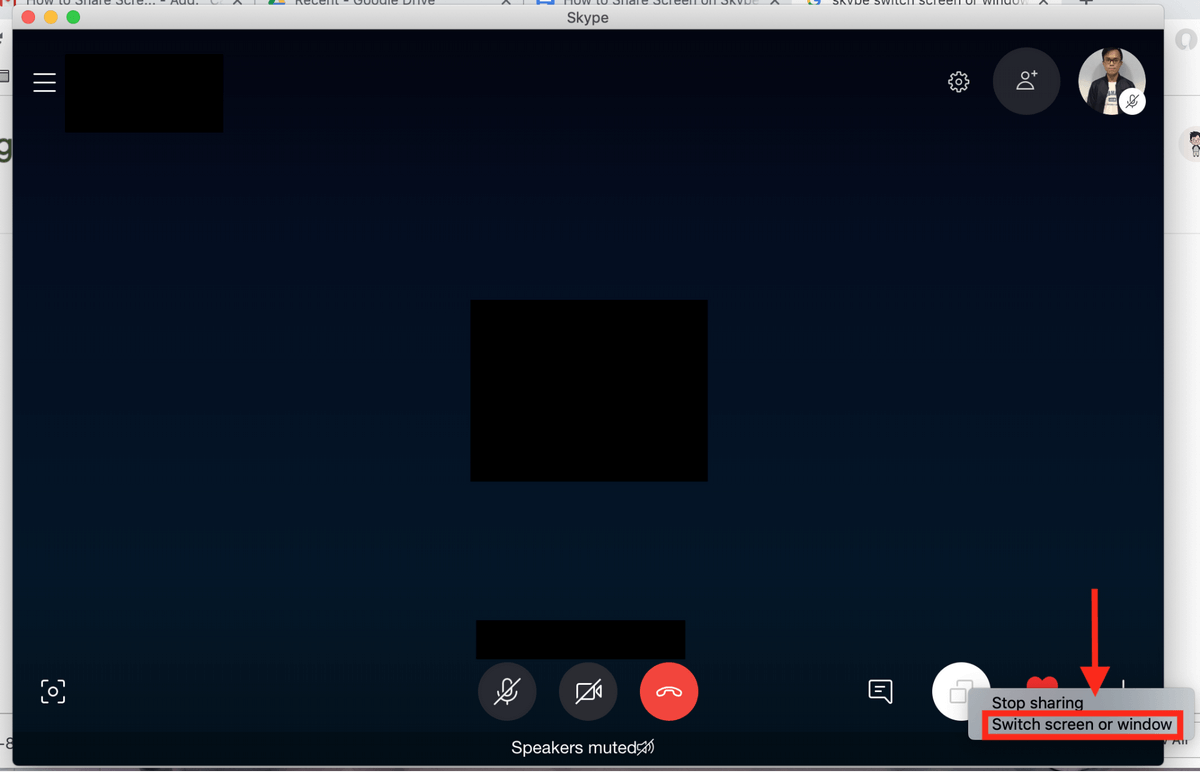
You can also switch screens to share an application window instead of your entire screen. This limits the individual you’re sharing your screen with to only seeing what’s going on in the application. To do this, click on the same icon. You should see Switch Screen or Window.
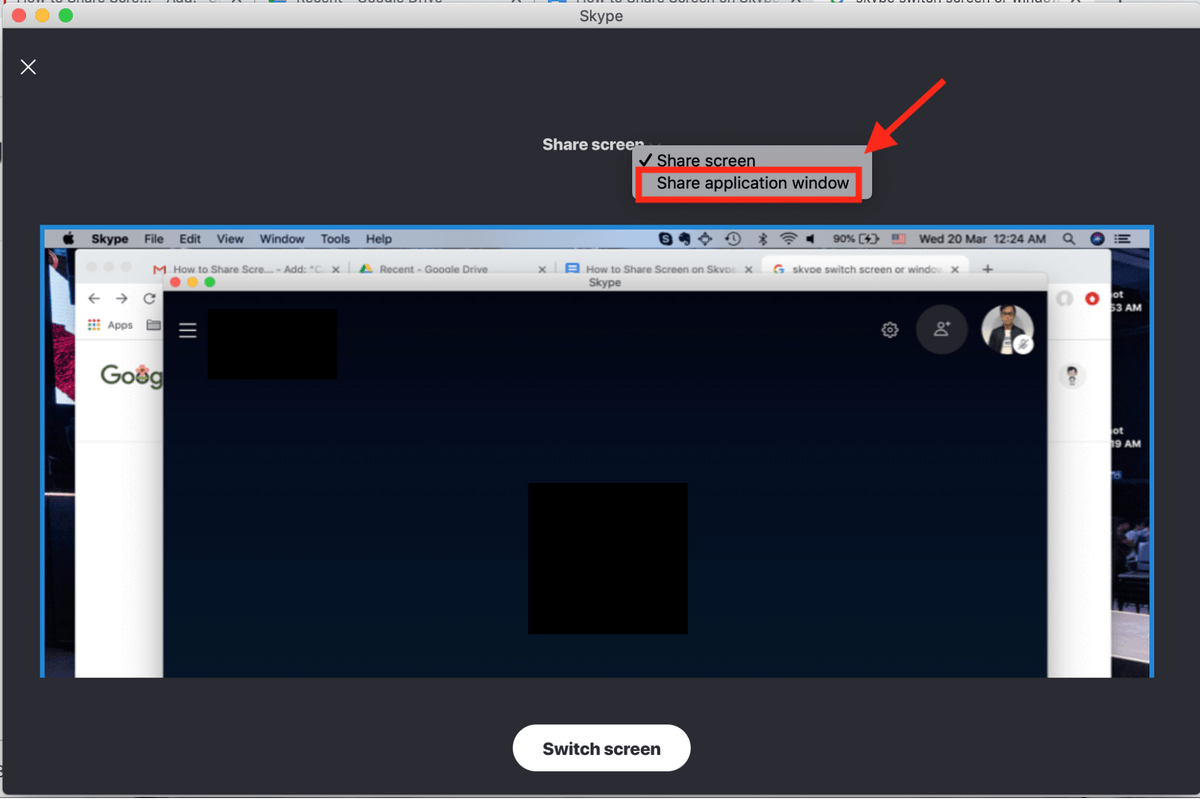
You will be shown what the receiver is currently seeing. Select Share Application Window.
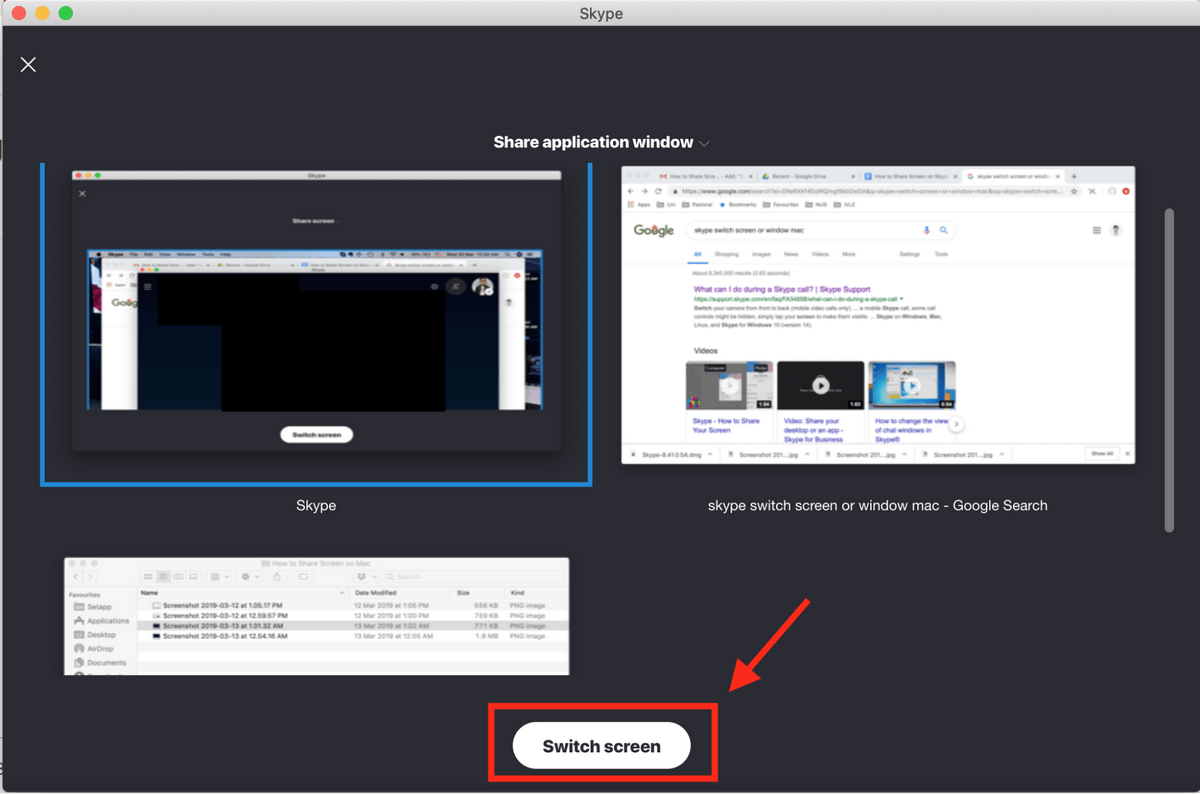
Next, choose the application window you want to share and click Switch Screen.
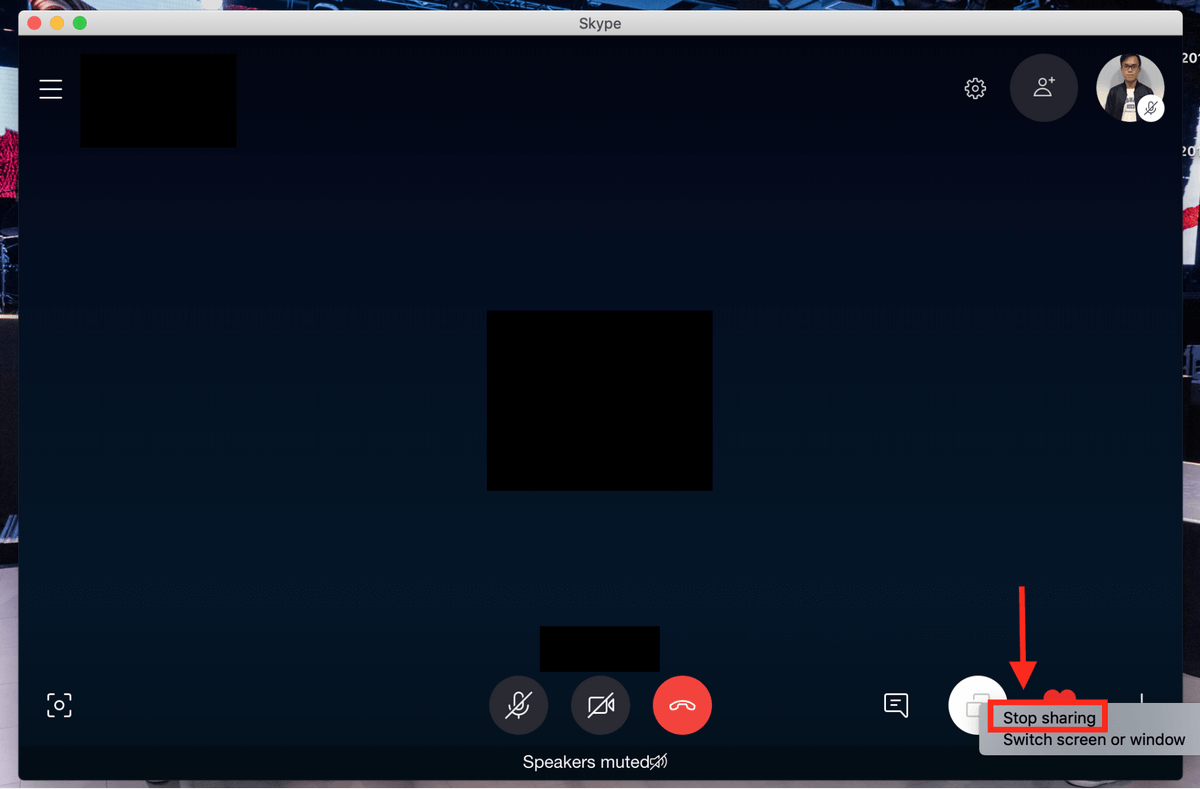
When you want to stop sharing your screen, click on the same icon and click Stop Sharing as shown below.
Now you no longer have to waste time describing what is on your screen, nor do your friends need to endlessly attempt to visualize what you’re saying.
Feel free to drop a comment if you have any further questions.
While i am sharing my mac book screen on skype,only my wall paper is being displayed and not the files.
Earlier i was able to share my file on screen
I was not able to handle my problem and was charged for a person with whom I could not talk.
Источник
Как показать экран в Скайпе на Mac

Тем, кому нечасто приходится использовать функцию демонстрация экрана с Скайпе, бывает сложно найти такую кнопку в этой популярной программе для бесплатной связи с миром. В этой инструкции мы расскажем, как сделать ваш экран компьютера с системой Mac Os видимым для того, с кем разговариваете в данный момент.
Если вы хотите показать свой экран в Скайпе собеседнику, то первое, что необходимо сделать — это позвонить ему. То есть кнопка включения демонстрации экрана становится активной только в процессе голосовой связи.
После того, как связь установлена, нажмите правой кнопкой мышки на этот контакт и выберите в появившемся меню «Демонстрация экрана…»: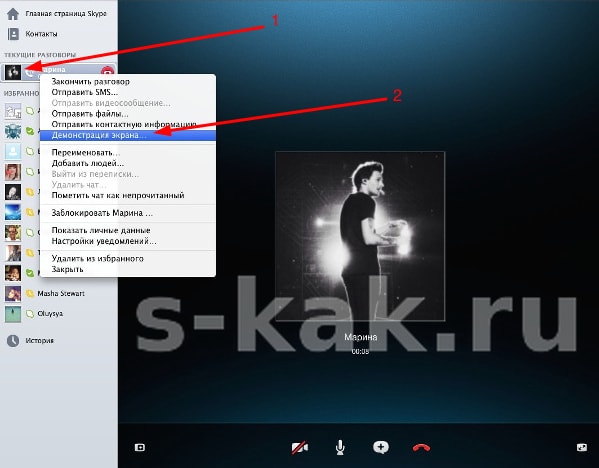
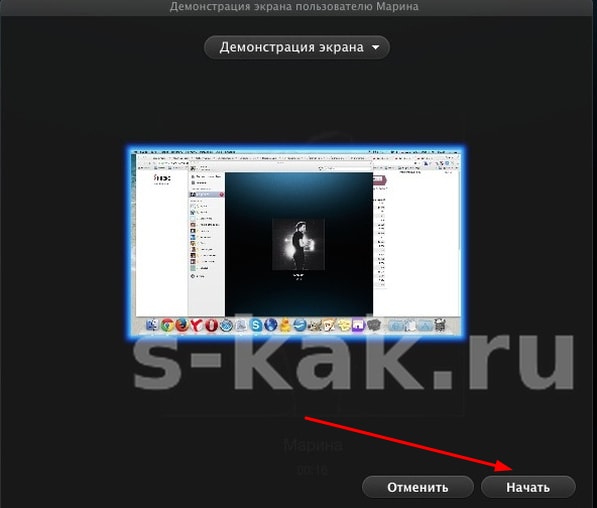
Подтвердите свое желание начать показывать экран собеседнику кнопкой «Начать»:
С этого момента всё, что вы видите на компьютере, видит и ваш контакт, находящийся на связи.
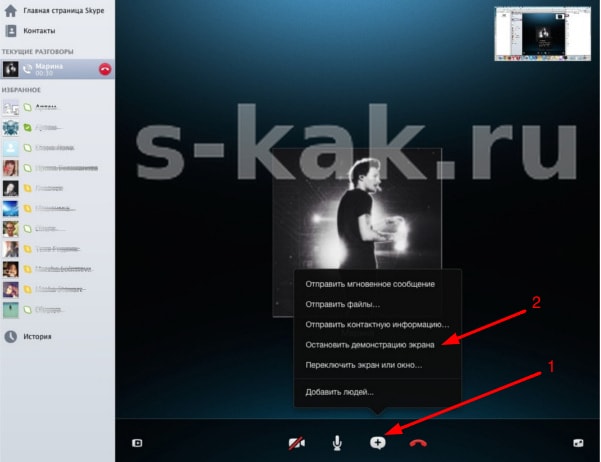
Чтобы отключить видимость экрана, но не завершать разговор, разверните окно программы Skype и найдите внизу иконку с «+», кликните по ней мышкой и в меню жмите — «Остановить демонстрацию экрана»:
Если в дальнейшем боитесь забыть порядок действий ^ чтобы показать экран в Скайпе на Mac, добавьте эту инструкцию себе в закладки.
Источник
How to Share Your Screen on Skype
Show friends or co-workers what’s on your screen
:max_bytes(150000):strip_icc()/acp_casual_headshot-5b59662146e0fb002561f951.jpg)
If you use Skype, you don’t need an expensive conferencing service to show your friends or colleagues something on your screen. The original video-chat service has long supported a screen-sharing feature, provided you launch it from a desktop version of the app.
Instructions in the article apply to Skype on Windows 10, macOS, Linux, Android, and iOS. Skype for Business is also addressed on the platforms where it’s available. Additionally, While Skype is available for web browsers, the Screen Share feature is not.
What to Know About How to Share a Screen on Skype
There’s one common requirement when you want to share your screen. You must be engaged in a voice call with your contact. You don’t need the sound, but it’s useful to explain what’s happening on the screen.
When you’re in a voice call, you can show someone what’s on your screen, though your sharing capabilities vary by platform:
- Windows, macOS, and Linux: One person can share a screen with everyone on the call.
- Android and iOS: You can take still snapshots, but not share the screen.
How to Share Screen on Skype for Windows, macOS, and Linux
Recent versions of Skype have come a long way to make the application consistent across desktop operating systems. When you’re connected to a call, Skype provides a one-click process to share your screen that’s similar across all platforms.
Select the Share screen icon in the lower-right corner of the screen.
:max_bytes(150000):strip_icc()/skypesharescreen-754acbdc397242a1812873d3bf823f9b.jpg)
If you have more than one monitor or display, select which one you’d like to share. Click Share Screen to start.
Confirm what’s being shared. Skype places a yellow border around the screen.
:max_bytes(150000):strip_icc()/skypeyellowoutline-d25c71f3d1244a1db985fd18a147d098.jpg)
To stop sharing, either select the Share screen icon again or hang up the call.
How to Share Screen on Skype for Business for Windows and macOS
Skype for Business is Microsoft’s corporate version of Skype. It comes from their previous messenger called Lync. The process to share your screen is similar to the consumer version of Skype, as you need to be in a voice call, but the on-screen controls are slightly different.
In a video call, select the Share Content icon at the bottom of the screen, second from the right.
Select Share your Desktop to share the entire desktop or select Share a Window to share a single window.
:max_bytes(150000):strip_icc()/Skypewiththe_ShareYourDesktop_and_ShareaWindow_commandshighlighted-33a3cd375b704798af148a12587eb880.jpg)
Use this menu to stop sharing or end the call.
How to Share Snapshots on Skype for Android and iOS
Mobile devices can’t share live screencasts in calls, but these devices can share screenshots.
Screen sharing is the equivalent of video. If you’re on a mobile network, it uses your data rapidly. Unless you’re only text chatting while using Skype, access a Wi-Fi network to avoid overage charges.
On iOS or Android, tap the Plus when you’re on a call. This tap displays the actions you can take during a call.
Tap Snapshot.
:max_bytes(150000):strip_icc()/theSkypeappwiththePlussignhighlighted-48320d0339a74665be5b880f2aec0467-e623ca330c724c989c2f54ccce539787.jpg)
Skype takes a snapshot of your screen and automatically inserts it into the call’s text chat.
You may not notice it with the voice call taking up the full screen, but the chat indicator in the lower-left corner of the screen shows a new message. That’s where you’ll find the picture of your screen.
:max_bytes(150000):strip_icc()/Skypecallwithascreenshothighlighted-88ec28a0c98848f6a1de2b9b5b76a1cc.jpg)
Others in the call can view or download the screenshot, so be careful what else is on the screen when you capture it.
While you can’t send your screen to other callers, you can receive shared screens on a mobile device. It appears in the center of the screen but might be too small to be useful.
Troubleshoot Skype Screen Sharing
Like most high-throughput internet features, screen sharing doesn’t always work as planned. Here are some common problems and solutions:
Источник


