- How to Play a Photo Slideshow in Windows 10 from File Explorer
- Play an Image Slideshow in Windows 10
- How to view Photos as a Slideshow on Windows 10
- View Photos as a Slideshow on Windows 10
- 1] Use the Slideshow feature in Explorer
- 2] Use the Windows Photos app
- 3] Use other apps to view Slideshows
- 4] View Pictures as a Slide Show on your Desktop
- [How To] Enable Desktop Slideshow In Windows 10
- How To Enable Desktop Slideshow In Windows 10
- About Kapil Arya
- Fix: Desktop Slideshow Is Not Working In Windows 10
- Check if Desktop slideshow is turned off
- Allow slideshow when on battery
- Check the number of wallpapers in the selected folder
- Make sure that wallpapers are not in sub-folder(s)
- Install a different desktop themepack
- Uninstall recently installed desktop customization software
- Restore Windows 10 to an earlier date
- Related Articles
- Comments
How to Play a Photo Slideshow in Windows 10 from File Explorer

![]()
In previous versions of Windows, starting with Millenium Edition, or Windows ME for those of you too young to remember that debacle, you could play a slideshow of your pictures in the My Pictures folder. With Windows 10, things have changed a bit, but you can still play an image slideshow from within File Explorer. Here’s a look at how to choose the images you want, and start the slideshow via the updated Ribbon interface.
Play an Image Slideshow in Windows 10
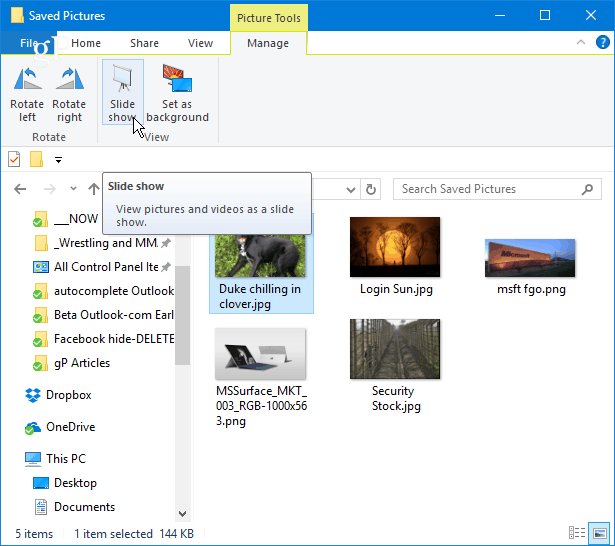
To easily start a slideshow of all images in a folder, open the folder that contains the images you want, and then select the first picture from the folder. A new yellow section called Picture Tools will appear in the Ribbon above the Manage tab; click on it.
There you will see some new options and in the View section. Click on Slide show to begin a slideshow of all of the pictures in the folder. Note that if you don’t select any of the pictures in the folder you will not be able to start a slideshow.
You can also start a slideshow with only the specific images in a folder you want to use. To select the images in the folder you want, hold down the Ctrl or Shift key on your keyboard to select the pictures you want to use. That will give you the same Picture Tools option in the Manage tab with the option to start a slideshow.
Once you start the slideshow you can right-click on any of the displayed images and control playback, change the speed, or exit from the slideshow.

Remember that this will only display the static images in File Explorer. If you want more sophisticated tools, check out the built-in Photos app or the upcoming Windows 10 feature, Story Remix, which will let you edit and combine pictures and video files, too. Or, you can always use a third-party app like IrfanView which also offers more customizable slideshow options.
Do you use the Slideshow option in Windows 10 File Explorer or do you prefer a third-party app? Leave a comment below and let us know how you like to show off images on your PC.
How to view Photos as a Slideshow on Windows 10
Do you have hundreds or thousands of photos in several folders on your Windows 10 computer? Gone are the days when you had to press the space key, and page up and down keys to browse through the photos. When it comes to browsing through various pictures stored on your system, viewing them in a slideshow works best. Slideshows enhance the viewing experience of your pictures as they add in a video like feel to the otherwise stagnant images. If you want to view your pictures in a clean slideshow on Windows 10, then this guide can be of much help.
View Photos as a Slideshow on Windows 10
There are four ways you can view pictures or photos as a slideshow in Windows 10:
- Use the Slideshow feature in Explorer
- Use the Windows Photos app
- Use other apps to view Slideshows
- View Pictures as a Slide Show on your Desktop.
Let’s look at each of these methods in detail.
1] Use the Slideshow feature in Explorer
From the ‘File Explorer’ navigate to the folder that contains all the pictures you want to view in a slideshow.
In the Pictures folder, click on the first image to include in the slideshow, now press and hold the Shift Key on your keyboard, and click the last picture. This action selects all the pictures between the first and the last image selected.
You can select individual images by holding the Ctrl Key and then click each picture individually to add to the Slideshow.
Now select the ‘Manage’ option appearing in the top ribbon under the ‘Picture Tools’
Select the ‘Slide Show’ option to begin the photos slideshow.
As soon as you click the ‘Slide show’ option all the selected images will appear one by one. To exit the slideshow, press the ‘ESC Key’ on your keyboard. Also, to view the slideshow advanced controls click right on the screen.
- Click ‘Loop’ to run the pictures continuously
- To adjust the image transition speed, click ‘Slow,’ ‘Medium,’ or ‘Fast.
- To change the pictures manually, click ‘Pause’ and to go back to the automatic mode, click ‘Play.’
This is one of the easiest and convenient methods of running a Slideshow on Windows 10.
2] Use the Windows Photos app
The Windows Photos application hides plenty of features, and one of them is the built-in slideshow maker. This application is quite simple, just ensure that you upload your photos folder on the application, and Photos app will churn it out an attractive digital slideshow.
Go to the ‘Photos’ app from the ‘Start Menu’. Click on ‘Folders’.
If you do not see your photos folder, click ‘Choose where to look’ appearing under ‘Not seeing all your photos’
Now click on the ‘Add a folder’ option
Select the photo folder and click on the ‘Slideshow’ option appearing on the top-right corner.
This will start the slideshow of the selected folder. To stop the slideshow, click on the ‘ESC Key’ or simply click anywhere on the screen with your mouse.
3] Use other apps to view Slideshows
For many users, the Photos app may not be a default viewer for photos. In such cases, users can run slideshows on other Windows programs; these programs include Windows Photo Viewer, Photo Gallery, and Picasa. Out of these, Windows Photo Viewer is a popular option; this application has been replaced with the Photos app, but it can be restored with this guide. To use this application for viewing pictures in a slideshow:
- Open Windows Photo Viewer or simply click on any picture.
- Now click on the round icon found at the bottom center. This starts the Photos Slideshow.
- To exit, click the ‘ESC Key’.
Other programs like Photo Gallery offer animated options including ‘Cinematic’ and ‘Pan’ and ‘Zoom’. Therefore, if you have images that are natural they may come to life like no other.
4] View Pictures as a Slide Show on your Desktop
In this method, the slide show will play the images as your desktop background. To set to view pictures in a folder as a slide show on your desktop, follow these steps:
- From the ‘Start Menu’ go to ‘Settings’
- Click On ‘Personalization’
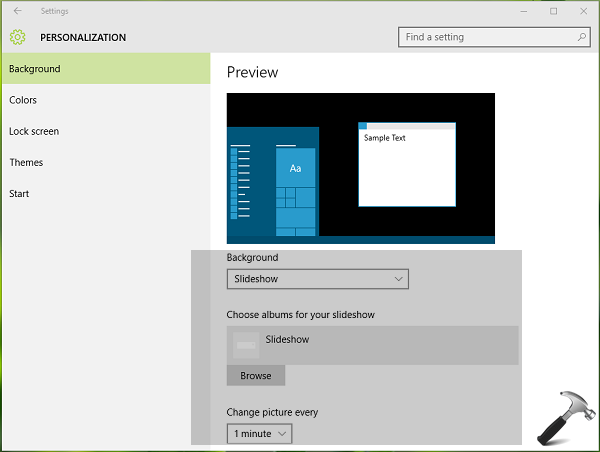
- On the right, under ‘Background’, click and select ‘Slideshow’
- By default, the folder selected is ‘Pictures.’ You can hit ‘Browse’ under ‘Choose albums for your slideshow’ to change the default picture location.
- Finally, under ‘Change picture every’ option select from 1 minute to 1 day to decide how frequently you want a new image to display on your Windows 10 desktop.
Slide Show plays pictures in the same order as they are in the folder starting with the first image. You can choose ‘Shuffle’ for the random sequencing of images.
Creating a slideshow on Windows 10 elevates the overall experience in viewing our pictures.
We hope this guide has given you quite a few options to create a slideshow on Windows 10 based on your personal need. Do let us know if you have more tips in the comments section below.
[How To] Enable Desktop Slideshow In Windows 10
Published: November 29, 2015 · 09:32 AM \\ Applies to: How To, Windows 10
No doubt, Windows 10 has many customization options available for users. Desktop Slideshow is one of those customization option that was very popular with Windows 7. This feature is still available in Windows 10 and can be configured from all new Settings app.
Desktop Slideshow feature changes desktop background automatically in a specified amount of time. In order to allow slideshow to run, you need to specify a folder with some images that will be shuffled during the slide show. Complete steps to configure slide show with a shuffle at custom amount of time in which background changes are mentioned here:
How To Enable Desktop Slideshow In Windows 10
1. Open Settings app and navigate to Personalization > Background.
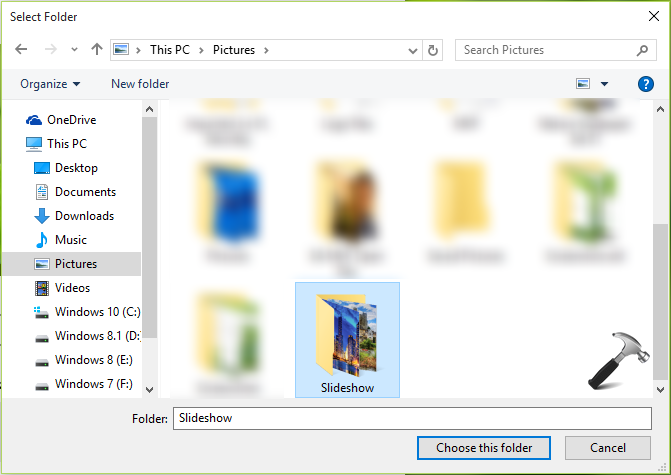
2. Next, in the right pane of Background, set Background option to Slideshow. Then under Choose albums for your slideshow heading, click Browse. Now select the folder whose picture you want to appear in slideshow.
You can also set the timing of changing wallpaper after a specified time. Windows gives you the option to choose from six intervals – 1 minute, 10 minutes, 30 minutes, 1 hour, 6 hours and 1 day. However, for setting a custom interval, you need to tweak registry which is mentioned in further steps.
Registry Disclaimer: The further steps will involve registry manipulation. Making mistakes while manipulating registry could affect your system adversely. So be careful while editing registry entries and create a System Restore point first.
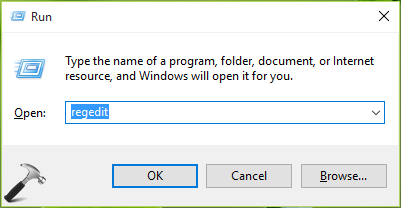
3. Press  + R and put regedit in Run dialog box to open Registry Editor (if you’re not familiar with Registry Editor, then click here). Click OK.
4. In the left pane of Registry Editor, navigate to following registry key:
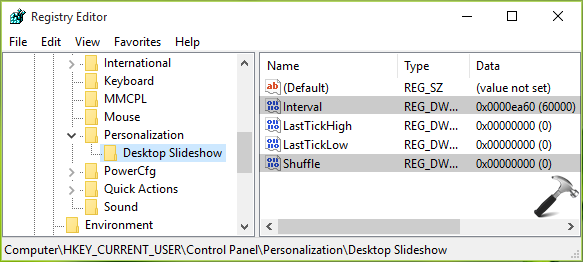
5. In the right pane of Desktop Slideshow key, look for the registry DWORD name Interval and Shuffle. Double click on Interval to modify its Value data:
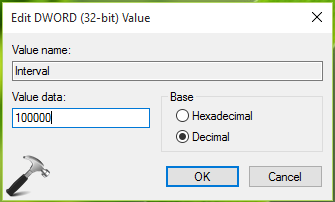
6. Finally, set the Value data as the amount of interval after you want to let the wallpaper changed. Select the Decimal as Base first and then input custom value with convention 10000 milliseconds = 10 seconds. Click OK. Similarly, change the Value data for Shuffle DWORD to 1, if you want let shuffling be enabled. Close Registry Editor.
In this way, custom desktop background slideshow is ready and you can restart File Explorer/machine to enjoy it.

About Kapil Arya
Kapil is presently a Microsoft MVP in Windows IT Pro expertise. He is Windows Insider MVP as well, and author of ‘Windows Group Policy Troubleshooting’ book. In 2015, Microsoft India accomplished him as ‘Windows 10 Champion’. Being passionate Windows blogger, he loves to help others on fixing their system issues. You can follow him for news/updates and fixes for Windows.
Fix: Desktop Slideshow Is Not Working In Windows 10
Last Updated on March 2, 2020 by admin 10 Comments
The Desktop slideshow or desktop background slideshow is a handy feature available in Windows 10 to automatically shuffle desktop background picture at given intervals.
The desktop slideshow feature can be enabled and configured by navigating to the personalization section of the Settings app.
At times, the desktop slideshow feature might stop working on Windows 10. In other words, Windows 10 might not automatically change desktop wallpaper at given intervals, even when the desktop slideshow is enabled.
If Windows 10 is not automatically changing desktop slideshow, you can try out the following solutions to fix the desktop slideshow feature issue.
Method 1 of 7
Check if Desktop slideshow is turned off
Well, the desktop slideshow feature will not work if it’s turned off. So it’s important to make sure that the feature is enabled under Settings.
To check the status of desktop slideshow feature:
Step 1: Right-click on the empty area of the desktop, click Personalize and then click Background.
Step 2: Under the Background section, make sure that the Slideshow option is selected.

If the slideshow is selected, but if the feature is not working, please refer to the solutions 2, 3, 4, and 5 mentioned below.
Refer to our how to enable desktop slideshow feature in Windows 10 guide for detailed instructions for enabling and configuring the slideshow feature.
Method 2 of 7
Allow slideshow when on battery
With default settings, Windows 10 doesn’t automatically change the desktop background picture when your PC is running on battery power to improve the backup time. In short, the desktop slideshow doesn’t work when the PC is using battery power.
However, you can configure Windows 10 to allow slideshow feature when on the battery by following the given below steps.
Step 1: Right-click on desktop, click Personalize and then click Background.
Step 2: Turn on the option labeled Allow slideshow when on battery feature to force Windows 10 to automatically change the desktop background even if the PC is running on battery power.

There is another way to allow slideshow when on battery
Step 1: Type Edit power plan in Start menu or taskbar search box, and then press Enter key to open Edit plan settings window.
Step 2: Click Change advanced power settings link to open Power Options dialog.
Step 3: Expand Desktop Background Settings tree, expand Slideshow, and then select Available for On Battery. Click the Apply button and then click OK.

Note that when you allow slideshow on the battery using the above method, Windows 10 will allow the slideshow for the selected power plan only. If you want to allow slideshow when on battery for all plans, select another plan from the drop-down list in the Power Options dialog (refer to the picture above) and make the change.
Method 3 of 7
Check the number of wallpapers in the selected folder
As you likely know, while enabling the desktop slideshow feature, Windows 10 asks you to select a folder containing pictures that you want to use for the slideshow feature.
If the slideshow is not working, make sure that the folder you selected has at least two pictures as Windows 10 can’t automatically change the desktop background if there is only one picture inside the selected folder.
Method 4 of 7
Make sure that wallpapers are not in sub-folder(s)
While checking the desktop slideshow settings, make sure that the wallpapers are present in the root of the selected folder or not in sub-folders.
Method 5 of 7
Install a different desktop themepack
If the desktop slideshow feature is not working for a specific desktop theme (desktop themepack), install a different theme, and then check if the slideshow is working. Refer to our how to install and delete a theme in Windows 10 guide.
Method 6 of 7
Uninstall recently installed desktop customization software
If none of those mentioned above solutions fixing the slideshow issue, then it could be because of a recently installed or configured third-party desktop background customization software.
If you recently installed or configured a desktop customization software, please uninstall the same and check if the slideshow works after removing the third-party customization software.
Method 7 of 7
Restore Windows 10 to an earlier date
If the slideshow feature was working without any issues till recently, you could try restoring Windows 10 to a previous date. While restoring, select a restore point created on a specific date when the slideshow was working.

Related Articles
Comments
Thanks, I’m so stupid I forgot there is advance power setting for desktop background settings
it worked, thanks
Raphaël Dufour says
My problem : Everytime my pc ic back from “sleep mode” the shuffle stops, I have to :
Open personnalize, Uncheck shuffle and then recheck it start working again. Else it just freezes the same wallpaper for ever. How do you fix this ?
Was this article written by Captain Obvious?
Bill Crichton says
When I updated to 1903, my Slideshow disappeared. Tried switching to a solid color and back again to Slideshow but background still reverted to solid color. What worked was to switch to Picture mode, select a photo, and THEN switch back to Slideshow.
You have to choose a folder that does not have any subfolders.
All the pics must be in 1 map.
Laxman Ganapati says
None of the fixes posted on the web and Microsoft forum worked for me. After struggling for days, I stumbled across a solution purely by accident and for which I can’t offer a legit explanation.
I connected a USB flash drive and presto! The pictures started changing.
Lizzie Hutchings says
I figured out something that worked. I didn’ t work for me for a really long time, until after I set a slideshow background, then click “Next desktop backdrop” then it just started working, so yay.
None of these works.
I have a suggestion for another solution to desktop slideshow issues, which I haven’t seen anywhere else:
My problem is that the settings menu crashes if I change the desktop background to a slideshow, or if I try to open the lock screen settings. (on Windows 10 Pro version 1803 OS build 17134.441).
My solution involves going into C:\Windows folders and may require advanced permissions, and is as follows:
1. In (C:\Windows\Web\Wallpaper) create new folder and give it theme name.
2. Add desired images for slideshow, give them simple names like img1, img2, etc.
3. In (C:\Windows\Resources\Themes) right-click and open with notepad any of the Windows Theme Files (recommended to pick one you won’t be using again. Double click on the theme files to apply them to see which ones they are. I used the Flowers theme).
4. In the notepad file, under ([Control Panel\Desktop]) Wallpaper, change the location to an image from your created (C:\Windows\Web\Wallpaper) folder. This will be the theme thumbnail.
5. Under ([Slideshow]) change the Items locations to your images. For example: (Item0Path=%SystemRoot%\Web\Wallpaper\Birbs\img1.jpg)
6. File > Save As and select Save as type: All Files. Give it a name and the extension (.theme)
7. You will be prompted to save in a documents/users folder instead of the \Resources\Themes folder, do so.
8. Copy the resulting .theme file and paste it back into (C:\Windows\Resources\Themes).
9. Double click the .theme file and your slideshow should be applied.


