- Установка клиента WebDAV в Windows Server 2016
- Что такое WebDAV?
- Установка WebDAV Client Windows Server 2016
- Включение автозапуска службы WebDAV
- Настройка WebDAV Client Windows Server
- Подключение сетевой папки WebDAV в Windows Server 2016
- Требуется настройка Windows Server?
- Установка клиента WebDAV в Windows Server 2016
- Set up the Remote Desktop web client for your users
- What you’ll need to set up the web client
- How to publish the Remote Desktop web client
- How to update the Remote Desktop web client
- How to uninstall the Remote Desktop web client
- How to install the Remote Desktop web client without an internet connection
- From a device with internet access
- From the RD Web Access server
- Connecting to RD Broker without RD Gateway in Windows Server 2019
- Setting up the RD Broker server
- Follow these steps if there is no certificate bound to the RD Broker server
- Follow these steps if there is a certificate previously bound to the RD Broker server
- Setting up the RD Session Host
- General Observations
- How to pre-configure settings for Remote Desktop web client users
- Suppress telemetry
- Remote resource launch method
- Reset RDWebClientDeploymentSetting configurations to default
- Troubleshooting
- What to do if the user’s browser shows a security warning when they try to access the web client
- What to do if the user can’t connect to a resource with the web client even though they can see the items under All Resources
- Diagnose issues with the console log
- Get help with the web client
Установка клиента WebDAV в Windows Server 2016
Не оставляю без внимания Windows Server 2016. Недавно потребовалось подключить Яндекс.Диск к одному терминальному серверу, поэтому сегодня познакомимся с протоколом WebDAV – выполним установку, настройку и подключение диска.
Нет времени читать статью?🚀 Закажите настройку Windows Server и служб под Ваши задачи! Заявку можно оставить любым удобным способом, используя контакты технической поддержки.👍
Что такое WebDAV?
WebDAV (Web Distributed Authoring and Versioning) – расширение протокола HTTP / 1.1, которое позволяет обращаться к файлам на удаленном сервере и выполнять с ними общие операции:
- чтение;
- запись;
- копирование;
- удаление файлов и т.д.
Как правило, этот протокол используется пользователями для совместной работы с удаленными файлами. Проще говоря, webdav — это, по сути, общая сетевая папка, расположенная на веб-сервере. Для доступа к общим ресурсам WebDAV на клиентской стороне должен быть установлен клиент WebDAV.
В серверных операционных системах Microsoft отдельного клиента WebDAV нет. Например, в Windows Server 2008 R2,2012/2012 R2 клиент WebDAV входит в состав компоненты Desktop-Experience. Поэтому для доступа к WebDAV ресурсам на этих ОС необходимо установить это расширение. Запускаем Power Shell от имени администратора и выполняем следующую команду:
Совет. В Windows Server 2008 R2, отсутствует командлет Install-WindowsFeature, вместо него нужно использовать другой командлет — Add-WindowsFeature.
Установка WebDAV Client Windows Server 2016
В Windows Server 2016 появился отдельный компонент WebDAV-Redirector. Для эго установки, нужно выполнить такую команду (потребуется перезагрузка сервера):
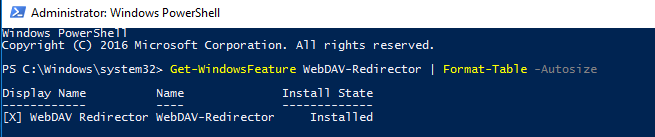
После перезагрузки проверим, что компонент WebDAV-Redirector установлен:
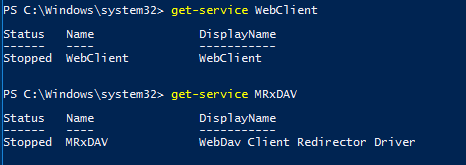
В системе при этом появятся две новые службы:
- WebClient (get-service WebClient) – позволяет программ Windows создавать, изменять и получать доступ к файлам в Интернете;
- MRxDAV (get-service MRxDAV) – драйвер файловой системы (WebDav Client Redirector Driver).
Включение автозапуска службы WebDAV
По умолчанию служба WebClient и драйвер MRxDAV отключены и настроены на запуск в ручном режиме, при срабатывании определенного триггера. По-видимому, идея разработчиков была в том, что сервис должен автоматически запускаться при попытке доступа через драйвер MRXDAV.SYS, но, увы, это не работает. Поэтому лучше изменить тип запуска этих служб на автоматический.
Осталось запустить данные службы:
Настройка WebDAV Client Windows Server
Служба WebClient настраивается только через реестр. Все ее параметры хранятся в ветке HKLM\SYSTEM\CurrentControlSet\Services\WebClient\Parameters.
С практической точки зрения, могут быть интересны следующие параметры службы WebClient:
- AcceptOfficeAndTahoeServers — отвечает за возможность подключения к веб-серверам SharePoint и Office Web Server (по умолчанию значение — 1);
- BasicAuthLevel – тип аутентификации, используемый клиентом WebClient. Доступны следующие значения:
- 0 — Базовая (Basic) аутентификация отключена;
- 1 — Базовая (аутентификация включена только SSL каталогов — это значение используется по умолчанию в Windows Server 2016);
- 2 и выше— используется базовая аутентификация для любого типа общих каталогов, как с поддержкой SSL, так и без (это небезопасный вариант, т.к. имя и пароль пользователя при таком типе аутентификации пересылаются по сети в открытом виде).
- FileSizeLimitInBytes — максимальный размер передаваемых файлов (задается в байтах, по умолчанию размер файлов ограничен 50 Мб)
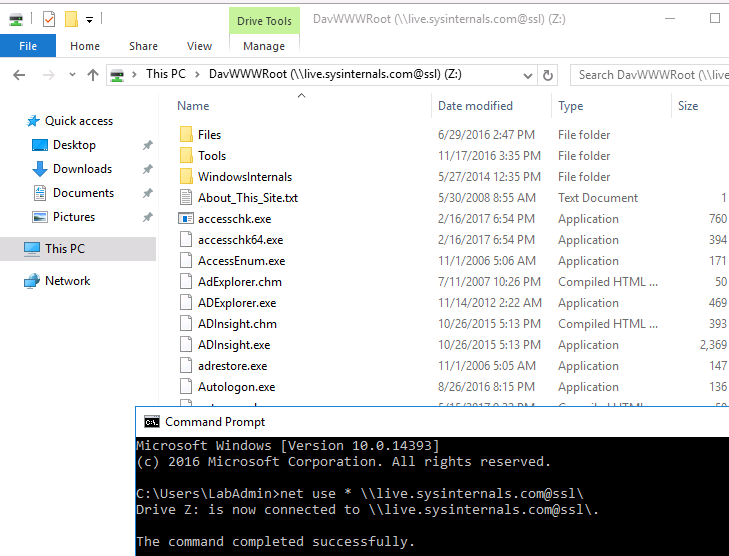
Для проверки работы клиента WebDav можно попробовать подключить к общедоступному ресурсу с включенной поддержкой Webdav, например live.sysinternals.com. В этом веб-каталоге хранятся популярные утилиты от Sysinternals (Марка Русиновича).
Подключение сетевой папки WebDAV в Windows Server 2016
Сетевую папку WebDAV в Windows Server 2016 можно подключить следующими способами :
- Без SSL: net use * \\live.sysinternals.com\
- С SSL: net use * \\live.sysinternals.com@ssl\
- Можно указать данные для авторизации на удаленном сервере: net use * \\live.sysinternals.com@ssl\ /user:vmblog *
- Можно указать конкретный порт TCP: \\live.sysinternals.com@80\folder или \\live.sysinternals.com@ssl\share
- Чтобы отмонтировать подключенный по WebDav диск, выполните команду: net use * /del /y
Если при монтировании диска WebDAV через Проводник Windows или командную строку вы получаете ошибку:
Проверьте, что служба WebClient запущена, измените значение ключа реестра BasicAuthLevel, на 1 и перезагрузите сервер.
Требуется настройка Windows Server?
Закажите настройку Windows сервера под Ваши задачи и получите расширенную консультацию системного администратора!💥
📞 8-800-511-24-07 | 📩 support@gotoadm.ru |👍 telegram
Нашли ошибку в тексте? Выделите фрагмент текста и нажмите Ctrl+Enter
Установка клиента WebDAV в Windows Server 2016
WebDAV (Web Distributed Authoring and Versioning) является расширением протокола HTTP / 1.1. и позволяет обращаться к файлам на удаленном сервере и выполнять с ними общие операции, такие как чтение, запись, копирование, удаление файлов и т.д. Как правило, этот протокол используется пользователями для совместной работы с удаленными файлами. Проще говоря, webdav — это, по сути, общая сетевая папка, расположенная на веб-сервере. Для доступа к общим ресурсам WebDAV на клиентской стороне должен быть установлен клиент WebDAV.
В серверных операционных системах Microsoft отдельного клиента WebDAV нет. Например, в Windows Server 2008 R2,2012/2012 R2 клиент WebDAV входит в состав компоненты Desktop-Experience. Поэтому для доступа к WebDAV ресурсам на этих ОС необходимо установить это расширение.
Совет. В Windows Server 2008 R2, отсутствует командлет Install-WindowsFeature, вместо него нужно использовать другой командлет — Add-WindowsFeature.
В Windows Server 2016 ситуация немного другая. В этой операционной системе появился отдельный компонент WebDAV-Redirector. Для эго установки, нужно выполнить такую команду (потребуется перезагрузка сервера)
Install-WindowsFeature WebDAV-Redirector –Restart
После перезагрузки проверим, что компонент WebDAV-Redirector установлен:
Get-WindowsFeature WebDAV-Redirector | Format-Table –Autosize
В системе при этом появятся две новые службы:
- WebClient (get-service WebClient) – позволяет программ Windows создавать, изменять и получать доступ к файлам в Интернете.
- MRxDAV (get-service MRxDAV) – драйвер файловой системы (WebDav Client Redirector Driver)
По умолчанию служба WebClient и драйвер MRxDAV отключены и настроены на запуск в ручном режиме, при срабатывании определенного триггера. По-видимому, идея разработчиков была в том, что сервис должен автоматически запускаться при попытке доступа через драйвер MRXDAV.SYS, но, увы, это не работает. Поэтому лучше изменить тип запуска этих служб на автоматический.
Set-Service WebClient -StartupType Automatic
Set-Service MRxDAV -StartupType Automatic
Осталось запустить данные службы:
Start-Service WebClient
Start-Service MRxDAV

Служба WebClient настраивается только через реестр. Все ее параметры хранятся в ветке HKLM\SYSTEM\CurrentControlSet\Services\WebClient\Parameters.

С практической точки зрения, могут быть интересны следующие параметры службы WebClient
AcceptOfficeAndTahoeServers — отвечает за возможность подключения к веб-серверам SharePoint и Office Web Server (по умолчанию значение — 1)
BasicAuthLevel – тип аутентификации, используемый клиентом WebClient. Доступны следующие значения:
- 0 — Базовая (Basic) аутентификация отключена
- 1 — Базовая (аутентификация включена только SSL каталогов — это значение используется по умолчанию в Windows Server 2016)
- 2 и выше— используется базовая аутентификация для любого типа общих каталогов, как с поддержкой SSL, так и без (это небезопасный вариант, т.к. имя и пароль пользователя при таком типе аутентификации пересылаются по сети в открытом виде)
FileSizeLimitInBytes — максимальный размер передаваемых файлов (задается в байтах, по умолчанию размер файлов ограничен 50 Мб)
Для проверки работы клиента WebDav можно попробовать подключить к общедоступному ресурсу с включенной поддержкой Webdav, например live.sysinternals.com. В этом веб-каталоге хранятся популярные утилиты от Sysinternals (Марка Русиновича).
Сетевую папку WebDAV в Windows Server 2016 можно подключить следующими способами :
- Без SSL: net use * \\live.sysinternals.com\
- С SSL: net use * \\live.sysinternals.com@ssl\
- Можно указать данные для авторизации на удаленном сервере: net use * \\live.sysinternals.com@ssl\ /user:vmblog *
- Можно указать конкретный порт TCP: \\live.sysinternals.com@80\folder или \\live.sysinternals.com@ssl\share
- Чтобы отмонтировать подключенный по WebDav диск, выполните команду: net use * /del /y
Если при монтировании диска Webdav через Проводник или командную строку вы получаете ошибку:
System error 67 has occured.
The network name cannot be found.
Проверьте, что служба WebClient запущена, измените значение ключа реестра BasicAuthLevel, на 1 и перезагрузите сервер.
Set up the Remote Desktop web client for your users
The Remote Desktop web client lets users access your organization’s Remote Desktop infrastructure through a compatible web browser. They’ll be able to interact with remote apps or desktops like they would with a local PC no matter where they are. Once you set up your Remote Desktop web client, all your users need to get started is the URL where they can access the client, their credentials, and a supported web browser.
The web client does support using Azure AD Application Proxy but does not support Web Application Proxy at all. See Using RDS with application proxy services for details.
What you’ll need to set up the web client
Before getting started, keep the following things in mind:
- Make sure your Remote Desktop deployment has an RD Gateway, an RD Connection Broker, and RD Web Access running on Windows Server 2016 or 2019.
- Make sure your deployment is configured for per-user client access licenses (CALs) instead of per-device, otherwise all licenses will be consumed.
- Install the Windows 10 KB4025334 update on the RD Gateway. Later cumulative updates may already contains this KB.
- Make sure public trusted certificates are configured for the RD Gateway and RD Web Access roles.
- Make sure that any computers your users will connect to are running one of the following OS versions:
- Windows 10
- Windows Server 2008R2 or later
Your users will see better performance connecting to Windows Server 2016 (or later) and Windows 10 (version 1611 or later).
If you used the web client during the preview period and installed a version prior to 1.0.0, you must first uninstall the old client before moving to the new version. If you receive an error that says «The web client was installed using an older version of RDWebClientManagement and must first be removed before deploying the new version,» follow these steps:
- Open an elevated PowerShell prompt.
- Run Uninstall-Module RDWebClientManagement to uninstall the new module.
- Close and reopen the elevated PowerShell prompt.
- Run Install-Module RDWebClientManagement -RequiredVersion
- to install the old module.
- Run Uninstall-RDWebClient to uninstall the old web client.
- Run Uninstall-Module RDWebClientManagement to uninstall the old module.
- Close and reopen the elevated PowerShell prompt.
- Proceed with the normal installation steps as follows.
How to publish the Remote Desktop web client
To install the web client for the first time, follow these steps:
On the RD Connection Broker server, obtain the certificate used for Remote Desktop connections and export it as a .cer file. Copy the .cer file from the RD Connection Broker to the server running the RD Web role.
On the RD Web Access server, open an elevated PowerShell prompt.
On Windows Server 2016, update the PowerShellGet module since the inbox version doesn’t support installing the web client management module. To update PowerShellGet, run the following cmdlet:
You’ll need to restart PowerShell before the update can take effect, otherwise the module may not work.
Install the Remote Desktop web client management PowerShell module from the PowerShell gallery with this cmdlet:
After that, run the following cmdlet to download the latest version of the Remote Desktop web client:
Next, run this cmdlet with the bracketed value replaced with the path of the .cer file that you copied from the RD Broker:
Finally, run this cmdlet to publish the Remote Desktop web client:
Make sure you can access the web client at the web client URL with your server name, formatted as https://server_FQDN/RDWeb/webclient/index.html . It’s important to use the server name that matches the RD Web Access public certificate in the URL (typically the server FQDN).
When running the Publish-RDWebClientPackage cmdlet, you may see a warning that says per-device CALs are not supported, even if your deployment is configured for per-user CALs. If your deployment uses per-user CALs, you can ignore this warning. We display it to make sure you’re aware of the configuration limitation.
When you’re ready for users to access the web client, just send them the web client URL you created.
To see a list of all supported cmdlets for the RDWebClientManagement module, run the following cmdlet in PowerShell:
How to update the Remote Desktop web client
When a new version of the Remote Desktop web client is available, follow these steps to update the deployment with the new client:
Open an elevated PowerShell prompt on the RD Web Access server and run the following cmdlet to download the latest available version of the web client:
Optionally, you can publish the client for testing before official release by running this cmdlet:
The client should appear on the test URL that corresponds to your web client URL (for example, https://server_FQDN/RDWeb/webclient-test/index.html).
Publish the client for users by running the following cmdlet:
This will replace the client for all users when they relaunch the web page.
How to uninstall the Remote Desktop web client
To remove all traces of the web client, follow these steps:
On the RD Web Access server, open an elevated PowerShell prompt.
Unpublish the Test and Production clients, uninstall all local packages and remove the web client settings:
Uninstall the Remote Desktop web client management PowerShell module:
How to install the Remote Desktop web client without an internet connection
Follow these steps to deploy the web client to an RD Web Access server that doesn’t have an internet connection.
Installing without an internet connection is available in version 1.0.1 and above of the RDWebClientManagement PowerShell module.
You still need an admin PC with internet access to download the necessary files before transferring them to the offline server.
The end-user PC needs an internet connection for now. This will be addressed in a future release of the client to provide a complete offline scenario.
From a device with internet access
Open a PowerShell prompt.
Import the Remote Desktop web client management PowerShell module from the PowerShell gallery:
Download the latest version of the Remote Desktop web client for installation on a different device:
Download the latest version of the RDWebClientManagement PowerShell module:
Copy the content of «C:\WebClient» to the RD Web Access server.
From the RD Web Access server
Follow the instructions under How to publish the Remote Desktop web client, replacing steps 4 and 5 with the following.
You have two options to retrieve the latest web client management PowerShell module:
- Import the Remote Desktop web client management PowerShell module:
- Copy the downloaded RDWebClientManagement folder to one of the local PowerShell module folders listed under $env:psmodulePath, or add the path to the folder with the downloaded files to the $env:psmodulePath.
Deploy the latest version of the Remote Desktop web client from the local folder (replace with the appropriate zip file):
Connecting to RD Broker without RD Gateway in Windows Server 2019
This section describes how to enable a web client connection to an RD Broker without an RD Gateway in Windows Server 2019.
Setting up the RD Broker server
Follow these steps if there is no certificate bound to the RD Broker server
Open Server Manager > Remote Desktop Services.
In Deployment Overview section, select the Tasks dropdown menu.
Select Edit Deployment Properties, a new window titled Deployment Properties will open.
In the Deployment Properties window, select Certificates in the left menu.
In the list of Certificate Levels, select RD Connection Broker — Enable Single Sign On. You have two options: (1) create a new certificate or (2) an existing certificate.
Follow these steps if there is a certificate previously bound to the RD Broker server
Open the certificate bound to the Broker and copy the Thumbprint value.
To bind this certificate to the secure port 3392, open an elevated PowerShell window and run the following command, replacing » « with the value copied from the previous step:
To check if the certificate has been bound correctly, run the following command:
In the list of SSL Certificate bindings, ensure that the correct certificate is bound to port 3392.
Open the Windows Registry (regedit), go to HKLM\SYSTEM\CurrentControlSet\Control\Terminal Server\WinStations\RDP-Tcp and locate the key WebSocketURI. Next, set the value to https://+:3392/rdp/ .
Setting up the RD Session Host
Follow these steps if the RD Session Host server is different from the RD Broker server:
Create a certificate for the RD Session Host machine, open it and copy the Thumbprint value.
To bind this certificate to the secure port 3392, open an elevated PowerShell window and run the following command, replacing » « with the value copied from the previous step:
To check if the certificate has been bound correctly, run the following command:
In the list of SSL Certificate bindings, ensure that the correct certificate is bound to port 3392.
Open the Windows Registry (regedit) and navigate to HKLM\SYSTEM\CurrentControlSet\Control\Terminal Server\WinStations\RDP-Tcp and locate the key WebSocketURI. The value must be set to https://+:3392/rdp/ .
General Observations
Ensure that both the RD Session Host and RD Broker server are running Windows Server 2019.
Ensure that public trusted certificates are configured for both the RD Session Host and RD Broker server.
If both the RD Session Host and the RD Broker server share the same machine, set the RD Broker server certificate only. If the RD Session Host and RD Broker server use different machines, both must be configured with unique certificates.
The Subject Alternative Name (SAN) for each certificate must be set to the machine’s Fully Qualified Domain Name (FQDN). The Common Name (CN) must match the SAN for each certificate.
How to pre-configure settings for Remote Desktop web client users
This section will tell you how to use PowerShell to configure settings for your Remote Desktop web client deployment. These PowerShell cmdlets control a user’s ability to change settings based on your organization’s security concerns or intended workflow. The following settings are all located in the Settings side panel of the web client.
Suppress telemetry
By default, users may choose to enable or disable collection of telemetry data that is sent to Microsoft. For information about the telemetry data Microsoft collects, please refer to our Privacy Statement via the link in the About side panel.
As an administrator, you can choose to suppress telemetry collection for your deployment using the following PowerShell cmdlet:
By default, the user may select to enable or disable telemetry. A boolean value $false will match the default client behavior. A boolean value $true disables telemetry and restricts the user from enabling telemetry.
Remote resource launch method
This setting currently only works with the RDS web client, not the Windows Virtual Desktop web client.
By default, users may choose to launch remote resources (1) in the browser or (2) by downloading an .rdp file to handle with another client installed on their machine. As an administrator, you can choose to restrict the remote resource launch method for your deployment with the following PowerShell command:
By default, the user may select either launch method. A boolean value $true will force the user to launch resources in the browser. A boolean value $false will force the user to launch resources by downloading an .rdp file to handle with a locally installed RDP client.
Reset RDWebClientDeploymentSetting configurations to default
To reset a deployment-level web client setting to the default configuration, run the following PowerShell cmdlet and use the -name parameter to specify the setting you want to reset:
Troubleshooting
If a user reports any of the following issues when opening the web client for the first time, the following sections will tell you what to do to fix them.
What to do if the user’s browser shows a security warning when they try to access the web client
The RD Web Access role might not be using a trusted certificate. Make sure the RD Web Access role is configured with a publicly trusted certificate.
If that doesn’t work, your server name in the web client URL might not match the name provided by the RD Web certificate. Make sure your URL uses the FQDN of the server hosting the RD Web role.
What to do if the user can’t connect to a resource with the web client even though they can see the items under All Resources
If the user reports that they can’t connect with the web client even though they can see the resources listed, check the following things:
- Is the RD Gateway role properly configured to use a trusted public certificate?
- Does the RD Gateway server have the required updates installed? Make sure that your server has the KB4025334 update installed.
If the user gets an «unexpected server authentication certificate was received» error message when they try to connect, then the message will show the certificate’s thumbprint. Search the RD Broker server’s certificate manager using that thumbprint to find the right certificate. Verify that the certificate is configured to be used for the RD Broker role in the Remote Desktop deployment properties page. After making sure the certificate hasn’t expired, copy the certificate in .cer file format to the RD Web Access server and run the following command on the RD Web Access server with the bracketed value replaced by the certificate’s file path:
Diagnose issues with the console log
If you can’t solve the issue based on the troubleshooting instructions in this article, you can try to diagnose the source of the problem yourself by watching the console log in the browser. The web client provides a method for recording the browser console log activity while using the web client to help diagnose issues.
- Select the ellipsis in the upper-right corner and navigate to the About page in the dropdown menu.
- Under Capture support information select the Start recording button.
- Perform the operation(s) in the web client that produced the issue you are trying to diagnose.
- Navigate to the About page and select Stop recording.
- Your browser will automatically download a .txt file titled RD Console Logs.txt. This file will contain the full console log activity generated while reproducing the target issue.
The console may also be accessed directly through your browser. The console is generally located under the developer tools. For example, you can access the log in Microsoft Edge by pressing the F12 key, or by selecting the ellipsis, then navigating to More tools > Developer Tools.
Get help with the web client
If you’ve encountered an issue that can’t be solved by the information in this article, you can report it on Tech Community. You can also request or vote for new features at our suggestion box.


