- Как проверить состояние жёсткого диска или SSD Mac с помощью статуса SMART
- Как проверить состояние жёсткого диска в Mac OS
- Статус SMART в порядке, но проблемы с диском есть
- Жёсткий диск вообще не отображается в Дисковой утилите
- Более подробная информация с помощью Smartmontools
- smartmontools
- Контекстная Навигация
- About Smartmontools
- Contribute to Smartmontools
- Device Information
- Bug Reports
- Patches
- GitHub mirror and Circle CI integration
- Incident Reports
- License
- smartmontools
- Контекстная Навигация
- Smartmontools Download and Installation
- Table of Contents
- Install precompiled package
- Install the Windows package
- Install the OSX/Darwin package
- Install from the source tarball
- Install latest unreleased code from SVN repository
- Update the drive database
- Run smartmontools from Live-system
Как проверить состояние жёсткого диска или SSD Mac с помощью статуса SMART
Пользователи Mac могут легко проверить состояние жёсткого диска с помощью функции SMART в Дисковой утилите Mac OS.

Сегодня мы расскажем, как проверить статус SMART жёсткого диска или SSD Mac OS. Таким образом можно легко узнать, в каком состоянии жёсткий диск, и нуждается ли он в замене.
SMART (Self Monitoring Analysis and Reporting Technology System) – это механизм для проверки состояния жёсткого диска, с помощью которого можно проверить наличие каких-либо системных проблем. Делать это очень важно, поскольку проблемы с жёстким диском довольно распространённые и возникают у многих пользователей.
Как проверить состояние жёсткого диска в Mac OS
Способ одинаковый во всех современных версиях MacOS.
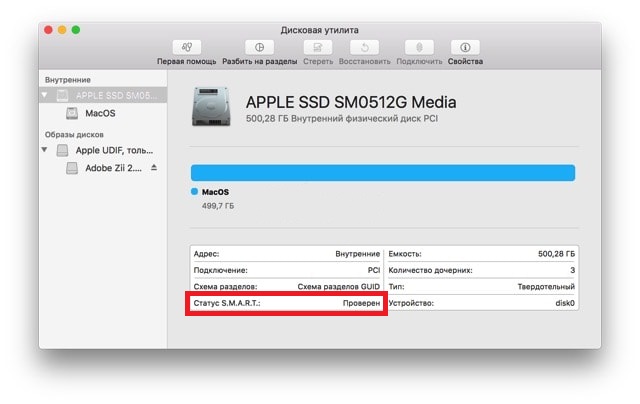
- Откройте Дисковую утилиту в папке /Программы/Утилиты/.

- Выберите жёсткий диск из списка слева.
- Найдите на экране пункт «Статус S.M.A.R.T.».
- Если рядом с ним указано «Проверен», то состояние диска хорошее.
- Если вы видите текст «Ошибка», то необходимо как можно скорее сохранить копию своих данных и заменить диск.

Если статус SMART отображает ошибку, значит с жёстким диском серьёзная проблема, которая может привести к потере данных.
Рекомендуем регулярно сохранять копию данных через Time Machine или другим способом, а также следить за состоянием жёсткого диска описанным выше способом.
Статус SMART в порядке, но проблемы с диском есть
Если у вас возникают какие-либо проблемы с жёстким диском, но статус SMART указан как «Проверен», можно ввести устройство в режим восстановления и выяснить, в чём заключается проблема.
Жёсткий диск вообще не отображается в Дисковой утилите
Если ваш жёсткий диск вообще не отображается в Дисковой утилите, то он либо уже в неисправном состоянии, либо периодически перестаёт работать и скоро перестанет работать совсем. Также есть вероятность, что диск не подключен физически, что возможно при повреждении устройства.
Также учтите, что не все жёсткие диски поддерживают статус SMART, и в таком случае вы не сможете узнать, в каком они состоянии.
У самих дисков зачастую названия соответствуют производителю. К примеру, если «APPLE SSD SM0512G Media» — название жёсткого диска, то «Macintosh HD» — только его раздел. Нужно выбирать в списке именно сам диск.
Самый простой способ сохранить копию жёсткого диска – через Time Machine. Если с диском какие-то проблемы, нужно срочно сохранить все данные, которые на нём хранятся, иначе вы можете их потерять. Если проблема заключается в самом жёстком диске, его нужно будет заменить.
Если вы хотите узнать более подробную информацию о состоянии SSD-диска M1 Mac, вам понадобится инструмент Smartmontools.
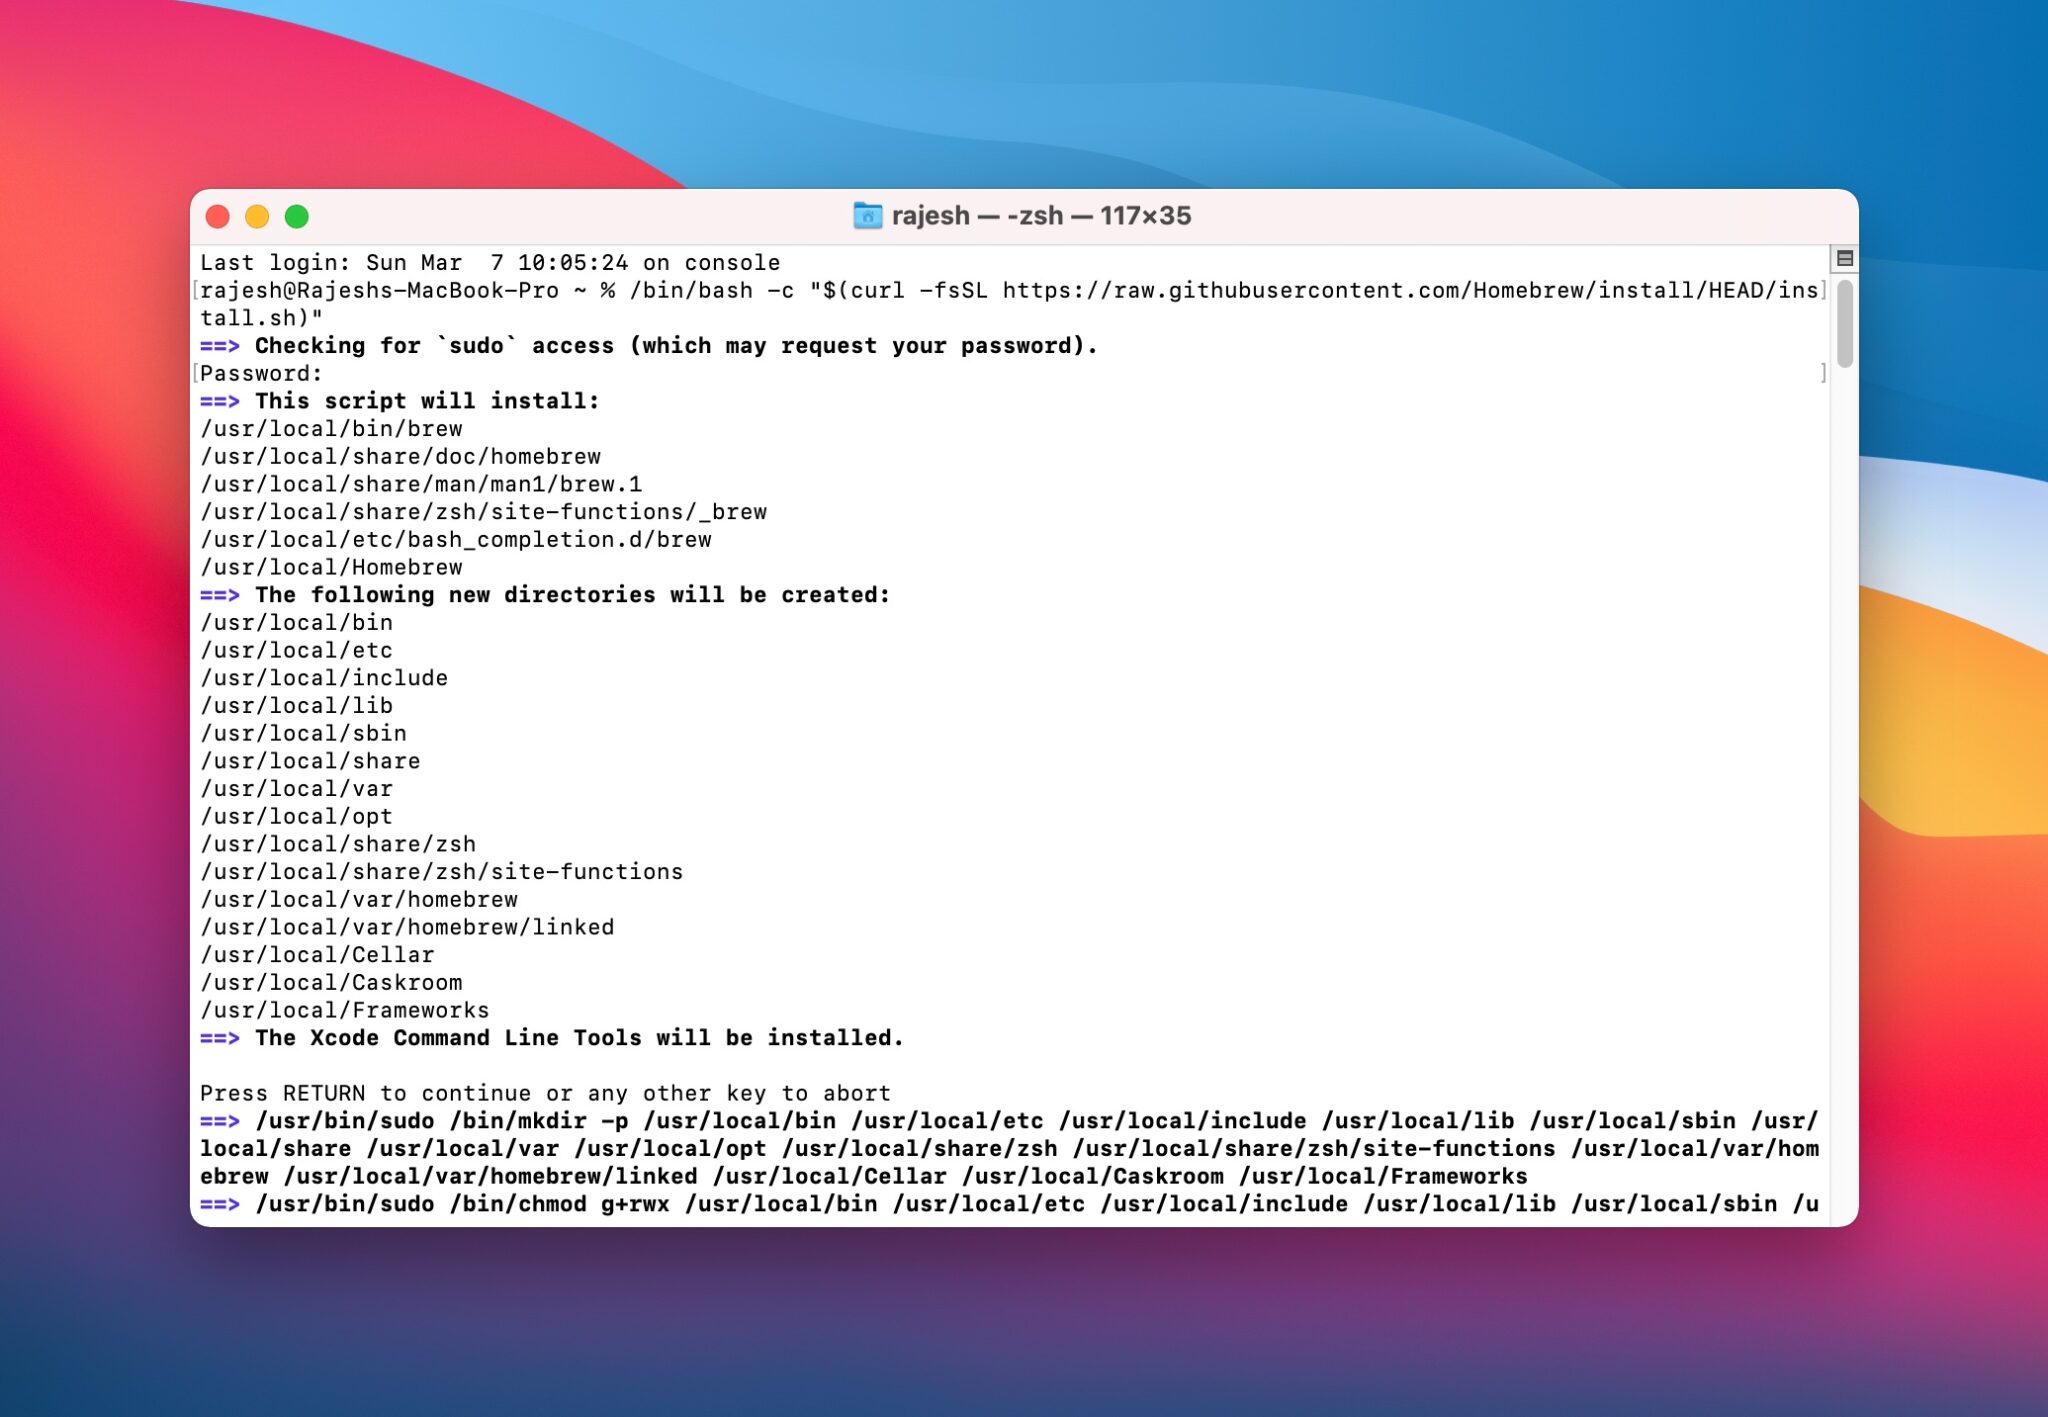
Шаг 2: Установите Homebrew на Mac. Откройте Терминал и используйте следующую команду:
Если Xcode ещё не установлен на ваш Mac, Терминал попросит это сделать. Просто нажмите Enter, чтобы установить Xcode и Homebrew. На этот процесс может уйти некоторое время.
Шаг 3: Теперь нужно установить Smartmontools на Mac. Для этого используйте данную команду:
Во время установки понадобится ввести пароль от Mac.
Шаг 4: Когда инструмент smartmontools установится, он автоматически просканирует «/disk0» SSD на вашем Mac и отобразит информацию о состоянии жёсткого диска.
Более подробная информация с помощью Smartmontools
Чтобы ещё раз вручную с помощью smartmontools проверить состояние своего SSD на Mac, делайте следующее:
Шаг 1: Запустите Дисковую утилиту. В меню слева нажмите на жёсткий диск правой кнопкой мыши и выберите Свойства.
Шаг 2: В правом нижнем углу найдите текст, который отображается в пункте «Устройство». Он вам понадобится.
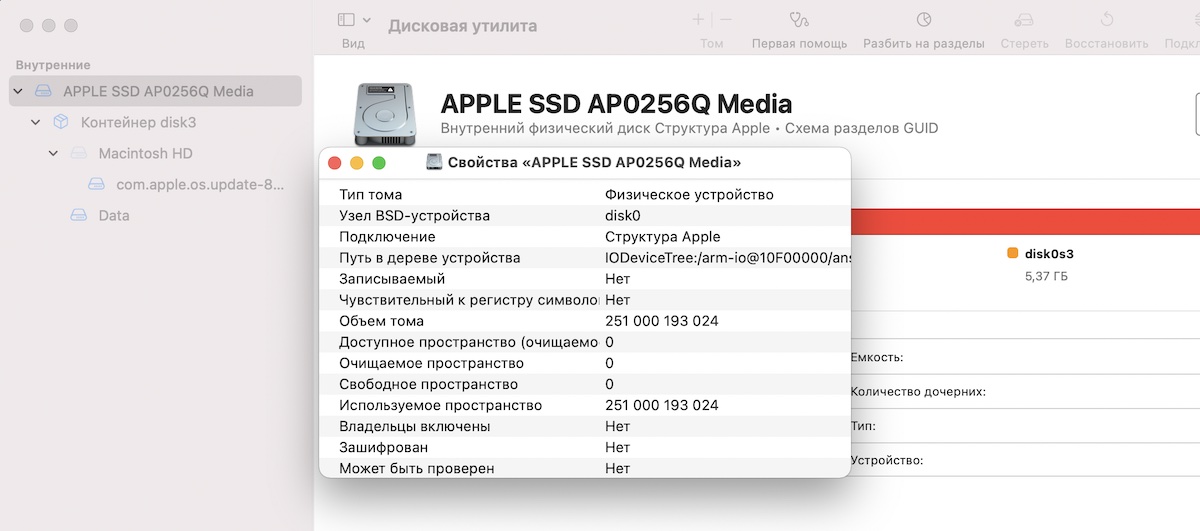
Шаг 3: Откройте Терминал и используйте команду ниже. Используйте то название, которое вы узнали только что. К примеру, у нас это «disk0».
Вы увидите детали о состоянии жёсткого диска. Важно понимать эти детали. Главные – Available Spare Threshold и Percentage Used. В идеале, если у вас M1 Mac, эти показатели должны быть 0% или 1%.
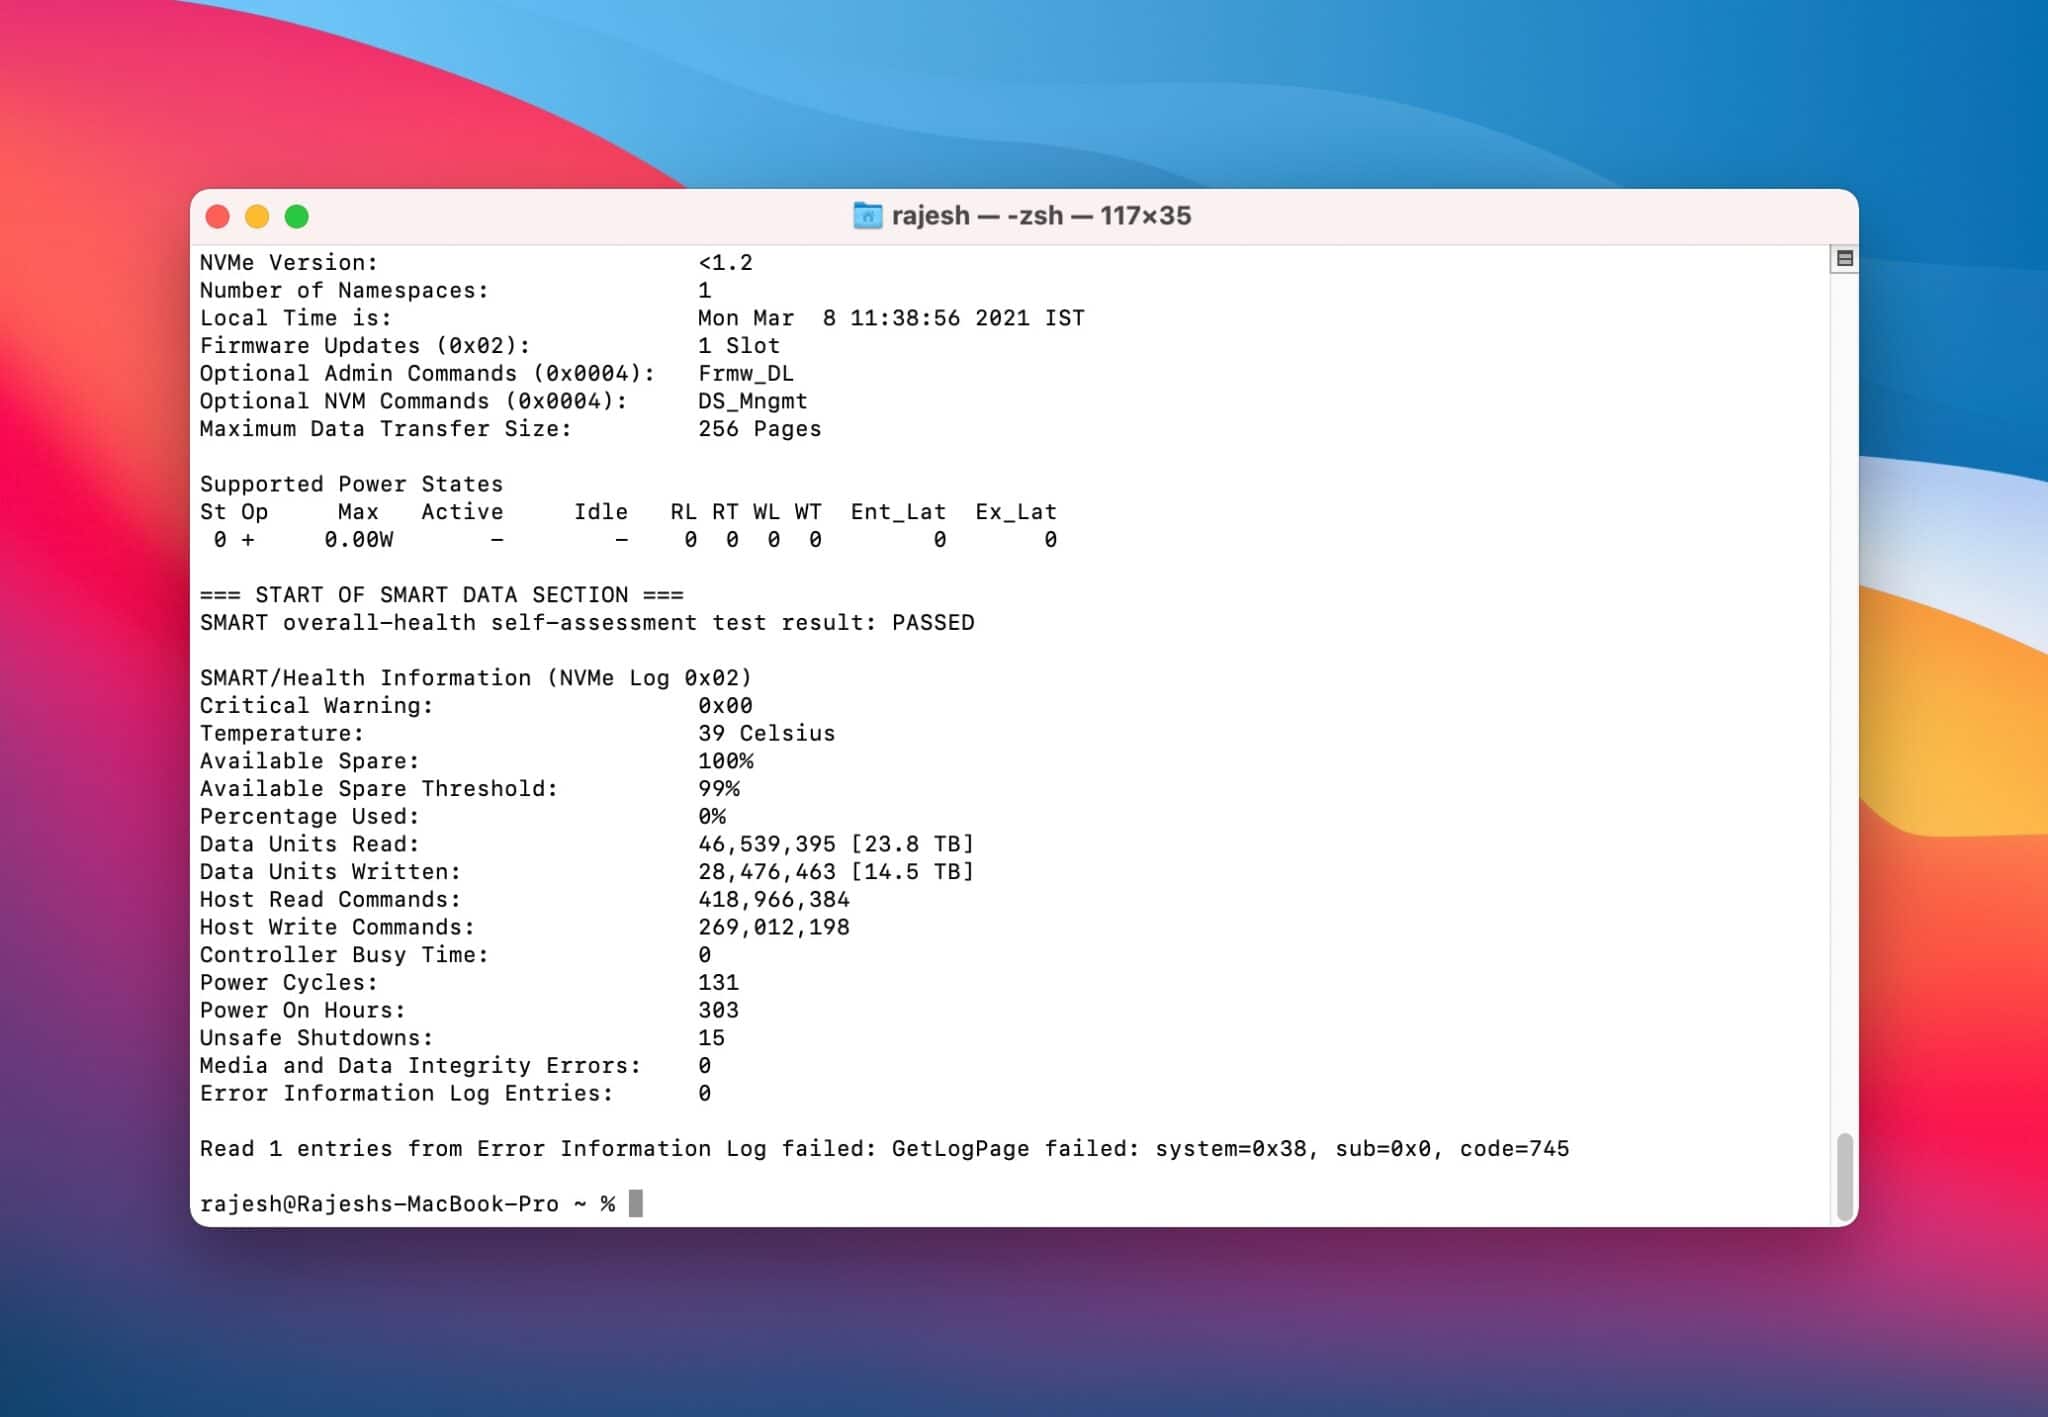
Если показатели выше, вам стоит подождать выхода обновления, которое может содержать решение проблемы. Возможно, версия macOS 11.3 Big Sur поможет.
Таким же образом можно посмотреть данные о состоянии SSD Intel Mac. Если у вас относительно старый Mac, то показатель «Percentage Used» может достигать 5-30%.
Если показатель ещё выше, то стоит сохранить копию своих данных, поскольку состояние SSD влияет на длительность работы компьютера. Кстати, таким же способом вы можете проверить состояние внешних жёстких дисков.
Источник
smartmontools
Контекстная Навигация
- 2020-12-30 : We released version 7.2 of Smartmontools. See the NEWS file and the ticket report to get a summary of the changes and new features.
- 2019-12-30 : We released version 7.1 of Smartmontools.
- 2019-12-01 : Smartmontools website migrated to the new server. Please let us know in case of any issues.
- 2018-12-30 : We released version 7.0 of Smartmontools.
- 2018-10-17 : In the past we offered daily builds on builds.smartmontools.org. Now we do automated builds on every commit to the repository. Read more about it in section GitHub mirror and Circle CI integration below.
- 2017-11-12 : Alexander Shaduri released version 1.1.3 of GSmartControl (a graphical user interface for smartctl). Available for Linux, FreeBSD, MacOS X and Windows.
- 2017-11-05 : We released version 6.6 of Smartmontools.
- 2017-10-10 : 15th anniversary of smartmontools first release 🙂 If you want to know more about the roots see our article about smartmontools history
- 2017-07-30 : Our mailing lists moved from sourceforge to JPBerlin. (!) Please subscribe on the new mailing lists.
- 2017-04-11 : We moved the Bad block HOWTO for smartmontools from the svn repository to the Trac wiki. So it is open now for your contributions of further recipes, case studies and comments.
- . see here for further news
About Smartmontools
The smartmontools package contains two utility programs ( smartctl and smartd ) to control and monitor storage systems using the Self-Monitoring, Analysis and Reporting Technology System (SMART) built into most modern ATA/SATA, SCSI/SAS and NVMe disks. In many cases, these utilities will provide advanced warning of disk degradation and failure. Smartmontools was originally derived from the Linux smartsuite package and actually supports ATA/SATA, SCSI/SAS and NVMe disks and also SCSI/SAS tape devices. It should run on any modern Linux, FreeBSD, NetBSD, OpenBSD, Darwin (macOS), Solaris, Windows, Cygwin, OS/2, eComStation or QNX system. Smartmontools can also be run from one of many different Live CDs/DVDs.
Sourcecode tarballs and precompiled packages for Darwin (macOS) and Windows are available at the project page at Sourceforge.
Precompiled packages are available from the repositories of various distributions, see the Packages page or Repology.org. Some examples:
Due to OS-specific issues and also depending on the different state of smartmontools development on the platforms, device support is not the same for all OS platforms. See info about RAID-controller, USB and NVMe support here on the homepage and of course in the manpages.
Thanks to Alexander Shaduri, there is also a graphical user interface for smartctl available. Go to the Homepage of GSmartControl to get all info and the software itself. Have a look at the screenshots and the feature list to get an impression of this nice tool.
Contribute to Smartmontools
Device Information
If your drive is not in the current version of smartmontools drive database, you can help to improve smartmontools information by sending a report about your drive to our mailinglist smartmontools-database.
We collect info about USB devices that have been successfully or unsuccessfully tested with smartmontools. If you have a device not listed there, please tell us the test result, by editing the wiki page, and/or by sending an email to the smartmontools-database mailinglist.
Bug Reports
To submit a bug report or propose an enhancement for smartmontools create a new ticket here in trac. Login is needed for that. If you don’t want to register an account, you can also send the info to our smartmontools-support mailing list.
Patches
Patches are welcome! The most convenient way for us is, when you attach them to a new ticket here in trac. But it’s also possible to submit patches for code review to developers mailinglist. You don’t need to be member of the mailinglist for it. Our list moderator will approve posting requests in these cases. Your patches should refer to our recent code base in SVN. You should also have a look at the documents in the developers area here in the wiki. You will find info about smartmontools software architecture and tutorials and guidelines from our developers there.
GitHub mirror and Circle CI integration
For those who prefer to use git and GitHub we maintain an official mirror of the smartmontools project. Feel free to fork, submit PR-s and issues. The mirror is updated every 15 minutes from our sourceforge SVN. Also a Circle CI Continuous Integration and Delivery system has been setup, see builds page for the details. Every commit to the GitHub triggers a new build and provides a source tarball and various binaries as artifacts.
- GitHub:
- Trunk build status:

- LGTM alerts:
Incident Reports
If you see a failure or have a problem with our project facilities you may report it to smartmontools-devel@listi.jpberlin.de . You don’t need to be subscribed for that. Your mail will then go to the list moderator and she will take action to solve the issue.
License
Smartmontools (and content in this wiki) are published under GNU GPL.
Источник
smartmontools
Контекстная Навигация
Smartmontools Download and Installation
Table of Contents
Smartmontools 7.2 was released 2020-12-30, see NEWS, ChangeLog and tickets for details.
Release files are signed with OpenPGP/GPG key ID 64BCAA8B , fingerprint: 847A F8F7 2DF4 C7B4 9238 2C94 BF0B 339C 64BC AA8B .
The public key block is available here: Trac Browser, SVN Repository, Key Servers (see the FAQ for older keys).
After installation or booting from a Live-CD, you can read smartmontools man pages and try out the commands:
Note that the default location for the manual pages are /usr/share/man/man5 and /usr/share/man/man8 . If ‘ man ‘ doesn’t find them, then you may need to add /usr/share/man to your MANPATH environment variable.
The Windows package provides preformatted man pages in *.html and *.txt format.
Install precompiled package
Precompiled packages are available for many distributions, see the Packages page.
Install the Windows package
Download and run the latest smartmontools NSIS-installer ( *.win32-setup.exe ) from here. More recent Windows test releases build from SVN snapshots are available here.
The default install type «Full» creates start menu shortcuts including an uninstaller, and adds the install directory to the PATH variable. The install type «Extract files only» is useful to unpack a «portable» version without affecting the Windows registry. The files can also be unpacked by 7-Zip which is also available for Linux.
The 32-bit version of smartmontools usually works also on 64-bit versions of Windows. Starting with smartmontools 5.43, the installer also provides 64-bit executables. These may be useful if the 32-bit subsystem is not available (e.g. 64-bit Windows Recovery CD).
Virus scanners occasionally produce false positive virus reports for NSIS-installers, see the NSIS False Positives page. If this is the case for the smartmontools installer, please send a report to the smartmontools-support mailing list.
To use the smartd warning mail feature, download and install the Blat mail utility.
See the WPKG-Wiki for info about automated deployment of smartmontools and Blat.
Alternatively you could use the Smartmontools for Windows Package by Ozy de Jong. This independent package provides user friendly support for smartd configuration and unattended setup.
Install the OSX/Darwin package
Download and run the latest smartmontools dmg image from here. More recent OS X test releases build from the SVN snapshots are available here.
Package provides Mach-O universal binary with 2 architectures (i386 and x86_64) and should work on any Intel based Mac.
Install from the source tarball
Download the latest source tarball from here. More recent test tarballs build from SVN snapshots are available here.
Uncompress the tarball:
The previous step created a directory called smartmontools-6.3 containing the code. Go to that directory, build, and install:
These optional arguments of ./configure are fully explained in the INSTALL file. The most important one is —prefix to change the default installation directories. If you don’t pass any arguments to ./configure all files will reside under /usr/local to not interfere with files from your distribution.
To compile from another directory (avoids overwriting virgin files from the smartmontools package) replace ./configure [options] by:
To install to another destination (useful for testing and to avoid overwriting an existing smartmontools installation) replace make install by:
Use a full path:
/smartmontools-test would work but ./smartmontools-test won’t.
The smartmontools binaries for Windows can also be build from the source tarball (or from SVN) using the MinGW or the MinGW-w64 compiler. Build environments may be Cygwin or MSYS, cross-compilation under Linux is also supported. Extra ./configure arguments —host=. and —build=. may be required. The make install command does not work for Windows. See INSTALL file for details.
Install latest unreleased code from SVN repository
Sourceforge moved our repository to a new location: https://svn.code.sf.net/p/smartmontools/code/. Use the trac or sourceforge viewer to browse it.
You can also download the source tree via the code browser link Download Snapshot.
For those, who don’t already have a Subversion client installed, here is a list of SVN Packages and a comparison of SVN clients for different operating systems and in all colors and flavours. (Stand-alone clients, Desktop-integrated clients, IDE plug-in clients, ..)
All you need to do to get the latest development code is (but note that the development code may be unstable, and that the documentation and code may be inconsistent):
This will create a subdirectory called smartmontools/ containing the code. Go to that directory, build, and install:
See notes under Install from source tarball for different options to ./configure and other useful remarks.
To update your sources from trunk (development version):
One of the really cool things about version control systems is that you can get any version of the code you want, from the first release up the the most current development version. And it’s trivial, because each release is tagged with a name. Look at the tags in our SVN repository to see what the different names are.
E.g. run the following command to fetch the RELEASE_5_38 release:
Note that the directory with the smartmontools sourcefiles is named sm5 in releases
Update the drive database
The drive database file drivedb.h can be updated separately with the following command:
This command uses curl, wget or lynx for download. A proxy server can be specified by the environment variable https_proxy (lower case only), see the man pages of the tools for details.
The downloaded file is verified with OpenPGP/GPG key ID 721042C5 (release 6.6: DFD22559 ).
The public key block is included in the script. It is also available at Key Servers ( release 6.6) but there is no need to import it into a local keyring.
The above update method does no longer work for smartmontools older than 6.5. The update-smart-drivedb tools from 5.40 to 6.1 use a download URL which is no longer valid since sourceforge platform upgrades. Releases 6.2 to 6.4 of the script use a HTTP URL which does no longer work since sourceforge site changed to HTTPS-only. The script from release 6.6 could also be used for older releases if the line BRANCH=RELEASE_X_Y is adjusted accordingly.
The Windows package provides update-smart-drivedb.exe . It reads the proxy configuration from IE registry key.
The drivedb.h file can be viewed or downloaded ( ) using the Trac browser: 5.41, 5.42, 5.43, 6.0, 6.1, 6.2, 6.3, 6.4, 6.5, 6.6, 7.0-7.1, 7.2, trunk.
The following branches are no longer maintained: 5.39, 5.40.
Run smartmontools from Live-system
If you have a system that is showing signs of disk trouble (for example, it’s unbootable and the console is full of disk error messages) it can be handy to have a version of smartmontools that can be run off of a bootable medium to examine the disk’s SMART data and run self-tests. This is also useful if you want to run Captive Self-Tests (the -C option of smartctl ) on disks that can not easily be unmounted, such as those hosting the Operating System files. Or you can use this to run smartctl on computers that don’t use Linux as the day-to-day operating system.
License
All content in this wiki is published under GNU GPL.
Источник


