- Как проверить состояние жёсткого диска или SSD Mac с помощью статуса SMART
- Как проверить состояние жёсткого диска в Mac OS
- Статус SMART в порядке, но проблемы с диском есть
- Жёсткий диск вообще не отображается в Дисковой утилите
- Более подробная информация с помощью Smartmontools
- smartmontools
- Контекстная Навигация
- About Smartmontools
- Contribute to Smartmontools
- Device Information
- Bug Reports
- Patches
- GitHub mirror and Circle CI integration
- Incident Reports
- License
- smartmontools
- Контекстная Навигация
- Smartmontools Frequently Asked Questions (FAQ)
- Table of Contents
- Attributes
- I see some strange output from smartctl . What does it mean?
- How can I get the attribute information in human readable format?
- Why is the attributes number and meaning different on the disks?
- What details can be interpreted from Raw read error rate ?
- Why is my disk temperature reported by smartd as 150 Celsius?
- Attribute 194 (Temperature Celsius) behaves strangely on my Seagate disk
- smartctl reports the age as thousands of hours for my Maxtor/Hitachi/Fujitsu disk, yet it is only a few days old
- The power-on timer (Attribute 9 raw value) on my Maxtor disk acts strange.
- The time stamps in the self-test log don’t correspond to the power-on time, when test was run on my Western Digital (WD) disk
- The (normalized) WORST Attribute values of my Western Digital (WD) disk are larger than the (normalized) CURRENT Attribute values
- The SSD_Life_Left Attribute of my new SandForce based SSD reports zero
- The Power_On_Hours Attribute of my new Intel SSD reports
- Protocols, Devices and Controllers
- Can I monitor disks behind RAID controllers?
- What is error recovery control (ERC) and why it is important to enable it for the (S)ATA disks in RAID?
- Smartmontools for FireWire, USB, and SATA disks/systems
- Smartmontools for SCSI disks and tapes (TapeAlert)
- Smartmontools for the NVMe devices
- Smartmontools Database
- My ATA/SATA drive is not in the smartctl / smartd database
- My SCSI/SAS drive is not in the smartctl / smartd database
- My NVMe drive is not in the smartctl / smartd database
- Self-tests
- ATA drive is failing self-tests, but SMART health status is ‘PASSED’. What’s going on?
- Unreadable, uncorrectable, pending sectors or Medium error on disk. What’s going on?
- Why do self-tests take very long?
- Why is the system very slow during a self-test?
- Why do self-tests take much longer than predicted?
- Why are long self-tests keep getting interrupted?
- Where can I find manufacturer-specific disk-testing utilities?
- Operating System
- What are the operating system requirements?
- BIOS has a SMART enable/disable setting. What does it do, and how should I set it?
- Why does SAT pass-through fail under Linux if UAS is enabled
- Do smartctl and smartd run on a virtual machine guest OS?
- Is smartctl available for VMware ESXi?
- What is the purpose of the command smartctl-nc on Windows?
- smartctl aborts with the message «. SMART_GET_VERSION failed» on Windows. What is going wrong?
- On Windows smartctl prints the message: «. Log Read failed: Function not implemented»
- I found in syslog: ‘Can’t locate module block-major-65’
- On OSX smartctl prints ATA_READ_LOG_EXT (addr=0x11:0x00, page=0, n=1) failed: 48-bit ATA commands not implemented
- OSX — External USB / FireWire drive diagnostics support
- Firmware Issues
- ‘Error SMART Status command failed’ What’s the meaning of this smartctl message?
- ‘Warning: ATA error count 9 inconsistent with error log pointer 5’ What’s the meaning of this smartctl message?
- Distribution
- Is there a bootable standalone CD/DVD that contains smartmontools?
- How can I check that the package hasn’t been tampered with?
- Historic
- What Attributes does smartmontools not yet recognize?
- Startup message: smartd [FAILED] on Fedora Core Linux system
- What’s the story on IBM SMART disks?
- Does it work on Windows?
- Why did the release version scheme change?
- Other
- How to create a bug report
Как проверить состояние жёсткого диска или SSD Mac с помощью статуса SMART
Пользователи Mac могут легко проверить состояние жёсткого диска с помощью функции SMART в Дисковой утилите Mac OS.

Сегодня мы расскажем, как проверить статус SMART жёсткого диска или SSD Mac OS. Таким образом можно легко узнать, в каком состоянии жёсткий диск, и нуждается ли он в замене.
SMART (Self Monitoring Analysis and Reporting Technology System) – это механизм для проверки состояния жёсткого диска, с помощью которого можно проверить наличие каких-либо системных проблем. Делать это очень важно, поскольку проблемы с жёстким диском довольно распространённые и возникают у многих пользователей.
Как проверить состояние жёсткого диска в Mac OS
Способ одинаковый во всех современных версиях MacOS.
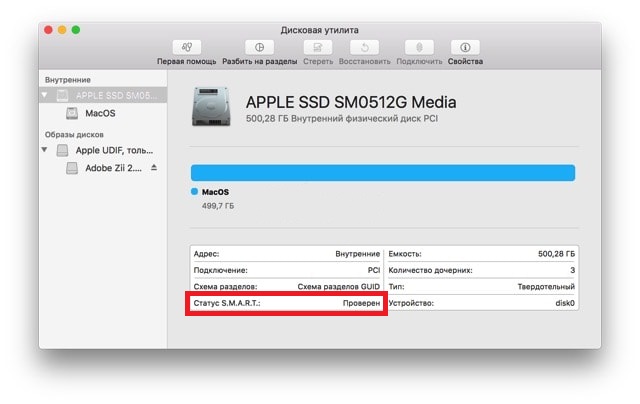
- Откройте Дисковую утилиту в папке /Программы/Утилиты/.

- Выберите жёсткий диск из списка слева.
- Найдите на экране пункт «Статус S.M.A.R.T.».
- Если рядом с ним указано «Проверен», то состояние диска хорошее.
- Если вы видите текст «Ошибка», то необходимо как можно скорее сохранить копию своих данных и заменить диск.

Если статус SMART отображает ошибку, значит с жёстким диском серьёзная проблема, которая может привести к потере данных.
Рекомендуем регулярно сохранять копию данных через Time Machine или другим способом, а также следить за состоянием жёсткого диска описанным выше способом.
Статус SMART в порядке, но проблемы с диском есть
Если у вас возникают какие-либо проблемы с жёстким диском, но статус SMART указан как «Проверен», можно ввести устройство в режим восстановления и выяснить, в чём заключается проблема.
Жёсткий диск вообще не отображается в Дисковой утилите
Если ваш жёсткий диск вообще не отображается в Дисковой утилите, то он либо уже в неисправном состоянии, либо периодически перестаёт работать и скоро перестанет работать совсем. Также есть вероятность, что диск не подключен физически, что возможно при повреждении устройства.
Также учтите, что не все жёсткие диски поддерживают статус SMART, и в таком случае вы не сможете узнать, в каком они состоянии.
У самих дисков зачастую названия соответствуют производителю. К примеру, если «APPLE SSD SM0512G Media» — название жёсткого диска, то «Macintosh HD» — только его раздел. Нужно выбирать в списке именно сам диск.
Самый простой способ сохранить копию жёсткого диска – через Time Machine. Если с диском какие-то проблемы, нужно срочно сохранить все данные, которые на нём хранятся, иначе вы можете их потерять. Если проблема заключается в самом жёстком диске, его нужно будет заменить.
Если вы хотите узнать более подробную информацию о состоянии SSD-диска M1 Mac, вам понадобится инструмент Smartmontools.
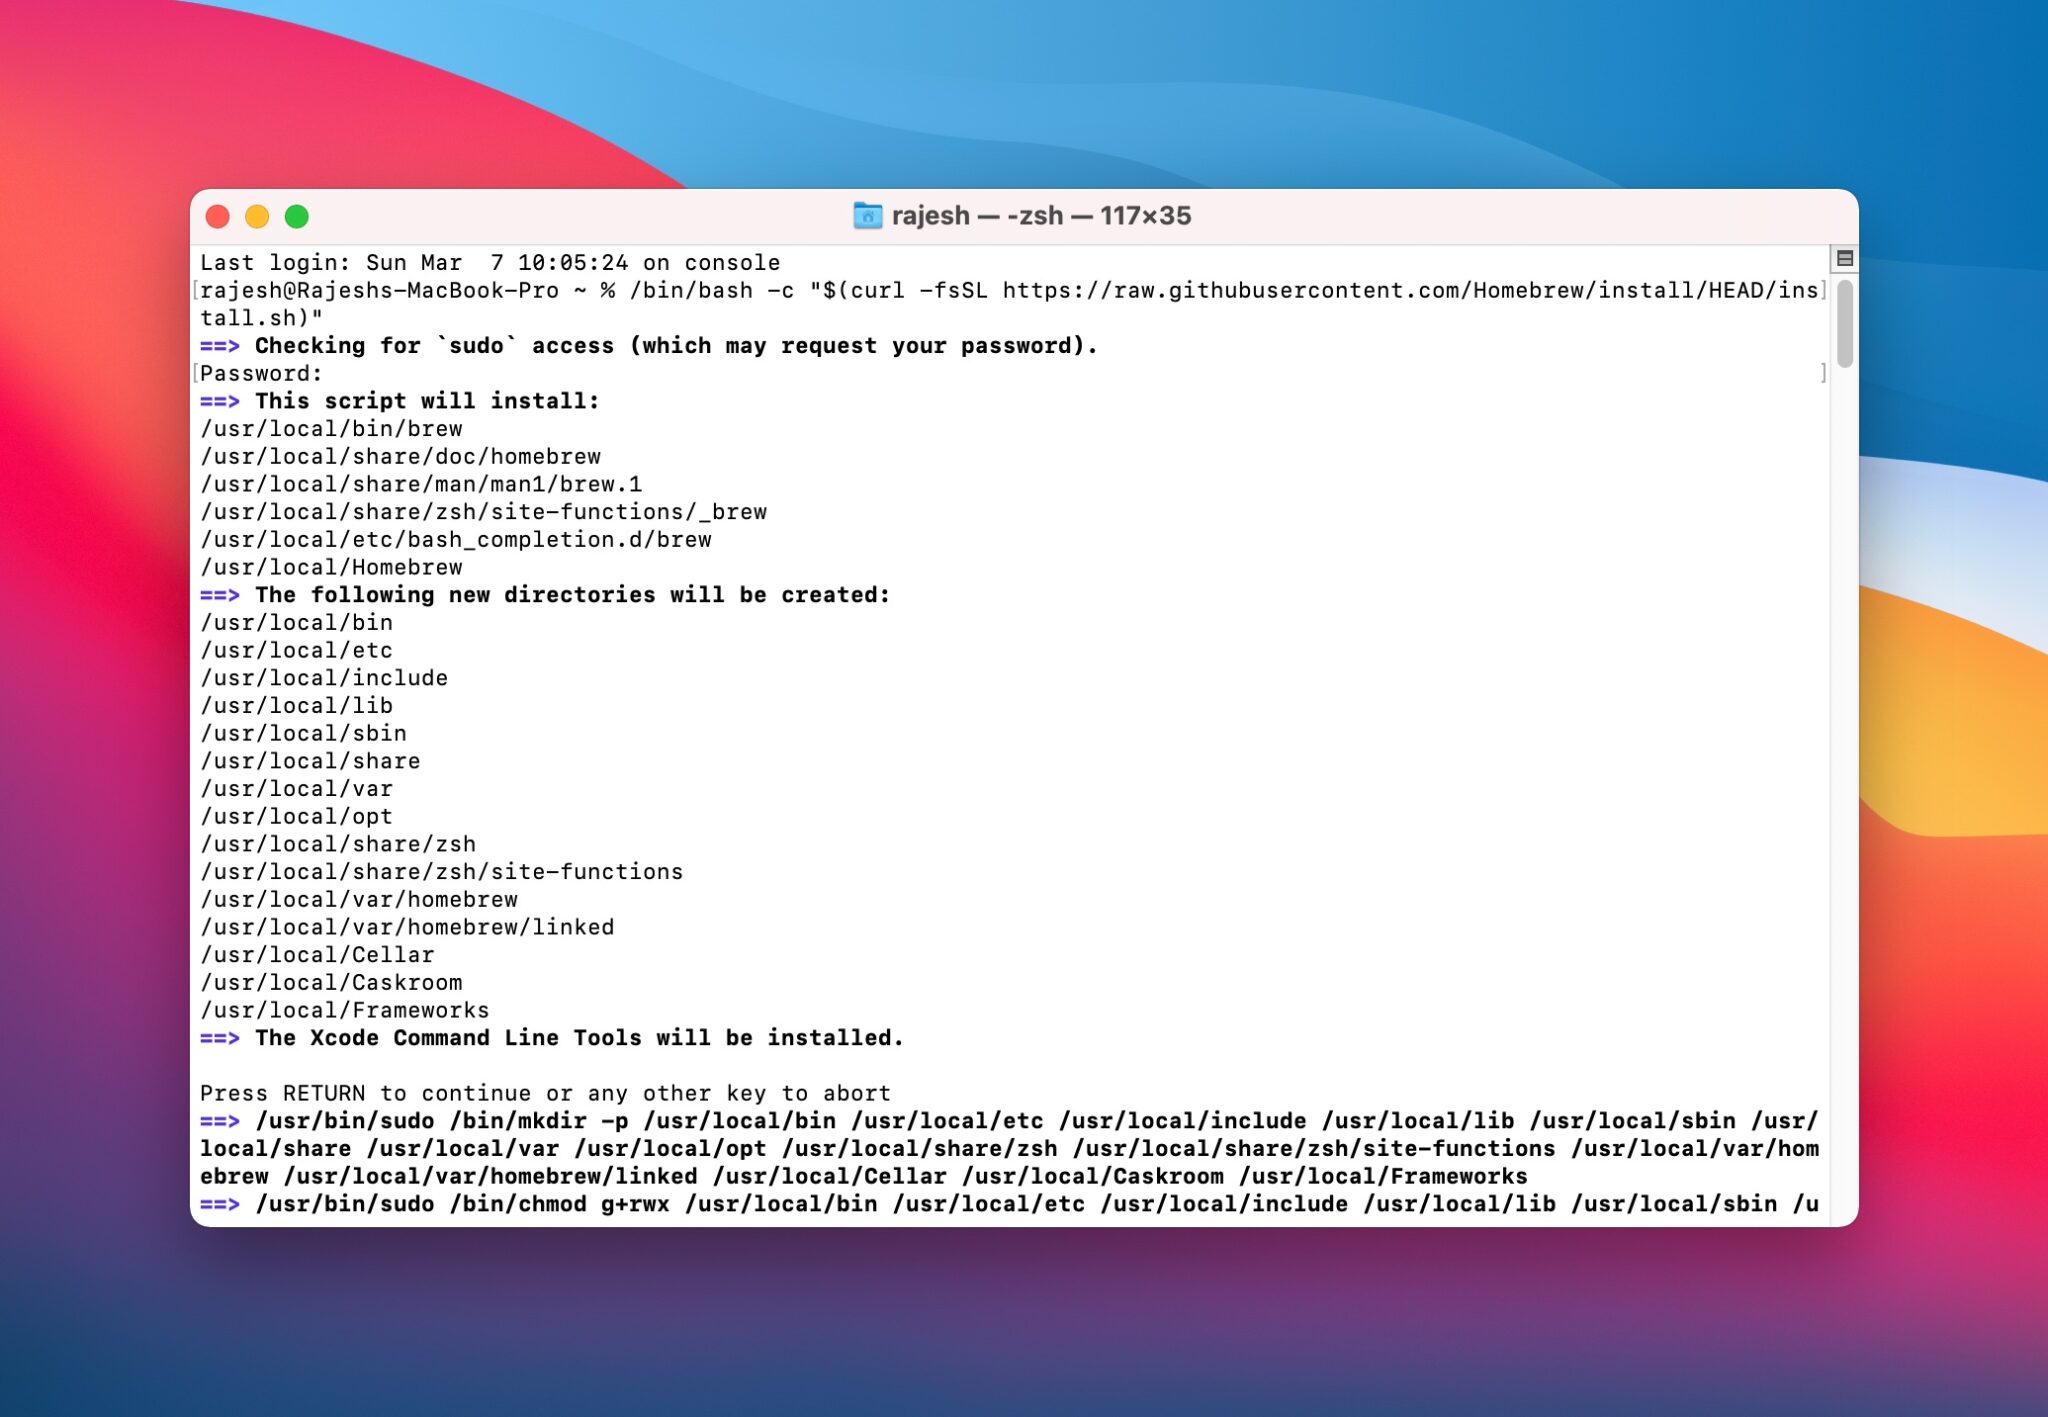
Шаг 2: Установите Homebrew на Mac. Откройте Терминал и используйте следующую команду:
Если Xcode ещё не установлен на ваш Mac, Терминал попросит это сделать. Просто нажмите Enter, чтобы установить Xcode и Homebrew. На этот процесс может уйти некоторое время.
Шаг 3: Теперь нужно установить Smartmontools на Mac. Для этого используйте данную команду:
Во время установки понадобится ввести пароль от Mac.
Шаг 4: Когда инструмент smartmontools установится, он автоматически просканирует «/disk0» SSD на вашем Mac и отобразит информацию о состоянии жёсткого диска.
Более подробная информация с помощью Smartmontools
Чтобы ещё раз вручную с помощью smartmontools проверить состояние своего SSD на Mac, делайте следующее:
Шаг 1: Запустите Дисковую утилиту. В меню слева нажмите на жёсткий диск правой кнопкой мыши и выберите Свойства.
Шаг 2: В правом нижнем углу найдите текст, который отображается в пункте «Устройство». Он вам понадобится.
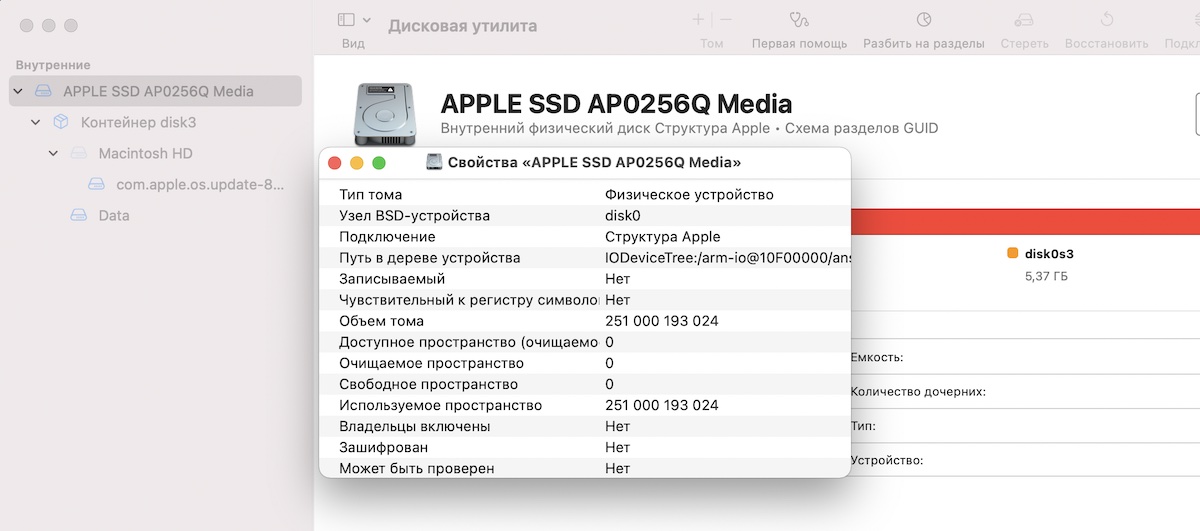
Шаг 3: Откройте Терминал и используйте команду ниже. Используйте то название, которое вы узнали только что. К примеру, у нас это «disk0».
Вы увидите детали о состоянии жёсткого диска. Важно понимать эти детали. Главные – Available Spare Threshold и Percentage Used. В идеале, если у вас M1 Mac, эти показатели должны быть 0% или 1%.
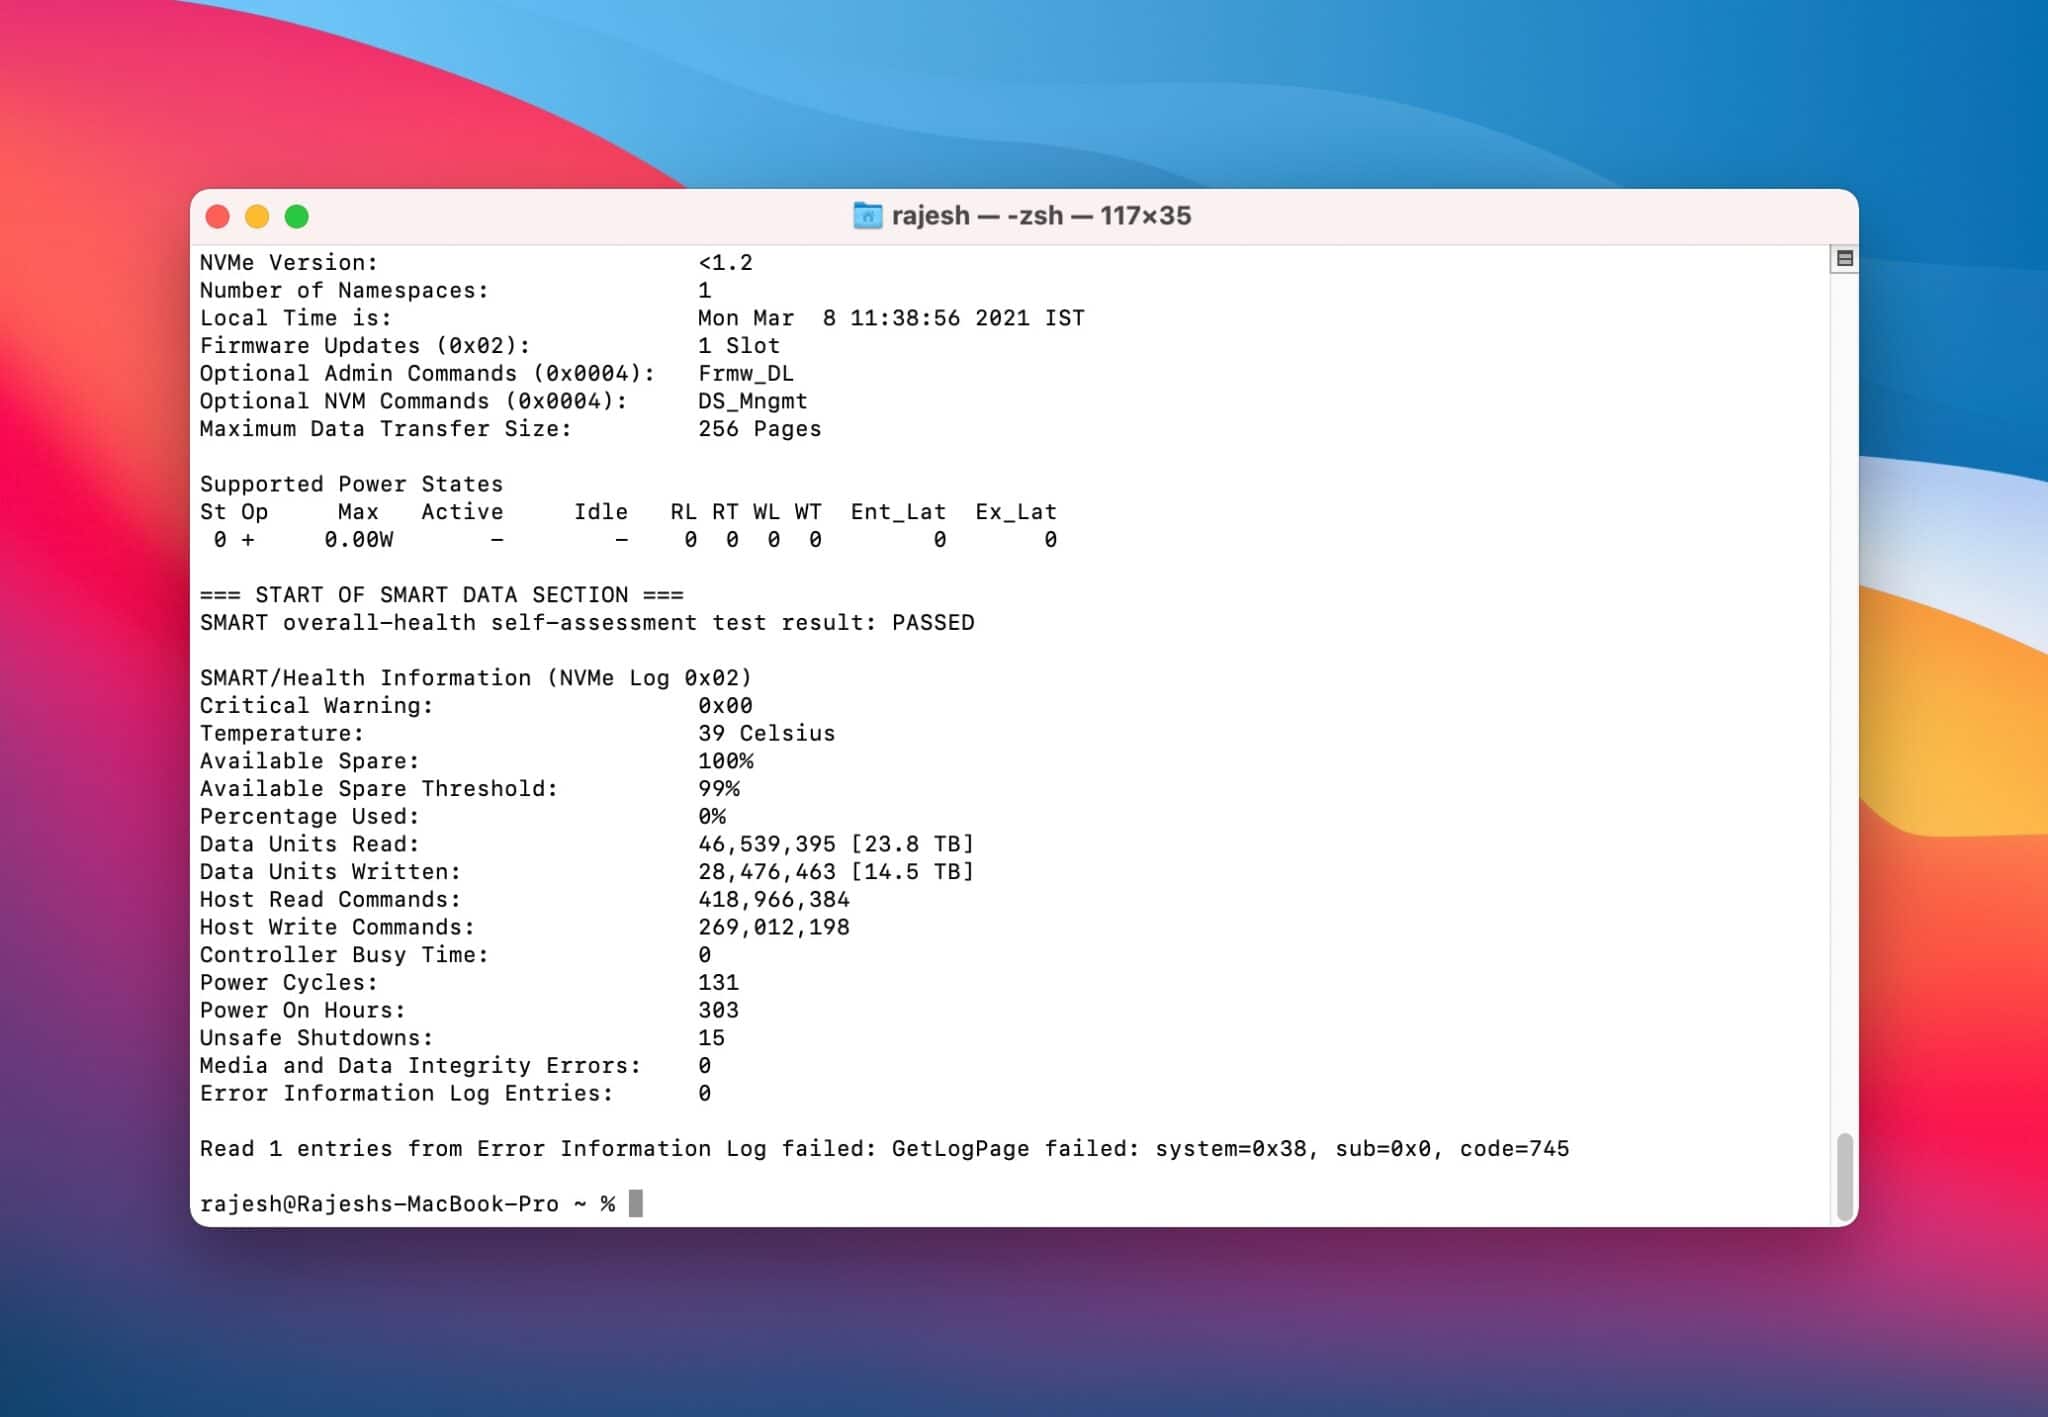
Если показатели выше, вам стоит подождать выхода обновления, которое может содержать решение проблемы. Возможно, версия macOS 11.3 Big Sur поможет.
Таким же образом можно посмотреть данные о состоянии SSD Intel Mac. Если у вас относительно старый Mac, то показатель «Percentage Used» может достигать 5-30%.
Если показатель ещё выше, то стоит сохранить копию своих данных, поскольку состояние SSD влияет на длительность работы компьютера. Кстати, таким же способом вы можете проверить состояние внешних жёстких дисков.
Источник
smartmontools
Контекстная Навигация
- 2020-12-30 : We released version 7.2 of Smartmontools. See the NEWS file and the ticket report to get a summary of the changes and new features.
- 2019-12-30 : We released version 7.1 of Smartmontools.
- 2019-12-01 : Smartmontools website migrated to the new server. Please let us know in case of any issues.
- 2018-12-30 : We released version 7.0 of Smartmontools.
- 2018-10-17 : In the past we offered daily builds on builds.smartmontools.org. Now we do automated builds on every commit to the repository. Read more about it in section GitHub mirror and Circle CI integration below.
- 2017-11-12 : Alexander Shaduri released version 1.1.3 of GSmartControl (a graphical user interface for smartctl). Available for Linux, FreeBSD, MacOS X and Windows.
- 2017-11-05 : We released version 6.6 of Smartmontools.
- 2017-10-10 : 15th anniversary of smartmontools first release 🙂 If you want to know more about the roots see our article about smartmontools history
- 2017-07-30 : Our mailing lists moved from sourceforge to JPBerlin. (!) Please subscribe on the new mailing lists.
- 2017-04-11 : We moved the Bad block HOWTO for smartmontools from the svn repository to the Trac wiki. So it is open now for your contributions of further recipes, case studies and comments.
- . see here for further news
About Smartmontools
The smartmontools package contains two utility programs ( smartctl and smartd ) to control and monitor storage systems using the Self-Monitoring, Analysis and Reporting Technology System (SMART) built into most modern ATA/SATA, SCSI/SAS and NVMe disks. In many cases, these utilities will provide advanced warning of disk degradation and failure. Smartmontools was originally derived from the Linux smartsuite package and actually supports ATA/SATA, SCSI/SAS and NVMe disks and also SCSI/SAS tape devices. It should run on any modern Linux, FreeBSD, NetBSD, OpenBSD, Darwin (macOS), Solaris, Windows, Cygwin, OS/2, eComStation or QNX system. Smartmontools can also be run from one of many different Live CDs/DVDs.
Sourcecode tarballs and precompiled packages for Darwin (macOS) and Windows are available at the project page at Sourceforge.
Precompiled packages are available from the repositories of various distributions, see the Packages page or Repology.org. Some examples:
Due to OS-specific issues and also depending on the different state of smartmontools development on the platforms, device support is not the same for all OS platforms. See info about RAID-controller, USB and NVMe support here on the homepage and of course in the manpages.
Thanks to Alexander Shaduri, there is also a graphical user interface for smartctl available. Go to the Homepage of GSmartControl to get all info and the software itself. Have a look at the screenshots and the feature list to get an impression of this nice tool.
Contribute to Smartmontools
Device Information
If your drive is not in the current version of smartmontools drive database, you can help to improve smartmontools information by sending a report about your drive to our mailinglist smartmontools-database.
We collect info about USB devices that have been successfully or unsuccessfully tested with smartmontools. If you have a device not listed there, please tell us the test result, by editing the wiki page, and/or by sending an email to the smartmontools-database mailinglist.
Bug Reports
To submit a bug report or propose an enhancement for smartmontools create a new ticket here in trac. Login is needed for that. If you don’t want to register an account, you can also send the info to our smartmontools-support mailing list.
Patches
Patches are welcome! The most convenient way for us is, when you attach them to a new ticket here in trac. But it’s also possible to submit patches for code review to developers mailinglist. You don’t need to be member of the mailinglist for it. Our list moderator will approve posting requests in these cases. Your patches should refer to our recent code base in SVN. You should also have a look at the documents in the developers area here in the wiki. You will find info about smartmontools software architecture and tutorials and guidelines from our developers there.
GitHub mirror and Circle CI integration
For those who prefer to use git and GitHub we maintain an official mirror of the smartmontools project. Feel free to fork, submit PR-s and issues. The mirror is updated every 15 minutes from our sourceforge SVN. Also a Circle CI Continuous Integration and Delivery system has been setup, see builds page for the details. Every commit to the GitHub triggers a new build and provides a source tarball and various binaries as artifacts.
- GitHub:
- Trunk build status:

- LGTM alerts:
Incident Reports
If you see a failure or have a problem with our project facilities you may report it to smartmontools-devel@listi.jpberlin.de . You don’t need to be subscribed for that. Your mail will then go to the list moderator and she will take action to solve the issue.
License
Smartmontools (and content in this wiki) are published under GNU GPL.
Источник
smartmontools
Контекстная Навигация
Smartmontools Frequently Asked Questions (FAQ)
Table of Contents
Attributes
I see some strange output from smartctl . What does it mean?
The raw SMART attributes (temperature, power-on lifetime, and so on) are stored in vendor-specific structures. Sometime these are strange. Hitachi disks (at least some of them) store power-on lifetime in minutes, rather than hours (see next question below). IBM disks (at least some of them) have three temperatures stored in the raw structure, not just one. And so on.
If you find strange output, or unknown attributes, have a look at our wiki pages, were we collect vendor specific info:
When you don’t find an answer to your question there, please send an email to smartmontools-support and we’ll help you try and figure it out.
How can I get the attribute information in human readable format?
smartctl provides human readable format as far as possible. If the exact meaning of the RAW value is not known, there is nothing we can do.
Why is the attributes number and meaning different on the disks?
Unlike other parts of SMART (logs, self-tests), the attributes are not (and never were) part of the ATA standards. Even the general attribute format (ID, VALUE, WORST, RAW) is removed from the standard since ATA-4 (1998).
Attribute assignment and interpretation are vendor/device specific and undocumented in many cases.
What details can be interpreted from Raw read error rate ?
If no documentation is available, the RAW value of attribute 1 is typically useless. The 48-bit field might encode several values, try -v 1,hex48 to check.
Why is my disk temperature reported by smartd as 150 Celsius?
It’s not. For example, in the message:
the value given is the Normalized not the Raw Attribute value (the disk temperature in this case is about 22 Celsius). The ‘-R’ and ‘-r’ Directives modify this behavior, so that the information is printed with the Raw values as well, for example:
Here the Raw values are the actual disk temperatures in Celsius. Please see the smartctl manual page for further explanation of the differences between Normalized and Raw Attribute values.
Alternatively suppress these messages with -I and enable temperature reports and/or warnings with -W directive. For example this smartd.conf setting:
would result in messages like:
The last message would also be sent as a warning email to ADDRESS.
Attribute 194 (Temperature Celsius) behaves strangely on my Seagate disk
Some Seagate disks store the current temperature Celsius in both the RAW and NORMALIZED Attribute 194 values, and the maximum lifetime temperature in Celsius in the WORST value. Since cooler is better, this means that in this case, lower NORMALIZED Attribute values are farther from failure, and that over time the WORST Attribute values get larger, not smaller (as with other Attributes).
smartctl reports the age as thousands of hours for my Maxtor/Hitachi/Fujitsu disk, yet it is only a few days old
On recent disks, Maxtor has started to use Attribute 9 to store the power-on disk lifetime in minutes rather than hours. In this case, use the: ‘-v 9,minutes’ option to correctly display hours and minutes.
Some models of Fujitsu disks use Attribute 9 to store the power-on disk lifetime in seconds. In that case, use the: ‘-v 9,seconds’ option to correctly display hours, minutes and seconds.
The power-on timer (Attribute 9 raw value) on my Maxtor disk acts strange.
There are three related problems with Maxtor’s SMART firmware:
- On some Maxtor disks, the raw value of Attribute 9 (Power On Time) is supposed to be minutes. But it advances at an unpredictable rate, always more slowly than one count per minute. This is because when the disk is in idle mode, the counter stops advancing. This is only supposed to happen in standby mode. This will be corrected in Maxtor product lines released after October 2004.
In Maxtor disks that use the raw value of Attribute 9 as a minutes counter, only two bytes (of the six available) are used to store the raw value. So it resets to zero once every 65536=2 16 minutes, or about once every 1092 hours. This is fixed in all Maxtor disks manufactured after July 2003, where the raw value was extended to four bytes.
The time stamps in the self-test log don’t correspond to the power-on time, when test was run on my Western Digital (WD) disk
The self-test log timestamps in many WD disks roll back to zero every 1092 hours (65536 minutes). This problem is due to a WD firmware bug. The power-on lifetime in hours is correctly stored in Attribute 9. However when the power-on lifetime is calculated for self-test log entries, the lifetime in minutes is put into a 16-bit register then divided by 60. The 16-bit register overflows and wraps around every 1092 hours.
For WD drives that exhibit this firmware bug, the relationship between Attribute 9’s raw value (H) and the time-stamps in the self-test log (h) are given by:
The (normalized) WORST Attribute values of my Western Digital (WD) disk are larger than the (normalized) CURRENT Attribute values
Western Digital firmware initializes SMART Attributes 10, 11, and 199 after either 120 spin-ups or 8 power-on hours. Until that time, they have the uninitialized value 253.
The SSD_Life_Left Attribute of my new SandForce based SSD reports zero
It doesn’t. The RAW value of this attribute is always 0 and has no meaning. Check the normalized VALUE instead. It starts at 100 and indicates the approximate percentage of SDD life left. It typically decreases when Flash blocks are marked as bad, see the RAW value of Retired_Block_Count:
The Power_On_Hours Attribute of my new Intel SSD reports
This is a bug in Intel 330 Firmware 300i and Intel 520 Firmware 400i. The offset is 894794 hours. See also ticket #289 and Intel SSD Toolbox SMART Attributes FAQ. The hours counter from Device Statistics is not affected:
Protocols, Devices and Controllers
Can I monitor disks behind RAID controllers?
Support for disks behind RAID controllers is highly dependent on both platform and controller type. See our page about smartmontools RAID controller support for the details.
What is error recovery control (ERC) and why it is important to enable it for the (S)ATA disks in RAID?
In computing, error recovery control (ERC) is a feature of hard disks which allow a system administrator to configure the amount of time a drive’s firmware is allowed to spend recovering from a read or write error. Limiting the recovery time allows for improved error handling in hardware or software RAID environments. In some cases, there is a conflict as to whether error handling should be undertaken by the hard drive or by the RAID implementation, which leads to drives being marked as unusable and significant performance degradation, when this could otherwise have been avoided.
It is best for ERC to be «enabled» when in a RAID array to prevent the recovery time from a disk read or write error from exceeding the RAID implementation’s timeout threshold. If a drive times out, the hard disk will need to be manually re-added to the array, requiring a re-build and re-synchronization of the hard disk. Limiting the drives recovery timeout helps for improved error handling in the hardware or software RAID environments.
On disks that fully implement the ATA-8 standard, the smartctl utility can be used to control the ERC behavior of many drives by setting the SCT Error Recovery Control (scterc) parameter:
- Reading current settings:
- Changing the setting:
ERC control needs to be set on the boot time and if hot-replacement been made. You may find sample Linux scripts and related discussion in the ticket #658.
Smartmontools for FireWire, USB, and SATA disks/systems
As for USB and FireWire (IEEE 1394) disks and tape drives, the news is not good. They appear to the operating system as SCSI devices but their implementations do not usually support those SCSI commands needed by smartmontools. A consortium associated with IEEE 1394 certified some external enclosures (containing a ATA disk and a protocol bridge) as being compliant to the relevant standards. Even still, that compliance means that they tend to only support the bare minimum of commands needed for device operation (i.e. SMART support is an unsupported extra). Hopefully external USB and Firewire devices will support SAT in the future, see below. Some USB device based on cypress chips support a proprietary protocol (ATACB) that allow to send raw ATA commands (i.e. SMART support).
Smartmontools should work correctly with SATA drives under both Linux 2.4 and 2.6 kernels. Depending on which subsystem the SATA controller is in (i.e. drivers/ide , drivers/ata or libata (under drivers/scsi ) a SATA drive will appear as /dev/hd* or /dev/sd* . Either way, smartmontools should be able to figure out what is going on and act accordingly. In some cases smartmontools may need a hint in the form of a ‘ -d sat ‘ or ‘ -d ata ‘ option on the smartctl command line or in the /etc/smartd.conf file. There may be a hint to add one of those options in the log file when smartd is run as a daemon or on the command line with smartctl . The ‘ -d ata ‘ option means that even though the drive has a SCSI device name, treat it as an ATA disk. Unfortunately such an approach doesn’t often work. The next paragraph has more information about ‘ -d sat ‘.
The SCSI to ATA Translation (SAT) standard (ANSI INCITS 431-2007) may solve many problems in this area. It defines how SCSI commands will be translated to the corresponding ATA commands and defines a pass-through mechanism. ATA commands are conveyed natively by two transports: parallel and serial ATA. SCSI commands can be conveyed by many transports: the veteran SCSI Parallel Interface (SPI), Fibre Channel (FC), Infiniband (SRP), Serial Attached SCSI (SAS), IP (iSCSI and iSER), USB (mass storage), and IEEE 1394 (SBP) to name some. Due to their cost and storage capacity, more and more ATA disks (especially SATA disks) are appearing «behind» a SCSI transport. This is especially true of the SAS transport which can painlessly accomodate both SAS and SATA disks. Enter another acronym: SATL which stands for SCSI to ATA Translation Layer. In Linux libata has a SATL in it. Some SAS host bus adapters have a SATL in their firmware. FC might have a SATL in a switch. Perhaps in the future USB and IEEE 1394 enclosures will have a SATL in them. Starting from smartmontools versions 5.36 and 5.37, no matter where a SATL is, irrespective of the operating system in use, the user should have less problems with ATA disks, no matter which transport is involved. As always, it helps to know a little of what is happening under the covers. The ‘ -d sat ‘ option instructs smartctl and smartd to assume a SATL is in place and act accordingly. The smartctl command can often detect a SATL and autoconfigure while in smartmontools version 5.37 smartd often needs a hint.
The current USB mass storage specification is based on a version of SCSI (SPC-2) that can’t support SAT. But some chips manufacturers implement proprietary SCSI commands that allow ATA pass through (similiar like for SAT). Well known is the cypress chipset, that contains an ATACB proprietary pass through (for ATA commands passed through SCSI commands) for which some information is publicly available (see cy7c68300c_8.pdf). Smartmontools 5.39 supports these cypress chips via the ‘ -d usbcypress ‘ option on the smartctl command line. A lot of devices can be autodetected already. Have a look on the wiki page about supported USB-Devices, wether your device is on the list. Check your device usb id (most cypress usb ata bridge got vid=0x04b4 , pid=0x6830 ) or to try to call smartctl with option ‘ -d usbcypress ‘. If the usb device doesn’t support ATACB, smartmontools will abort.
Smartmontools for SCSI disks and tapes (TapeAlert)
Smartmontools for SCSI disks and tapes (including medium changers) is discussed on a separate page.
Smartmontools for the NVMe devices
Smartmontools supports NVMe interface starting from version 6.5. NVMe related functionality and supported configurations are discussed on the NVMe wiki page.
Smartmontools Database
My ATA/SATA drive is not in the smartctl / smartd database
Does this break anything? How do I get it added?
If your drive is not in the database, then the names of the Attributes (displayed in the ATTRIBUTE_NAME column of smartctl -A /dev/sdX ) and the format of the the raw Attribute values shown in the RAW_VALUE column may be incorrect. This is mostly cosmetic: the essential drive health monitoring/testing functionality of smartmontools does not depend upon the database.
If your drive is not in the database, please make sure to update the drive database first. Please do not submit a new drive for the database without checking to see if it is already in the current drive database (drivedb.h) file.
If your drive is not in the current database, to have it added to the database, first use the command:
to run a short self-test on the drive, and wait a few minutes for the test to complete. Then create a full smartmontools report and redirect it to a text file:
Note: Replace VENDOR-MODEL in the above file name with some actual identify information for the drive.
The timestamp in the self-test log will help us to determine whether Attribute 9 is being used to store the lifetime in hours, minutes, or seconds.
Alternatively you could use:
This report does not contain the » Serial Number » and » LU WWN Device Id » output lines.
Then either email the file to smartmontools-database mailing list or create a ticket here in trac. Add the file as a plain-text ASCII attachment to avoid reformatting. In tickets, wiki markup for preformatted text could be used alternatively.
Place the drive model name in the email subject or ticket summary. To submit info about different drive models, please use separate emails or tickets.
Further information about the drive is welcome (link to device specification, output from a vendor specific SMART tool, name of the SSD controller, an already tested drivedb.h entry, . ).
Please note that there usually will be no feedback on the smartmontools-database mailing list after a drive has been added to the database. If such feedback is desired, please create a ticket instead.
My SCSI/SAS drive is not in the smartctl / smartd database
My NVMe drive is not in the smartctl / smartd database
SCSI/SAS and NVMe drives do not provide ATA/SATA-like SMART Attributes. Therefore the drive database does not contain any entries for these drives. This may change in the future as some drives provide similar info via vendor specific commands (see ticket #870).
Self-tests
ATA drive is failing self-tests, but SMART health status is ‘PASSED’. What’s going on?
If your ATA drive supports self-tests, you should run them on a regular basis, for example one per week:
After the test has completed, you should examine the results with:
If the drive fails a self-test, but still has ‘ PASSED ‘ SMART health status, this usually means that there is a corrupted (uncorrectable=UNC) sector on the disk. This means that the ECC data stored at that sector is not consistent with the user data stored at that sector, and an attempt to read the sector fails with a UNC error. This can be a one-time transient effect: a sudden power failure while the disk was writing to the sector corrupted the ECC code or data, but the sector could correctly store new data. Or it can be a permanent effect: the magnetic media has been damaged by a bit of dust, and the sector could not correctly store new data.
If the disk can read the sector of data a single time, and the damage is permanent, not transient, then the disk firmware will mark the sector as ‘bad’ and allocate a spare sector to replace it. But if the disk can’t read the sector even once, then it won’t reallocate the sector, in hopes of being able, at some time in the future, to read the data from it. A write to an unreadable (corrupted) sector will fix the problem. If the damage is transient, then new consistent data will be written to the sector. If the damange is permanent, then the write will force sector reallocation. Please see Bad block HOWTO for instructions about how to force this sector to reallocate (Linux only).
The disk still has passing health status because the firmware has not found other signs of trouble, such as a failing servo.
Such disks can often be repaired by using the disk manufaturer’s ‘disk evaluation and repair’ utility. Beware: this may force reallocation of the lost sector and thus corrupt or destroy any file system on the disk. See Bad block HOWTO for generic Linux instructions.
Unreadable, uncorrectable, pending sectors or Medium error on disk. What’s going on?
SCSI and ATA disk drives store data in blocks (sectors) of 512 (1) bytes. Each 512 bytes of user data is stored on the media plus 40 or more bytes of ECC data included in it. These — so called ECC Bytes — are used internally by the disk firmware for error checking/detection and correction.
Sometimes the data in a sector gets corrupted. This can happen because a speck of dust scratched the disk, or because the disk was powered down while writing data to that sector, or for other reasons. Usually the ECC bytes can be used to correct the corrupted data. However if the ECC bytes are inconsistent or can’t be used to correct the bad data, then the 512 bytes of data are lost. Such a sector is called unreadable or uncorrectable.
If your disk has an unreadable sector, this means that some of your data can’t be retrieved. You can force the disk to replace the unreadable sector with a spare good sector, but only at the price of losing the 512 bytes of data forever.
Disks with uncorrectable sectors can often be repaired by using the disk manufaturer’s ‘disk evaluation and repair’ utility (see previous FAQ entry). Beware: this may force reallocation of the lost sector and thus corrupt or destroy any file system on the disk. See Bad block HOWTO for generic Linux instructions.
Normally when an uncorrectable sector is found, the disk puts this onto a ‘pending sector list’ to indicate that it should be replaced with a spare good sector. However this replacement won’t take place until either the disk can read the data on the bad sector, or is instructed to write new data to that bad sector.
(1) In the future the block size for disks (especially in the terabyte range) will increase from 512 bytes to 4096 bytes.
Why do self-tests take very long?
Why is the system very slow during a self-test?
The smartctl -t TEST command (or smartd.conf -s directive) issues a command to start a test (ATA: SMART EXECUTE OFF-LINE IMMEDIATE, SCSI: SEND DIAGNOSTIC). The self-tests are controlled by drive firmware. There is no related data transfer between host and drive during a test. The interleaving of regular I/O and read tests depends on the specific implementation in the firmware.
Many implementations work reasonably. Some slow down the self-test even on average system load such that the test virtually never ends. Others slow down regular I/O such that the system is unusable during a test.
Why do self-tests take much longer than predicted?
The predicted completion time printed by smartctl -t TEST is based on values returned by drive firmware (ATA: SELF-TEST ROUTINE RECOMMENDED POLLING TIME from SMART DATA STRUCTURE, SCSI: EXTENDED SELF-TEST COMPLETION TIME from CONTROL MODE PAGE). The prediction assumes that no regular I/O is done during the test.
Why are long self-tests keep getting interrupted?
The host may send a standby command to the drive after some time of I/O inactivity. This also aborts any running self-test. The self-test log then reports Aborted by host or Interrupted (host reset) as status. This is typical for drives behind USB bridges.
As a workaround, run some tool or script which perform periodic low volume read accesses. See this thread on smartmontools-support mailing list for an example.
Where can I find manufacturer-specific disk-testing utilities?
A good listing of such utilities can be found here. Unfortunately most of these are for MS operating systems, but most can be run from a MS-DOS boot disk.
The UBCD (Ultimate Boot CD) includes most of these disk-testing utilities and many other useful diagnostic tools ready to boot from CD or USB memory stick.
Note: if you do run one of these utilities, and it identifies the meanings of any SMART Attributes that are not known to smartmontools, please report them to the smartmontools-support mailing list or add the info to our info pages on vendor specific SMART Attributes.
These utilities have an important role to fill. If your disk has bad sectors (for example, as revealed by running self-tests with smartmontools) and the disk is not able to recover the data from those sectors, then the disk will not automatically reallocate those damaged sectors from its set of spare sectors, because forcing the reallocation to take place may entail some loss of data. Because the commands that force such reallocation are Vendor Specific, most manufacturers provide a utility for this purpose. It may cause data loss but can repair damaged sectors (at least, until it runs out of replacement sectors).
Operating System
What are the operating system requirements?
Please see the first section of the INSTALL file.
BIOS has a SMART enable/disable setting. What does it do, and how should I set it?
Some type of BIOS can check the SMART health status of a disk at bootup: the equivalent of ‘ smartctl [-s on] -H /dev/sd? ‘. This one-time check on bootup is done if the BIOS SMART setting is set to ENABLE , and is not done if the setting is set to DISABLE .
If this one-time check is done, and the disk’s health status is found to be FAILED , then typically the BIOS will display an error message and refuse to boot the machine.
For the proper functioning of smartmontools, either BIOS setting may be used.
A BIOS may perform the SMART health check even if it does not provide a corresponding setting. The check cannot be disabled in this case.
Why does SAT pass-through fail under Linux if UAS is enabled
The Linux kernel rejects SAT ATA pass-through commands to certain devices if UAS is enabled. See the SAT with UAS under Linux page for details.
Do smartctl and smartd run on a virtual machine guest OS?
Yes and no. Smartctl and smartd run on a virtual machine guest OS without problems. But this isn’t very useful because the virtual disks do not support SMART. If a guest OS disk is configured as a raw disk, this only means that its sectors are mapped transparently to the underlying physical disk. This does not imply the ATA or SCSI pass-through access required to access the SMART info of the physical disk. Even the disk’s identity is typically not exposed to the guest OS.
Is smartctl available for VMware ESXi?
No. See the ESXi related tickets and this thread on smartmontools-support mailing list.
What is the purpose of the command smartctl-nc on Windows?
The file smartctl-nc.exe (no console) from the smartmontools Windows package is a copy of smartctl.exe with the SUBSYSTEM type in the EXE header changed from CONSOLE to GUI. This prevents that an empty console window is opened when the command is run in background with output redirected. GSmartControl uses this command for this purpose. When smartctl-nc is run without redirection from a console window, its output is not visible because Windows detaches the program from the console.
smartctl aborts with the message «. SMART_GET_VERSION failed» on Windows. What is going wrong?
A failing SMART_GET_VERSION call means that the device driver does not implement the I/O controls (see below) to access ATA SMART functionality.
Some Windows drivers for (S)ATA controllers are implemented as SCSI class drivers. This is usually the case for drivers which support RAID. Unfortunately, such drivers do not support the ATA specific SMART I/O controls.
On Windows smartctl prints the message: «. Log Read failed: Function not implemented»
What is going wrong?
This means that the device driver does not support the command SMART READ LOG. The message does not indicate a hard disk problem» It does also not mean that the disk itself does not support SMART logs. It may still be possible to read the logs with a Linux version of smartmontools run from some Live CD/DVD.
To access ATA SMART functionality on Windows, smartmontools uses the I/O control calls SMART_RCV_DRIVE_DATA and SMART_SEND_DRIVE_CMD. These calls were available since Win95 OSR2. An example program from Microsoft can be found (SmartApp?.exe, no longer available, the related KB article 208048 is also no longer available).
Starting with NT4, these calls do more restrictive parameter checks. In particular, the command codes for SMART READ LOG and ABORT SELF-TEST are not accepted. To perform these functions, smartmontools uses the undocumented functions SCSIOP_ATA_PASSTHROUGH (NT4) or IOCTL_IDE_PASS_THROUGH (2000/XP) instead. An example program using these calls can be found here, a related newsgroup thread is here.
Unfortunately, these undocumented functions are not implemented in most vendor specific ATA device drivers. smartctl prints a «Function not implemented» message in this case.
A new I/O control call IOCTL_ATA_PASS_THROUGH is available since Win2003 and XP SP2. It should be supported by most new drivers. Experimental code using this call was added 2006-04-27 and is included in smartmontools release 5.37.
I found in syslog: ‘Can’t locate module block-major-65’
When I run smartd , the SYSLOG /var/log/messages contains messages like this:
This is because when smartd starts, if there is no configuration file, it looks for all ATA and SCSI devices to monitor (matching the pattern /dev/hd[a-t] or /dev/sd[a-z] ). The log messages appear because your system doesn’t have most of these devices.
The solution is simple: use the smartd configuration file /etc/smartd.conf to specify which devices to monitor.
On OSX smartctl prints ATA_READ_LOG_EXT (addr=0x11:0x00, page=0, n=1) failed: 48-bit ATA commands not implemented
When I run smartctl -x output contains lines that:
This is because OSX provides very limited SMART API and direct disk access is not allowed. It is possible to use Linux LiveCD to get full information about the drive.
OSX — External USB / FireWire drive diagnostics support
Mac OS X does not support diagnosing external drives using S.M.A.R.T. technology “out of the box” . In order to allow your Mac to diagnose external drives, you will need to install a special third party driver. Please note that this is a requirement of Mac OS X, and not smartmontools. Links:
- Binary Fruit page about USB/OSX with instructions for the different versions
- OSX Smart driver GitHub page original source code of the driver
Firmware Issues
‘Error SMART Status command failed’ What’s the meaning of this smartctl message?
The SMART status command (health monitoring) is not working properly. This is found on USB 3.0 enclosures based on LucidPORT USB300 bridge with firmware 2447 or earlier. Firmware 2580 may fix this error. Contact both your enclosure manufacturer and LucidPORT to obtain a working firmware.
‘Warning: ATA error count 9 inconsistent with error log pointer 5’ What’s the meaning of this smartctl message?
The ATA error log is stored in a circular buffer, and the ATA specifications are unambiguous about how the entries should be ordered. This warning message means that the disk’s firmware does not strictly obey the ATA specification regarding the ordering of the error log entries in the circular buffer. Smartmontools will correct for this oversight, so this warning message can be safely ignored by users. (On the other hand, firmware engineers: please read the ATA specs more closely then fix your code!).
Distribution
Is there a bootable standalone CD/DVD that contains smartmontools?
How can I check that the package hasn’t been tampered with?
Since the smartmontools utilities run as root, you might be concerned about something harmful being embedded within them. Starting with release 5.19 of smartmontools , the released files have been GPG signed (except releases 5.37 to 5.39.1). The fingerprint are given in a file on the release page with a name like smartmontools-6.4.tar.gz.asc .
Please verify these using the
Historic
The FAQ entries below are probably outdated.
What Attributes does smartmontools not yet recognize?
From Maxtor disks (99), (100), and (101). These are not used by Maxtor in SMART revision 5. They will be used in SMART revision 6, but the engineering group has not yet decided what to monitor with these Attributes.
Startup message: smartd [FAILED] on Fedora Core Linux system
Fedora Core is distributed with a smartd configuration file /etc/smartd.conf that monitors the first IDE disk /dev/hda. If this device does not exist (or lacks SMART capability) you will get the error message above. Look in SYSLOG (/var/log/messages) for additional details about what is going wrong.
The solution: If your system has only SCSI disks, or has IDE disk(s) on a non-primary controller, just edit /etc/smartd.conf to reflect the correct location of the drive(s). Please also read the smartd.conf man page for additional information.
What’s the story on IBM SMART disks?
Apparently some of the older SMART firmware on IBM disks can interfere with the regular operation of the disk. If you have this problem, here is a link to an IBM DeskStar hard disk drive firmware update.
Does it work on Windows?
Yes, finally it does. A windows port of smartctl 5.26 by Christian Franke was first checked in 2004/02/23 on CVS branch RELEASE_5_26_WIN32_BRANCH and has been merged to the CVS trunk later.
The Cygwin or MSYS environment can be used to build Windows (using MinGW) versions of smartctl and smartd . Installation instructions for binary distributions can be found here.
Why did the release version scheme change?
It was non-standard. So with the move to GNU Autoconf and GNU Automake it changed from 5.X-Y (where X and Y are one or more digits) to 5.Y. Starting with the first release, and moving forward in time, the releases are numbered as follows:
Other
How to create a bug report
The most convenient way for us is, when you create a new ticket here in TRAC. You must be logged in to your smartmontools.org Trac account in order to do that.
If you don’t have a smartmontools Trac account and don’t want to have one, you can also send the info to our smartmontools-support mailing list
Источник


