- Appendix F. Running Samba on Mac OS X Server
- Setup Procedures
- Sharing Files
- Figure F-1. Workgroup Manager: Share Points and Windows File Settings
- Sharing Printers
- Figure F-2. Server Settings: Print Service
- Configuring and Activating Services
- Figure F-3. Server Settings: Windows Services
- Password Server
- Activating Password Server
- Figure F-4. Password Server authentication protocols
- Enabling Password Server
- Figure F-5. Workgroup Manager: Enabling Password Server authentication
- Monitoring Services
- Figure F-6. Server Status: Windows Services
- Configuration Details
- Figure F-7. NetInfo Manager: SMBServer properties
- Table F-1. Samba configuration settings in Mac OS X Server
- Question: Q: How to edit «smb.conf»
- All replies
- macOS: Fixing SMB Windows File Sharing Not Working On Mac
- Background: How to enable SMB Windows file sharing on your mac
- Problem: Cannot select and activate user for SMB Windows file sharing on my Mac
- How to fix Mac cannot access user account for SMB Windows File Sharing
Appendix F. Running Samba on Mac OS X Server
Setup Procedures
The first thing to note is that the procedure described in Chapter 2 using System Preferences to enable Samba does not apply to Mac OS X Server. Unlike Mac OS X, the Sharing pane of System Preferences does not include an option to turn on Windows File Sharing. Instead, there is a set of applications to configure, activate, and monitor services: Workgroup Manager, Server Settings, Server Status, and Open Directory Assistant, all located in the directory /Applications/Utilities.
In addition to being installed with Mac OS X Server, these and other administrative applications are included on a separate installation CD-ROM sold with the operating system. They can be used to manage Mac OS X Server systems remotely from any Mac OS X machine.
Briefly, the procedure for setting up SMB file and printer shares is as follows:
Designate share points in Workgroup Manager for file sharing.
Set up print queues in Server Settings for printer sharing, and activate Printer Service.
Configure and activate Windows Services in Server Settings.
Activate Password Server and enable SMB authentication in Open Directory Assistant.
Enable Password Server authentication for user accounts in Workgroup Manager.
Monitor file and print services with Server Status.
Sharing Files
To designate a share point, launch Workgroup Manager. You will be prompted for the local or remote server’s hostname or IP address, as well as for a username and password; this process is required by all the Mac OS X Server administrative applications. Once Workgroup Manager is open, click the Sharing button in the toolbar. The list on the left, under the Share Points tab, displays currently defined share points. To add a new one, click the All tab, and navigate to the folder you want to share.
On the right, under the General tab, check the box labeled Share this item and its contents, change the ownership and permissions if desired, then click the Save button. Next, under the Protocols tab, select Windows File Settings from the pop-up menu, and ensure that the box labeled Share this item using SMB is checked. At this point, you can also decide whether to allow guest access to the share, change the name of the share displayed to SMB clients, or set permissions for files and folders created by SMB clients. Click the Save button when you’re finished making changes. See Figure F-1.
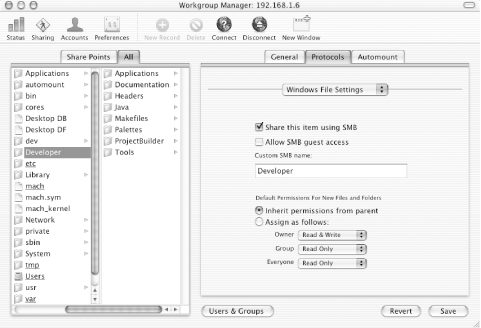
Figure F-1. Workgroup Manager: Share Points and Windows File Settings
Sharing Printers
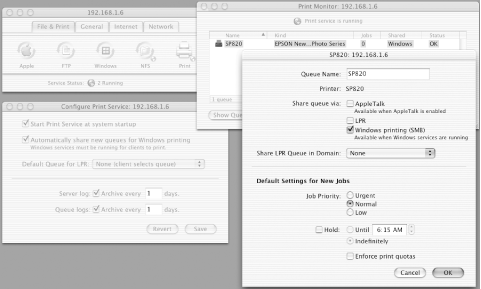
Figure F-2. Server Settings: Print Service
Server Settings will make local printers available for sharing only if they’re PostScript compatible. Unfortunately, many printers, including consumer-grade USB inkjet printers, aren’t. If you want to make one of these printers available to SMB clients, you can still add the share to /etc/smb.conf yourself with a text editor. See «Rolling Your Own» later in this chapter for instructions and caveats related to making manual changes to smb.conf.
Configuring and Activating Services
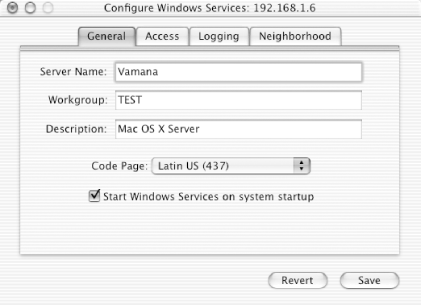
Figure F-3. Server Settings: Windows Services
The Windows Services Access tab offers options to enable guest access and limit the number of simultaneous client connections; under the Logging tab, you can specify the verbosity of your logging. With options under the Neighborhood tab, you can configure your machine as a WINS client or server or have it provide browser services locally or across subnets.
Password Server
If you need to use Authentication Manager, use the following procedure to enable it:
On every machine hosting a domain that will bind into the NetInfo hierarchy, execute the command tim -init -auto tag for each domain, where tag is the name of the domain’s database.
When prompted, provide a password to be used as the encryption key for the domain. This key is used to decrypt the Windows passwords and is stored in an encrypted file readable only by root, /var/db/netinfo/.tag.tim.
Set AUTHSERVER=-YES- in /etc/hostconfig.
Start Authentication Manager by invoking tim. This is also executed during the boot sequence by the AuthServer startup item.
Reset the password of each user requiring SMB client access. In Mac OS X Server 10.2 or later, make sure the user is set up for Basic authentication, not Password Server authentication.
When you’ve finished configuring Windows Services, click the Save button, then click the Windows icon in Server Settings, and select Start Windows Services. This starts the Samba daemons, enabling access from SMB clients.
Activating Password Server
To enable Password Server or merely check its settings, start the Open Directory Assistant. Unless you wish to change any of the settings, just click the right arrow button in the lower-right corner of the window until you get to the first Security step. At this point, activate Password Server by selecting the option marked Password and authentication information will be provided to other systems. The next step displays the main administrative account, and the one after that gives you a choice of authentication protocols to enable (see Figure F-4). Make sure that SMB-NT is checked, and check SMB-Lan Manager if you have Windows 95/98/Me or older clients. The final step saves the Password Server configuration and prompts you to reboot.
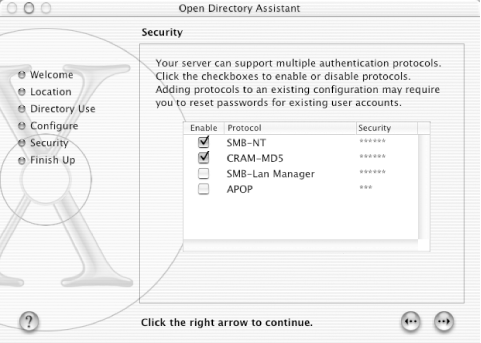
Figure F-4. Password Server authentication protocols
Enabling Password Server
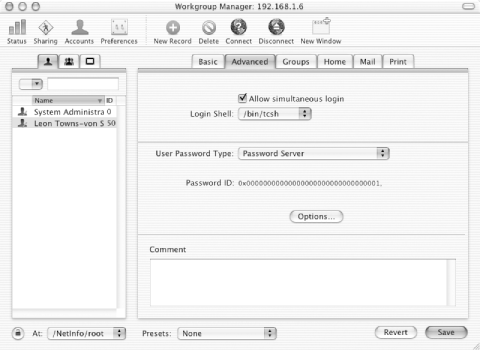
Figure F-5. Workgroup Manager: Enabling Password Server authentication
Monitoring Services
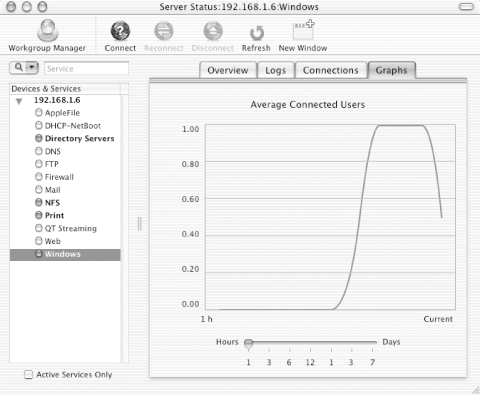
Figure F-6. Server Status: Windows Services
Configuration Details
Instead, a process named sambadmind generates /etc/smb.conf from the configuration specified in Server Settings and Workgroup Manager and handles starting and restarting the Samba daemons as necessary. The sambadmind process is in turn monitored by watchdog, which keeps an eye on certain processes and restarts those which fail. The watchdog utility is configured in /etc/watchdog.conf, a file similar to a System V inittab, which specifies how the services under watchdog‘s purview are to be treated. For example, the line for sambadmind looks like this:
Using a watchdog-monitored process such as sambadmind to start the Samba daemons, instead of a one-time execution of a startup item, results in more reliable service. In Mac OS X Server, if a Samba daemon dies unexpectedly, it is quickly restarted. (Examples of other services monitored by watchdog are Password Server, Print Service, and the Server Settings daemon that allows remote management.)
There’s another wrinkle in Mac OS X Server: the Samba configuration settings are not written directly to /etc/smb.conf, as they are in the non-Server version of Mac OS X. Instead, they’re stored in the server’s local Open Directory domain,[1] from which sambadmind retrieves them and regenerates smb.conf. For example, the Samba global parameters are stored in /config/SMBServer (see Figure F-7). Share point information is also kept in Open Directory, under /config/SharePoints, while CUPS takes responsibility for printer configuration in /etc/cups/printers.conf (also creating stub entries used by Samba in /etc/printcap).
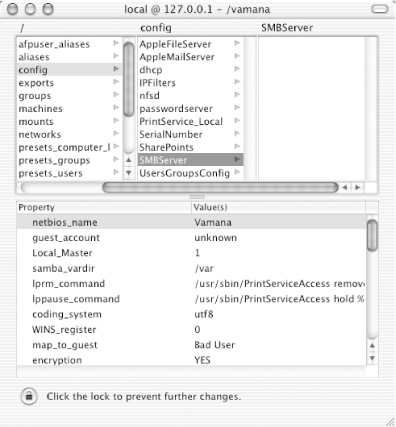
Figure F-7. NetInfo Manager: SMBServer properties
Table F-1 summarizes the association of Windows Services settings in the Server Settings application, properties stored in Open Directory, and parameters in /etc/smb.conf.
Table F-1. Samba configuration settings in Mac OS X Server
Server Settings graphical element in Windows Services
Open Directory property in /config/SMBServer
Источник
Question: Q: How to edit «smb.conf»
Hi there,
i would like to share some folders directly from the smb.conf
I am able to do that with Linux, but i my Mac i can’t find this file!
Anyone can help me?
Other question is:
where mac os puts the sharing folder settings when you edit the system preferences?
MacBook Pro 5.5, Mac OS X (10.6.6)
Posted on Jan 29, 2011 9:43 AM
All replies
Loading page content
Page content loaded
The file is here:
If you’re not sure where a file is located, the find command is typical, or you can use Spotlight from the command line:
Mac has /etc linked over into /private, as you’ll discover. (This is implemented such that going after /etc directly does work correctly.)
Off the top, I don’t recall the details of the plists the Server Admin settings; it’s typical to use the command-line serveradmin tool for that purpose. And using the provides tools is an approach which avoids derailing the command-line serveradmin and Server Admin GUI tools through an errant edit. Issue +man serveradmin+ for details.
As for technical resources, the File Server Administration, Introduction to the Command Line manuals are in the [documentation set|http://www.apple.com/server/macosx/resources/documentation.html], and will provide details on the typical Apple approach. (Carrying over Linux norms for directly accessing configuration files can sometimes lead to operational problems, too. There are various discussions of this around, including [TS3144|http://support.apple.com/kb/TS3144].)
Jan 29, 2011 10:52 AM
Thank you for your quick answer!
Now i can see the smb.conf but i can’t edit it with:
sudo open -a /Applications/TextEdit.app /etc/smb.conf
So Mac os saves the sharing folder settings in a .plist file in /Users/TechnoPhil/Library/Preferences?
Message was edited by: filippo1982
Jan 29, 2011 11:17 AM
sudo nano /etc/smb.conf
sudo vim /etc/smb.conf
sudo emacs /etc/smb.conf
I’d create a copy first, particularly if you don’t have a full backup of your disk.
If you’re just getting going with a shell text editor, then you’ll probably want to use nano and then work your way to vim or emacs or (if you prefer a GUI editor) have a look at textwrangler and its text-mode capabilities, or at macvim and its GUI interface.
Using many of the GUI-facing editors and saving out RTF files and other such (and text files can be encoded in many different ways) can lead to configuration file corruptions and problems with tools or even with booting the operating system.
Using Textedit.app is a common way to corrupt Unix-layer files, too.
So Mac os saves the sharing folder settings in a .plist file in /Users/TechnoPhil/Library/Preferences?
Off-hand, I haven’t needed to look at the details of the implementations underneath the serveradmin tool and Server Admin in this area.
And FWIW, I would not expect to see the server-wide share settings in /User. I’d expect to see those over in /Library. The [file and directory structures used by Mac OS X|http://developer.apple.com/library/mac/#documentation/MacOSX/Conceptual/BPFil eSystem/BPFileSystem.html] are a superset of those found on Unix and POSIX platforms.
Mac OS X and Mac OS X Server make heavy use of plist files, yes. This is tied into the plutil tool, as well as the defaults command, and at various tools that are part of Xcode including Property List Editor.app and such.
If you’re coming over from Linux and want to know more about the platforms, then read the manuals end-to-end for a high-level introduction to the norms and expectations, and then have a look at Amit Singh’s Mac OS X Internals book, then start Googling around for details and procedures.
It can also help if you make an effort to forget a whole lot of what you know about Linux administration, particularly around how management is based on editing command files. Mac OS X works differently, and is managed entirely differently than Linux.
Put another way, you look likely to be headed for a learning experience here. Have fun, but definitely have a backup first.
Shell commands are unforgiving of errors. Shell commands with sudo are particularly unforgiving. Have a backup. Or three.
Источник
macOS: Fixing SMB Windows File Sharing Not Working On Mac
SMB Windows file sharing not working on Mac after upgrading to macOS 10.13 High Sierra or macOS 10.12 Sierra or setting up a new Mac or MacBook via iCloud is easily fixed. For SMB windows file sharing, you need to select a user for activation. Sometimes, you cannot select the user because the user is grayed out. The real cause of this problem is that you most probably use the same password for accessing your Mac and as your iCloud password. Due to security reasons, you cannot use the same password for both your Mac and iCloud anymore. This fix also applies to Mac OS X 10.11 El Capitan.

Fixing SMB Windows file sharing not working_user grayed out
Background: How to enable SMB Windows file sharing on your mac
Go to the Apple menu and choose ‘System Preferences‘ from the drop down menu. To enable File Sharing in macOS or Mac OS X, open the ‘Sharing‘ pane of ‘System Preferences‘ and select the option for ‘File Sharing‘. Windows computers and Macs can then see your computer on the local network. If you want to add an existing user for SMB file sharing open ‘Options…‘ for selecting and activating the user. For details see Apple’s support document.
Problem: Cannot select and activate user for SMB Windows file sharing on my Mac
You cannot activate SMB Windows file sharing because the user is grayed-out. The reason for this is that you got the same password for both your iCloud account and your mac (local password). I guess you set up or upgraded your macOS or Mac OS X and chose your iCloud account and password to access your Mac locally. This iCloud password login was removed in Mac OS X 10.11.4 El Capitan (I think due to security reasons). It doesn’t forcibly remove it from existing accounts, but if you turn it off, you can’t turn it back on.

Fixing SMB Windows file sharing not working_cannot connect to iCloud
Some user will see the pop-up message ‘This mac can’t connect to iCloud because of a problem with ‘Your iCloud email‘. Open iCloud preferences to fix this problem.‘ The fix for this is the same as for SMB Windows file sharing.
How to fix Mac cannot access user account for SMB Windows File Sharing
For enabling SMB windows file sharing, you need to change the password of your local account on your Mac and NOT the iCloud password:
- Go to the Apple menu and choose ‘System Preferences‘ from the drop down menu. Click on ‘iCloud‘ and then sign out from iCloud.
- On the next pop-up choose ‘Stop using iCloud…‘.
- Now you need to use a separate password for your local Mac account. Click on ‘Use separate password‘ and give the local account on your Mac a new password different from your iCloud one!
- On the next window ‘Do you want to keep a copy your iCloud data on your Mac before signing out?‘ select ‘Cancel‘. You’ve already changed the password of your local account and you really need not to sign out from iCloud.
- Next, go back to ‘System preferences‘ > ‘Sharing‘ >’File sharing‘ and click on ‘Options…‘. The user is not graded-out anymore and can be activated. Select the user and click on ‘Done’.
- Now you have to type in the newly generated local password from step 3 and click on ‘OK‘.
- Finally, the user activated for SMB windows file sharing on your Mac.

Fixing SMB Windows file sharing not working_user not grayed-out anymore
Choosing a new password for your local account on your mac different to your iCloud account will fix that SMB Windows file sharing is not working on Mac after upgrading to macOS 10.13 High Sierra, macOS 10.12 Sierra, Mac OS X 10.11.3 El Capitan or setting up a new Mac or MacBook via iCloud before Mac OS X 10.11.4 El Capitan.
Источник


