- Маски для Zoom-конференции
- Руководство
- Официальная функция
- Установка и настройка Snap Camera
- Решение проблем
- Итоги
- Snap Camera
- Getting Started
- Overview
- Download Snap Camera
- System Requirements
- Select a Lens
- Using Snap Camera as Webcam
- Restart Webcam Enabled Application
- Selecting Snap Camera in OBS Studio
- Favoriting Lenses
- Searching for Lenses
- Sharing Lenses
- Snapcode Overlay
- Snapcode URL
- Support
- Snap Camera for Mac
Маски для Zoom-конференции
Маски очень распространены в социальных сетях и различных онлайн-сервисах (Instagram, Snapchat и так далее). Их суть заключается в том, что на лицо человека накладываются дополнительные элементы, например, кошачьи ушки, шапка из кактуса и т. п. Удобнее всего они работают на мобильных устройствах, где уже предусмотрена камера. Но также есть вариант использования для компьютера. Но существуют ли маски для Zoom-конференции? Узнаете из нашей статьи.
Руководство
В мобильном приложении Зум в настоящий момент данная функция не предусмотрена, но есть виртуальный фон. В клиенте для ПК до недавнего времени ее тоже не было, но в одном из последних обновлений разработчики ее добавили. Так что мы разберемся, как включить и настроить такую «гримасу» на компьютере или ноутбуке. Но стоит понимать, что данная функция несколько ограничена, потому в конце статьи будет предложен обходной вариант, который многих заинтересует. Суть в том, что сторонняя программа обрабатывает картинку с веб-камеры пользователя и передает ее уже в Зум. Подобного рода программ для ПК довольно много, но самая распространенная из них – Snap Camera, за разработку которой отвечают создатели мобильного приложения Snapchat. Разберемся с ее использованием более детально.
Официальная функция
Включить маску можно заранее, в настройках программы, или в самой конференции. Первый вариант будет удобен, если вы уже авторизовались в учетной записи Зум на компьютере.
Активация через настройки:
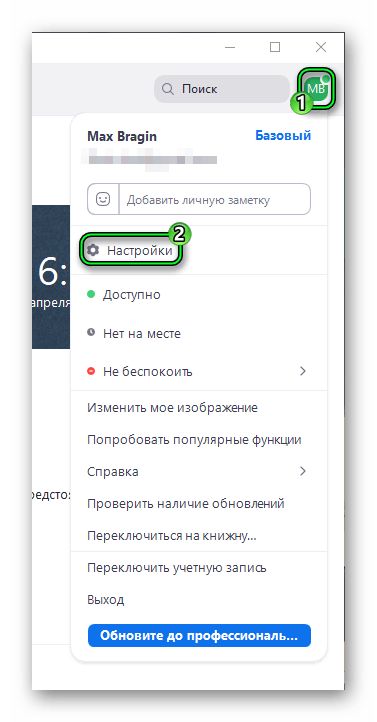
- В главном окне программы кликните на миниатюру профиля в правом верхнем углу.
- Теперь перейдите в «Настройки».
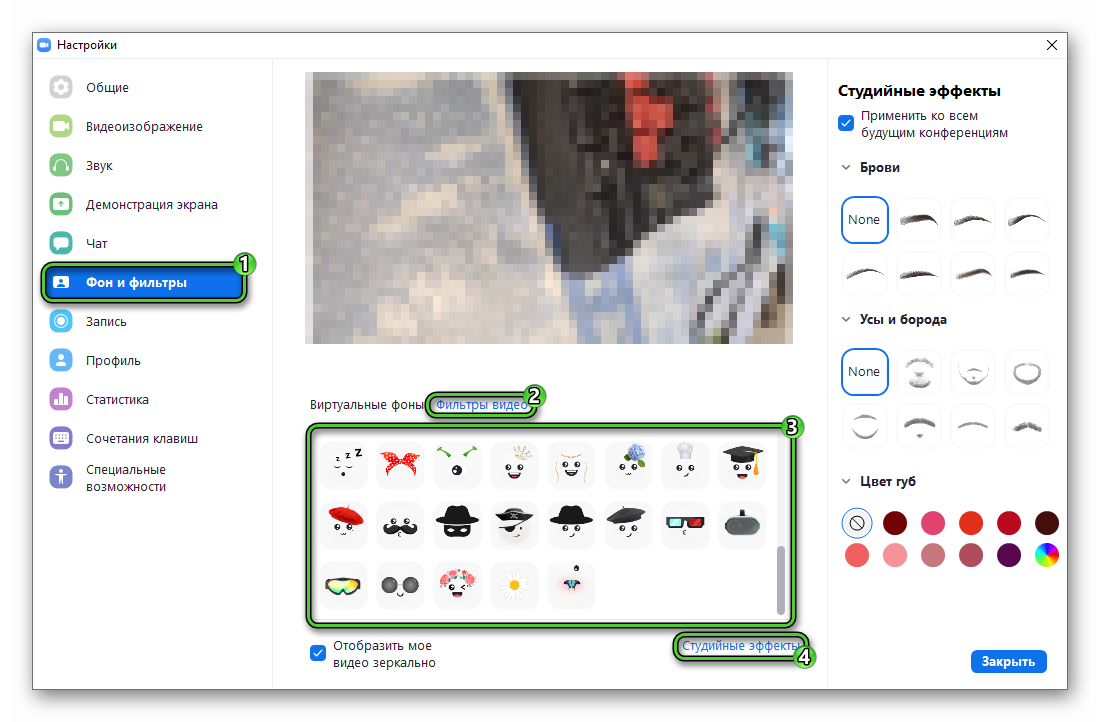
- Посетите вкладку «Фон и фильтры».
- Внутри откройте «Фильтры видео».
- Покликайте по предложенным маскам, пока не найдете подходящий вариант.
- Теперь вызовите окошко «Студийные эффекты».
- По желанию выберите форму бровей, наложите усы и бороду и смените цвет губ.
- Закройте страницу настроек и запустите конференцию.
Установка и настройка Snap Camera
Для начала установите последнюю версию программы:
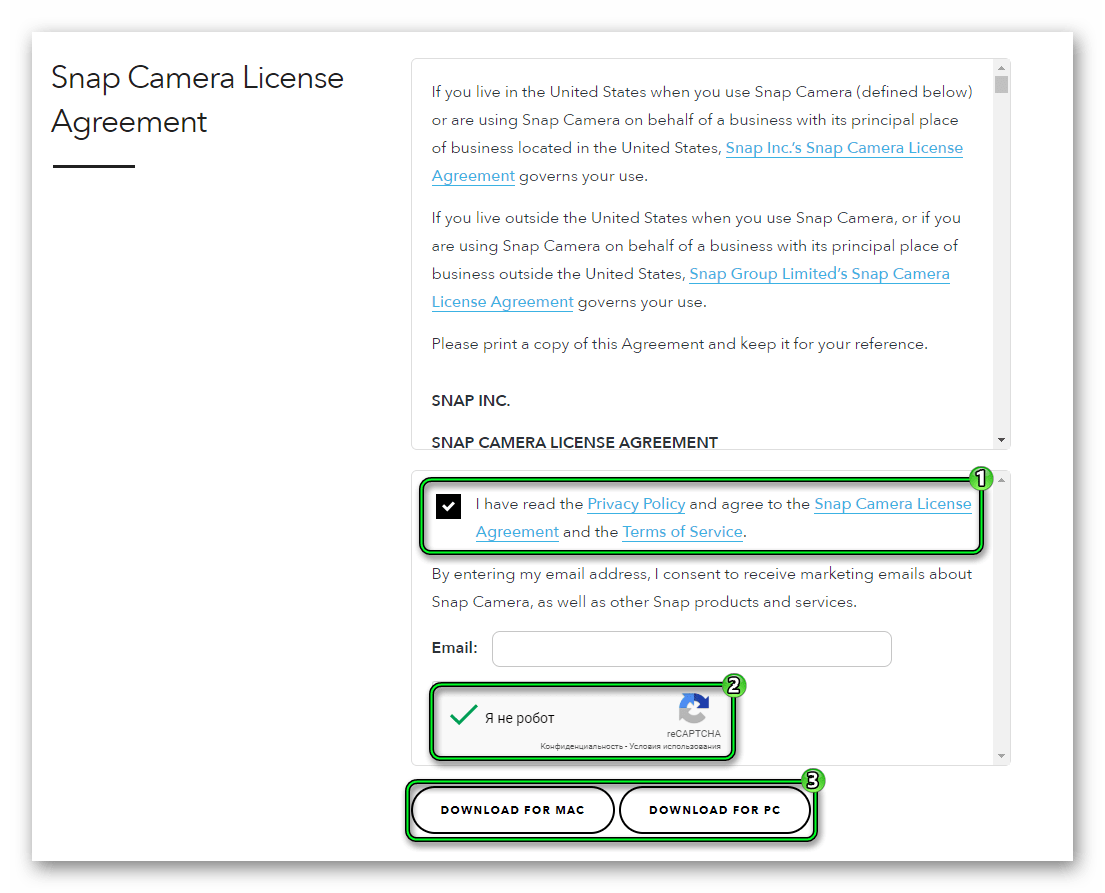
- Перейдите на официальную страницу загрузки.
- Отметьте галочкой пункт «I have read the Privacy Policy…».
- Далее, подтвердите каптчу в блоке ниже.
- Нажмите DownloadforMac, чтобы скачать версию Snap Camera для Мак ОС, или DownloadforPC – для Виндовс.
- Сохраните и запустите предложенный файл.
В случае с Windows для установки четыре раза кликните на кнопку Next, потом на Install и в конце на Finish.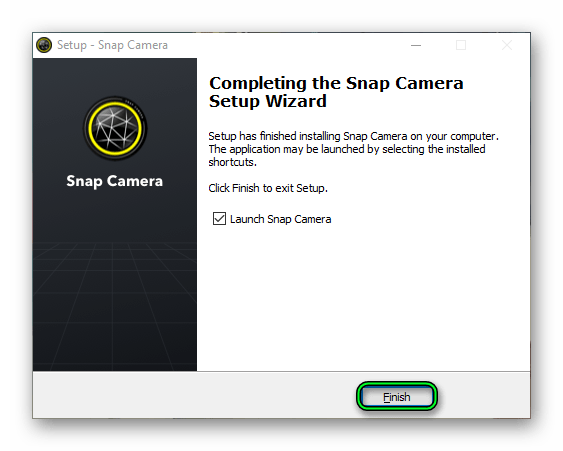
В случае с Mac OS перетащите миниатюру Snap Chat в каталог «Приложения» (Applications), откройте ее из общего списка программ и разрешите запуск в окне системы безопасности.
Перейдем к ее настройке:
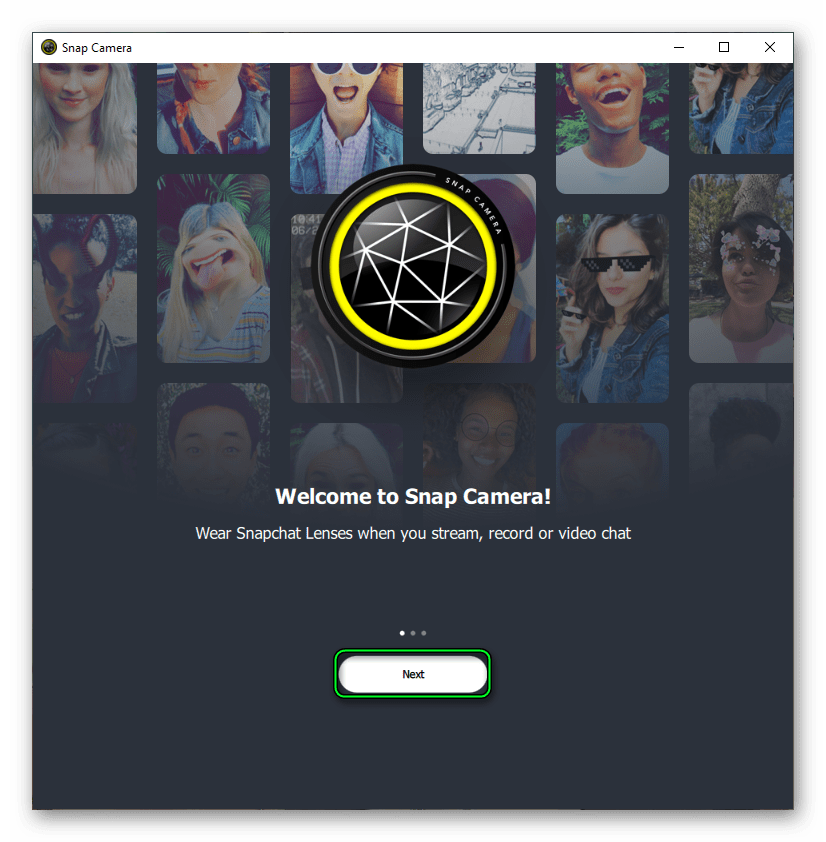
- В главном окне два раза нажмите Next, а потом Finish.
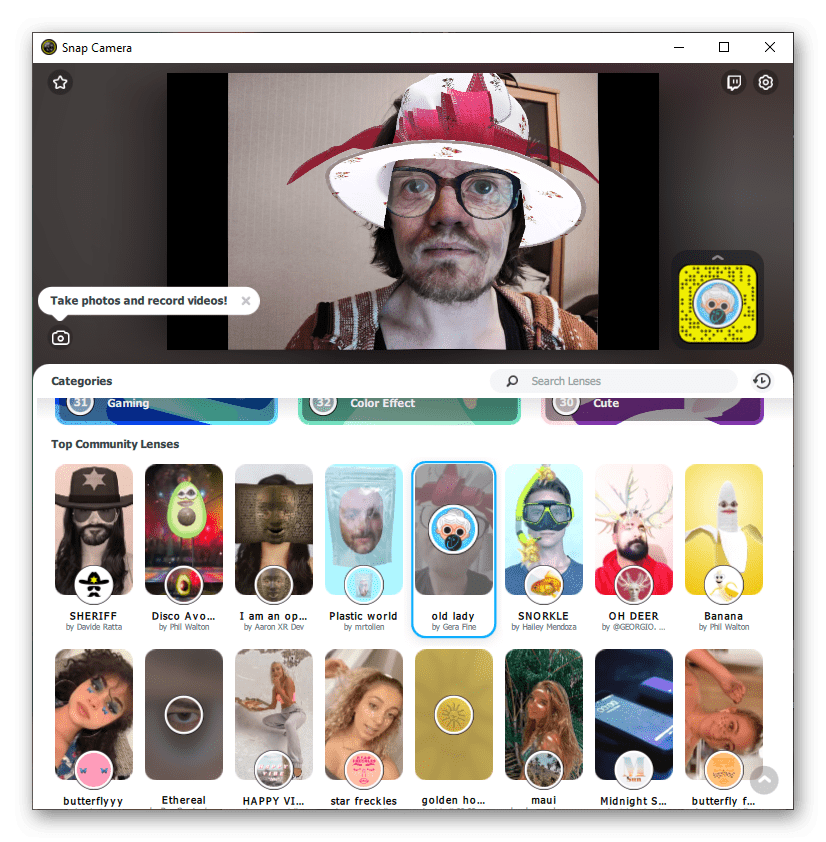
- В верхней части страницы отображается сама камера, а чуть ниже – всевозможные эффекты. Примените любой фильтр из библиотеки.
- При необходимости воспользуйтесь поиском.
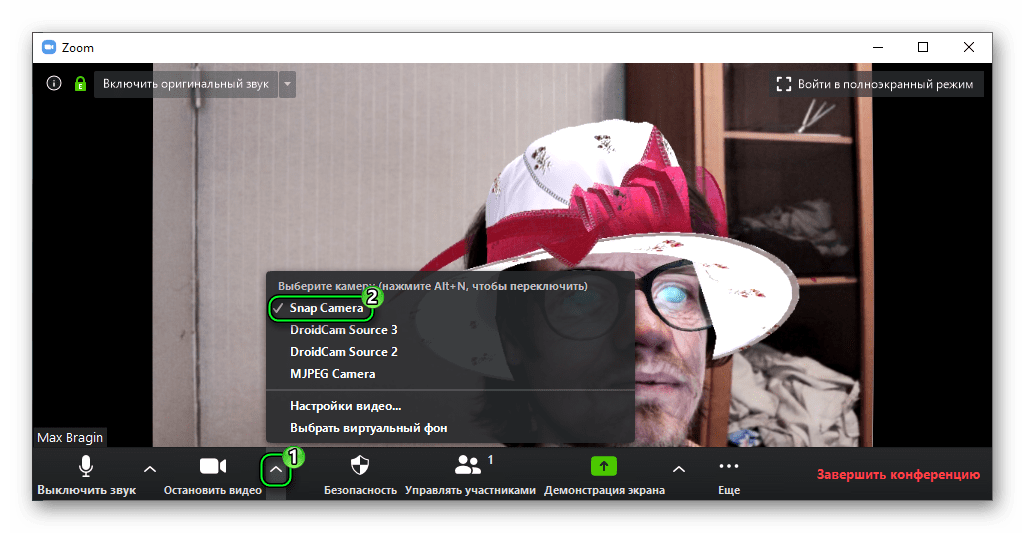
Самое время сделать такое видео в Зуме. Для этого:
- Подключитесь к любой конференции.
- Включите веб-камеру с помощью соответствующей иконки.
- Далее, нажмите на «стрелочку».
- В качестве устройства выберите SnapCamera.
- Убедитесь, что все в порядке.
Решение проблем
Программа Snap Camera может работать некорректно, в таком случае ее следует настроить. Попасть на нужную страницу получится из главного окна, если кликнуть на иконку в виде шестеренки.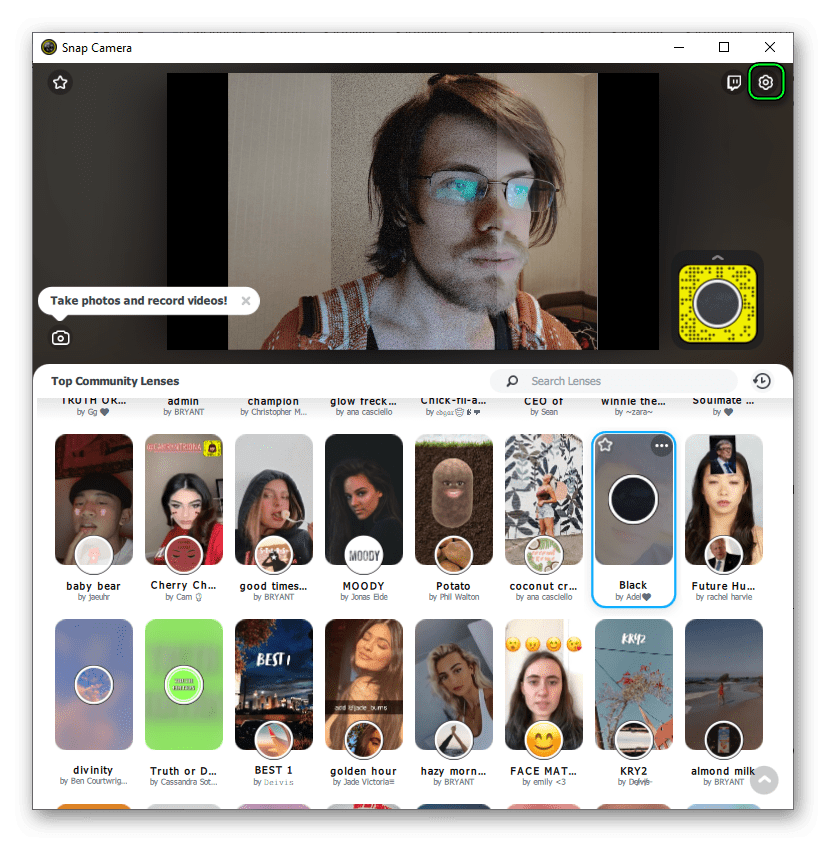
В Choose camera resolution укажите разрешение и количество кадров в секунду. Если видео обрывается или показывается плохо, то выберите более низкое значение.
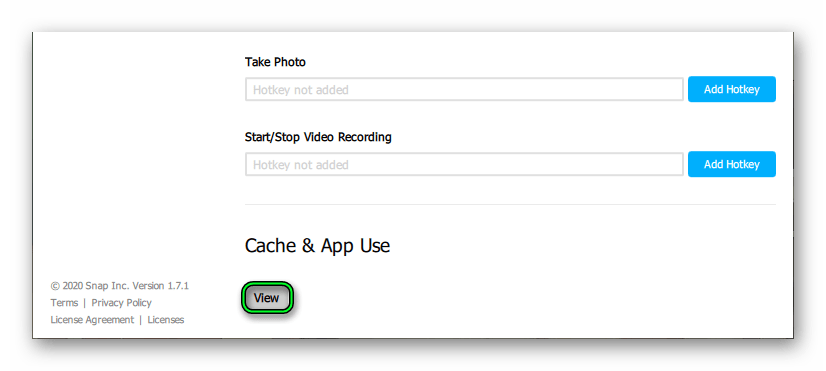
Также нередко помогает чистка кэша. Осуществляется она так:
- Пролистайте страницу настроек в самый низ.
- Нажмите на кнопку View.
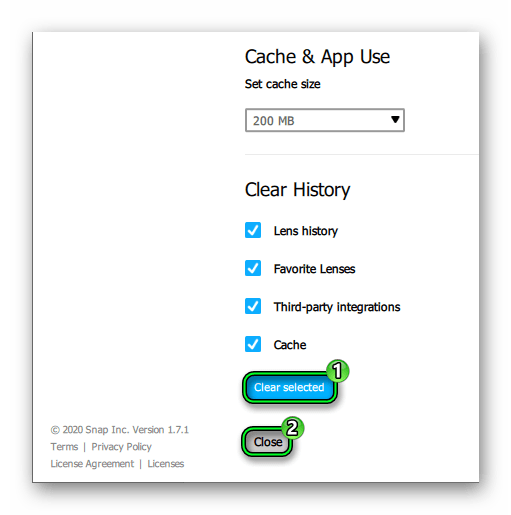
- Опять прокрутите страницу в самый низ.
- Кликните по пункту Clearselected.
- Закройте настройки с помощью кнопки Close.
- Перезапустите ПК.
Итоги
Сделать маску в Zoom на смартфонах и планшетах, к сожалению, не получится. Возможно, в будущем разработчики добавят в мобильное приложение эту функцию, но пока что официальной информации нет. Но вот в клиенте для ПК такая возможность присутствует. А если стандартных функций вам не хватает, имеет смысл установить программу Snap Camera. Она добавляет виртуальную веб-камеру, которую легко использовать для вывода измененной картинки в видеоконференции. Она довольна простая в установке и настройке, но на всякий случае выше мы описали детальную инструкцию.
Источник
Snap Camera
Getting Started
Overview
Snap Camera lets you apply Lenses to your face while using your computer’s webcam. Utilize Snap Camera in your favorite third party live streaming or video chat applications by selecting Snap Camera as your webcam device.
Download Snap Camera
To start using Snap Lenses on your desktop computer, first Download Snap Camera!
Once downloaded, on Windows, double click the .exe to install. On MacOS, double click the .pkg to install.
System Requirements
- Operating System: Windows 10 (64 bit); MacOS 10.11+
- Hardware: Minimum of Intel Core i3 2.5Ghz or AMD Phenom II 2.6Ghz with 4 GB RAM; Intel HD Graphics 4000 / Nvidia GeForce 710 / AMD Radeon HD 6450; screen resolution of 1280×768 or higher
Select a Lens
With Snap Camera opened, you’ll see a preview of your computer’s physical webcam. To apply a Lens to the input video, simply select a Lens from the Featured Lenses.
Scroll down in the Lens selection section to select from the Top Community Lenses . These are Lenses created by the community using Lens Studio, the tool for building Snapchat Lenses.
Using Snap Camera as Webcam
Snap Camera creates a virtual webcam on your computer. When Snap Camera is open, it takes the input of a physical webcam and then augments it with the selected Lens. This augmented video is then output to the Snap Camera virtual webcam. In your application that supports webcam input, select Snap Camera from the list of webcams to utilize the augmented video.
Restart Webcam Enabled Application
If your webcam enabled application was running prior to opening Snap Camera, you have to restart the application for it to recognize Snap Camera the first time you use it. For example, if you are using OBS, close and reopen OBS to see Snap Camera as a selectable camera.
Tip
If you don’t see Snap Camera as a selectable webcam, restart the application you are using
Tip
Browsers like Google Chrome need to be restarted as well before web applications like Google Hangouts can utilize Snap Camera
Selecting Snap Camera in OBS Studio
As an example, we’ll walk through how to select Snap Camera in OBS Studio, a widely used broadcast software for live streaming.
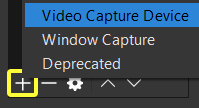
In OBS Studio, we’ll add a new input source by clicking the Add button under Sources . Then, we’ll select Video Capture Device .
When configuring the new device, select Snap Camera from the Device drop down.
OBS Studio will now be using the Snap Camera virtual webcam in the same way it utilizes a physical webcam.
For more information on streaming with Snap Camera, visit the Streaming guide.
Favoriting Lenses
You can favorite Lenses which allows you to easily select them later. To favorite a Lens, click the Star button in the top left corner of a Lens.
To select from your favorites, click the Star button in the top left corner of Snap Camera. Then, select from your favorite Lenses.
Note
Hotkeys can be assigned to favorited Lenses. For more information on assigning hotkeys, refer to the Settings guide.
Searching for Lenses
To unlock a Lens by name in Snap Camera, click the Search Lenses search bar. Then search for Lenses by name or creator name.
Sharing Lenses
All Lenses that can be used in Snap Camera can also be used and shared in Snapchat. Lenses can be shared to your viewers through the following methods.
Snapcode Overlay
For other video chat or streaming platforms, you can also show the active Lens Snapcode by enabling Show Snapcode Overlay in Snap Camera’s Settings. Your viewers will be able to scan this Snapcode to unlock the Lens for themselves using Snapchat.
Snapcode URL
All Lenses have a Snapcode URL which can be shared anywhere you can share a clickable link. For example, you can paste this link to your stream’s chat for your viewers to unlock the Lens. To get the Snapcode URL, click the Lens Snapcode to the right of the camera preview. Once expanded, click the Copy Lens Link button. This will copy the URL to your clipboard for sharing.
To learn how to unlock a Lens in Snapchat, refer to the Unlocking Lenses guide. For more information on sharing Lenses on Snapchat, refer to the Sharing Lenses guide.
Support
For additional Snap Camera support, please visit the Snap Camera Support page.
Источник
Snap Camera for Mac
Snap Camera 1.14 LATEST
macOS 10.13 High Sierra or later
Snap Camera 1.14.0.pkg
Snap Camera for Mac 2021 full offline installer setup for Mac
Snap Camera for Mac lets you apply Lenses to your face while using your computer’s webcam. Utilize the app in your favorite third party live streaming or video chat applications by selecting Snap Camera as your webcam device. Compatible with your favorite apps. Choose Lenses that match your play-style, persona, or mood! Enjoy!
For Twitch streamers, It also has a powerful Twitch Extension that works hand-in-hand with the application. The Snap Camera Twitch Extension allows your audience to unlock the Lenses you use in your stream and activate special Lenses when viewers subscribe to your channel.
With the app opened, you’ll see a preview of your computer’s physical webcam. To apply a Lens to the input video, simply select a Lens from the Featured Lenses. Scroll down in the Lens selection section to select from the Top Community Lenses. These are Lenses created by the community using Lens Studio, the tool for building Snapchat Lenses.
Using Snap Camera as Webcam
The program creates a virtual webcam on your computer. When the app is open, it takes the input of a physical webcam and then augments it with the selected Lens. This augmented video is then output to the virtual webcam. In your application that supports webcam input, select Snap Camera for macOS from the list of webcams to utilize the augmented video.
Restart Webcam Enabled Application
If your webcam enabled application was running prior to opening the software, you have to restart the application for it to recognize Snap Camera the first time you use it. For example, if you are using OBS, close, and reopen OBS to see the app as a selectable camera.
Selecting Snap Camera in OBS Studio
How to select Snap Camera in OBS Studio, a widely used broadcast software for live streaming. When configuring the new device, select Snap Camera from the Device drop-down. OBS Studio will now be using the virtual webcam in the same way it utilizes a physical webcam.
All Lenses that can be used in the app can also be used and shared in Snapchat. Lenses can be shared with your viewers through the following methods.
All Lenses have a Snapcode URL which can be shared anywhere you can share a clickable link. For example, you can paste this link to your stream’s chat for your viewers to unlock the Lens. To get the Snapcode URL, click the Lens Snapcode to the right of the camera preview. Once expanded, click the Copy Lens Link button. This will copy the URL to your clipboard for sharing.
Источник
