- Ubuntu Gutsy и MCP51 (snd-hda-intel) — что сделать, чтобы зазвучало
- Как исправить отсутствие звука в Ubuntu и Linux Mint
- Различные способы исправить отсутствие звука в Ubuntu
- Исправление фиктивного вывода в настройках звука
- Первый альтернативный способ исправить отсутствие звука в Ubuntu
- Второй альтернативный способ исправить отсутствие звука в Ubuntu
- Третий альтернативный метод: попробуйте alsamixer
- Четвертый альтернативный способ исправить отсутствие звука в Ubuntu
- Пятый альтернативный метод (специально для Lenovo Carbon X1)
- Matrix:Module-hda-intel
- Contents
- The module options for snd-hda-intel
- Introduction for HDA Intel soundcard
- Quick installation
- Setting up modprobe and kmod support
- modules.conf
- Native devices
- Autoloading OSS/free emulation
- The .asoundrc file
- Software volume control
- Links
Ubuntu Gutsy и MCP51 (snd-hda-intel) — что сделать, чтобы зазвучало
Похоже, что не только у меня, но и в большинстве вновь установлненных Ubuntu Gutsy на мамках со встроенным звуком на чипе MCP51 (определяется на большинстве *нихов как snd-hda-intel) есть проблемы со звуком — карточка просто никак не определяется.
Во-первых, источников, которыми я пользовался, несколько, но основных два, первый это Ubuntu Answers и второй Hda Intel Sound How to.
Во-вторых, всё что описанно ниже выглядит как громадные изменения системы в целом, ядра или пакетов в частности, однако, поверьте, это только добавит новый функционал, но не сломает, даже если Вы ооочень постараетесь (без фанатизма, пожалуйста! :).
В-третьих, не забудьте включить звук в БИОСе! Я на это наступил и убил немного времени, но достаточно 🙂
Теперь по порядку:
1) Добавляем необходимые для сборки alsa’ы пакеты в систему:
$ sudo apt-get install build-essential ncurses-dev gettext
$ sudo apt-get install linux-headers-`uname -r`
3) Скачиваем с сайта alsa’ы последние вверсии драйверов, библиотек и утилит:
$ sudo tar xjf alsa-driver*.bz2
$ sudo tar xjf alsa-lib*.tar.bz2
$ sudo tar xjf alsa-utils*.tar.bz2
4) Компилируем и устанавливаем драйвер (обратите внимание на ключик!), библиотеки и утилиты:
$ cd ../alsa-driver-1.0.15rc3
$ sudo ./configure —with-cards=hda-intel
$ sudo make
$ sudo make install
$ cd ../alsa-lib-1.0.15rc3
$ sudo ./configure
$ sudo make
$ sudo make install
$ cd ../alsa-utils-1.0.15rc1
$ sudo ./configure
$ sudo make
$ sudo make install
6) После перезагрузки в /proc должна появится карточка, смотрим её:
$ sudo cat /proc/asound/card0/codec#* | grep Codec
Codec: Analog Devices AD1986A
7) Идём по этой ссылке, ищём карточку и смотрим какой режим выставить. В моём случае это 3stack.
8) Добавляем одну строчку в конфиг alsa:
i
options snd-hda-intel position_fix=1 model=3stack
:
wq
9) Опять перезагружаемся.
10) Настраиваем alsa:
здесь должна «найтись» карточка, например, в моём случае это именно hda-intel
11) Проверяем настройку:
$ sudo aplay —list-devices
**** List of PLAYBACK Hardware Devices ****
card 0: NVidia [HDA NVidia], device 0: AD198x Analog [AD198x Analog]
Subdevices: 1/1
Subdevice #0: subdevice #0
card 0: NVidia [HDA NVidia], device 1: AD198x Digital [AD198x Digital]
Subdevices: 1/1
Subdevice #0: subdevice #0
12) И наконец как играет:
$ aplay -vv ./alsa-utils-1.0.15rc1/speaker-test/samples/Noise.wav
Описанный выше способ успешно опробован на трёх одинаковых машинах, но на разных убунтах: Feisty, Gutsy и Edgy.
Источник
Как исправить отсутствие звука в Ubuntu и Linux Mint
![]()
Нет звука в свежей установке Ubuntu? Видите только фиктивный вывод? Без проблем. Вот несколько методов, с помощью которых вы можете попробовать пофиксить проблему отсутствия звука в Ubuntu и других дистрибутивах Linux
Как это происходит с каждым новым выпуском Ubuntu, вы устанавливаете или обновляете свою ось до свежей версии Ubuntu и сталкиваетесь с рядом проблем. Но всегда есть способ преодолеть эти не большие, но досадные неприятности.
Одна из наиболее распространенных проблем — отсутствие звука после установки Ubuntu. Есть несколько причин отсутствия звука в Ubuntu, но я расскажу о тех приемах, которые сработали в моем случае.
Давайте же пристальнее рассмотрим те шаги, с помощью которых я исправил подобную проблему и как можете исправить ее вы.
Различные способы исправить отсутствие звука в Ubuntu
Причины отсутствия звука в Ubuntu могут быть совершенно разными. И, так как решение зависит от типа проблемы, я предлагаю получить некоторую информацию о вашей системе, особенно об оборудовании, связанным со звуком.
Сначала установите инструмент inxi:
Теперь проверьте информацию о системе, машине и аудио с помощью этой команды:
Вы должны увидеть примерно такую информацию:
Присмотритесь к аудио части вышеприведенного вывода. Он сообщает, что это Intel Sunrise Point-LP HD Audio, и у него есть драйвер Linux snd_hda_intel, и звук обслуживается Alsa. Эта информация может быть полезна на некоторых этапах устранения неполадок со звуком.
Исправление фиктивного вывода в настройках звука
Первый шаг, чисто, что называется, «для отчистки совести», проверьте, не замьючен ли звук. Убедившись в этом, перейдите в Настройки звука:
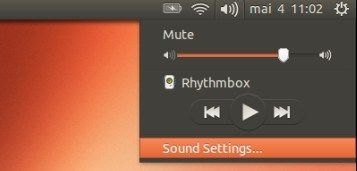
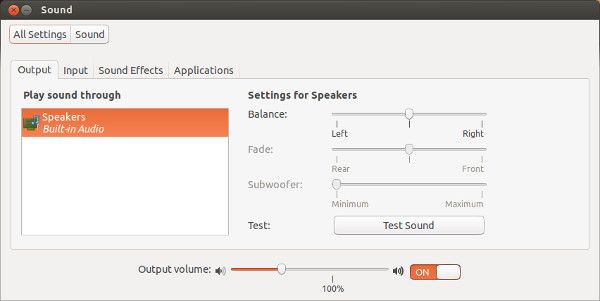
В настройках звука вы обнаружите, что здесь практически ничего нет, кроме фиктивного выхода. Довольно неприятно. Это означает, что ваша звуковая карта даже не распознается. Ба-дум-тс!

Без паники. Единственное решение, которое устранило проблему со звуком на моем Dell Inspiron с процессором Intel, — это принудительная перезагрузка Alsa. Для этого используйте в терминале следующую команду (Ctrl + Alt + T):
Вывод будет таким:

Вы можете подумать, что процесс подвис или все еще обрабатывается, но сам процесс занимает всего пару секунд. Вы можете просто закрыть террминал, нажав Ctrl + C.
Теперь вам нужно перезагрузить компьютер. А после: либо воспроизвести музыкальные или видеофайлы, либо заглянуть в настройки системы, что бы выяснить сработал ли этот способ.
Первый альтернативный способ исправить отсутствие звука в Ubuntu
Если прошлый способ не помог вам в устранении проблемы, попробуйте переустановить Alsa и Pulse audio следующим образом.
И снова принудительно перезагрузите Alsa:
Перезагрузитесь и проверьте, вернулся ли звук.
Второй альтернативный способ исправить отсутствие звука в Ubuntu
Перейдите в свой домашнюю директорию, а затем перейдите в скрытый каталог конфигурации. Переименуйте здесь каталог с именем pulse:
Теперь перезагрузите вашу систему. Каталог Pulse будет создан заново, и у вас должен восстановиться звук.
Третий альтернативный метод: попробуйте alsamixer
Откройте терминал и используйте следующую команду, чтобы открыть alsamixer:
Вы должны увидеть такой экран:
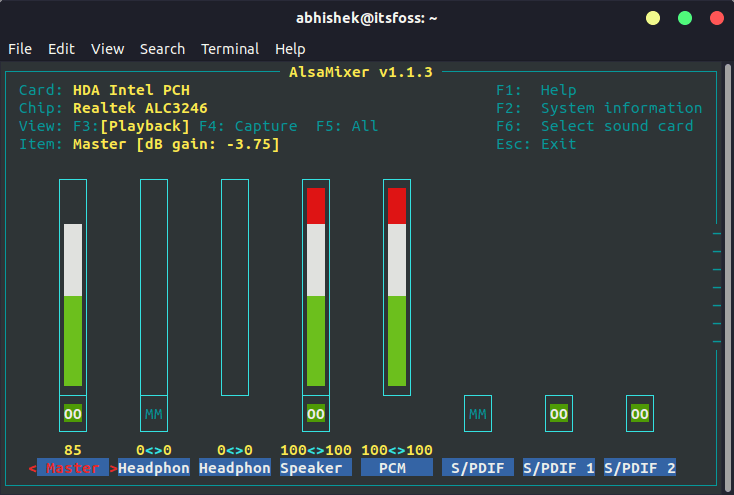
Проверьте, отключены ли здесь динамики или желаемый аудиовыход. MM означает отключение звука, а OO означает включение. Если желаемый аудиовыход (в основном это динамики) или мастер отключен, включите его.
Вы можете закрыть экран alsamixer, нажав клавишу Esc.
Обратите внимание: если команда alsamixer возвращает ошибку, возможно, это связано с тем, что у вас более одной звуковой карты. В этом случае вам нужно указать номер звуковой карты (см. Вывод inxi, который я упоминал в начале) следующим образом:
Четвертый альтернативный способ исправить отсутствие звука в Ubuntu
Диспетчер скорости (speed dispatcher) — это функция, которая позволяет вашей системе преобразовывать текст в речь. Иногда она конфликтует с другими настройками звука. Если вам не нужна эта функция, вы можете попробовать отключить ее, возможно это вернет вам звук.
Откройте терминал и отредактируйте файл диспетчера речи с помощью следующей команды:
Здесь измените RUN = yes на RUN = no. Перезагрузитесь и наслаждайтесь звуком.
Пятый альтернативный метод (специально для Lenovo Carbon X1)
Некоторые из наших читателей отметили, что ни один из вышеперечисленных методов не помог их ноутбуку Lenovo Thinkpad Carbon X1 7-го поколения.
Я изучил проблему и обнаружил следующее. У этой модели есть проблемы с Linux. Хотя в ядре Linux 5.5 и более поздних версиях улучшена поддержка этой модели, но для пользователей Ubuntu 18.04 и Mint 19, в которых используется ядро более ранней версии — 5.3, все еще остаются проблемы.
Проверьте версию ядра Linux, и если она 5.4 или ниже, попробуйте следующий обходной путь, предложенный разработчиками Arch Linux и Ubuntu.
Откройте файл конфигурации alsa (команда может быть другой для Mint, потому что текстовый редактор Gedit не используется в Mint):
Добавьте в конец этого файла следующую строку:
Сохраните и закройте файл и перезагрузите систему. После этих действий звук должен вернуться.
Устранение проблемы со звуком, безусловно, является одним из обязательных действий после установки Ubuntu.
Если один из вышеупомянутых методов сработал для вас, оставьте комментарий ниже, указав метод, который сэкономил вам время. Также приветствуются любые другие предложения и отзывы.
Источник
Matrix:Module-hda-intel
Contents
The module options for snd-hda-intel
| description: | Intel HDA driver |
| author: | author unknown |
| license: | GPL |
| parm: | index:Index value for Intel HD audio interface. (int) |
| parm: | id:ID string for Intel HD audio interface. (charp) |
| parm: | model:Use the given board model. (charp) |
| parm: | single_cmd:Use single command to communicate with codecs (for debugging only). (bool) |
| parm: | enable_msi:Enable Message Signaled Interrupt (MSI) (int) |
| parm: | enable:bool |
Introduction for HDA Intel soundcard
There are two ways of getting Linux drivers to work, you can either compile them into the kernel or build them separately as modules. Read the Kernel-HOWTO for details of how to compile a kernel.
You must turn on the sound support soundcore module. This is in the kernel. Look in the sound drivers directory and it should be the first option. Most people enable the module setting. That way you can load and unload the module manually if you have multiple soundcards/devices or if you intend to debug or use cutting edge software which may cause your drivers to halt sometimes. Of course it also means you have more control of your system.
Most modern distros come with soundcore compiled as a module. You can check this in numerous ways. The easiest way is to type:
If this command returns that you have this module, then you don’t need to recompile your kernel.
Quick installation
This explains how to build from source tarballs. See GIT_Server for instructions on getting and using the latest source from git repositories.
Type the following commands in the shell of your choice.
Make a directory to store the alsa source code in:
Now unzip and install the alsa-driver package:
Now unzip and install the alsa-lib package:
Now unzip and install the alsa-firmware package:
Now unzip and install the alsa-utils package:
Now insert the modules into the kernel:
Now adjust your soundcard’s volume levels. All mixer channels are muted by default. You must use a native mixer program to unmute appropriate channels, for example alsamixer from the alsa-utils package. Note that some usb-audio devices do not have internal mixer controls. Run:
You can also look at the utils/alsasound file. This script is designed for the RedHat Linux distribution, but it can also be used with other distributions which use System V style rc init scripts. This will allow you to load your modules at boot time. If you don’t want to do this you can of course compile them into the kernel instead and save yourself the hassle of coming to terms with the rc init scripts.
Setting up modprobe and kmod support
Before you send a mail complaining that «I don’t have /etc/modules.conf, where do I find it ……» ‒ the /etc/conf.modules has been deprecated with a few distro’s, but in your case it may still be /etc/conf.modules. Basically they are both the same, but recent version of modutils use /etc/modules.conf instead. Nothing to worry about as such, optionally please update to the latest version of modutils. This should solve your problem.
Here’s the example for this card. Copy and paste this to the bottom of your /etc/modules.conf file.
Debian GNU/Linux users need to save this information into a file in the /etc/modutils/ directory (eg. /etc/modutils/alsa) and run update-modules.
Note also that the kernel module soundcore has been renamed in Debian kernels >2.6.23 into snd. A workaround is to put a symlink at /lib/modules/x.x.xx/kernel/sound/soundcore.ko pointing to snd.ko
Systemd users need to save this information into a file in the /etc/modprobe.d/ directory terminating with .conf (eg. /etc/modprobe.d/alsa.conf).
In case of modules auto-loading instead, the module name must be inserted in a file in the/etc/modules-load.d/ directory terminating with .conf (eg. /etc/modules-load.d/alsa.conf).
To copy and paste the above to your /etc/modules.conf file follow these instructions.
modules.conf
This is a short explanation of what happens in the /etc/modules.conf file.
Native devices
After the main multiplexer is loaded, its code automatically requests the top level sound card module. String snd-card-%i is requested for native devices where %i is the sound card number, counted from zero (the first sound card) to seven (the eighth sound card). String sound-slot-%i is requested for native devices where %i is slot number for the corresponding ALSA owner (which is basically the sound card number). The options line allows you to set various configuration options before the module is loaded. String id (or snd_id) lets you set the name of the card which is then returned in the /proc/asound/cards file, i.e. to user space applications. Other options may be available depending on the specific card. Options for these cards are found in the INSTALL file or above.
For drivers older than 0.9.0rc5 use:
The «snd_» prefix has been removed from the module options to fit with the kernel standard.
Autoloading OSS/free emulation
At this point we are finished with the configuration for ALSA native devices, but you may also need autoloading for the OSS/Free emulation modules, an ALSA add-on. At this time only one module does not depend on any others, thus must be loaded separately: snd-pcm1-oss. String sound-service-%i-%i is required for OSS/Free service where the first %i is the slot number/sound card number and the second %i is the service number.
The alias for snd-seq-oss is not necessary on the second device, because there is only one /dev/sequencer regardless how many devices you have.
The .asoundrc file
This file allows you to have more advanced control over your card/device. For most setups the default, system-wide configuration is sufficient. You may change this file only for special setup. The .asoundrc file consists of definitions for the various sound devices available in your system. It also provides access to the pcm plugins in alsa-lib. These allow you to do tricky things like combine your cards into one or access multiple I/O streams on your multi-channel card.
Below is the most basic definition (only example — not required to define at all).
Make a file called .asoundrc in your home and/or root directory:
Copy and paste the following into the file, then save it:
Software volume control
If your card doesn’t have hardware volume control (e. g. Asus Xonar XD/XDG), you might want to create software Master control. Edit .asoundrc as follows.
Restart alsa, then open a music player, play a file and close the player. Then check alsamixer, as you should have a Master volume control. Note that this control doesn’t have a mute option.
Links
- Keep up to date with the news at M-Station
- The most current book about Linux audio is Linux Music and Sound (September 2000)
- Find more applications at Sound & MIDI Software For Linux SourceForge
- For professional quality, low latency audio routing use JACK ‒ the “Jack Audio Connection Kit”.
Источник


