- Explore Microsoft 365
- Mar 2, 2013
- Snipping Tool in Windows Server 2012
- 8 comments:
- Get snippingtool in Windows Server 2012
- Explore Microsoft 365
- Mar 2, 2013
- Snipping Tool in Windows Server 2012
- 8 comments:
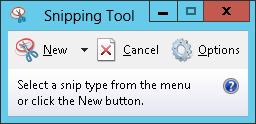
- Use Snipping Tool to capture screenshots
- Open Snipping Tool
- Work with your screenshots
- Очистка диска в Windows Server 2016/2012 R2/2008 R2 с помощью Cleanmgr
- Очистка диска с помощью Disk Cleanup в Windows Server 2016
- Очистка диска с помощью cleanmgr.exe из командной строки
- Запуск cleanmgr в Windows Server 2012 R2/ 2008 R2 без установки Desktop Experience
Explore Microsoft 365
Microsoft 365, SharePoint Online, Power BI, SharePoint On Premises, C#, .Net & Tips
Mar 2, 2013
Snipping Tool in Windows Server 2012

- Share This:
- Google+
- Stumble
- Digg
8 comments:
![]()
Thanks for your help. Now it works. 🙂
You are welcome!
![]()
good information! thanks!
You are welcome!
![]()
Thanks for writing this up, very helpful!
You are welcome!
Thank you Very much
You are welcome!
I LOVE to hear from you! Your feedback is always appreciated. I will try to reply to your query as soon as possible.
1. Make sure to click the «Notify me» check box at the right side to be notified of follow up comments and replies.
2. Please Do Not Spam — Spam comments will be deleted immediately upon review.
Get snippingtool in Windows Server 2012
Snipping tool is very useful and handy tool for taking screenshots of the console. I used it very much when worked on Windows 7 and Windows Server 2008 R2. While playing with Windows Server 2012, I found it is missing. Without that, it is difficult for me to post any blog update(trust me, I rely so much on it).
After some struggle, I learned that it will come by default and this optional feature needs to be installed explicitly if you want to have it on Windows Server 2012. The below powershell commands will help you in enable this feature.
Similarly if you want to remove the feature, try below oneliner.
Hope this helps.
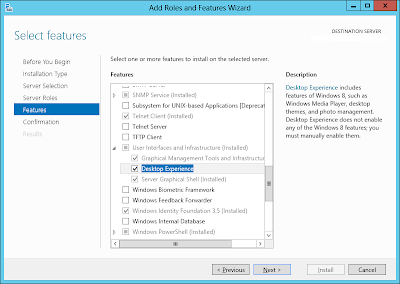
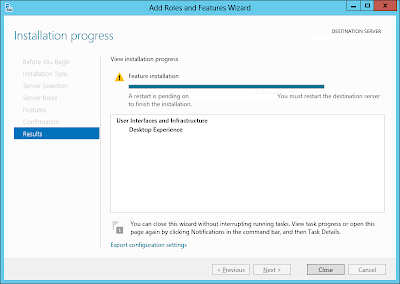
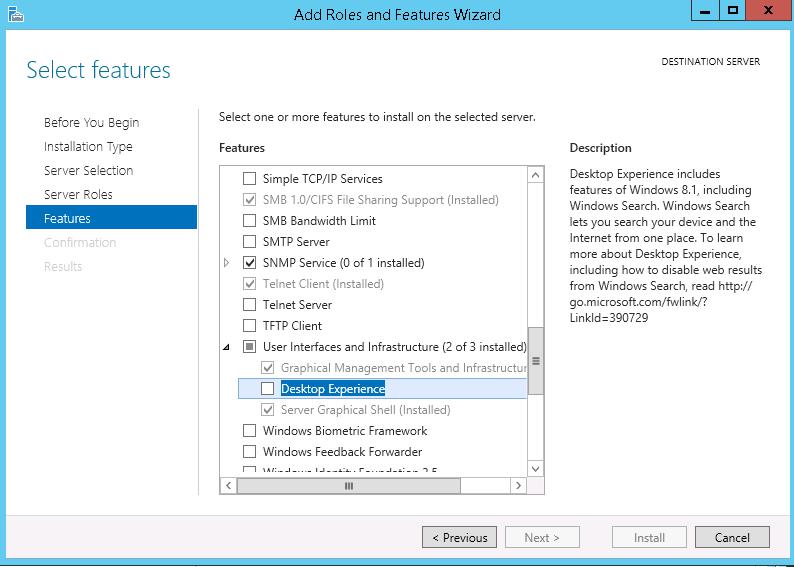
This did not completely enable the snipping tool – once I ran the line below, I had to THEN go to install roles/features, open it, go to user interfaces and infrastructure, open that, THEN add desktop experience to get the snipping tool
Enable-WindowsOptionalFeature -Online -FeatureName User-Interfaces-Infra
Hi Tom, I didn’t get you. What is that you have to open it explicitly from “install roles/features”?
after running your powershell command
go into add roles and features.
get down to features.
find “user interfaces and…” and expand it. it will only have 2 of 3 choicesselected.
you have to select “desktop experience” to get the snipping tool.
which requires “ink and handwriting services” and “media foundation” also be installed. (at least on my server 2012 R2 box)
I was able to get the snipping tool on Windows 2012 R2 after running the following powershell. It requires reboot.
Install-WindowsFeature -Name Desktop-Experience,Server-Gui-Mgmt-Infra,Server-Gui-Shell
PowerShell alone (run as Admin) did not do it for me. What Curtis wrote is what did work, needed a reboot afterwards.
I tried “Enable-WindowsOptionalFeature -Online -FeatureName User-Interfaces-Infra” at Windows Powershell
and got error message:
Enable-WindowsOptionalFeature : The requested operation requires elevation.
At line:1 char:1
+ Enable-WindowsOptionalFeature -Online -FeatureName User-Interfaces-Infra
+
+ CategoryInfo : NotSpecified: (:) [Enable-WindowsOptionalFeature], COMException
+ FullyQualifiedErrorId : Microsoft.Dism.Commands.EnableWindowsOptionalFeatureCommand
Am I missing something?
Best regards,
Harri
Harri, be sure to run PowerShell as an Administrator
Thank you very much for sharing information. It works for me!
best regards,
Adrian
Hello, for the “Requires Elevation error” you must run the powerShell as Admin user.
Explore Microsoft 365
Microsoft 365, SharePoint Online, Power BI, SharePoint On Premises, C#, .Net & Tips
Mar 2, 2013
Snipping Tool in Windows Server 2012
- Share This:
- Google+
- Stumble
- Digg
8 comments:
![]()
Thanks for your help. Now it works. 🙂
You are welcome!
![]()
good information! thanks!
You are welcome!
![]()
Thanks for writing this up, very helpful!
You are welcome!
Thank you Very much
You are welcome!
I LOVE to hear from you! Your feedback is always appreciated. I will try to reply to your query as soon as possible.
1. Make sure to click the «Notify me» check box at the right side to be notified of follow up comments and replies.
2. Please Do Not Spam — Spam comments will be deleted immediately upon review.
Use Snipping Tool to capture screenshots
Take a snapshot to copy words or images from all or part of your PC screen. Use Snipping Tool to make changes or notes, then save, and share.
Windows 10 has another screenshot app you might also like to try. When you open Snipping Tool, you’ll see an invitation and keyboard shortcut to Snip & Sketch. For more info on this app, see How to take and annotate screenshots on Windows 10.
Capture any of the following types of snips:
Draw a free-form shape around an object.
Drag the cursor around an object to form a rectangle.
Select a window, such as a dialog box, that you want to capture.
Capture the entire screen.
When you capture a snip, it’s automatically copied to the Snipping Tool window where you make changes, save, and share.
Open Snipping Tool
Select the Start button, type snipping tool in the search box on the taskbar, and then select Snipping Tool from the list of results.
For Windows 8.1 / Windows RT 8.1
Swipe in from the right edge of the screen, tap Search (or if you’re using a mouse, point to the lower-right corner of the screen, move the mouse pointer up, and then select Search), type snipping tool in the search box, and then select Snipping Tool from the list of results.
Select the Start button, then type snipping tool in the search box, and then select Snipping Tool from the list of results.
Work with your screenshots
With your Snipping Tool open, select one of the following to create and work with your screenshots.
In Snipping Tool, select Mode. In earlier versions of Windows, select the arrow next to the New button. Next, when you choose the kind of snip you want, you’ll see the whole screen change slightly to gray. Then, choosing from anything currently displayed on the screen, select the area of your screen that you want to capture.

After you open Snipping Tool, open the menu that you want to capture. For Windows 7, press the Esc key before opening the menu.
Press Ctrl + PrtScn keys. The entire screen changes to gray including the open menu.
Select Mode, or in earlier versions of Windows, select the arrow next to the New button. Select the kind of snip you want, and then select the area of the screen capture that you want to capture.
After you capture a snip, you can write or draw on or around it by selecting the Pen or Highlighter buttons. Select Eraser to remove the lines you’ve drawn.
After you capture a snip, select the Save Snip button.
In the Save As box, type a file name, location, and type, and then select Save.
When you capture a snip from a browser window and save it as an HTML file, the URL appears below the snip. To prevent the URL from appearing:
In the Snipping Tool, select the Options button.
In the Snipping Tools Options box, clear the Include URL below snips (HTML only) check box, then select OK.
After you capture a snip, select the arrow next to the Send Snip button, and then select an option from the list.
Очистка диска в Windows Server 2016/2012 R2/2008 R2 с помощью Cleanmgr
Утилита очистки диска (Disk Cleanup) позволяет администратору быстро очистить системный диск Windows Server, удалив ненужные и временные файлы, в том числе очистить каталог WinSxS от файлов устаревших компонентов, которые остались после установки обновлений. Утилита Disk Cleanup (cleanmgr.exe) по умолчанию уже установлена в графической версии Windows Server 2016/2019 (Desktop Experience), однако в предыдущих версиях Windows Server (2012 R2/ 2012/ 2008 R2) утилита cleanmgr.exe по-умолчанию отсутствует.
Очистка диска с помощью Disk Cleanup в Windows Server 2016
Чтобы очистить системный диск от ненужных файлов в Windows Server 2016 с помощью утилиты Disk Cleanup, нужно в File Explorer открыть свойства диска и нажать кнопку Disk Cleanup.
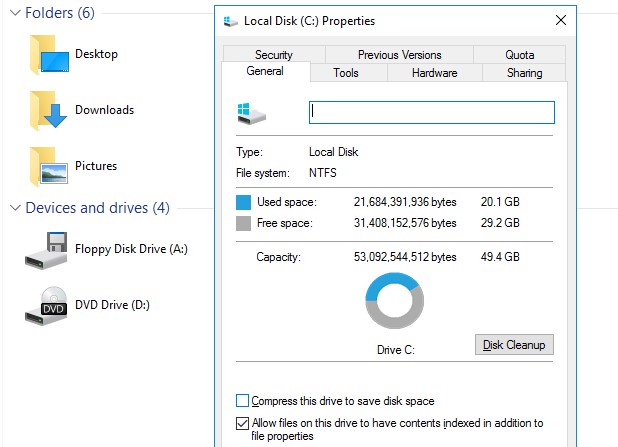
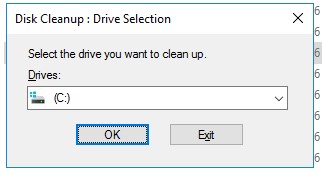
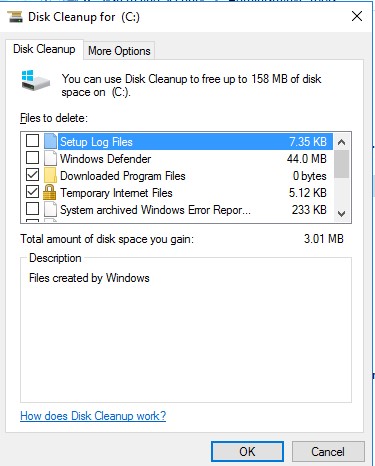
Выберите диск, который вы хотите очистить.
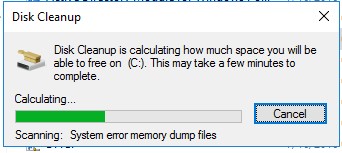
Дождитесь пока мастер очистки проверит ваш диск и найдет ненужные файлы, которые можно безболезненно удалить.
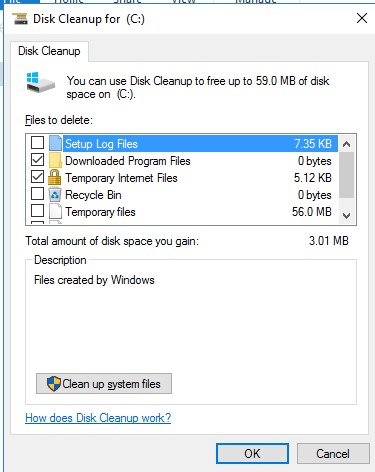
Вы можете выбрать компоненты, файлы которых можно удалить. Вам предлагается удалить следующие временные файлы:
- Setup Log Files
- Downloaded Program Files
- Temporary Internet Files
- Recycle Bin
- Temporary files
- Thumbnails
Чтобы удалить ненужные системные файлы нажмите на кнопку Clean up system files.
Дополнительно предлагается очистить:
- Устаревшие файлы Windows Defender
- System archived Windows Error Reporting (каталог C:\ProgramData\Microsoft\Windows\WER\ReportQueue)
- System queued Windows Error Reporting
- Device driver packages
- Windows Update Cleanup — при этом выполняется очистка хранилища компонентов в каталоге WinSxS. Удаляются старые версии компонентов, которые остались после установки обновленных версий.
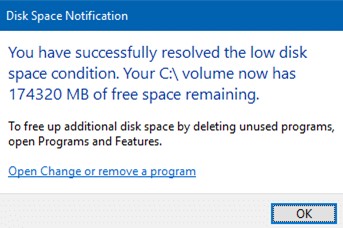
Выберите нужные опции, при этом Disk Cleanup покажет количество места, которое освободится. Нажмите Ок и подтвердите удаление временных файлов.
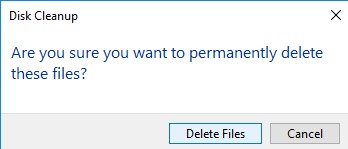
Дождитесь, пока утилита cleanmgr.exe удалит ненужные файлы.
Очистка диска с помощью cleanmgr.exe из командной строки
Утилита cleanmgr.exe имеет различные параметры командной строки, которые позволяют использовать ее в различных сценариях автоматической очистки системного диска. Их можно использовать как в Windows Server, так и на рабочих станциях пользователей с Windows 10.
cleanmgr [/d driveletter] [/SAGESET:n | /SAGERUN:n | TUNEUP:n | /LOWDISK | /VERYLOWDISK | /SETUP | /AUTOCLEAN]
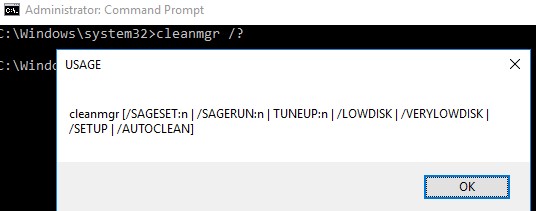
Ключ /AUTOCLEAN используется для очистки старых файлов, оставшихся после апгрейда билда Windows. Параметр /SETUP позволяет удалить файлы, оставшиеся от предыдущей версии Windows (если вы выполняли in-place upgrade).
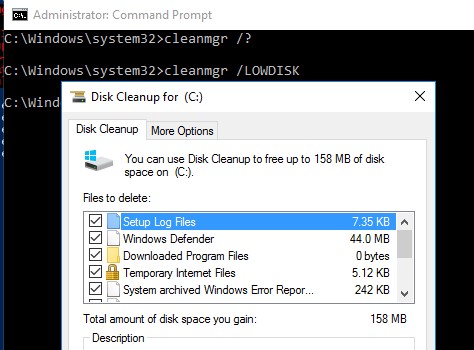
Команда cleanmgr /LOWDISK – запускает графический интерфейс Disk Cleanup с уже выбранными параметрами очистки.
Команда cleanmgr /VERYLOWDISK выполняет автоматическую очистку, а после окончания оторажает информацией о выполненных действиях и свободном месте.
С помощью параметров /sageset:n и /sagerun:n вы можете создать и выполнить настроенный набор параметров очистки.
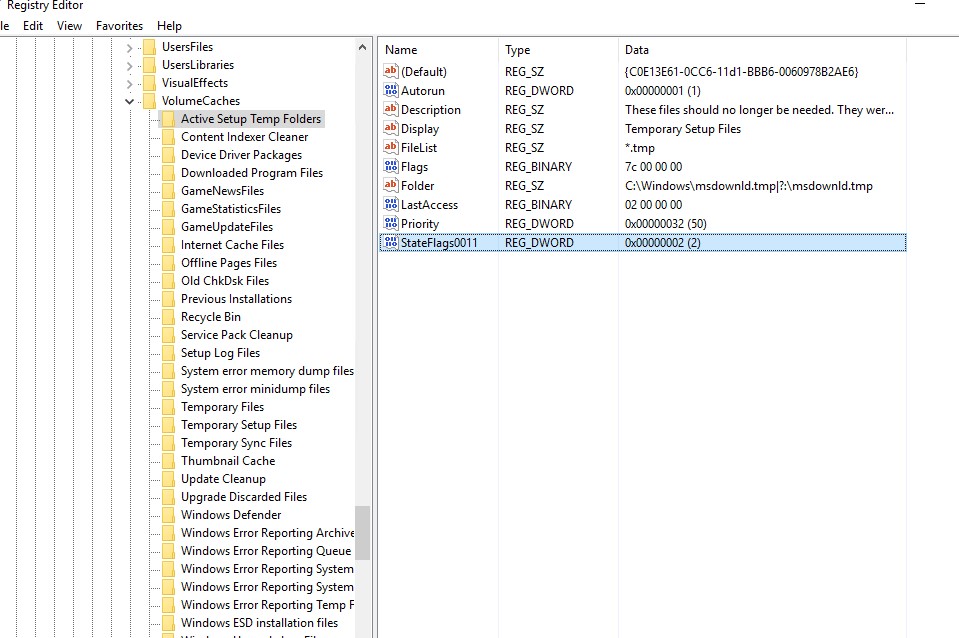
Например, выполните команду cleanmgr /sageset:11 . В открывшемся окне выберите компоненты и файлы, которые нужно автоматически очищать (я выбрал все опции).
Эти настройки сохраняются в ветке реестра HKEY_LOCAL_MACHINE\SOFTWARE\Microsoft\Windows\CurrentVersion\Explorer\VolumeCaches. В этой ветке перечислены все компоненты Windows, которые можно очистить с помощью Disk Cleanup. Для каждой опции, которую вы выбрали создается параметр типа DWORD с именем StateFlags0011 ( 0011 это число, которое вы указали в параметре sageset).
Чтобы запустить процесс очистки с выбранными параметрами, выполните команду:
Если вам нужно настроить автоматическую очистку дисков на компьютерах (или серверах) в домене, вам достаточно экспортировать эту ветку реестра и распространить ее через GPO.
Для автоматического запуска очистки системного диска на рабочих станциях с Windows 10 можно создать задание в планировщике со следующим PowerShell скриптом:
Start-Process -FilePath CleanMgr.exe -ArgumentList ‘/sagerun:11’ -WindowStyle Hidden -Wait
Запуск cleanmgr в Windows Server 2012 R2/ 2008 R2 без установки Desktop Experience
В Windows Server 2012 / R2 и 2008 /R2 по умолчанию не установлена утилита очистки диска Disk Cleanup (cleanmgr.exe). Чтобы воспользоваться утилитой cleanmgr сначала нужно установить отдельный компонент сервера Desktop Experience (Возможности рабочего стола) с помощью Server Manager или PowerShell ( Install-WindowsFeature Desktop-Experience ).
Но вместе с Desktop Experience устанавливается множество других компонентов, которые абсолютно не нужны на сервере:
- Windows Media Player
- Темы рабочего стола
- Поддержка AVI для Windows
- Windows SideShow
- Windows Defender
- Disk Cleanup
- Sync Center
- Запись звука
- Character Map
- Snipping Tool
Для запуска мастера очистки дисков в Windows Server можно воспользоваться более простым методом: достаточно скопировать в системный каталог два файла из каталога WinSxS: Cleanmgr.exe и Cleanmgr.exe.mui. Ниже представлены команды для копирования файлов cleanmgr из каталога WinSxS для разных версий Windows Server (во всех случаях используется путь для английских редакций ОC).
| ОС | Команда копирования файлов cleanmgr |
| Windows Server 2008 R2 x64 | copy C:\Windows\winsxs\amd64_microsoft-windows-cleanmgr_31bf3856ad364e35_6.1.7600.16385_none_c9392808773cd7da\cleanmgr.exe C:\Windows\System32\ copy C:\Windows\winsxs\amd64_microsoft-windows-cleanmgr.resources_31bf3856ad364e35_6.1.7600.16385_en-us_b9cb6194b257cc63\cleanmgr.exe.mui C:\Windows\System32\en-US\ |
| Windows Server 2008 x64 | copy C:\Windows\winsxs\amd64_microsoft-windows-cleanmgr_31bf3856ad364e35_6.0.6001.18000_none_c962d1e515e94269\cleanmgr.exe C:\Windows\System32\ copy C:\Windows\winsxs\amd64_microsoft-windows-cleanmgr.resources_31bf3856ad364e35_6.0.6001.18000_en-us_b9f50b71510436f2\cleanmgr.exe.mui C:\Windows\System32\en-US\ |
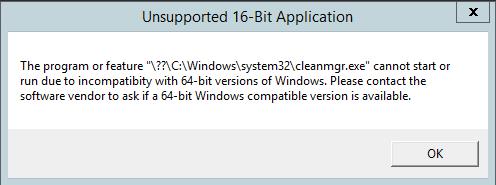
| Windows Server 2012 x64 | copy C:\Windows\WinSxS\amd64_microsoft-windows-cleanmgr_31bf3856ad364e35_6.2.9200.16384_none_c60dddc5e750072a\cleanmgr.exe C:\Windows\System32\ copy C:\Windows\WinSxS\amd64_microsoft-windows-cleanmgr.resources_31bf3856ad364e35_6.2.9200.16384_en-us_b6a01752226afbb3\cleanmgr.exe.mui C:\Windows\System32\en-US\ Windows Server 2012 R2 x64 Рассмотренный выше трюк не работает в Windows Server 2012 R2 из-за изменений, внесенных обновлением KB2821895. Дело в том, что после установки данного обновления для хранения бинарных файлов компонентов стала использоваться компрессия. При попытке запустить скопированный cleanmgr.exe появляется ошибка:
В качестве обходного решения можно воспользоваться такой методикой:
В дальнейшем эти два файла можно скопировать и на все другие сервера или интегрировать в шаблоны виртуальных машин с Windows Server 2012 R2. Для запуска утилиты очистки диска теперь достаточно выполнять с правами администратора команду cleanmgr.exe .
dism.exe /online /Cleanup-Image /StartComponentCleanup /ResetBase В Windows Server 2008 R2, чтобы cleanmgr могла удалять устаревшие файлы обновлений нужно установить отдельный патч KB2852386. |