- Socket сервер windows 10
- Понятие windows sockets приложения
- Список сокетов приложений в Windows
- Как посмотреть сокеты приложений у вас на компьютере
- Как изменить время жизни сокета
- Как узнать PID приложения
- Настраиваем «Диспетчер серверов» Windows 10 для управления серверами неродного домена
- Установка
- Добавление серверов в «Диспетчер серверов»
- Настройка доступа к серверам
- Определяем пользователя
- Добавляем серверы в список доверенных хостов
- Creating a Socket for the Server
- Sockets
- Build a basic TCP socket client and server
- An echo client and server, using TCP sockets
- References to StreamSockets in C++ PPL continuations (applies to C++/CX, primarily)
- Build a basic UDP socket client and server
- An echo client and server, using UDP sockets
- Background operations and the socket broker
- Batched sends
- Port sharing for DatagramSocket
- Providing a client certificate with the StreamSocket class
- Handling exceptions
Socket сервер windows 10

Добрый день, уважаемые посетители и читатели блога, недавно я на одном из форумов наткнулся на дискуссию, на тему того, что такое сокеты windows и как их посмотреть и подумал, что это неплохая тема для статьи. Подумал и написал :)). Думаю эта заметка будет полезна начинающим системным администраторам, в понимании того, как на транспортном уровне модели OSI найти проблему или проверить доступность приложения по номеру порта, хочу отметить, что эти знания фундаментальные, и их понимание заложит в вас отличную базу, для дальнейшей работы, на любом предприятии.
Понятие windows sockets приложения
Что такое сокет — это по сути область оперативной памяти, в которой на определенном сетевом порту (TCP/UDP) работает приложение, и именно оно прослушивает нужный порт. Какая задача стояла перед программистами, задача простая переместить информацию из оперативной памяти одного компьютера, в оперативную память другого компьютера. Дальше это может быть представлено как:
Номер сокета Windows, это номер ячейки оперативной памяти к которому привязано приложение. Приложение привязавшись к некой области оперативной памяти начинает туда писать данные и сокет из этой области памяти начинает мелкими пакетами по 65 кбайт, начинает передавать в сеть на другое устройство. На другой стороне эти кусочки, так же помещаются в ОЗУ, желательно в той же последовательности, и сокет с той стороны начинает их разбирать, и представлять пользователю из какого то приложения.
Список сокетов приложений в Windows
У меня стоит операционная систем Windows 8.1, показывать я буду все на ней, в прошлый раз мы кстати в ней лечили баг, что был не найден run vbs. Для того, чтобы посмотреть какие сокеты соответствуют каким приложениям и каким TCP/UDP портам, вы должны перейти в директорию
и отыскать там файл services, он будет без расширения, но его можно открыть правой кнопкой мыши через обычный блокнот, у меня это будет notepad++.
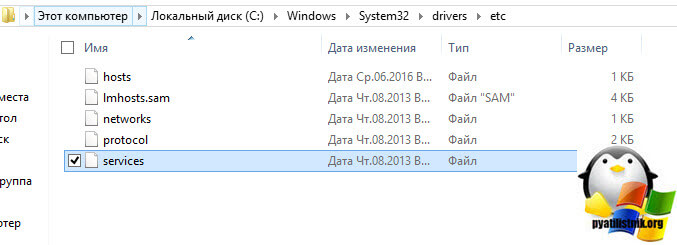
Открыв данный файл вы увидите название службы (приложения) номер сокета (TCP/UDP) и описание. Для примера видно, что сервер ftp работает по портам 20 и 21. По сути тут системе и задаются стандарты по которым должны работать службы.

Как посмотреть сокеты приложений у вас на компьютере
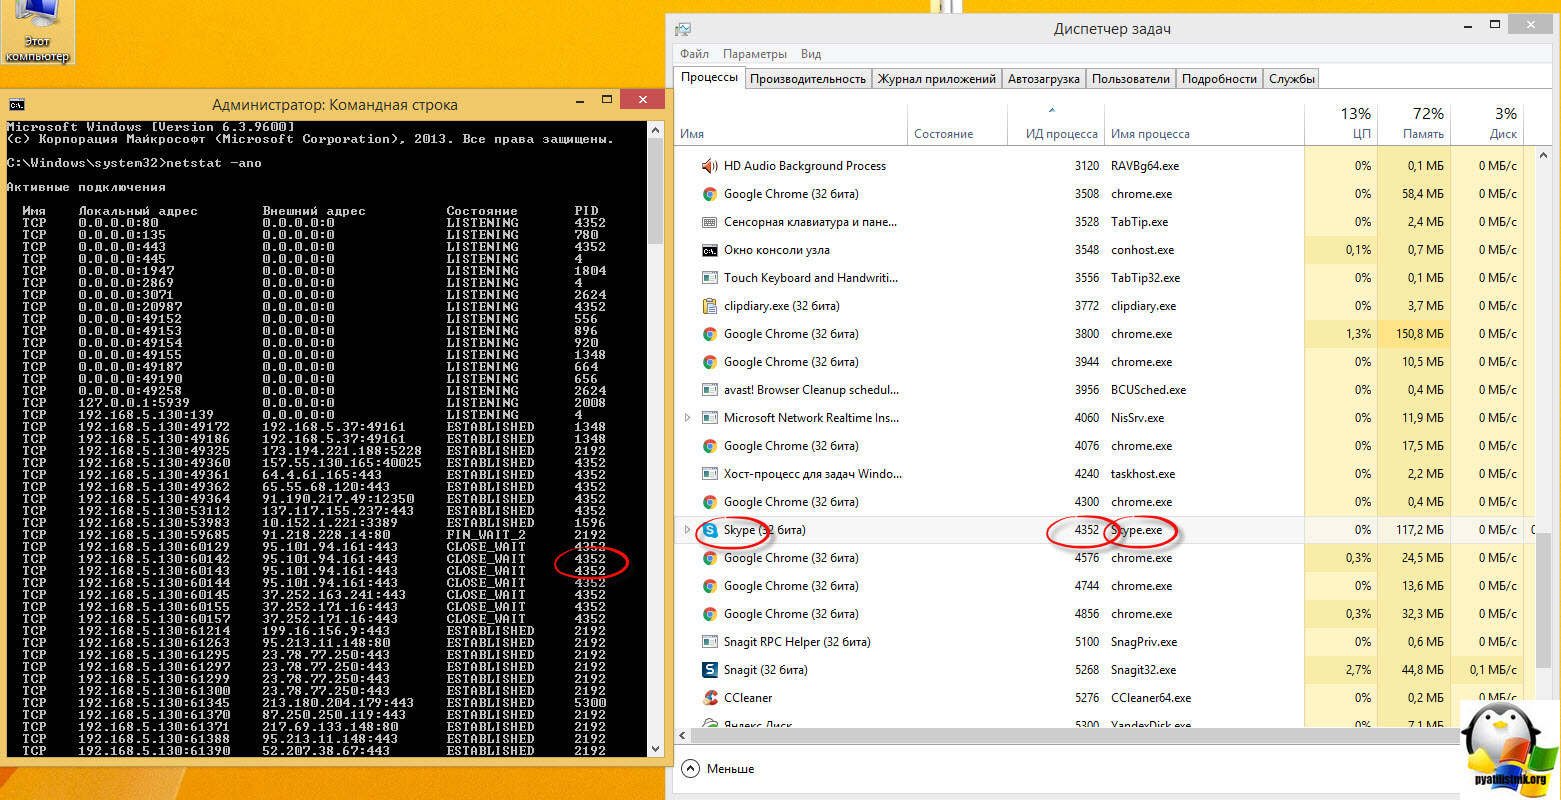
Тут два метода которыми я пользуюсь. Представим себе ситуацию, что вы установили некое приложение, все работает пытаетесь на него попасть с другого компьютера по сети, но не можете. Отключаете брандмауэр на том компьютере, и все начинает работать, вывод блокируется какой то порт этого приложения. Его вычислить поможет нам две утилиты, первая из командной строки, а вторая имеет удобный графический интерфейс.
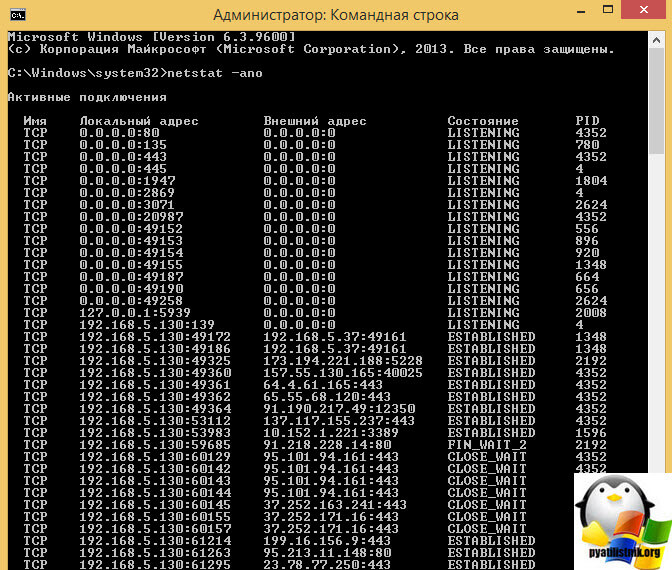
Более подробно про утилиту netstat и ее использование читайте по ссылке. В итоге вы получите сводную таблицу, в которой будет вот, что интересно:
- Тип протокола — TCP или UDP
- Адрес отправителя с указанием портов
- Адрес получателя с указанием портов
- Состояние — либо слушает либо установил соединение и закрыто
- PID это номер идентифицирующий приложение
Как видите в примере у меня много сессий по 443 и 80 порту по сути это браузер Google Chrome.
Приложение заняв сокет, уже не позволит на нем же открыться другому приложению, Сокет живет минут 10.
Как изменить время жизни сокета
Для того, чтобы в операционной системе Windows изменить TTL или как его еще называют время жизни сокета, вам необходимо воспользоваться реестром. Открываете редактор реестра Windows 8.1. Переходите в раздел
Там есть ключ TcpTimedWaitDelay, если его нет то нужно его создать. Укажите нужное вам десятичное значение. TcpTimedWaitDelay — Этот параметр определяет интервал времени, в течение которого подключение находится в состоянии TIME_WAIT, прежде чем будет закрыто. Пока подключение находится в состоянии TIME_WAIT, пара сокетов не может быть использована повторно (это т. н. «состояние 2MSL»). Согласно документу RFC793, данное значение должно в два раза превышать максимальное время жизни пакета в сети.
Как узнать PID приложения
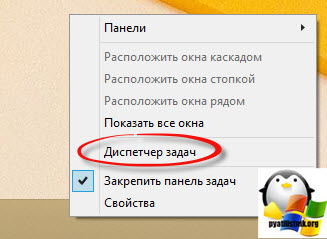
Для того, чтобы узнать PID приложения в Windows, вам нужно в области пуск кликнуть правой кнопкой мыши и из контекстного меню выбрать Диспетчер задач
В диспетчере задач, найдите поле ИД процесса .если его не будет то добавьте.
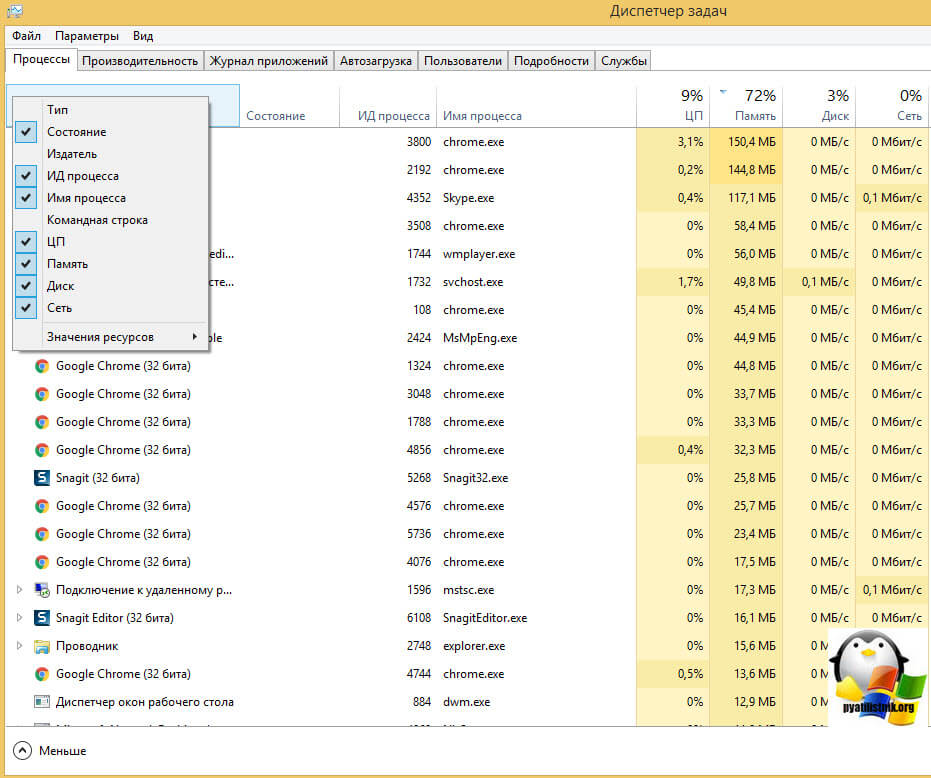
Теперь давайте смотреть, в правой части я вижу приложение skype и оно имеет PID 4352, смотрим в левой части экрана и видим порты и Ip адрес, которые слушает данной приложение.
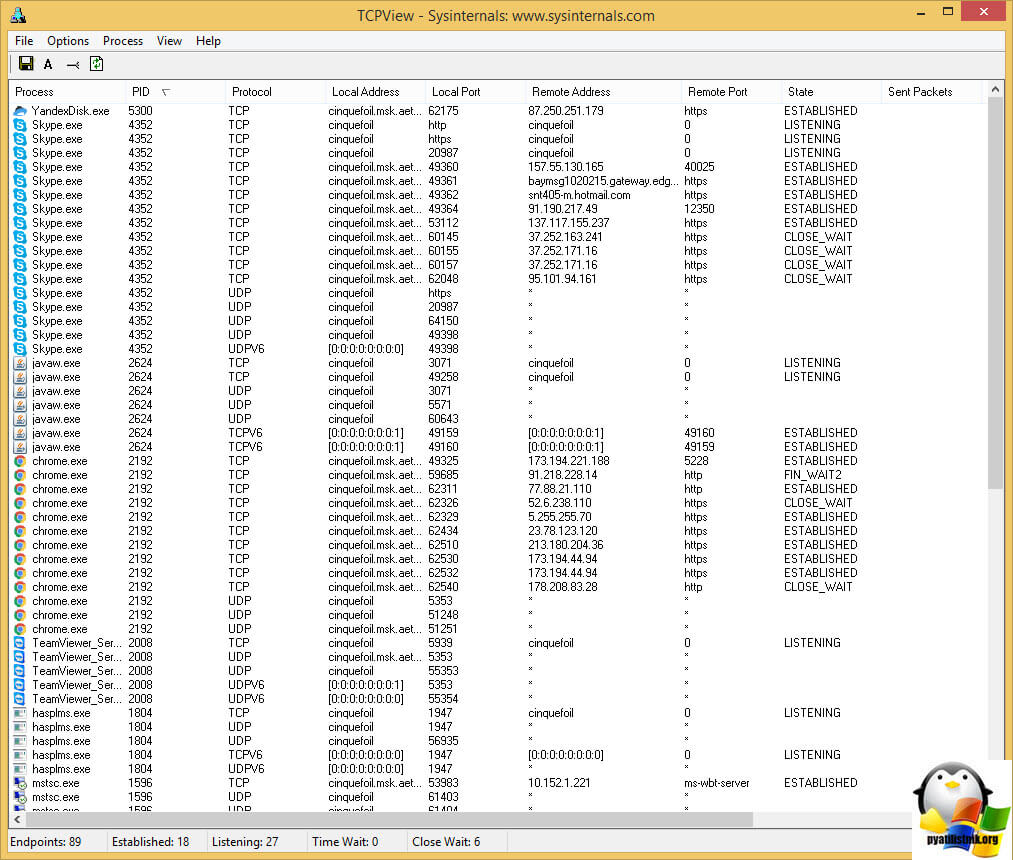
Ну и еще есть утилита TCPView, про нее я уже отдельно писал. Утилита бесплатная и имеет графический интерфейс, запустив ее вы сразу видите кому какой PID принадлежит. Так же видно все сокеты и их состояния.
Думаю, у вас теперь не должно быть вопроса, что такое сокеты windows и как их посмотреть, всем спасибо за прочтение.
Настраиваем «Диспетчер серверов» Windows 10 для управления серверами неродного домена
Не так давно Microsoft выпустила очень интересный инструмент Диспетчер серверов (Remote Server Administration Tools). Данный пакет дал возможность системным администраторам наглядно видеть состояние всех Windows серверов и запущенных на них сервисов.
В интернете существует огромное количество статей про данный инструмент и причина для появления ещё одной, очевидно должна быть не тривиальной. И такая причина есть – это возможность мониторинга и управления серверами с ноутбука или компьютера, которые не входят в один домен с администрируемыми серверами, что может быть очень актуально, например, для приходящего сисадмина.
Установка
Прежде чем переходить к основному вопросу нашей статьи кратко разберём один из вариантов установки.
Для начала нужно скачать с сайта Microsoft соответствующий вашей операционной системе установочный пакет. Для Windows 10 для этого пройдите по следующей ссылке, выберите язык, после чего вам будет доступен список доступных пакетов для выбранного вами языка:
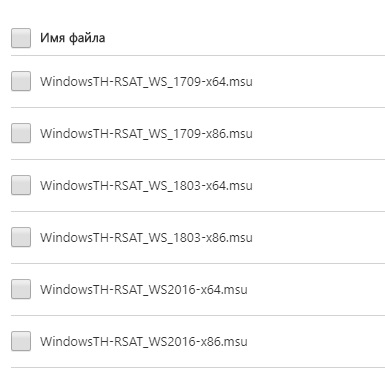
Обратите внимание, здесь вам нужно выбрать тип операционной системы x64 или x86, а также версию установленной ОС Windows. Версию ОС Windows можно узнать, выполнив, например, команду winver в командной строке Windows:
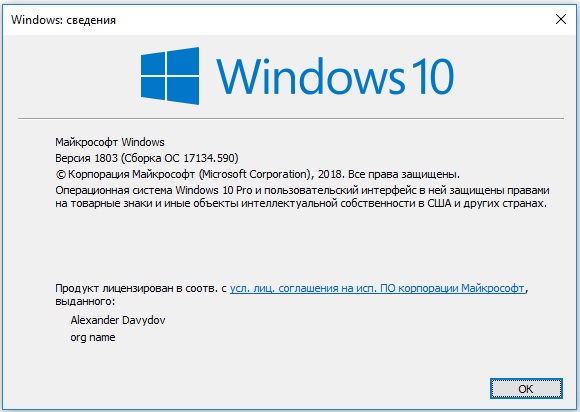
А моём случае это версия 1803, а так как у меня установлена 64-ёх разрядная версия, я буду скачивать установочный пакет WindowsTH-RSAT_WS_1803-x64.msu.
После установки данного пакета открываем папку C:\Windows\System32 и запускаем приложение ServerManager.exe

При необходимости вы можете создать ярлык для данного приложения на рабочем столе или закрепить его на Панели задач.
Добавление серверов в «Диспетчер серверов»
Для добавления серверов, которым мы хотим управлять открываем Управление -> Добавление серверов.
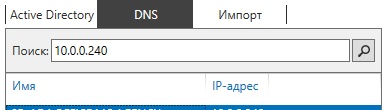
В открывшемся окне нам нужна вкладка DNS (ну или вы можете создать текстовый файл со списком IP-адресов ваших серверов и воспользоваться вкладкой Импорт). Вводим в строке поиска IP-адрес или имя нашего сервера, жмём лупу и добавляем нужный сервер в список:
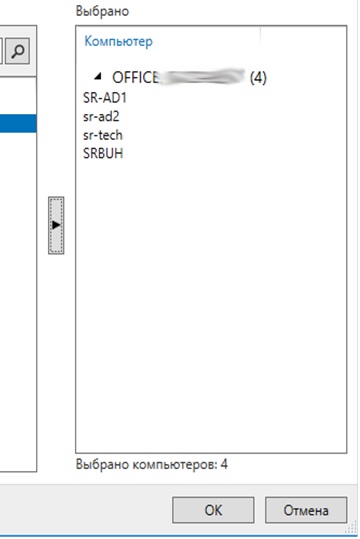
После того, как все сервера добавлены в список жмём ОК:
Если серверы находятся в вашем домене и у вас есть права Администратора, то на этом настройку Диспетчера серверов можно заканчивать.
Если же серверы находятся в неродном для вашего ПК домене, придётся выполнить ещё ряд настроек.
Настройка доступа к серверам
Если после добавления серверов на странице «Все серверы» вы видите следующую картину:
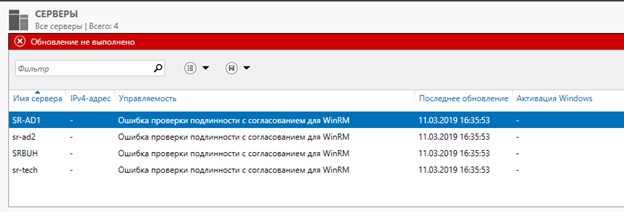
То вам необходимо выполнить следующие действия:
- Убедиться, что пользователь, который осуществляет доступ к серверам обладает правами Администратора данных серверов или домена, при необходимости установить в настройках подключения соответствующего пользователя.
- Если ваш ПК и серверы находятся в разных доменах необходимо прописать все управляемы серверы в списке доверенных хостов вашего ПК.
Определяем пользователя
Для того, чтобы определить или изменить пользователя, кликаем правой кнопкой мыши на соответствующем сервере на странице «Все серверы» Диспетчера серверов и выбираем пункт меню «Управлять как…».
В открывшемся окне вводим полное имя пользователя включая домен, например admin@mytestdomen.ru и его пароль.
Добавляем серверы в список доверенных хостов
Для добавления сервера в список доверенных хостов, необходимо открыть командную строку с правами администратора, после чего выполнить в ней следующий запрос:
winrm set winrm/config/client @
Где 10.0.0.10 – IP-адрес добавляемого сервера, вместо которого можно использовать имя соответствующего сервера, например sr-ad1.mytestdomen.ru
После чего в списке серверов у вас произойдут примерно такие изменения:

Но при попытке добавить следующий сервер, вы столкнётесь с тем, что запись предыдущего сервера будет затираться и активным будет оставаться только последний. Чтобы этого избежать необходимо запустить в командной строке команду, которая добавить в список доверенных хостов все необходимые нам сервера сразу. Для это перечисляем все наши серверы через запятую, примерно так:
winrm set winrm/config/client @
Если вы всё сделали верно наслаждаемся возможностью управлять серверами со своего рабочего ноутбука.
Надеюсь, данная статья была вам полезна.
Данная статья не подлежит комментированию, поскольку её автор ещё не является полноправным участником сообщества. Вы сможете связаться с автором только после того, как он получит приглашение от кого-либо из участников сообщества. До этого момента его username будет скрыт псевдонимом.
Creating a Socket for the Server
After initialization, a SOCKET object must be instantiated for use by the server.
To create a socket for the server
The getaddrinfo function is used to determine the values in the sockaddr structure:
- AF_INET is used to specify the IPv4 address family.
- SOCK_STREAM is used to specify a stream socket.
- IPPROTO_TCP is used to specify the TCP protocol .
- AI_PASSIVE flag indicates the caller intends to use the returned socket address structure in a call to the bind function. When the AI_PASSIVE flag is set and nodename parameter to the getaddrinfo function is a NULL pointer, the IP address portion of the socket address structure is set to INADDR_ANY for IPv4 addresses or IN6ADDR_ANY_INIT for IPv6 addresses.
- 27015 is the port number associated with the server that the client will connect to.
Create a SOCKET object called ListenSocket for the server to listen for client connections.
Call the socket function and return its value to the ListenSocket variable. For this server application, use the first IP address returned by the call to getaddrinfo that matched the address family, socket type, and protocol specified in the hints parameter. In this example, a TCP stream socket for IPv4 was requested with an address family of IPv4, a socket type of SOCK_STREAM and a protocol of IPPROTO_TCP. So an IPv4 address is requested for the ListenSocket.
If the server application wants to listen on IPv6, then the address family needs to be set to AF_INET6 in the hints parameter. If a server wants to listen on both IPv6 and IPv4, two listen sockets must be created, one for IPv6 and one for IPv4. These two sockets must be handled separately by the application.
WindowsВ Vista and later offer the ability to create a single IPv6 socket that is put in dual stack mode to listen on both IPv6 and IPv4. For more information on this feature, see Dual-Stack Sockets.
Check for errors to ensure that the socket is a valid socket.
Sockets
Sockets are a low-level data transfer technology on top of which many networking protocols are implemented. UWP offers TCP and UDP socket classes for client-server or peer-to-peer applications, whether connections are long-lived or an established connection is not required.
This topic focuses on how to use the Universal Windows Platform (UWP) socket classes that are in the Windows.Networking.Sockets namespace. But you can also use Windows Sockets 2 (Winsock) in a UWP app.
As a consequence of network isolation, Windows disallows establishing a socket connection (Sockets or WinSock) between two UWP apps running on the same machine; whether that’s via the local loopback address (127.0.0.0), or by explicitly specifying the local IP address. For details about mechanisms by which UWP apps can communicate with one another, see App-to-app communication.
Build a basic TCP socket client and server
A TCP (Transmission Control Protocol) socket provides low-level network data transfers in either direction for connections that are long-lived. TCP sockets are the underlying feature used by most of the network protocols used on the Internet. To demonstrate basic TCP operations, the example code below shows a StreamSocket and a StreamSocketListener sending and receiving data over TCP to form an echo client and server.
To begin with as few moving parts as possible—and to sidestep network isolation issues for the present—create a new project, and put both the client and the server code below into the same project.
You’ll need to declare an app capability in your project. Open your app package manifest source file (the Package.appxmanifest file) and, on the Capabilities tab, check Private Networks (Client & Server). This is how that looks in the Package.appxmanifest markup.
Instead of privateNetworkClientServer , you can declare internetClientServer if you’re connecting over the internet. Both StreamSocket and StreamSocketListener need one or other of these app capabilities to be declared.
An echo client and server, using TCP sockets
Construct a StreamSocketListener and begin listening for incoming TCP connections. The StreamSocketListener.ConnectionReceived event is raised each time a client establishes a connection with the StreamSocketListener.
Also construct a StreamSocket, establish a connection to the server, send a request, and receive a response.
Create a new Page named StreamSocketAndListenerPage . Put the XAML markup in StreamSocketAndListenerPage.xaml , and the put the imperative code inside the StreamSocketAndListenerPage class.
References to StreamSockets in C++ PPL continuations (applies to C++/CX, primarily)
If you use C++/WinRT coroutines, and you pass parameters by value, then this issue doesn’t apply. For parameter-passing recommendations, see Concurrency and asynchronous operations with C++/WinRT.
A StreamSocket remains alive as long as there’s an active read/write on its input/output stream (let’s take for example the StreamSocketListenerConnectionReceivedEventArgs.Socket that you have access to in your StreamSocketListener.ConnectionReceived event handler). When you call DataReader.LoadAsync (or ReadAsync/WriteAsync/StoreAsync ), then that holds a reference to the socket (via the socket’s input stream) until the Completed event handler (if any) of the LoadAsync is done executing.
The Parallel Patterns Library (PPL) doesn’t schedule task continuations inline by default. In other words, adding a continuation task (with task::then() ) doesn’t guarantee that the continuation task will execute inline as the completion handler.
From the perspective of the StreamSocket, the completion handler is done executing (and the socket is eligible for disposal) before the continuation body runs. So, to keep your socket from being disposed if you want to use it inside that continuation, you need to either reference the socket directly (via lambda capture) and use it, or indirectly (by continuing to access args->Socket inside continuations), or force continuation tasks to be inline. You can see the first technique (lambda capture) in action in the StreamSocket sample. The C++/CX code in the Build a basic TCP socket client and server section above uses the second technique—it echoes the request back as a response, and it accesses args->Socket from within one of the innermost continuations.
The third technique is appropriate when you’re not echoing a response back. You use the task_continuation_context::use_synchronous_execution() option to force PPL to execute the continuation body inline. Here’s a code example showing how to do it.
This behavior applies to all of the sockets and WebSockets classes in the Windows.Networking.Sockets namespace. But client-side scenarios usually store sockets in member variables, so the issue is most applicable to the StreamSocketListener.ConnectionReceived scenario, as illustrated above.
Build a basic UDP socket client and server
A UDP (User Datagram Protocol) socket is similar to a TCP socket in that it also provides low-level network data transfers in either direction. But, while a TCP socket is for long-lived connections, a UDP socket is for applications where an established connection is not required. Because UDP sockets don’t maintain connection on both endpoints, they’re a fast and simple solution for networking between remote machines. But UDP sockets don’t ensure integrity of the network packets nor even whether packets make it to the remote destination at all. So your app will need to be designed to tolerate that. Some examples of applications that use UDP sockets are local network discovery, and local chat clients.
To demonstrate basic UDP operations, the example code below shows the DatagramSocket class being used to both send and receive data over UDP to form an echo client and server. Create a new project, and put both the client and the server code below into the same project. Just as for a TCP socket, you’ll need to declare the Private Networks (Client & Server) app capability.
An echo client and server, using UDP sockets
Construct a DatagramSocket to play the role of the echo server, bind it to a specific port number, listen for an incoming UDP message, and echo it back. The DatagramSocket.MessageReceived event is raised when a message is receieved on the socket.
Construct another DatagramSocket to play the role of the echo client, bind it to a specific port number, send a UDP message, and receive a response.
Create a new Page named DatagramSocketPage . Put the XAML markup in DatagramSocketPage.xaml , and the put the imperative code inside the DatagramSocketPage class.
Background operations and the socket broker
You can use the socket broker, and control channel triggers, to ensure that your app properly receives connections or data on sockets while it’s not in the foreground. For more info, see Network communications in the background.
Batched sends
Whenever you write to the stream associated with a socket, a transition happens from user mode (your code) to kernel mode (where the network stack is). If you’re writing many buffers at a time then these repeated transitions compound into substantial overhead. Batching your sends is a way to send multiple buffers of data together, and avoid that overhead. It’s especially useful if your app is doing VoIP, VPN, or other tasks that involve moving a lot of data as efficiently as possible.
This section demonstrates a couple of batched sends techniques that you can use with a StreamSocket or a connected DatagramSocket.
To get a baseline, let’s see how to send a large number of buffers in an inefficient way. Here’s a minimal demo, using a StreamSocket.
This first example of a more efficient technique is only appropriate if you’re using C#. Change OnNavigatedTo to call BatchedSendsCSharpOnly instead of SendMultipleBuffersInefficiently or SendMultipleBuffersInefficientlyAsync .
This next example is appropriate for any UWP language, not just for C#. It relies on the behavior in StreamSocket.OutputStream and DatagramSocket.OutputStream that batches sends together. The technique calls FlushAsync on that output stream which, as of WindowsВ 10, is guaranteed to return only after all operations on the output stream have completed.
There are some important limitations imposed by using batched sends in your code.
- You cannot modify the contents of the IBuffer instances being written until the asynchronous write is complete.
- The FlushAsync pattern only works on StreamSocket.OutputStream and DatagramSocket.OutputStream.
- The FlushAsync pattern only works in WindowsВ 10 and onward.
- In other cases, use Task.WaitAll instead of the FlushAsync pattern.
Port sharing for DatagramSocket
You can configure a DatagramSocket to coexist with other Win32 or UWP multicast sockets bound to the same address/port. You do this by setting the DatagramSocketControl.MulticastOnly to true before binding or connecting the socket. You access an instance of DatagramSocketControl from the DatagramSocket object itself via its DatagramSocket.Control property.
Providing a client certificate with the StreamSocket class
StreamSocket supports using SSL/TLS to authenticate the server that the client app is talking to. In some cases, the client app needs to authenticate itself to the server using an SSL/TLS client certificate. You can provide a client certificate with the StreamSocketControl.ClientCertificate property before binding or connecting the socket (it must be set before the SSL/TLS handshake is started). You access an instance of StreamSocketControl from the StreamSocket object itself via its StreamSocket.Control property. If the server requests the client certificate then Windows will respond with the client certificate that you provided.
As indicated by the comment in the code examples below, your project needs to declare the sharedUserCertificates app capability for this code to work.
Handling exceptions
An error encountered on a DatagramSocket, StreamSocket, or StreamSocketListener operation is returned as an HRESULT value. You can pass that HRESULT value to the SocketError.GetStatus method to convert it into a SocketErrorStatus enumeration value.
Most SocketErrorStatus enumeration values correspond to an error returned by the native Windows sockets operation. Your app can switch on SocketErrorStatus enumeration values to modify app behavior depending on the cause of the exception.
For parameter validation errors, you can use the HRESULT from the exception to learn more detailed information about the error. Possible HRESULT values are listed in Winerror.h , which can be found in your SDK installation (for example, in the folder C:\Program Files (x86)\Windows Kits\10\Include\ \shared ). For most parameter validation errors, the HRESULT returned is E_INVALIDARG.
The HostName constructor can throw an exception if the string passed is not a valid host name. For example, it contains characters that are not allowed, which is likely if the host name is typed in to your app by the user. Construct a HostName inside a try/catch block. That way, if an exception is thrown, the app can notify the user and request a new host name.


