- Блог для заметок
- SoftEther VPN Project
- Прямой эфир
- Блоги
- SoftEther VPN Linux Client
- Softether client linux install
- Установка SoftEther на Ubuntu или Debian
- How to Set up SoftEther VPN Client on Linux
- Requirements
- Recommendations
- Part I. Install SoftEther VPN client
- Part II. Configure SoftEther VPN client
- Requirements
- Recommendations
- Part I. Install SoftEther VPN client
- Part II. Configure SoftEther VPN client
- Part III. IP and routing table
- Part IV. Disconnect from VPN
Блог для заметок
SoftEther VPN Project
Прямой эфир
dzek 28 апреля 2017, 08:27
dzek 7 февраля 2014, 23:49
dzek 2 октября 2013, 19:51
dzek 27 сентября 2013, 16:42
dzek 30 августа 2013, 08:10
aaaaa 13 августа 2013, 09:50
aaaaa 13 августа 2013, 09:49
aaaaa 13 августа 2013, 09:40
dzek 5 августа 2013, 19:41
dzek 26 апреля 2013, 09:48
dzek 21 апреля 2013, 00:43
dzek 23 марта 2013, 21:18
dzek 20 марта 2013, 07:05
dzek 2 ноября 2012, 12:27
dzek 29 сентября 2012, 13:40
Блоги
- FreeBSD0.00
- D-Link0.00
- Vyatta0.00
- Windows0.00
- Ubuntu0.00
- Команды консоли0.00
- Cisco0.00
- Элтекс0.00
- Debian0.00
- SoftEther VPN Project0.00
SoftEther VPN Linux Client
ситуация
SoftEther VPN у нас пока на Windows Server
необходимо подключить SoftEther VPN Linux Client
далее почти все просто.
забираем линукс клиента с оф.сайта softether.org, ставим.
и запускаем
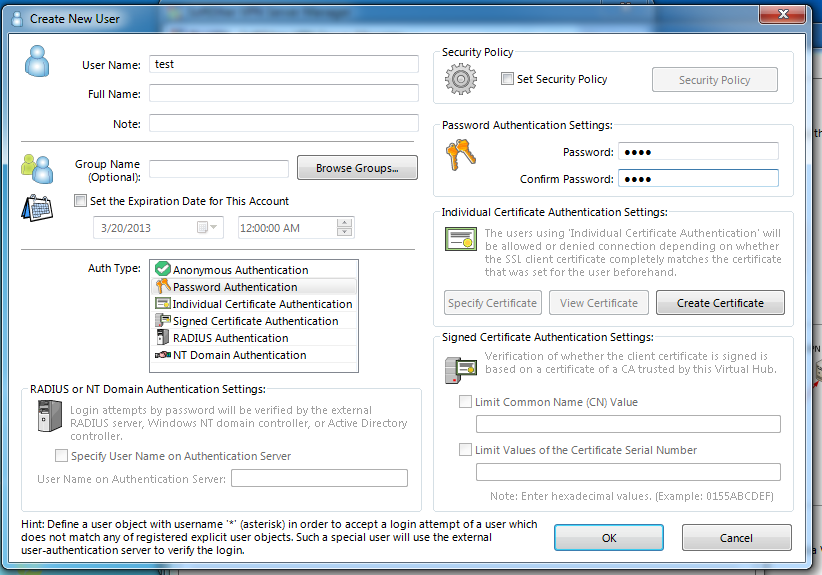
далее настроим клиента.
не забываем включит автоконнект
для надежности проверим.
о, нам не выдали IPv4, который необходим.
делаем просто.
Источник
Softether client linux install
Copy raw contents
Copy raw contents
SoftEther Linux Howto
This how-to is written to support those who wish to connect to a SoftEther VPN established by the Advanced Media Workflow Association (AMWA). This VPN has been established to provide remote connectivity in support of AMWA workshops. The purpose of these workshops is to further the development of technical specifications issues by the AMWA.
This how-to is written as a quick guide for those who want to install and configure the SoftEther VPN Client on a Linux system. Specifically, these instructions were written for an Intel NUC running Kali Linux. These instructions were based upon SoftEther documentation and an article found at https://www.cactusvpn.com/tutorials/how-to-set-up-softether-vpn-client-on-linux/.
- Download the appropriate version of the VPN client from www.softether.org
- Run the .install.sh script that is provided with the client
- Start the VPN Client vpnclient start
Configure a VPN account
The vpncmd utility is used to configure accounts and to connect to a VPN. This utility connects to the VPN client running on your local machine.
Run vpncmd and choose option 2. Press ENTER to connect to the client running on your local machine.
check to test your installation.
NicCreate vpn_se to create a virtual VPN interface on your computer
AccountCreate [accountName] to create your account. You will need the following information:
- User Name (You will need to contact the AMWA to obtain login credentials)
- Account Name (this may be any name you choose)
- VPN server URL (The current AMWA URL is amwa-nmos-vpn.softether.net )
- port number for the VPN server. In the case of the AMWA VPN it is 443
- Virtual hub to connect to (For AMWA use NMOS-VPN )
- Virtual Network Adapter Name (You created this earlier — vpn_se )
Note: during account creation, when asked, Desination VPN Server Host Name and Port Number: , enter the information as follows: amwa-nmos-vpn.softether.net:443
AccountPassword [accountName] to enter your VPN account password. Specify Standard when requested.
Connect to SoftEther VPN
- Run vpncmd if you have not already done so. Select option 2 and press ENTER to connect to your local VPN Client.
- AccountConnect [accountName] to connect to the VPN server
- AccountList shows connection settings. Look for Connected under Status
- Enter ^D to exit the vpncmd utility
Modify Route Table
Now that you are connected to the VPN and have an IP address, you must modify your IP route table to send traffic through the VPN. There are two procedures below. The first will route ALL traffic from your computer through the VPN, including traffic destined for the Internet. The second will route traffic from your computer throught the VPN and on to the VPN network, but leaves your default route in place so that traffic destined for the Internet still uses your local network interface.
Route ALL traffic from your computer through the VPN
N.B. you will lose connectivity to local devices on your network such as printers. (I am short on time — if anyone using this can submit a PR with commands to restore routing for local devices, please do so.)
- cat /proc/sys/net/ipv4/ip_forward to check if IP Forwarding is enabled. If ‘1’ is returned then skip the next step
(You may need to sudo su to perform some of the next commands)
- echo 1 > /proc/sys/net/ipv4/ip_forward
- dhclient vpn_vpn_se to obtain an IP address from the VPN DHCP server
- ip a to show the vpn_se interface and the assigned IPv4 address
- netstat -rn to show the route table prior to modification.
The following assumes that your local network is 192.168.0.0/24 and your default gateway is 192.168.0.1, and that the IP address of the remote VPN server is 15.48.223.55.
- sudo ip route add 15.48.223.55/32 via 192.168.0.1
- Delete the old default route. ip route del default via 192.168.0.1 Review the new route table with netstat -rn
Ping google’s nameservers at 8.8.8.8 ping 8.8.8.8 -c4
Check your public IP address wget -qO- http://ipecho.net/plain ; echo
Route only VPN traffic through the VPN interface
- cat /proc/sys/net/ipv4/ip_forward to check if IP Forwarding is enabled. If ‘1’ is returned then skip the next step
(You may need to sudo su to perform some of the next commands)
echo 1 > /proc/sys/net/ipv4/ip_forward
dhclient vpn_vpn_se to obtain an IP address from the VPN DHCP server
ip a to show the vpn_se interface and the assigned IPv4 address
netstat -rn to show the route table prior to modification The following assumes that your local network is 192.168.0.0/24 and your default gateway is 192.168.0.1, and that the IP address of the remote VPN server is 15.48.223.55.
Delete the default route added by the dhclient command you issued earlier. sudo ip route del default via 192.168.0.1
Review the new route table with netstat -rn
Ping google’s nameservers at 8.8.8.8 ping 8.8.8.8 -c4
Ping the remote gateway at 192.168.0.1 ping 192.168.0.1 -c4
Check your public IP address wget -qO- http://ipecho.net/plain ; echo
Route issues on cloud computers
Be aware that the dhclient command will install a deafult route to the gateway received via DHCP over the VPN.
If you are using a cloud Linux instance, you will loose your ssh (or other) Internet connectivity to your cloud Linux instance.
In such as case, you may want to create a script with the following commands:
Where X.Y.Z.J is the IP address of your cloud Linux instance Internet gateway, and eth0 is the Internet facing network interface.
Use netstat -nr to ensure that the desired route to the VPN subnet IPs is properly being routed over the VPN interface vpn_vpn_se .
Disconnect from VPN and restore route table
Источник
Установка SoftEther на Ubuntu или Debian
Купить виртуалку под VPN можно тут
Чуть более подробно про возможности сервера:
- Множество виртуальных хабов. Т.е. не каждый экземпляр сервера обслуживает только своих клиентов, а все в пределе одного сервера.
- Remote-Access (клиент-к-LAN) и Site-to-Site (объединение двух и более LAN в одну) туннелей.
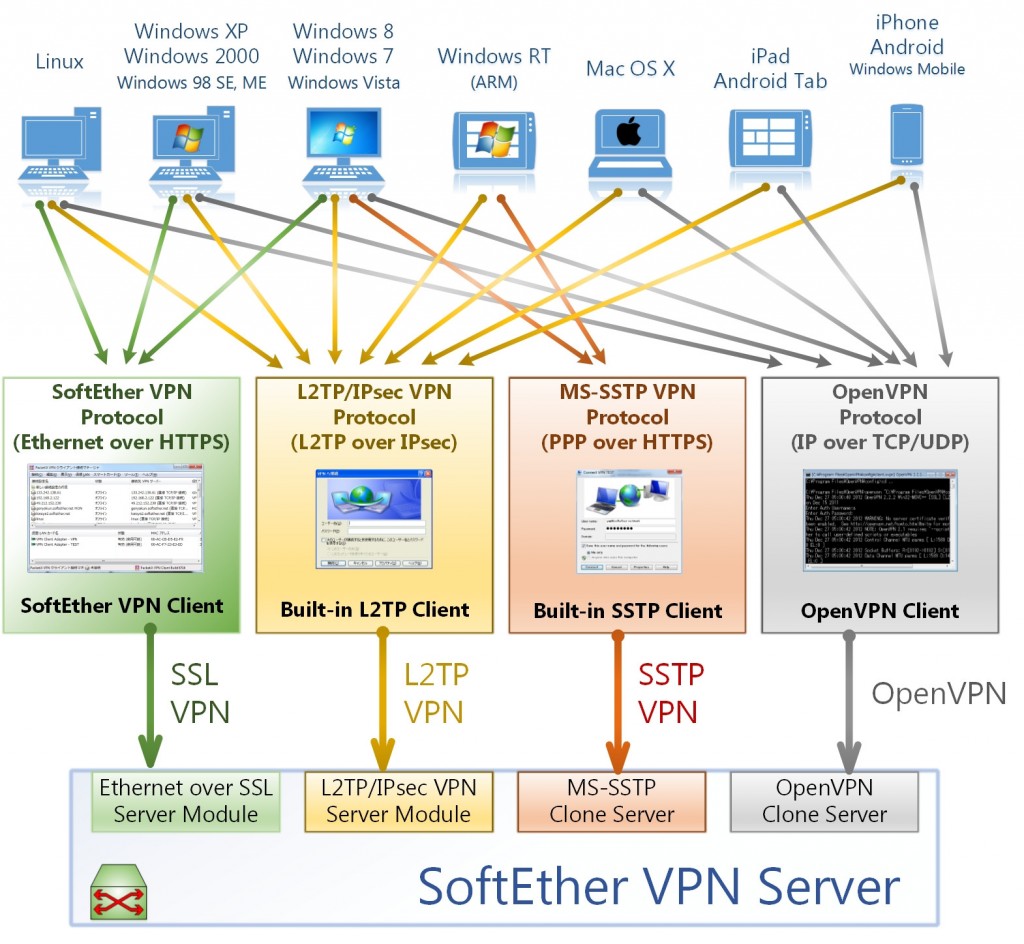
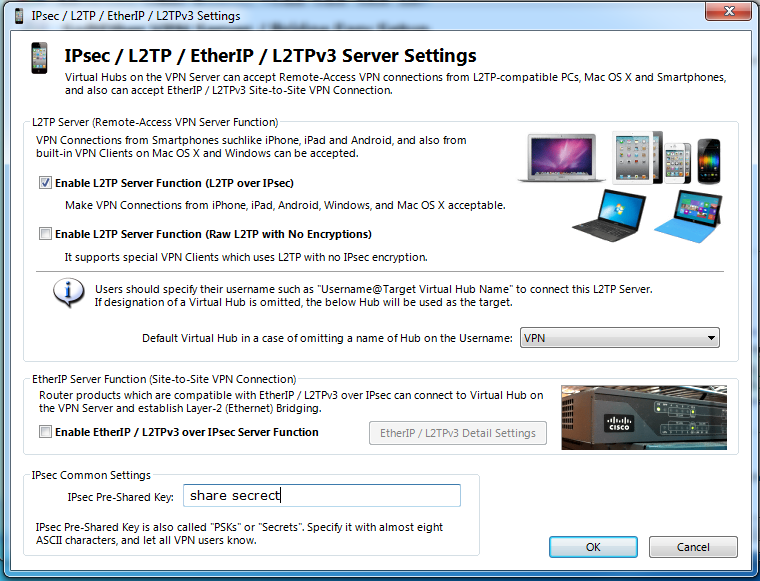
- Поддержка L2TP/IPsec, OpenVPN, MS-SSTP, L2TPv3, EtherIP и своего протокола
- VPN через ICMP и через DNS (только через свой протокол)
- Dynamic DNS и NAT Traversal через бесплатный релей (да-да, можно поднять VPN сервер с серым IP!)
- Логгирование
- Встроенный firewall
- Поддержка IPv6 в L3-режиме (ну и в L2, конечно, тоже)
- Шейпинг трафика по группам пользователей либо по конкретным пользователям
- SecureNAT (user-space NAT и DHCP-сервер). Удобно на не-серверных Windows
- Поддержка VLAN
- Поддержка QoS с автоматической приоритезацией
Есть возможность настроить работу в local bridge и SecureNAT
В случае с SecureNAT нужно меньше настроек из консоли, но данный тип настройки, по мнению многих является более медленным. Мы опишем обе настройки.
Помните, что нельзя включить сразу local bridge и SecureNAT — получите 100% загрузку процессора на VDS
Установка (картинки кликабельные):
Идём на офсайт и выбираем необходимую версию
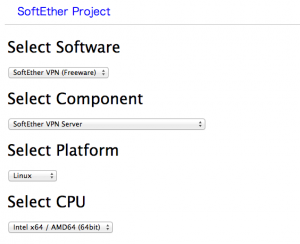
Копируем ссылку на архив
Читаете многабукаф и соглашаетесь с правилами использования: 1 — 1 — 1
Потом переносите накомпиленное в каталог /usr/local/
Вставляете содержимое в /etc/init.d/vpnserver
Проверяете работу сервера
Должны получить 4 раза “Pass”.
Добавляете пароль администратора на сервер
Скачиваем клиент для настройки сервера:
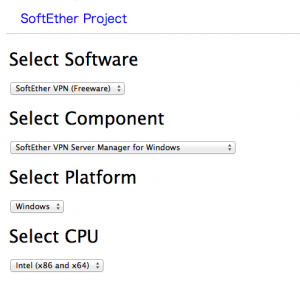
Устанавливаем, вводим адрес сервера и логин администратора

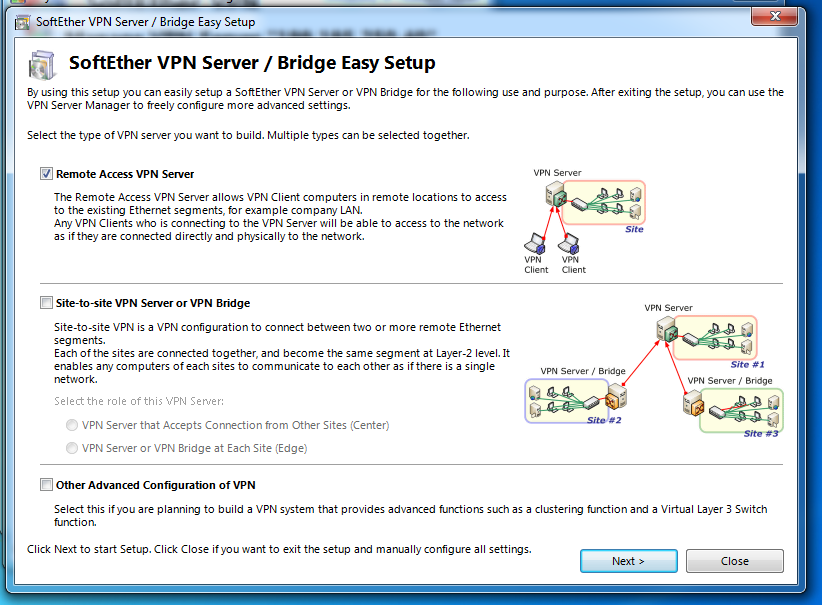
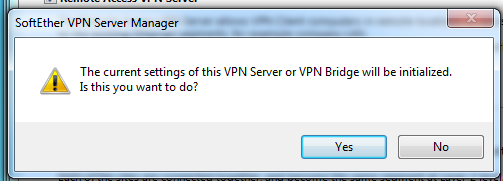

Выбираем 1й пункт и вводим
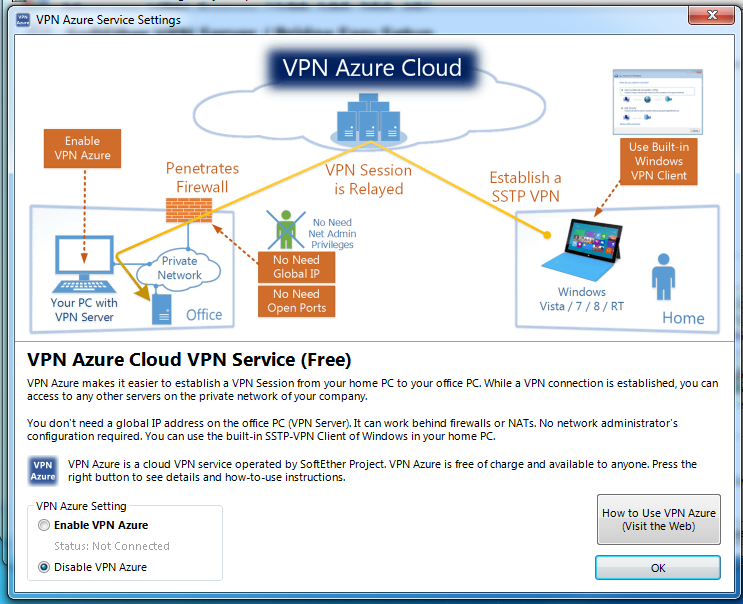
Выключаем Azure VPN
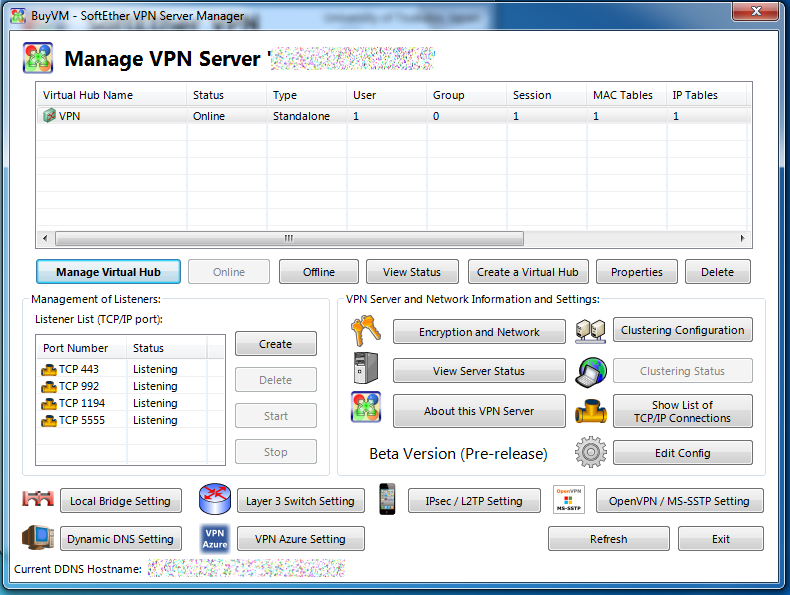
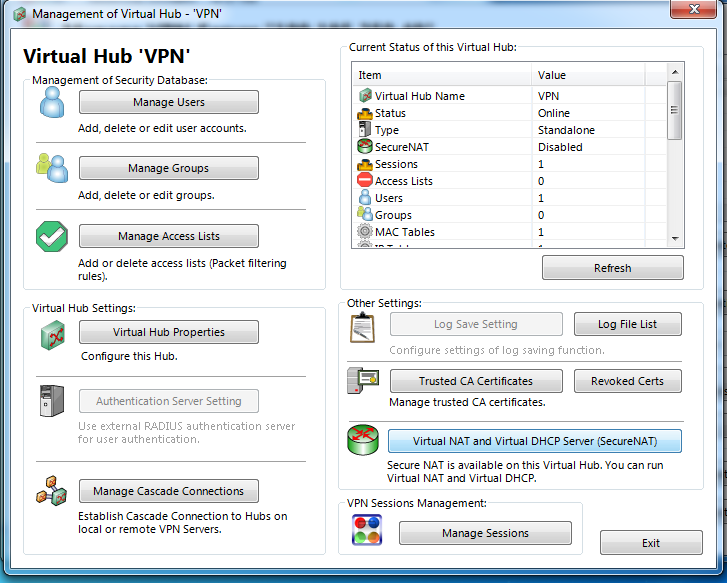
Для настройки Secure NAT заходим в Manage Virtual Hub
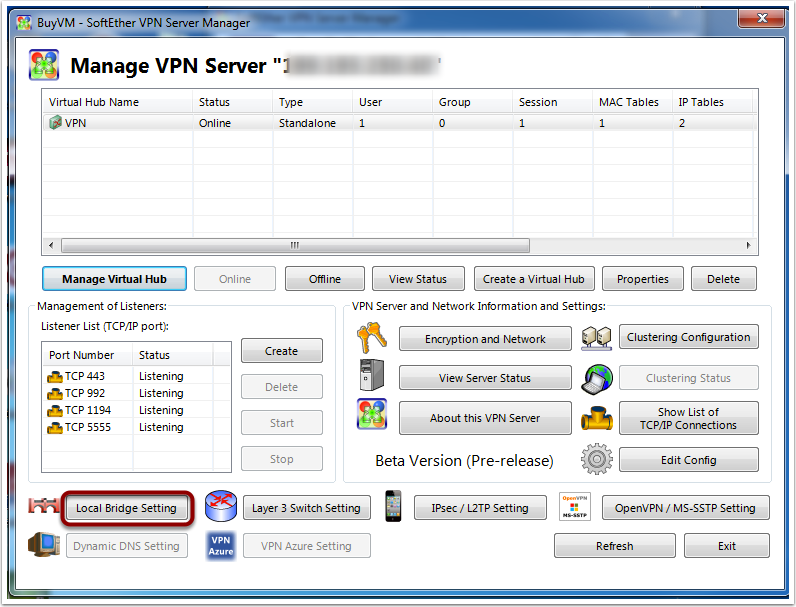
Local bridge Setup
Настройки у нас такие:
Отключаем Secure NAT
Создаём Local Bridge

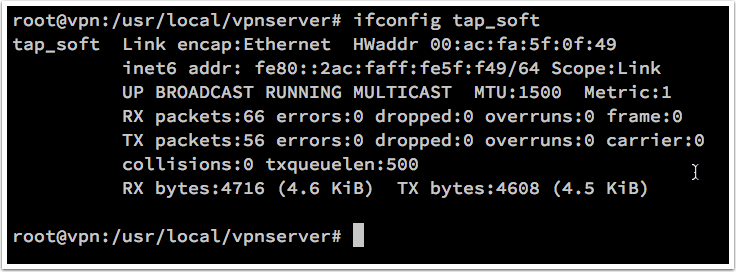
Проверяем на сервере, создался ли интерфейс
Добавляем в файл /etc/dnsmasq.conf
Изменяем стартовый скрипт /etc/init.d/vpnserver
Добавляем в /etc/sysctl.d/ipv4_forwarding.conf
Добавляем правило фаервола
Где [YOUR VPS IP ADDRESS] — адрес вашего VDS
Источник
How to Set up SoftEther VPN Client on Linux
In this tutorial we will show you how to set up SoftEther VPN Client on Linux but first let’s see what are our requirements and recommendations.
Requirements
In order to set up the SoftEther you will need:
- A CactusVPN account. If you don’t have one you can try our services for free.
- Your VPN username, password and VPN server address. You can find them in your account on our website, by going to Settings.
Recommendations
- This tutorial requires advanced Linux knowledge. There is a potential risk to break your Internet connection if you don’t follow all steps exactly. You can always set up VPN on Linux using other VPN protocols that are easier to set up.
- Connect to SoftEther VPN protocol on Linux only if you have experience with the configuration of Linux applications and are familiar with reading / modifying IP routing tables.
If you still want to set up SoftEther VPN on Linux, go step-by-step through following instructions:
Part I. Install SoftEther VPN client
We’ll show you how to install the SoftEther VPN client on Linux.
You can do this in two ways: from package manager on Ubuntu or other Debian Derivates [x86_64 or AMD 64 machines] and from source on Linux distributives.
Choose the way you want to use from the menu below and follow its steps.
Ensure your system is up to date:
This step is not mandatory, though it is recommended.
Add the CactusVPN repository to your package manager source list:
Update the package manager cache:
Important! You may get the following error:
E: The method driver /usr/lib/apt/methods/https could not be found.
N: Is the package apt-transport-https installed?
E: Failed to fetch https://repository.cactusvpn.com/softether/amd64/InRelease
E: Some index files failed to download. They have been ignored, or old ones used instead.
If you get this error, you need to install apt-transport-https on your device:
sudo apt install -y apt-transport-https
and run the first command again.
If you do not see any errors just ignore this step.
Install the SoftEther VPN manager:
Ensure your system is up to date:
On Debian / Ubuntu:
On CentOS / Fedora:
This step is not mandatory, though it is recommended.
Download the latest version of SoftEther VPN client (at the time of writing this tutorial it was v4.27-9668-beta.) available here:
Decompress SofEther VPN client:
Make sure your system have all the needed tools for SoftEther compilation.
On Debian / Ubuntu:
On CentOS / Fedora:
Change the directory to the vpnclient folder:
Compile SoftEther into an executable file:
SoftEther will ask you to read and agree its License Agreement. Select 1 to read the agreement, again to confirm you have read it and finally to agree to the License Agreement.
SoftEther is now compiled and it’s an executable file (vpnclient and vpncmd). If the process fails, check if you have all of the requirement packages installed.
Now we can move the vpnclient directory somewhere else. We moved it to /usr/:
Part II. Configure SoftEther VPN client
Start the SoftEther VPN client:
If you see this message: The SoftEther VPN Client service has been started. then the SoftEther VPN client has successfully started.
Check the SoftEther VPN client:
Select 3 to enter Use of VPN Tools (certificate creation and Network Traffic Speed Test Tool).
Test the SoftEther VPN Client installation:
If all the checks are passed, you can go to the next step.
Important! Do not go to the next step until you do not correct all the errors.
Press Ctrl + c or Ctrl + d to exit.
Set up SoftEther VPN client. Start configuration with:
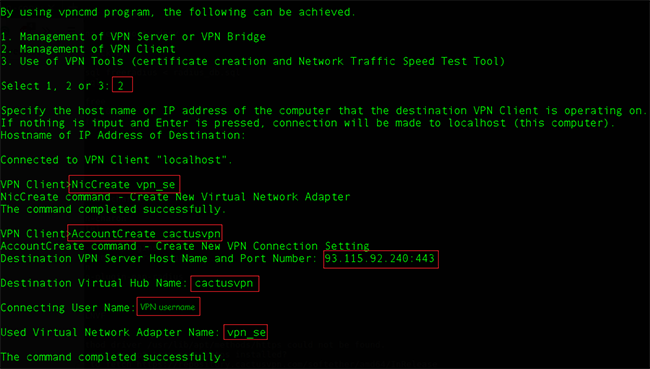
Select 2. Management of VPN Client.
Do not enter any addresses at Hostname of IP Address of Destination and press Enter to connect to the localhost.
Create a virtual interface to connect to the VPN server. In the SoftEther VPN configuration type:
Create an account that will use this interface for the VPN connection. Run this command in the terminal:
Set up VPN account with your details:
Destination Virtual Hub Name: cactusvpn
Destination VPN server Host Name and Port Number:
You can find IP addresses of all our servers in your account on our website, by going to Settings.
Connecting User Name:
You can find your VPN username and password in your account on our website, by going to Settings -> VPN Username & Password. Make sure you use your VPN username and password and NOT the website account credentials (What is the difference?).
Used Virtual Network Adapter Name: vpn_se
If you get the The command completed successfully. message, it means that the account creation was successfully finished.
Set up a password:
and enter your VPN password for Password and Confirm input.
You can find your VPN username and password in your account on our website, by going to Settings -> VPN Username & Password. Make sure you use your VPN username and password and NOT the website account credentials (What is the difference?).
At Specify standard or radius: type
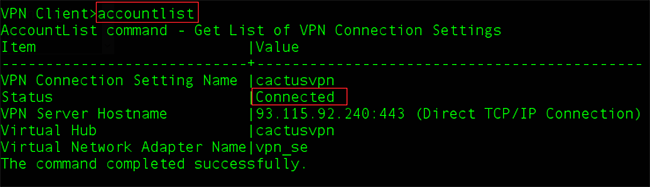
Connect to the SoftEther VPN client using the created account:
Test the connection to the VPN server:
If you see “Connected” you can go to the next step.
Press Ctrl + c or Ctrl + d to exit the SoftEther VPN Client manager.
In this tutorial we will show you how to set up SoftEther VPN Client on Linux but first let’s see what are our requirements and recommendations.
Requirements
In order to set up the SoftEther you will need:
- A CactusVPN account. If you don’t have one you can try our services for free.
- Your VPN username, password and VPN server address. You can find them in your account on our website, by going to Settings.
Recommendations
- This tutorial requires advanced Linux knowledge. There is a potential risk to break your Internet connection if you don’t follow all steps exactly. You can always set up VPN on Linux using other VPN protocols that are easier to set up.
- Connect to SoftEther VPN protocol on Linux only if you have experience with the configuration of Linux applications and are familiar with reading / modifying IP routing tables.
If you still want to set up SoftEther VPN on Linux, go step-by-step through following instructions:
Part I. Install SoftEther VPN client
We’ll show you how to install the SoftEther VPN client on Linux.
You can do this in two ways: from package manager on Ubuntu or other Debian Derivates [x86_64 or AMD 64 machines] and from source on Linux distributives.
Choose the way you want to use from the menu below and follow its steps.
Ensure your system is up to date:
This step is not mandatory, though it is recommended.
Add the CactusVPN repository to your package manager source list:
Update the package manager cache:
Important! You may get the following error:
E: The method driver /usr/lib/apt/methods/https could not be found.
N: Is the package apt-transport-https installed?
E: Failed to fetch https://repository.cactusvpn.com/softether/amd64/InRelease
E: Some index files failed to download. They have been ignored, or old ones used instead.
If you get this error, you need to install apt-transport-https on your device:
sudo apt install -y apt-transport-https
and run the first command again.
If you do not see any errors just ignore this step.
Install the SoftEther VPN manager:
Ensure your system is up to date:
On Debian / Ubuntu:
On CentOS / Fedora:
This step is not mandatory, though it is recommended.
Download the latest version of SoftEther VPN client (at the time of writing this tutorial it was v4.27-9668-beta.) available here:
Decompress SofEther VPN client:
Make sure your system have all the needed tools for SoftEther compilation.
On Debian / Ubuntu:
On CentOS / Fedora:
Change the directory to the vpnclient folder:
Compile SoftEther into an executable file:
SoftEther will ask you to read and agree its License Agreement. Select 1 to read the agreement, again to confirm you have read it and finally to agree to the License Agreement.
SoftEther is now compiled and it’s an executable file (vpnclient and vpncmd). If the process fails, check if you have all of the requirement packages installed.
Now we can move the vpnclient directory somewhere else. We moved it to /usr/:
Part II. Configure SoftEther VPN client
Start the SoftEther VPN client:
If you see this message: The SoftEther VPN Client service has been started. then the SoftEther VPN client has successfully started.
Check the SoftEther VPN client:
Select 3 to enter Use of VPN Tools (certificate creation and Network Traffic Speed Test Tool).
Test the SoftEther VPN Client installation:
If all the checks are passed, you can go to the next step.
Important! Do not go to the next step until you do not correct all the errors.
Press Ctrl + c or Ctrl + d to exit.
Set up SoftEther VPN client. Start configuration with:
Select 2. Management of VPN Client.
Do not enter any addresses at Hostname of IP Address of Destination and press Enter to connect to the localhost.
Create a virtual interface to connect to the VPN server. In the SoftEther VPN configuration type:
Create an account that will use this interface for the VPN connection. Run this command in the terminal:
Set up VPN account with your details:
Destination Virtual Hub Name: cactusvpn
Destination VPN server Host Name and Port Number:
You can find IP addresses of all our servers in your account on our website, by going to Settings.
Connecting User Name:
You can find your VPN username and password in your account on our website, by going to Settings -> VPN Username & Password. Make sure you use your VPN username and password and NOT the website account credentials (What is the difference?).
Used Virtual Network Adapter Name: vpn_se
If you get the The command completed successfully. message, it means that the account creation was successfully finished.
Set up a password:
and enter your VPN password for Password and Confirm input.
You can find your VPN username and password in your account on our website, by going to Settings -> VPN Username & Password. Make sure you use your VPN username and password and NOT the website account credentials (What is the difference?).
At Specify standard or radius:” type
Connect to the SoftEther VPN client using the created account:
Test the connection to the VPN server:
If you see Connected” you can go to the next step.
Press Ctrl + c or Ctrl + d to exit the SoftEther VPN Client manager.
Part III. IP and routing table
Check if the IP forward is enabled on your system:
If you get 1 you can skip this step and go to the Obtain an IP address from the VPN server step.
If you have 0, please enable IP forward:
You can also make it permanent by editing the /etc/sysctl.conf file:
If you get net.ipv4.ip_forward = 1 the IP forward was successfully enabled.
Obtain an IP address from the VPN server:
and you’ll see the virtual network vpn_vpn_se created with SoftEther VPN client tool.
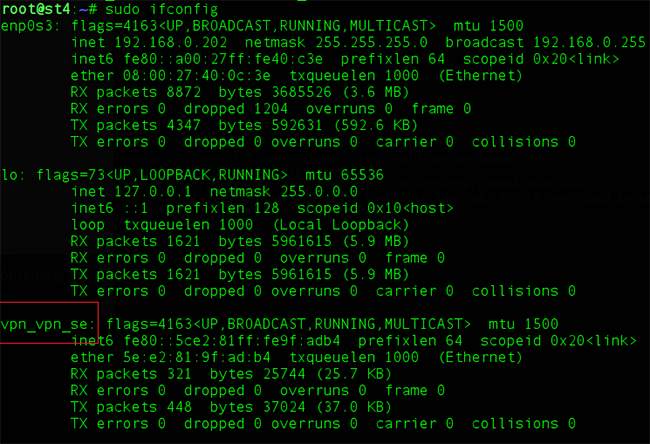
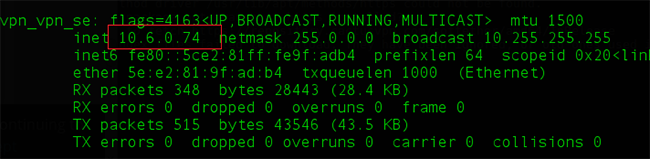
To get an IP address from the VPN server:
After a few moments you should get an IP address from the 10.6.0.0/24 network.
Edit the routing table:
to see the current routing table. Yours should be similar to this:

Add a route to the VPN server’s IP address via your old default route. In my specific case:
The 93.115.92.240 is the IP address of the VPN server. The 192.168.0.1 is my previous gateway.
Delete the old default route:
After these updates, the routing table should look like this:

Ping any IP address to check your network connection:
Check your public IP address from the command line:
If you see the VPN server’s IP, everything was set up correctly and your Linux is connected to the VPN via SoftEther VPN client.
If the ping to the 8.8.8.8 is OK but you can not retrieve anything else by public hostname, add Google DNS (or any Public DNS server) to your /etc/resolv.conf file:
Part IV. Disconnect from VPN
To turn the VPN connection OFF you need to close SoftEther VPN Client manager and edit the routing table to get the access to the Internet via your router’s gateway.
To disconnect from VPN simply turn OFF the SoftEther VPN Client manager:
Edit the routing table by deleting the route from your gateway to the VPN server (in our specific case 93.115.92.240/32):
Add a default route via your local gateway (192.168.0.1 for the IPs we used in this example):
Источник


