- Create and deploy an application with Configuration Manager
- Before you start
- Create the Configuration Manager application
- To start the Create Application Wizard and create the application
- Examine the properties of the application and its deployment type
- Add a requirement to the deployment type
- Add the application content to a distribution point
- Deploy the application
- Monitor the application
- To review the deployment status
- End-user experience
- Create Windows applications in Configuration Manager
- General considerations
- Provision Windows app packages for all users on a device
- Support for MSIX format
- Convert applications to MSIX
- Prerequisites for MSIX
- Process to convert applications to MSIX format
- Task sequence deployment type
- Prerequisites for a task sequence deployment type
- Known issues for a task sequence deployment type
- Support for Universal Windows Platform (UWP) apps
- Deploy Windows Installer apps to MDM-enrolled Windows 10 devices
Create and deploy an application with Configuration Manager
Applies to: Configuration Manager (current branch)
In this topic, you’ll jump right in and create an application with Configuration Manager. In this example, you’ll create and deploy an application that contains a line-of-business app for Windows PCs called Contoso.msi, which must be installed on all PCs that are running Windows 10 in your company. Along the way, you’ll learn about many of the things you can do to manage applications effectively.
This procedure is designed to give you an overview of how to create and deploy Configuration Manager applications. However, it does not cover all the configuration options, or how to create and deploy applications for other platforms.
For specific details that are relevant to each platform, see one of the following articles:
If you are already familiar with Configuration Manager applications, you can skip this topic. However, you might want to review Create applications to learn about all the options that are available when you create and deploy applications.
Before you start
Make sure that you’ve reviewed the information in Introduction to application management so that you have prepared your site to install applications and you understand the terminology that’s used in this topic.
Also, make sure that the installation files for the Contoso.msi app are in an accessible location on your network.
Create the Configuration Manager application
To start the Create Application Wizard and create the application
In the Configuration Manager console, choose Software Library > Application Management > Applications.
On the Home tab, in the Create group, choose Create Application.
On the General page of the Create Application Wizard, choose Automatically detect information about this application from installation files. This pre-populates some of the information in the wizard with information that’s extracted from the installation .msi file. Then specify the following information:
Type: Choose Windows Installer (*.msi file).
Location: Type the location (or choose Browse to select the location) of the installation file Contoso.msi. Note that the location must be specified in the form \\Server\Share\File for Configuration Manager to locate the installation files.
You’ll end up with something that looks like the following screenshot:

Choose Next. On the Import Information page, you’ll see some information about the app and any associated files that were imported to Configuration Manager. Once you are done, choose Next again.
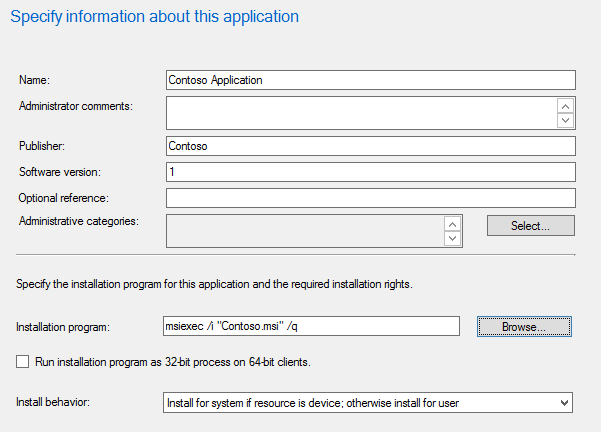
On the General Information page, you can supply further information about the application to help you sort and locate it in the Configuration Manager console.
Additionally, the Installation program field lets you specify the full command line that will be used to install the application on PCs. You can edit this to add your own properties (for example /q for an unattended installation).
Some of the fields on this page of the wizard might have been filled in automatically when you imported the application installation files.
You’ll end up with a screen that looks similar to the following screenshot:
Choose Next. On the Summary page, you can confirm your application settings and then complete the wizard.
You’ve finished creating the app. To find it, in the Software Library workspace, expand Application Management, and then choose Applications. For this example, you’ll see:

Examine the properties of the application and its deployment type
Now that you’ve created an application, you can refine the application settings if you need to. To look at the application properties, select the app, and then, in the Home tab in the Properties group, choose Properties.
In the Application Properties dialog box, you’ll see many items that you can configure to refine the behavior of the application. For details about all the settings you can configure, see Create applications. For the purposes of this example, you’ll just be changing some properties of the application’s deployment type.
Choose the Deployment Types tab > Contoso Application deployment type > Edit.
You’ll see a dialog box like this one:

Add a requirement to the deployment type
Requirements specify conditions that must be met before an application is installed on a device. You can choose from built-in requirements or you can create your own. In this example, you add a requirement that the application will only get installed on PCs that are running Windows 10.
From the deployment type properties page you just opened, choose the Requirements tab.
Choose Add to open the Create Requirement dialog box.
In the Create Requirement dialog box, specify the following information:
Category: Device
Condition: Operating system
Rule type: Value
Operator: One of
From the operating systems list, select Windows 10.
You’ll end up with a dialog box that looks like this:

Choose OK to close each property page that you opened. Then return to the Applications list in the Configuration Manager console.
Requirements can help reduce the number of Configuration Manager collections you need. Because you just specified that the application can only get installed on PCs that are running Windows 10, you can later deploy this to a collection that contains PCs that run many different operating systems. But the application will only get installed on Windows 10 PCs.
Add the application content to a distribution point
Next, to deploy the application to PCs, make sure that the application content is copied to a distribution point. PCs access the distribution point to install the application.
To find out more about distribution points and content management in Configuration Manager, see Manage content and content infrastructure.
In the Configuration Manager console, choose Software Library.
In the Software Library workspace, expand Applications. Then, in the list of applications, select the Contoso Application that you created.
On the Home tab, in the Deployment group, choose Distribute Content.
On the General page of the Distribute Content Wizard, check that the application name is correct, and then choose Next.
On the Content page, review the information that will be copied to the distribution point, and then choose Next.
On the Content Destination page, choose Add to select one or more distribution points, or distribution point groups on which to install the application content.
Complete the wizard.
You can check that the application content was copied successfully to the distribution point from the Monitoring workspace, under Distribution Status > Content Status.
Deploy the application
Next, deploy the application to a device collection in your hierarchy. In this example, you deploy the application to the All Systems device collection.
Remember that only Windows 10 computers will install the application because of the requirements that you selected earlier.
In the Configuration Manager console, choose Software Library > Application Management > Applications.
From the list of applications, select the application that you created earlier (Contoso Application), and then, on the Home tab in the Deployment group, choose Deploy.
On the General page of the Deploy Software Wizard, choose Browse to select the All Systems device collection.
On the Content page, check that the distribution point from which you want PCs to install the application is selected.
On the Deployment Settings page, make sure that the deployment action is set to Install, and the deployment purpose is set to Required.
By setting the deployment purpose to Required, you make sure that the application is installed on PCs that meet the requirements that you set. If you set this value to Available, then users can install the application on demand from Software Center.
On the Scheduling page, you can configure when the application will be installed. For this example, select As soon as possible after the available time.
On the User Experience page, choose Next to accept the default values.
Complete the wizard.
Use the information in the following Monitor the application section to see the status of your application deployment.
Monitor the application
In this section, you’ll take a quick look at the deployment status of the application that you just deployed.
To review the deployment status
In the Configuration Manager console, choose Monitoring > Deployments.
From the list of deployments, select Contoso Application.
On the Home tab, in the Deployment group, choose View Status.
Select one of the following tabs to see more status updates about the application deployment:
Success: The application installed successfully on the indicated PCs.
In Progress: The application has not yet finished installing.
Error: An error occurred installing the application on the indicated PCs. Further information about the error is also displayed.
Requirements Not Met: No installation attempt was made on the indicated devices because they did not meet the requirements you configured (in this example, because they do not run on Windows 10).
Unknown: Configuration Manager was unable to report the status of the deployment. Check back again later.
There are a few ways you can monitor application deployments. For full details, see Monitor applications.
End-user experience
Users who have PCs that are managed by Configuration Manager and running Windows 10 see a message telling them that they must install the Contoso application. Once they accept the installation, the application gets installed.
Starting in Configuration Manager version 1906, the New Software is Available notification will only show once for a user for a given application and revision. The user will no longer see the notification each time they sign in. They’ll only see another notification for an application if the application has changed or was redeployed.
Create Windows applications in Configuration Manager
Applies to: Configuration Manager (current branch)
In addition to the other Configuration Manager requirements and procedures for creating an application, also take the following considerations into account when you create and deploy applications for Windows devices.
General considerations
Configuration Manager supports the deployment of Windows app package (.appx) and app bundle (.appxbundle) formats for Windows 8.1 and Windows 10 devices.
When you create an application in the Configuration Manager console, select the application installation file Type as Windows app package (*.appx, *.appxbundle, *.msix, *.msixbundle). For more information on creating apps in general, see Create applications. For more information on the MSIX format, see Support for MSIX format.
To take advantage of new Configuration Manager features, first update clients to the latest version. While new functionality appears in the Configuration Manager console when you update the site and console, the complete scenario isn’t functional until the client version is also the latest.
Provision Windows app packages for all users on a device
Provision an application with a Windows app package for all users on the device. One common example of this scenario is provisioning an app from the Microsoft Store for Business and Education, like Minecraft: Education Edition, to all devices used by students in a school. Previously, Configuration Manager only supported installing these applications per user. After signing in to a new device, a student would have to wait to access an app. Now when the app is provisioned to the device for all users, they can be productive more quickly.
Be careful with installing, provisioning, and updating different versions of the same Windows app package on a device, which may cause unexpected results. This behavior may occur when using Configuration Manager to provision the app, but then allowing users to update the app from the Microsoft Store. For more information, see the next step guidance when you Manage apps from the Microsoft Store for Business.
When deploying offline apps to Windows 10 devices with the Configuration Manager client, don’t allow users to update applications external to Configuration Manager deployments. Control of updates to offline apps is especially important in multi-user environments such as classrooms. For more information, see Manage apps from the Microsoft Store for Business and Education with Configuration Manager.
Configuration Manager supports app provisioning on all supported versions of Windows 10.
To configure a Windows app deployment type for this feature, enable the option to Provision this application for all users on the device. For more information, see Create applications.
If you need to uninstall a provisioned application from devices to which users have already signed on, you need to create two uninstall deployments. Target the first uninstall deployment to a device collection that contains the devices. Target the second uninstall deployment to a user collection that contains the users who have already signed on to devices with the provisioned application. When uninstalling a provisioned app on a device, Windows currently doesn’t uninstall that app for users as well.
Support for MSIX format
Configuration Manager supports the Windows 10 app package (.msix) and app bundle (.msixbundle) formats. Windows 10 version 1809 or later support these formats.
For an overview of MSIX, see A closer look at MSIX.
Convert applications to MSIX
Convert your existing Windows Installer (.msi) applications to the MSIX format.
Prerequisites for MSIX
A reference device running Windows 10 version 1809 or later
Sign in to Windows on this device as a user with local administrative rights
Install the following apps on this device:
Configuration Manager console
Install the MSIX Packaging Tool from the Microsoft Store
Don’t install any other apps or services on this device. It’s your reference system.
Process to convert applications to MSIX format
Elevate the Configuration Manager console, go to the Software Library workspace, expand Application Management, and select the Applications node.
Select an application that has a Windows Installer (.msi) deployment type.
You need to be able to access the application’s source content from the reference device.
The application’s name can’t have any special characters. Configuration Manager uses the app name as the name of the output file.
Don’t install this application on the reference device in advance.
Select Convert to .MSIX in the ribbon.
When the wizard completes, the MSIX Packaging Tool creates an MSIX file in the location you specified in the wizard. During this process, Configuration Manager silently installs the application on the reference device.
If the process fails, the summary page points to the log file with more information. If there’s an error about capturing user state, sign out of Windows. Signing in again may resolve this issue.
To use this MSIX app, you first need to digitally sign it so that clients trust it. For more information on this process, see the following articles:
After signing the app, create a new deployment type on the application in Configuration Manager. For more information, see Create deployment types for the application.
Task sequence deployment type
In this version of Configuration Manager, the task sequence deployment type is a pre-release feature. To enable it, see Pre-release features.
Starting in version 2002, you can install complex applications using task sequences via the application model. Add a task sequence deployment type to an app either to install or uninstall the app. This deployment type provides the following behaviors:
Display the app task sequence with an icon in Software Center. An icon makes it easier for users to find and identify the app task sequence.
Define additional metadata for the app task sequence, including localized information
Starting in version 2010, deploy an app task sequence to a user collection
You can only add a non-OS deployment task sequence as a deployment type on an app. High-impact, OS deployment, or OS upgrade task sequences aren’t supported. A user-targeted deployment still runs in the context of the local System account.
When you add this deployment type to an app, configure its properties on the Task Sequence page. For more information, see Deployment type Task Sequence options.
Starting in version 2006, use the following Windows PowerShell cmdlets to add and configure a task sequence deployment type:
Prerequisites for a task sequence deployment type
Create a custom task sequence:
Use only non-OS deployment steps, for example: Install Package, Run Command Line, or Run PowerShell Script. For more information including the full list of supported steps, see Create a task sequence for non-OS deployments.
On the task sequence properties, User Notification tab, don’t select the option for a high-impact task sequence.
When you create the application, to add a task sequence deployment type, your user account needs permission to read task sequences. Use one of the following options to configure these permissions:
Add the app administrator’s user account to the built-in Read-Only Analyst role. This role allows them to view all Configuration Manager objects.
Copy the built-in Application Administrator role to create a custom role. Add the Read permission on the Task Sequence Package object.
Known issues for a task sequence deployment type
Don’t use the Install Application step in this task sequence. Use the Install Package step to install apps.
In version 2006 and earlier, you can’t yet deploy an app task sequence to a user collection. This issue was resolved in version 2010.
Support for Universal Windows Platform (UWP) apps
Windows 10 devices don’t require a sideloading key to install line-of-business apps. To enable sideloading on Windows, however, the registry key HKEY_LOCAL_MACHINE\Software\Policies\Microsoft\Windows\Appx\AllowAllTrustedApps must have a value of 1.
If you don’t configure this registry key, Configuration Manager automatically sets this value to 1 the first time you deploy an app to the device. If you’ve set this value to 0, Configuration Manager can’t automatically change the value, and your line-of-business app deployment fails.
Digitally sign UWP line-of-business apps. Use a code-signing certificate that’s trusted on each device to which you deploy the app. Use certificates from your organization’s PKI, or purchase a certificate from a third-party provider whose public root certificate is already trusted by Windows.
To sign mobile app packages, use the following table to determine the type of code-signing certificate to use:
| Package | Symantec | Non-Symantec |
|---|---|---|
| Universal .appx packages on Windows 10 Mobile devices | Yes | Yes |
| .xap packages | Yes | No |
| .appx packages built for Windows Phone 8.1 to install on Windows 10 Mobile devices | Yes | No |
Deploy Windows Installer apps to MDM-enrolled Windows 10 devices
The Windows Installer through MDM (*.msi) deployment type lets you create and deploy Windows Installer-based apps to MDM-enrolled devices running Windows 10.
When you use this deployment type, consider the following points:
Only upload a single file with the MSI extension.
Configuration Manager uses the file’s product code and product version for app detection.
Windows uses the app’s default restart behavior. Configuration Manager doesn’t control the app restart behavior.
Per-user MSI packages are installed for a single user.
Per-machine MSI packages are installed for all users of the device.
Configuration Manager supports app updates. The MSI product code of each version must be the same.


