- AOMEI Partition Assistant Standard 9.1
- AOMEI Partition Assistant Standard
- Comprehensive Partition Manager
- Smart Disk & Partition Wizards
- More Useful Features
- How to Delete Recovery Partition in Windows 10/8/7 Safely?
- Is it safe to delete recovery partition?
- Which recovery partition should you delete?
- Remove recovery partition with Diskpart
- Delete recovery partition with AOMEI Partition Assistant
- Delete a Partition on a USB Drive in Windows 10
- USB Has TwoВ Partitions Issue
- How to Unpartition a USB Drive in Windows 10 withВ DiskpartВ
- Use an Easier Partition ManagerВ to Delete a Partition on a USB Drive
- Video Tutorial — How to Partition Hard Drive
- How to Merge Partitions on USB Flash Drive in Windows 10
- Conclusions
AOMEI Partition Assistant Standard 9.1
Safely partition your hard drive without any data loss
- Absolutely FREE for personal and home use
- The benchmark for free hard disk partition software
- Supports Windows 10, Windows 8.1, Windows 8, Windows 7, Vista, XP
Download FreewareUpgrade to Pro
AOMEI Partition Assistant Standard

AOMEI Partition Assistant Standard is FREE disk partition management software, which has earned its reputation among users worldwide. It comes with so many powerful features that allows you to completely control your hard disk and partitions. For example, the » Resize Partition» enables you to increase partition size to solve low disk space problems, or shrink partition size to make partition size more reasonable. You can flexibly manage disk space with «Create Partition», «Merge Partitions», «Delete Partition», «Format Partition», «Copy Partition» and so on.
- AOMEI Partition Assistant embeds sector-level data protection technology.
- It enables you to realize even safer partitioning operations that meet your expectations.
- It is able to help you solve all manner of problems on your disk partitions, regardless of MBR or GPT styled disks or the size(small or larger than 2TB) of your disks.
AOMEI Partition Assistant versions upgrade history
Comprehensive Partition Manager
Hunting for an easy-to-use software to fix hard disk partition problems for Windows OS? AOMEI Partition Assistant Standard is the right one for your PC, guaranteeing you get a full suite of features for creating, resizing, deleting, merging, and splitting partitions, and so much more. Show all features on one page
Resize/Move Partition
Let you adjust the size of partition freely without data loss.
Merge Partitions
You can merge two partitions into a larger one to extend space.
Clone Disk
Clone a disk to quickly make a duplicate to another for disk upgrading.
Migrate OS to SSD
Migrate system drive between MBR and MBR Drives (SSD/HDD supported).
Delete Partition
Delete a partition if we don’ t need it anymore and an unallocated space will be generated as soon as we delete it.
Windows To Go Creator
Create Windows 7/8/10 To Go bootable USB drive without Windows 7, Windows 8 Enterprise or Windows 10.Build a portable and fully functional Windows 8/10 system on USB flash drive.
Make Bootable CD Wizard
Make a Windows PE bootable CD/DVD or USB without installing Windows AIK. Troubleshoot computer problems and recover data when the native system fails to boot.
Integrate to Recovery Environment
Integrate AOMEI Partition Assistant or AOMEI Backupper into Windows built-in recovery environment.Extend system partition or restore system back without bootale media.
Clone Partition
Clone a single partition to quickly make a duplicate to another partition/disk to backup data.
Create Partition
Creating partition(s) on a disk to make use of the disk for saving all kinds of data.
Format Partition
Formatting partition with Partition Assistant could help you change file system between NTFS and FAT 32/FAT easily, even it is larger than 32 GB.
Smart Disk & Partition Wizards
Partition Clone Wizard
The partition copy wizard provides two methods for cloning/transferring partitions.
Disk Clone Wizard
You can easily upgrade hard disks and transfer a large amount of data from one disk to another.
NTFS to FAT32 Converter
It is a professional utility for converting file systems between FAT32 and NTFS without losing data.
More Useful Features
There are many advanced utilities offered by AOMEI Partition Assistant to maintain your computer and manage hard drives and partitions.
How to Delete Recovery Partition in Windows 10/8/7 Safely?
Learn how to safely delete recovery partition to reclaim disk space since Windows 7/8/10 has one or more recovery partitions on a disk, which takes much space.

By AOMEI  / Last Updated February 26, 2020
Is it safe to delete recovery partition?
There are basically two kinds of recovery partition, Windows recovery partitions, and computer supplier’s recovery partitions. Windows recovery partition allows you to boot into Windows recovery environment (WinRE) to restore your computer when problems happen, while the recovery partitions created by manufacturers allow you to press a specific key (usually F9 for HP and F12 for Dell) to recover your computer to the factory default settings.
If you see a few gigabytes recovery partition in Disk Management, it is definitely included by computer manufacturers such as Dell, HP, and Lenovo. This recovery partition contains an image of everything pre-installed along with operating system. On some computers, it is labeled as OEM reserved partition. You may also see a recovery partition with several gigabytes space and an OEM partition that is less than 100 MB.
The Windows recovery partition consumes much less storage space. For example, Windows 10 recovery partition only takes about 450MB, and even less in the Windows 8 or 7. Therefore, it is recommended to keep the Windows recovery partition. However, if you really need to get rid of the recovery partition, you can create Windows 10 recovery disk with a USB drive, and then Windows 10 will give you an option to delete the current recovery partition for Windows 10.
Which recovery partition should you delete?
If you have upgraded to Windows 10 from previous Windows system, then the factory default recovery partition will not work normally. In that case, you should delete this recovery partition and reclaim disk space.
You only need one Windows recovery partition to be able to use Windows recovery options to fix your system. When you upgrade your system to the next version, Windows may generate another recovery partition. In that case, you should only keep the current recovery partition and delete the rest.
To locate this Windows recovery partition, you can type “reagentc /info” (without quotes) in an elevated command prompt.
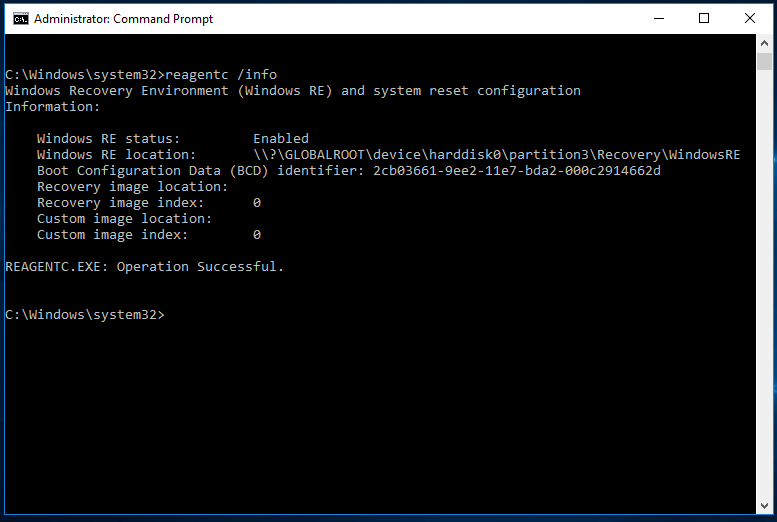
Note: from the screenshot above, this “harddisk0\partition3” does not mean the third partition on Disk 0. You can use type the following commands on another command prompt:
From my end, the second partition is the current Windows recovery partition that you should keep if you want to use the recovery options. Once you have decided which recovery partition to delete, it is easy.
Remove recovery partition with Diskpart
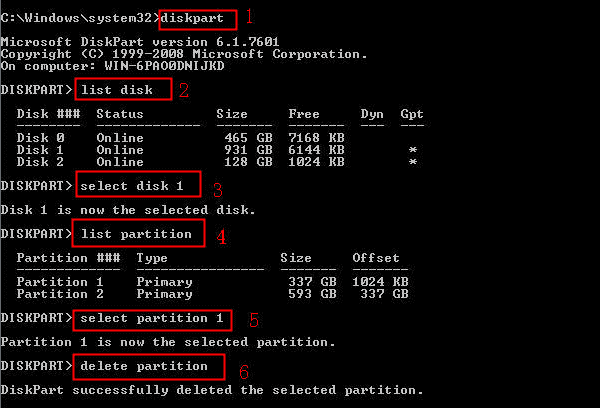
As you know, you are not allowed to delete recovery partition in Windows Disk Management, but you use Diskpart.exe to delete partitions from command prompt. You can use the following steps to remove recovery partition with diskpart:
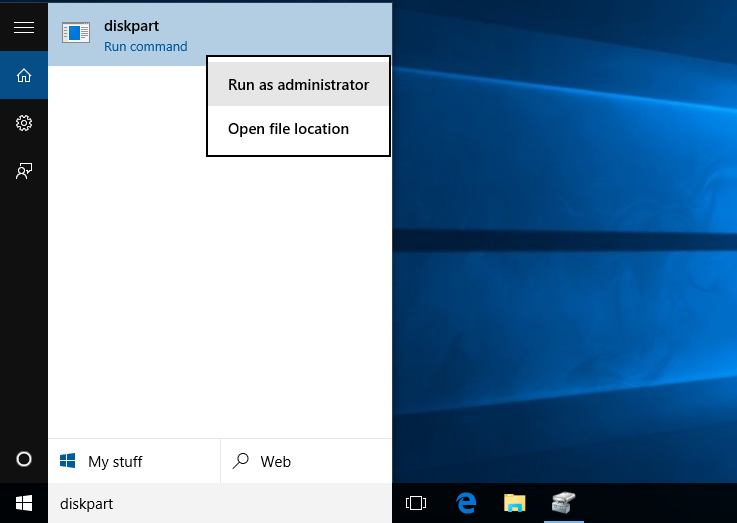
1. Type «diskpart.exe» in the search box, in the listed results, right-click on Diskpart and select Run as administrator.
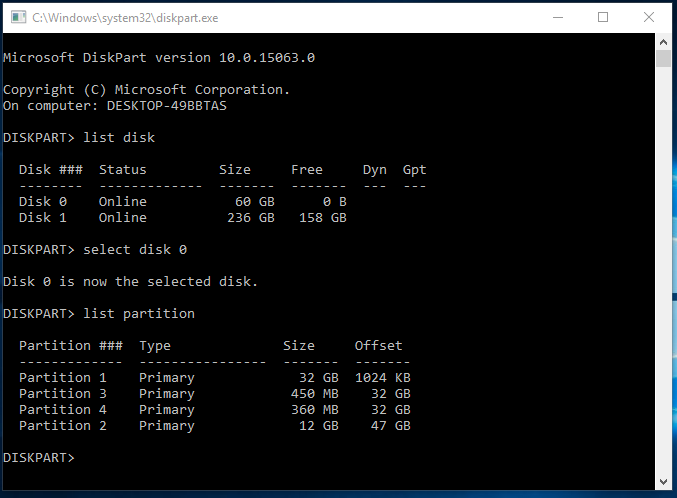
2. At a Diskpart prompt, type in «list disk» to display all the disks. Each disk on your computer will be listed with a disk number.
3. Specify the disk that contains the recovery partition by typing in «select disk n», in which «n» should be replaced with the disk number listed before.
4. Type in «list volume» to list all the partitions on the selected disk with all the partition labels, so you can determine which one is the recovery partition to be deleted. If you want to see the partition type, use «list partition» command instead.
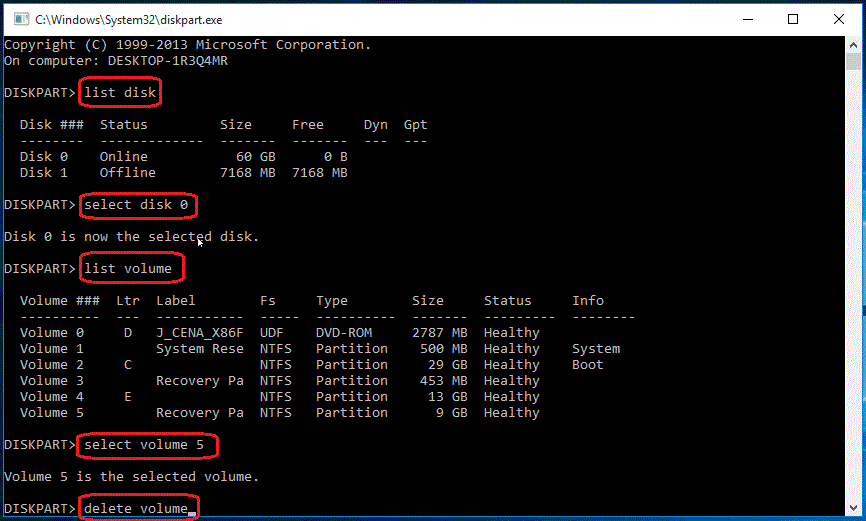
5. Specify the partition you want to delete using the volume number, like this: «select volume 3».
6. Type in: «delete volume».
Without a clear interface to show you display the details of each partition, there are chances that you may delete inappropriate partitions. What’s worse, this operation cannot be canceled or undo. For those who are not familiar with Diskpart, the best choice to get rid of recovery partition should be using third party partition manager software.
Delete recovery partition with AOMEI Partition Assistant
AOMEI Partition Assistant Standard is a completely free program that allows you to delete recovery partition and reclaim the storage space without a scratch. Let’s see how to delete recovery partition using AOMEI Partition Assistant.
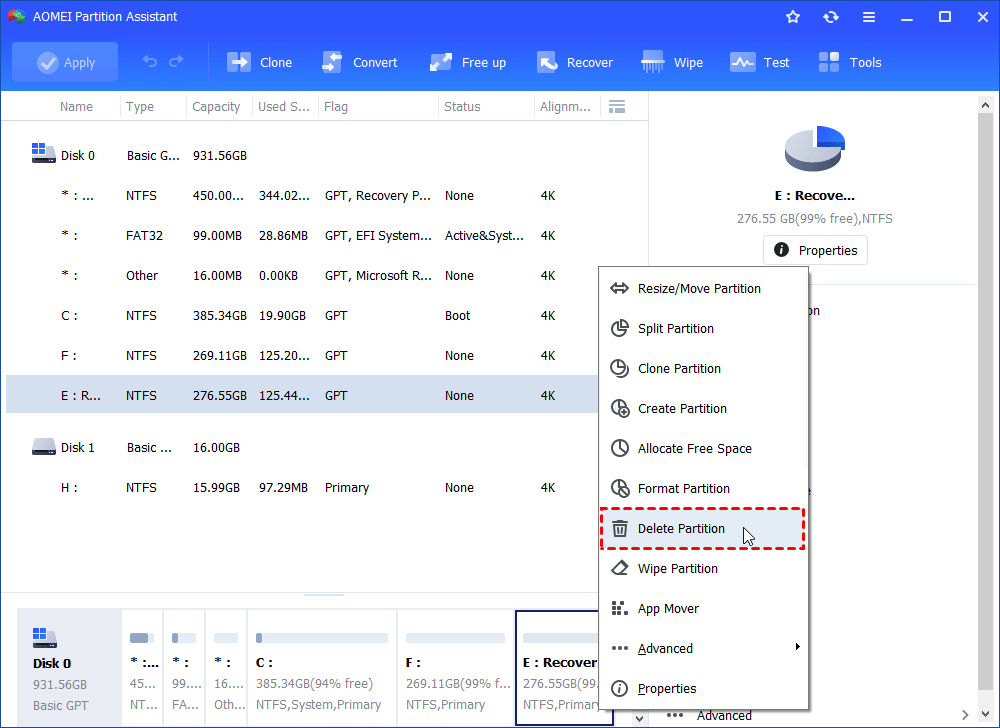
Step 1. Download this freeware. Install and open it. Right click on the recovery partition you want to delete and select «Delete Partition», and then click “OK”.
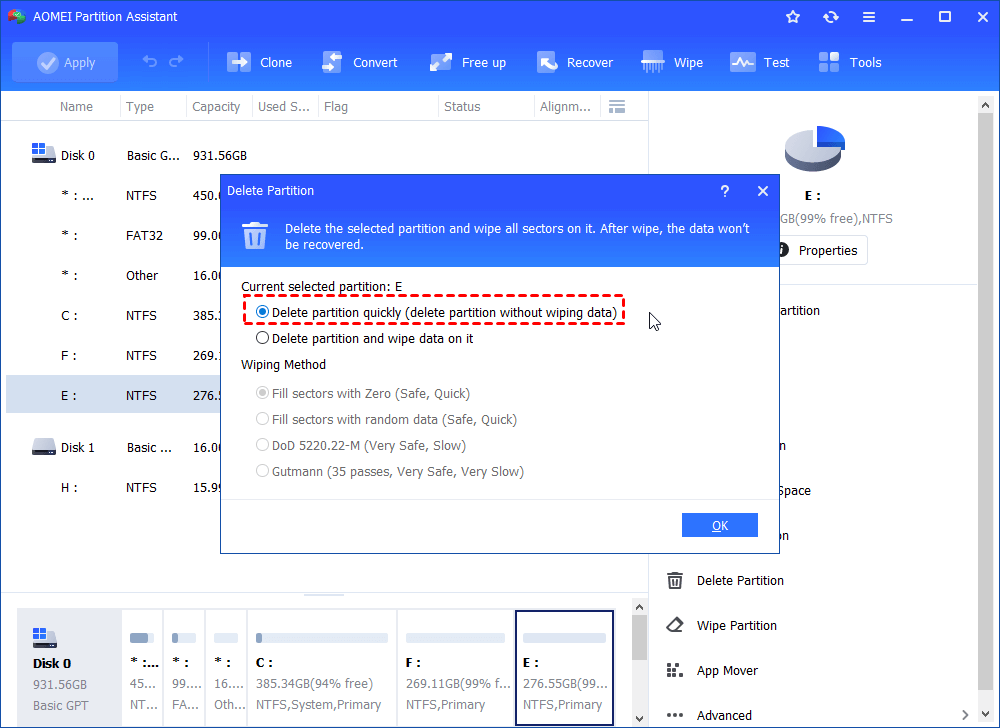
Step 2. Select a method to remove the recovery partition and click “OK”.
Step 3.The recovery partition will be displayed as unallocated space. Make sure that is the partition you want to get rid of, and click «Apply» to make the operation in process.
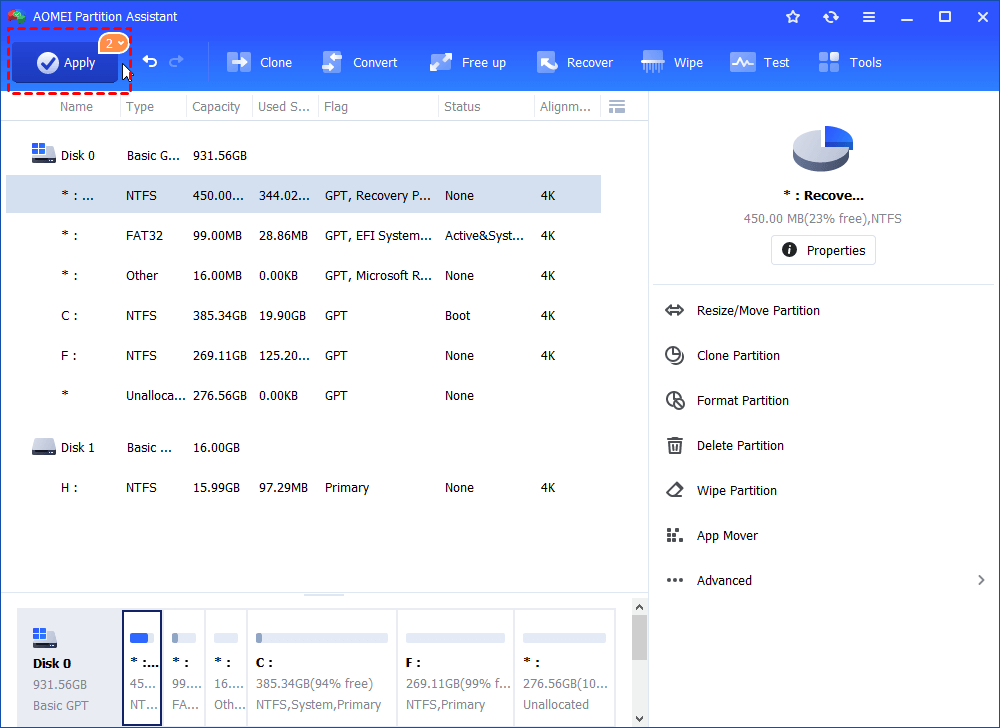
In a few seconds, you will have recovery partition deleted. You can use AOMEI Partition Assistant to add this unallocated space to any partition on this disk by using merge partitions or create a new partition. Besides that, AOMEI Partition Assistant also can be used to clone hard drive, resize partition and so on. If you want to experience more features likeallocating free space, quick partition, you can upgrade to AOMEI Partition Professional.
Delete a Partition on a USB Drive in Windows 10
USB Has TwoВ Partitions Issue
«I have a 16GB Kingston flash drive that has beenВ accidentally partitioned. TheВ USB drive split into twoВ parts, and now my USB has 2 partitions, with 7.3GB each. I’ve tried toВ delete one partitionВ orВ combine the two partitions into one with Disk Management, but all failed. How can I work out the problem?»
PluggingВ intoВ yourВ USB drive with several gigabytes of storageВ only to see two or multipleВ partitionsВ pop up in the Windows File Explorer? You may ask, can a USB drive have multiple partitions?В Yes, as long as you meet the following two conditions, you can create two or more partitions on the USB.
1.В Make sure your computer is running Windows 8.1 and later that supports the recognition of multiple USB flash drive partitions.
2. Your USB is generated by a specific vendor and supports the creation of multiple partitions.
Multiple partitions on one USB drive lead to a lot of unnecessary memory consumption, andВ it’s really inconvenient. Facing this issue, you can’t resolve itВ by simply reformatting as you can only reformat each individual partition instead of the whole disk drive. Then, it leaves you with two options to troubleshoot: one is deleting partitions on the USB drive, and the other is merging USB partitions. First, we will show you two ways to delete a partition on the USB drive with Diskpart and easy partition management software. Move to check details.В
How to Unpartition a USB Drive in Windows 10 withВ DiskpartВ
Sometimes, the «Delete Volume» option in Windows 10 Disk Management greys out, which prevents users from deleting partitions. At this moment, you can turn to the Diskpart utility to help you out.В Do as the guide instructs. Later, there should be a single partition on the USB flash drive.
Note: Deleting partitions with files saved before will cause data loss. Hence, back up your important files in advance.В
Step 1. PressВ WindowsВ + R simultaneously, type cmd, click «OK» to open an elevated command prompt.
Step 2. Type diskpart and hit enter.
Step 3. Type list disk. Soon diskpart will list all the hard drives on your computer, including your USB flash drive that is connecting with the computer. Assuming that your USB flash drive is drive G:.
Step 4. Type select disk G and hit enter.
Step 5. If there are one more partitions on the flash drive and you wish to delete some of them, now type list partition and hit enter. There should list all the partitions, numbered as 0, 1, 2.
Step 6. Type select partition 0 and hit enter.
Step 7. Type delete partition and hit enter.
Step 8. Repeat step 6 and step 7 to delete partition 1 or 2.
Step 9. After deleting all the target partitions, type create partition primary, and hit enter.
Step 10. Exit the command prompt. You can go back to the computer and follow the wizard to format the partition.
Use an Easier Partition ManagerВ to Delete a Partition on a USB Drive
Don’t have confidence in using Command Prompt well? Some people with a little technical background may try to avoid using diskpart utility because of the complex operation. More importantly, they’re afraid of making trouble with wrong commands and doing damage to their hard drive data. Apart from human factors, you might encounter an error called ‘diskpart cannot delete a partition on removable media’ from time to time, which makes you give up the Dispart. In all these cases, how do you remove all partitions from a USB drive/SD card easily? It is a wise choice to choose an easy-to-use partition management software as a workaround.В
EaseUS Partition Master, much more powerful than Diskpart and Disk Management in Windows 10,В provides a wide range of disk organization functions and enables you to delete partition, format partition, hide partition, wipe partition, clone/copy partition, combine/merge partitions effortlessly. It goes fully compatible with Windows 10 and has advanced partition management features that are unavailable in diskpart utility, such as migrate OS to HDD/SSD.
Video Tutorial — How to Partition Hard Drive
Now, download and use this partition manager to remove partitions from the USB drive without effort.
Step 1. Deleting a partition will erase data on it, so make sure you’ve made a backup of important data. With that in mind, use the correct way to connect your external device to the computer.
Open EaseUS Partition Master. Right-click on the desired partition and choose «Delete. «.
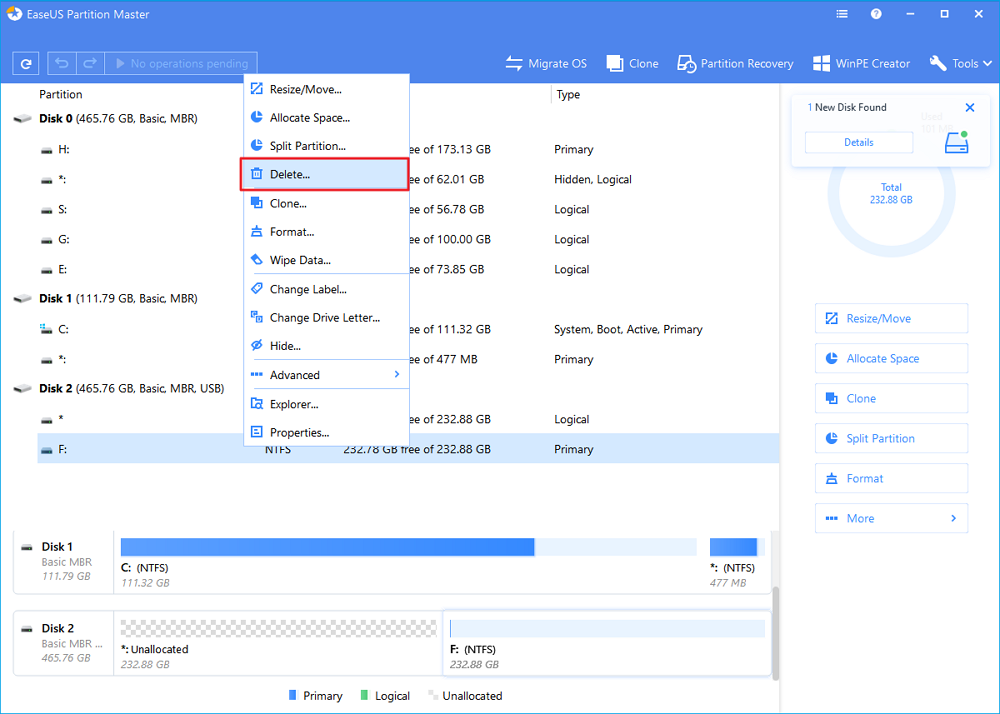
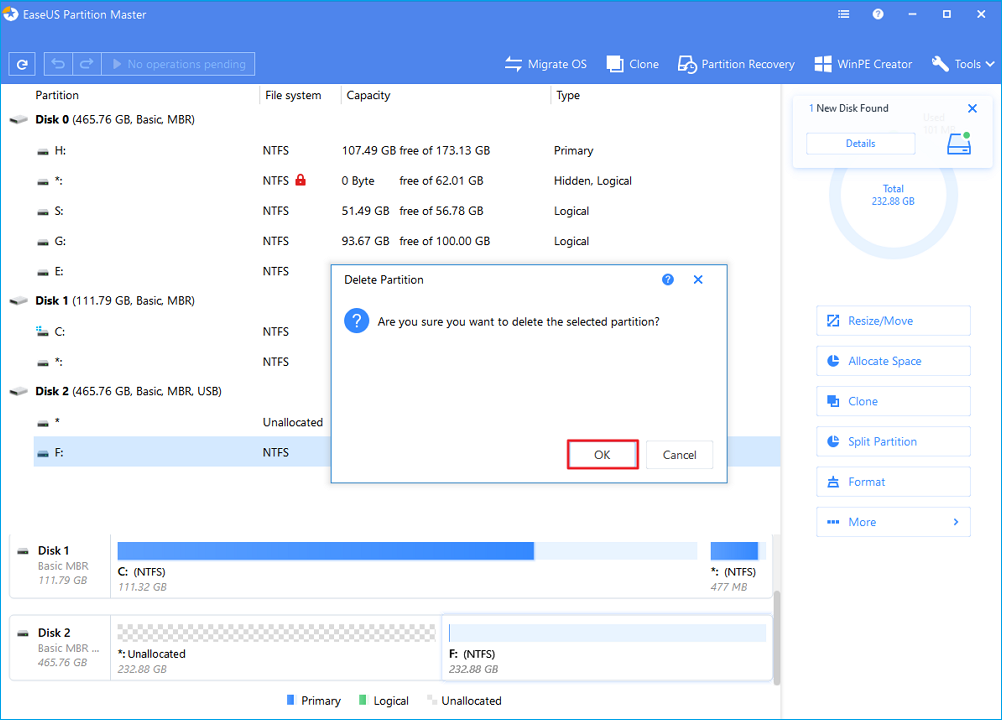
Step 2. Confirm the message «Are you sure you want to delete the selected partition?» and click «OK«.
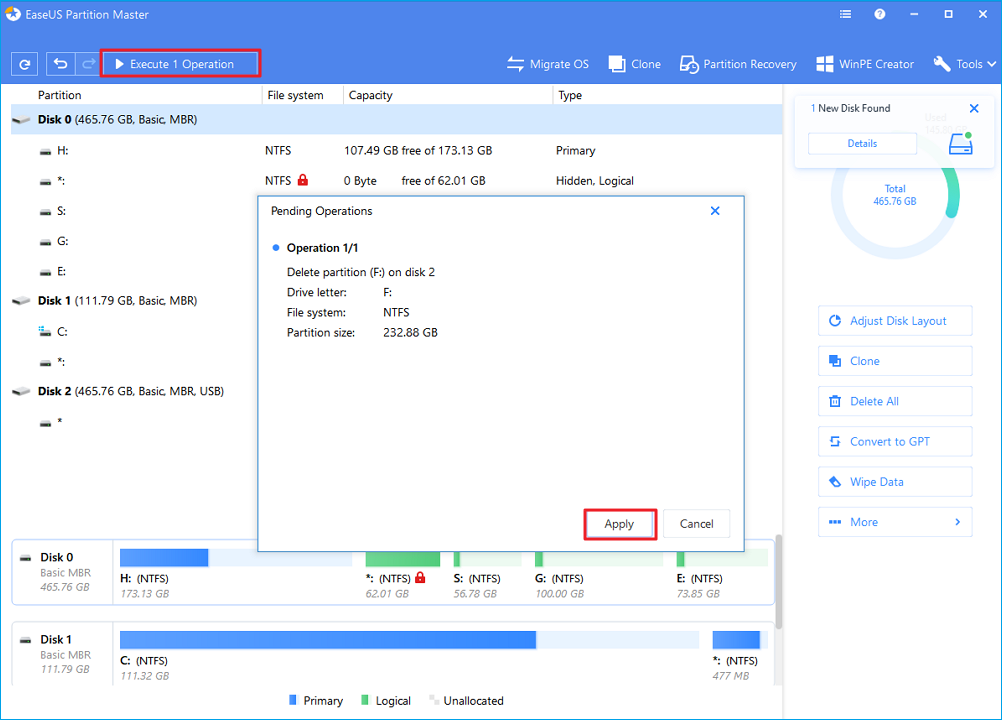
Step 3.В Excute the operation of deleting a partition and click «Apply«.
If you delete one or more partitions and keep the one with data, you can extend the partition with space left after deletion. While If you delete all the partitions, you can directly create a partition on your USB drive.В
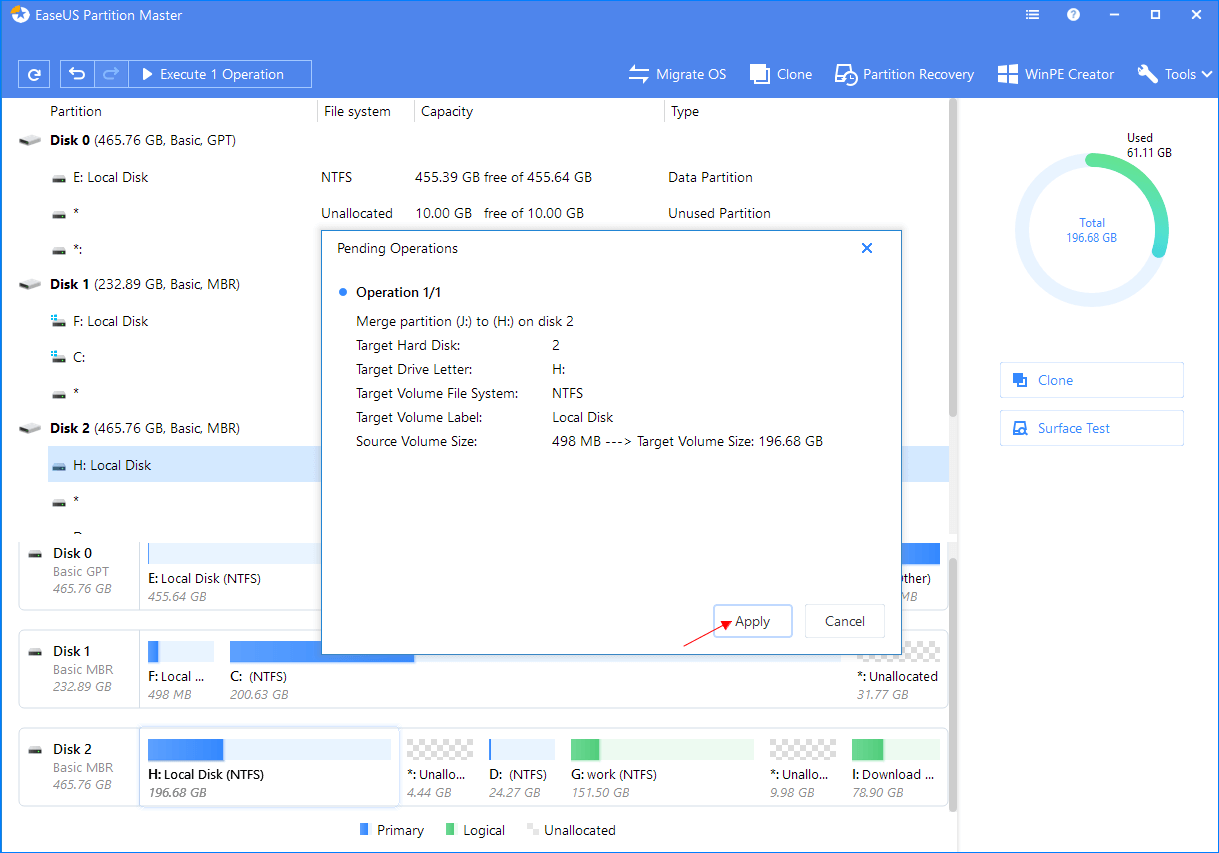
How to Merge Partitions on USB Flash Drive in Windows 10
If you have data on every partition, it is recommended that you merge the two or multiple partitions instead of deleting for data security. Then, how to merge USB partitions in Windows 10 without deleting? Let EaseUS Partition Master help you to make it. It supports combining two adjacent partitions with ease.В
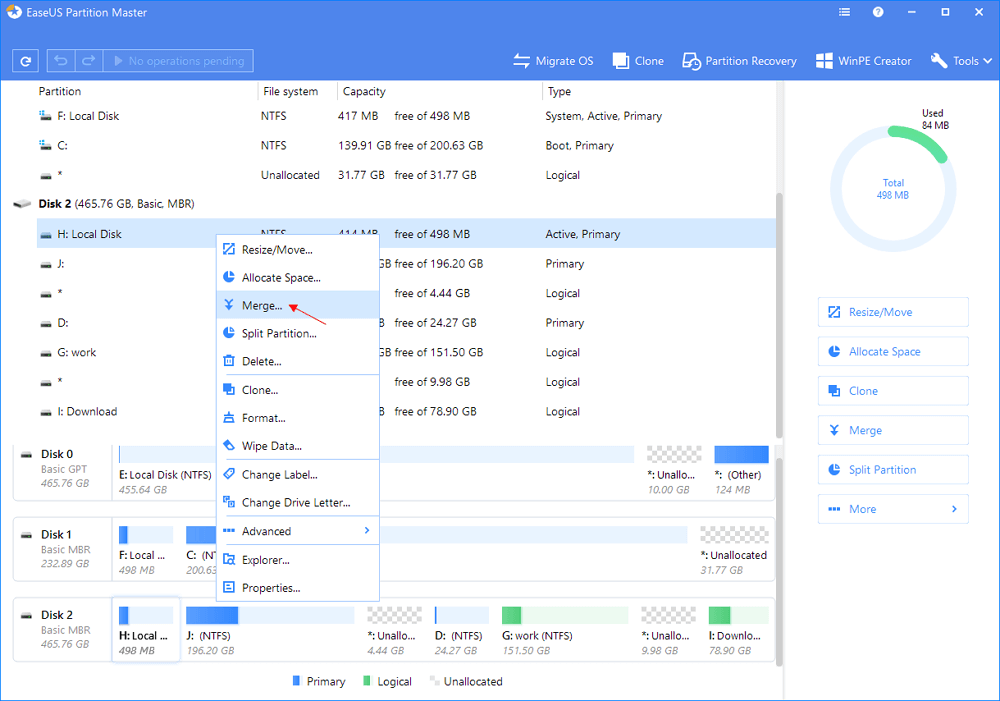
Step 1: Select the target partition
Right-click on the partition which you want to add space to and keep, and select «Merge».
Step 2: Select a neighborВ partition to merge
Select one partition next to the former selected partition and click «OK» to continue.

Step 3: Execute operation to merge partitions
1. Click the «Execute Operation» button at the top and then click «Apply».
2. The program will merge space and add files from the second partition to the first partition.
Conclusions
When you happen to meet the USB has two or multiple partitions on your USB drive and want to keep only one, you can selectively delete or merge partitions. But whichever way you choose, we believe that EaseUS Partition Master is your best partition management tool because of its ease-to-use feature and perfect functions, as you can see from the above tutorials. Therefore, give it a try, andВ you won’t be disappointed.В


