INF SourceDisksFiles Section
The SourceDisksFiles section names the source files that are used during installation, identifies the installation disks that contain those files, and provides the directory paths, if any, on the distribution disks that contain individual files.
In order for a driver file or an application file to be included as part of a signed driver package, the file must have a corresponding INF SourceDisksFiles section entry and a corresponding INF CopyFiles directive.
Entries
filename
Specifies the name of the file on the source disk.
diskid
Specifies the integer identifying the source disk that contains the file. This value, along with the initial subdir(ectory) path (if any) that contains the named file, must be defined in a SourceDisksNames section of the same INF.
subdir
This optional value specifies the subdirectory (relative to the path value of the SourceDisksNames section, if any) on the source disk where the named file resides.
If this value is omitted from an entry, the named source file is assumed to be in the path directory that was specified in the SourceDisksFiles section for the given disk or, if no path directory was specified, in the installation root.
size
This optional value specifies the uncompressed size, in bytes, of the given file.
Remarks
A SourceDisksFiles section can have any number of entries, one for each file on the distribution disks. Any INF with a SourceDisksFiles section must also have an INF SourceDisksNames section. By convention, SourceDisksNames and SourceDisksFiles sections follow the INF Version section. (These sections are omitted from a system-supplied INF, which instead specifies a LayoutFile entry in its Version section.)
Each filename entry must specify the exact name of a file on the source disk. You cannot use a %strkey% token to specify the file name. For more information about %strkey% tokens, see INF Strings Section.
To support distribution of driver files on multiple system architectures, you can specify an architecture-specific SourceDisksFiles section by adding an .x86, .ia64, .amd64, .arm, or .arm64 extension to SourceDisksFiles. Be aware that, unlike other sections such as a DDInstall section, the platform extensions for a SourceDisksFiles section are not .ntx86, .ntia64, or .ntamd64.
For example, to specify a source disk names section for an x86-based system, use a SourceDisksFiles.x86 section, not a SourceDisksFiles.ntx86 section. Similarly, use a SourceDisksFiles.ia64 section to specify an Itanium-based system and a SourceDisksFiles.amd64 section to specify an x64-based system.
During installation, SetupAPI functions look for architecture-specific SourceDisksFiles sections before using the generic section. For example, if, during installation on an x86-based platform, Windows is copying a file that is named driver.sys, it will look for the file’s description in [SourceDisksFiles.x86] before looking in [SourceDisksFiles].
ImportantВ В Do not use a SourceDisksFiles section to copy INF files. For more information about how to copy INF files, see Copying INFs.
Using Source Files
The debugger engine maintains a source path, which is a list of directories and source servers that contain source code files associated with the current targets. The debugger engine can search these directories and source servers for the source files. With the help of symbol files, the debugger engine can match lines in the source files with locations in the target’s memory.
For an overview of using source files with debuggers, see Debugging in Source Mode. For an overview of source paths, see Source Path. For an overview of using source servers from the debugger engine, see Using a Source Server.
Source Path
To add a directory or source server to the source path, use the method AppendSourcePath. The whole source path is returned by GetSourcePath and can be changed using SetSourcePath. A single directory or source server can be retrieved from the source path using GetSourcePathElement.
To find a source file relative to the source path, use FindSourceFile or, for more advanced options when using source servers, use FindSourceFileAndToken. FindSourceFileAndToken can also be used along with GetSourceFileInformation to retrieve variables related to a file on a source server.
Matching Source Files to Code in Memory
The debugger engine provides three methods for locating the memory locations that correspond to lines in a source file. To map a single line of source code to a memory location, use GetOffsetByLine. To search for memory locations for more than one source line or for nearby source lines, use GetSourceEntriesByLine. The GetSourceFileLineOffsets method will return the memory location of every line in a source file.
To perform the opposite operation and find the line of a source file that matches a location in the target’s memory, use GetLineByOffset.
NoteВ В The relationship between memory locations and lines in a source file is not necessarily one-to-one. It is possible for a single line of source code to correspond to multiple memory locations and for a single memory location to correspond to multiple lines of source code.
Write a Hello World Windows Driver (KMDF)
This topic describes how to write a very small Universal Windows driver using Kernel-Mode Driver Framework (KMDF) and then deploy and install your driver on a separate computer.
To get started, be sure you have Microsoft Visual Studio, the Windows SDK, and the Windows Driver Kit (WDK) installed.
Debugging Tools for Windows is included when you install the WDK.
Create and build a driver
Open Microsoft Visual Studio. On the File menu, choose New > Project.
In the New Project dialog box, in the left pane, go to Visual C++ > Windows Drivers > WDF.
In the middle pane, select Kernel Mode Driver, Empty (KMDF).
In the Name field, enter «KmdfHelloWorld» for the project name.
When you create a new KMDF or UMDF driver, you must select a driver name that has 32 characters or less. This length limit is defined in wdfglobals.h.
In the Location field, enter the directory where you want to create the new project.
Check Create directory for solution. Select OK.
![]()
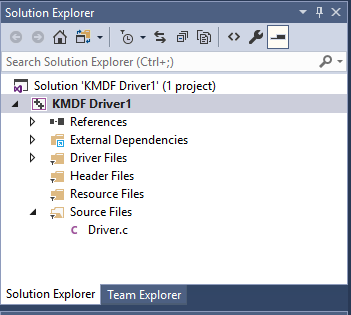
Visual Studio creates one project and a solution. You can see them in the Solution Explorer window, shown here. (If the Solution Explorer window is not visible, choose Solution Explorer from the View menu.) The solution has a driver project named KmdfHelloWorld.

In the Solution Explorer window, select and hold (or right-click) the KmdfHelloWorld project and choose Properties. Navigate to Configuration Properties > Driver Settings > General, and note that Target Platform defaults to Universal. Select Apply, and then select OK..
In the Solution Explorer window, again select and hold (or right-click) the KmdfHelloWorld project, choose Add, and then select New Item.
In the Add New Item dialog box, select C++ File. For Name, enter «Driver.c».
The file name extension is .c, not .cpp.
Select Add. The Driver.c file is added under Source Files, as shown here.
Write your first driver code
Now that you’ve created your empty Hello World project and added the Driver.c source file, you’ll write the most basic code necessary for the driver to run by implementing two basic event callback functions.
In Driver.c, start by including these headers:
If you can’t add Ntddk.h , open Configuration -> C/C++ -> General -> Additional Include Directories and add C:\Program Files (x86)\Windows Kits\10\Include\ \km , replacing with the appropriate directory in your WDK installation.
Ntddk.h contains core Windows kernel definitions for all drivers, while Wdf.h contains definitions for drivers based on the Windows Driver Framework (WDF).
Next, provide declarations for the two callbacks you’ll use:
Use the following code to write your DriverEntry:
DriverEntry is the entry point for all drivers, like Main() is for many user mode applications. The job of DriverEntry is to initialize driver-wide structures and resources. In this example, you printed «Hello World» for DriverEntry, configured the driver object to register your EvtDeviceAdd callback’s entry point, then created the driver object and returned.
The driver object acts as the parent object for all other framework objects you might create in your driver, which include device objects, I/O queues, timers, spinlocks, and more. For more information about framework objects, see Introduction to Framework Objects.
For DriverEntry, we strongly recommend keeping the name as «DriverEntry» to help with code analysis and debugging.
Next, use the following code to write your KmdfHelloWorldEvtDeviceAdd:
EvtDeviceAdd is invoked by the system when it detects that your device has arrived. Its job is to initialize structures and resources for that device. In this example, you simply printed out a «Hello World» message for EvtDeviceAdd, created the device object, and returned. In other drivers you write, you might create I/O queues for your hardware, set up a device context storage space for device-specific information, or perform other tasks needed to prepare your device.
For the device add callback, notice how you named it with your driver’s name as a prefix (KmdfHelloWorldEvtDeviceAdd). Generally, we recommend naming your driver’s functions in this way to differentiate them from other drivers’ functions. DriverEntry is the only one you should name exactly that.
Your complete Driver.c now looks like this:
This example illustrates a fundamental concept of drivers: they are a «collection of callbacks» that, once initialized, sit and wait for the system to call them when it needs something. This could be a new device arrival event, an I/O request from a user mode application, a system power shutdown event, a request from another driver, or a surprise removal event when a user unplugs the device unexpectedly. Fortunately, to say «Hello World,» you only needed to worry about driver and device creation.
Next, you’ll build your driver.
Build the driver
In the Solution Explorer window, select and hold (or right-click) Solution ‘KmdfHelloWorld’ (1 project) and choose Configuration Manager. Choose a configuration and platform for the driver project. For this exercise, we choose Debug and x64.
In the Solution Explorer window, select and hold (or right-click) KmdfHelloWorld and choose Properties. In Wpp Tracing > All Options, set Run Wpp tracing to No. Select Apply and then OK.
To build your driver, choose Build Solution from the Build menu. Visual Studio shows the build progress in the Output window. (If the Output window is not visible, choose Output from the View menu.) When you have verified that the solution built successfully, you can close Visual Studio.
To see the built driver, in File Explorer, go to your KmdfHelloWorld folder, and then to C:\KmdfHelloWorld\x64\Debug\KmdfHelloWorld. The folder includes:
- KmdfHelloWorld.sys — the kernel-mode driver file
- KmdfHelloWorld.inf — an information file that Windows uses when you install the driver
- KmdfHelloWorld.cat — a catalog file that the installer uses to verify the driver’s test signature
If you see DriverVer set to a date in the future when building your driver, change your driver project settings so that Inf2Cat sets /uselocaltime . To do so, use Configuration Properties->Inf2Cat->General->Use Local Time. Now both Stampinf and Inf2Cat use local time.
Deploy the driver
Typically when you test and debug a driver, the debugger and the driver run on separate computers. The computer that runs the debugger is called the host computer, and the computer that runs the driver is called the target computer. The target computer is also called the test computer.
So far you’ve used Visual Studio to build a driver on the host computer. Now you need to configure a target computer.
When you follow the steps to provision the target computer automatically using a network cable, take note of the port and key. You’ll use them later in the debugging step. In this example, we’ll use 50000 as the port and 1.2.3.4 as the key.
In real driver debugging scenarios, we recommend using a KDNET-generated key. For more information about how to use KDNET to generate a random key, see the Debug Drivers — Step by Step Lab (Sysvad Kernel Mode) topic.
On the host computer, open your solution in Visual Studio. You can double-click the solution file, KmdfHelloWorld.sln, in your KmdfHelloWorld folder.
In the Solution Explorer window, select and hold (or right-click) the KmdfHelloWorld project, and choose Properties.
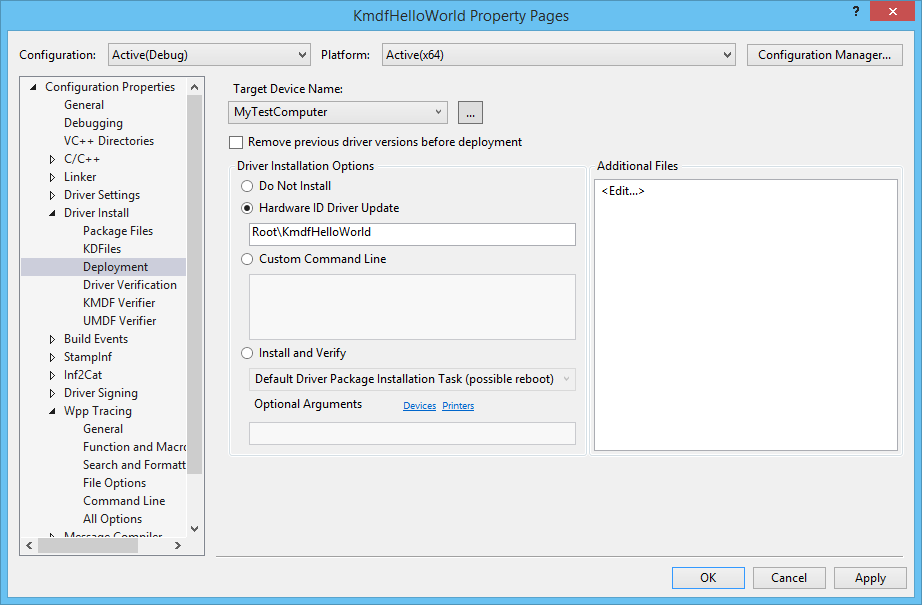
In the KmdfHelloWorld Property Pages window, go to Configuration Properties > Driver Install > Deployment, as shown here.
Check Remove previous driver versions before deployment.
For Target Device Name, select the name of the computer that you configured for testing and debugging. In this exercise, we use a computer named MyTestComputer.
Select Hardware ID Driver Update, and enter the hardware ID for your driver. For this exercise, the hardware ID is Root\KmdfHelloWorld. Select OK.
In this exercise, the hardware ID does not identify a real piece of hardware. It identifies an imaginary device that will be given a place in the device tree as a child of the root node. For real hardware, do not select Hardware ID Driver Update; instead, select Install and Verify. You’ll see the hardware ID in your driver’s information (INF) file. In the Solution Explorer window, go to KmdfHelloWorld > Driver Files, and double-click KmdfHelloWorld.inf. The hardware ID is located under [Standard.NT$ARCH$].
On the Build menu, choose Deploy Solution. Visual Studio automatically copies the files required to install and run the driver to the target computer. This may take a minute or two.
When you deploy a driver, the driver files are copied to the %Systemdrive%\drivertest\drivers folder on the test computer. If something goes wrong during deployment, you can check to see if the files are copied to the test computer. Verify that the .inf, .cat, test cert, and .sys files, and any other necessary files, are present in the %systemdrive%\drivertest\drivers folder.
For more information about deploying drivers, see Deploying a Driver to a Test Computer.
Install the driver
With your Hello World driver deployed to the target computer, now you’ll install the driver. When you previously provisioned the target computer with Visual Studio using the automatic option, Visual Studio set up the target computer to run test signed drivers as part of the provisioning process. Now you just need to install the driver using the DevCon tool.
On the host computer, navigate to the Tools folder in your WDK installation and locate the DevCon tool. For example, look in the following folder:
C:\Program Files (x86)\Windows Kits\10\Tools\x64\devcon.exe
Copy the DevCon tool to your remote computer.
On the target computer, install the driver by navigating to the folder containing the driver files, then running the DevCon tool.
Here’s the general syntax for the devcon tool that you will use to install the driver:
The INF file required for installing this driver is KmdfHelloWorld.inf. The INF file contains the hardware ID for installing the driver binary, KmdfHelloWorld.sys. Recall that the hardware ID, located in the INF file, is Root\KmdfHelloWorld.
Open a Command Prompt window as Administrator. Navigate to your folder containing the built driver .sys file and enter this command:
devcon install kmdfhelloworld.inf root\kmdfhelloworld
If you get an error message about devcon not being recognized, try adding the path to the devcon tool. For example, if you copied it to a folder on the target computer called C:\Tools, then try using the following command:
c:\tools\devcon install kmdfhelloworld.inf root\kmdfhelloworld
A dialog box will appear indicating that the test driver is an unsigned driver. Select Install this driver anyway to proceed.

Debug the driver
Now that you have installed your KmdfHelloWorld driver on the target computer, you’ll attach a debugger remotely from the host computer.
On the host computer, open a Command Prompt window as Administrator. Change to the WinDbg.exe directory. We will use the x64version of WinDbg.exe from the Windows Driver Kit (WDK) that was installed as part of the Windows kit installation. Here is the default path to WinDbg.exe:
C:\Program Files (x86)\Windows Kits\10\Debuggers\x64
Launch WinDbg to connect to a kernel debug session on the target computer by using the following command. The value for the port and key should be the same as what you used to provision the target computer. We’ll use 50000 for the port and 1.2.3.4 for the key, the values we used during the deploy step. The k flag indicates that this is a kernel debug session.
WinDbg -k net:port=50000,key=1.2.3.4
On the Debug menu, choose Break. The debugger on the host computer will break into the target computer. In the Debugger Command window, you can see the kernel debugging command prompt: kd>.
At this point, you can experiment with the debugger by entering commands at the kd> prompt. For example, you could try these commands:
To let the target computer run again, choose Go from the Debug menu or press «g,» then press «enter.»
To stop the debugging session, choose Detach Debuggee from the Debug menu.
Make sure you use the «go» command to let the target computer run again before exiting the debugger, or the target computer will remain unresponsive to your mouse and keyboard input because it is still talking to the debugger.
For a detailed step-by-step walkthrough of the driver debugging process, see Debug Universal Drivers — Step by Step Lab (Echo Kernel-Mode).
For more information about remote debugging, see Remote Debugging Using WinDbg.


