- Создание таблиц подстановки в приложениях Windows Forms Create lookup tables in Windows Forms applications
- Привязка элемента управления «Уточняющий запрос» To databind a lookup control
- Практическое руководство. Добавление таблиц и столбцов в элемент управления DataGrid в Windows Forms How to: Add Tables and Columns to the Windows Forms DataGrid Control
- Добавление таблицы и столбца в DataGrid программным способом To add a table and column to a DataGrid programmatically
- Шаг 1. Создание проекта и добавление таблицы в форму Step 1: Create a project and add a table to your form
- Создание проекта и добавление таблицы в форму To create a project and add a table to your form
- Задание свойств формы To set properties for a form
- Продолжить или повторить пройденный материал To continue or review
Создание таблиц подстановки в приложениях Windows Forms Create lookup tables in Windows Forms applications
Таблица Уточняющий запрос термина описывает элементы управления, привязанные к двум связанным таблицам данных. The term lookup table describes controls that are bound to two related data tables. Эти элементы управления «Уточняющий запрос» отображают данные из первой таблицы на основе значения, выбранного во второй таблице. These lookup controls display data from the first table based on a value selected in the second table.
Таблицы подстановки можно создать, перетащив главный узел родительской таблицы (из окна Источники данных) на элемент управления в форме, который уже привязан к столбцу в связанной дочерней таблице. You can create lookup tables by dragging the main node of a parent table (from the Data Sources window) onto a control on your form that is already bound to the column in the related child table.
Например, рассмотрим таблицу Orders в базе данных Sales. For example, consider a table of Orders in a sales database. Каждая запись в Orders таблице включает объект CustomerID , указывающий, какой клиент поместил заказ. Each record in the Orders table includes a CustomerID , indicating which customer placed the order. CustomerID — Это внешний ключ, указывающий на запись клиента в Customers таблице. The CustomerID is a foreign key pointing to a customer record in the Customers table. В этом сценарии вы развернете Orders таблицу в окне Источники данных и присвойте главному узлу сведения. In this scenario, you expand the Orders table in the Data Sources window and set the main node to Details. Затем задайте CustomerID для столбца значение ComboBox (или любой другой элемент управления, поддерживающий привязку уточняющего запроса) и перетащите Orders узел на форму. Then, set the CustomerID column to use a ComboBox (or any other control that supports lookup binding), and drag the Orders node onto your form. Наконец, перетащите Customers узел на элемент управления, привязанный к связанному столбцу — в данном случае — к ComboBox CustomerID столбцу. Finally, drag the Customers node onto the control that is bound to the related column — in this case, the ComboBox bound to the CustomerID column.
Привязка элемента управления «Уточняющий запрос» To databind a lookup control
Откройте проект, откройте окно Источники данных , выбрав Просмотреть > другие > Источники данных Windows. With your project open, open the Data Sources window by choosing View > Other Windows > Data Sources.
Для таблиц подстановки необходимо, чтобы в окне Источники данных были доступны две связанные таблицы или объекты. Lookup tables require that two related tables or objects are available in the Data Sources window. Дополнительные сведения см. в разделе связи в наборах данных. For more information, see Relationships in datasets.
Разверните узлы в окне Источники данных , пока не увидите родительскую таблицу и все ее столбцы, а также связанную дочернюю таблицу и все ее столбцы. Expand the nodes in the Data Sources window until you can see the parent table and all of its columns, and the related child table and all of its columns.
Узел дочерней таблицы — это узел, который отображается как развертываемый дочерний узел в родительской таблице. The child table node is the node that appears as an expandable child node in the parent table.
Измените тип перетаскивания дочерней таблицы на Details , выбрав сведения из списка элементов управления в узле дочерней таблицы. Change the drop type of the child table to Details by selecting Details from the control list on the child table’s node. Дополнительные сведения см. в разделе Установка элемента управления, создаваемого при перетаскивании из окна Источники данных. For more information, see Set the control to be created when dragging from the Data Sources window.
Нахождение узла, связывающего две таблицы ( CustomerID узел из предыдущего примера). Locate the node that relates the two tables (the CustomerID node in the previous example). Измените тип перетаскивания на, ComboBox выбрав поле со списком в списке элементов управления. Change its drop type to a ComboBox by selecting ComboBox from the control list.
Перетащите главный узел дочерней таблицы из окна Источники данных на форму. Drag the main child table node from the Data Sources window onto your form.
Элементы управления с привязкой к данным (с описательными метками) и панель инструментов ( BindingNavigator ) отображаются в форме. Databound controls (with descriptive labels) and a tool strip (BindingNavigator) appear on the form. Набор данных, TableAdapter, BindingSource и BindingNavigator отображается в области компонентов. A DataSet, TableAdapter, BindingSource, and BindingNavigator appear in the component tray.
Теперь перетащите главный узел родительской таблицы из окна Источники данных непосредственно в элемент управления Уточняющий запрос ( ComboBox ). Now, drag the main parent table node from the Data Sources window directly onto the lookup control (the ComboBox).
Привязки подстановки теперь установлены. The lookup bindings are now established. Конкретные свойства, заданные для элемента управления, см. в следующей таблице. Refer to the following table for the specific properties that were set on the control.
Практическое руководство. Добавление таблиц и столбцов в элемент управления DataGrid в Windows Forms How to: Add Tables and Columns to the Windows Forms DataGrid Control
Элемент управления DataGridView заменяет элемент управления DataGrid и расширяет его функциональные возможности; однако при необходимости элемент управления DataGrid можно сохранить для обратной совместимости и использования в будущем. The DataGridView control replaces and adds functionality to the DataGrid control; however, the DataGrid control is retained for both backward compatibility and future use, if you choose. Дополнительные сведения см. в разделе Различия элементов управления DataGridView и DataGrid в Windows Forms. For more information, see Differences Between the Windows Forms DataGridView and DataGrid Controls.
Данные можно отображать в DataGrid элементах управления Windows Forms в таблицах и столбцах, создавая объекты DataGridTableStyle и добавляя их к объекту GridTableStylesCollection , доступ к которому осуществляется через DataGrid свойство TableStyles элемента управления. You can display data in the Windows Forms DataGrid control in tables and columns by creating DataGridTableStyle objects and adding them to the GridTableStylesCollection object, which is accessed through the DataGrid control’s TableStyles property. Каждый стиль таблицы отображает содержимое любой таблицы данных, указанной в свойстве MappingName объекта DataGridTableStyle . Each table style displays the contents of whatever data table is specified in the DataGridTableStyle object’s MappingName property. По умолчанию в стиле таблицы, в котором не указаны стили столбцов, отображаются все столбцы в таблице данных. By default, a table style with no column styles specified will display all the columns within that data table. Можно ограничить список отображаемых столбцов таблицы, добавив объекты DataGridColumnStyle в объект GridColumnStylesCollection , доступ к которому осуществляется через свойство GridColumnStyles каждого объекта DataGridTableStyle . You can restrict which columns from the table appear by adding DataGridColumnStyle objects to the GridColumnStylesCollection object, which is accessed through the GridColumnStyles property of each DataGridTableStyle object.
Добавление таблицы и столбца в DataGrid программным способом To add a table and column to a DataGrid programmatically
Чтобы отобразить данные в таблице, необходимо сначала привязать DataGrid элемент управления к набору данных. In order to display data in the table, you must first bind the DataGrid control to a dataset. Дополнительные сведения см. в разделе руководство. привязка Windows Forms элемента управления DataGrid к источнику данных. For more information, see How to: Bind the Windows Forms DataGrid Control to a Data Source.
При программном указании стилей столбцов всегда создавайте объекты DataGridColumnStyle и добавляйте их в объект GridColumnStylesCollection перед добавлением объектов DataGridTableStyle в объект GridTableStylesCollection . When programmatically specifying column styles, always create DataGridColumnStyle objects and add them to the GridColumnStylesCollection object before adding DataGridTableStyle objects to the GridTableStylesCollection object. При добавлении пустого объекта DataGridTableStyle в коллекцию объекты DataGridColumnStyle создаются автоматически. When you add an empty DataGridTableStyle object to the collection, DataGridColumnStyle objects are automatically generated for you. Следовательно, при попытке добавить новые объекты DataGridColumnStyle с повторяющимися значениями MappingName в объект GridColumnStylesCollection будет создано исключение. Consequently, an exception will be thrown if you try to add new DataGridColumnStyle objects with duplicate MappingName values to the GridColumnStylesCollection object.
Объявите новый стиль таблицы и задайте его имя сопоставления. Declare a new table style and set its mapping name.
Объявите новый стиль столбца и задайте его имя сопоставления и другие свойства. Declare a new column style and set its mapping name and other properties.
Вызовите метод Add объекта GridColumnStylesCollection , чтобы добавить столбец в стиль таблицы. Call the Add method of the GridColumnStylesCollection object to add the column to the table style
Вызовите метод Add объекта GridTableStylesCollection , чтобы добавить стиль таблицы в сетку данных. Call the Add method of the GridTableStylesCollection object to add the table style to the data grid.
Шаг 1. Создание проекта и добавление таблицы в форму Step 1: Create a project and add a table to your form
Первым шагом создания игры «Подбери пару!» является создание проекта и добавление таблицы в форму. The first step in creating a matching game is to create the project and add a table to your form. Таблица помогает равномерно распределить значки по сетке 4×4. The table helps align the icons into an orderly 4×4 grid. Можно также задать несколько свойств, чтобы улучшить внешний вид игрового поля. You also set several properties to enhance the appearance of the game board.
Создание проекта и добавление таблицы в форму To create a project and add a table to your form
В строке меню щелкните Файл > Создать > Проект. On the menu bar, choose File > New > Project.
Выберите Visual C# или Visual Basic в левой области диалогового окна Новый проект, а затем — Классическое приложение Windows. Choose either Visual C# or Visual Basic on the left side of the New Project dialog box, and then choose Windows Desktop.
В списке шаблонов выберите шаблон Приложение Windows Forms (.NET Framework), назовите его MatchingGame, а затем нажмите кнопку ОК. In the list of templates, choose the Windows Forms App (.NET Framework) template, name it MatchingGame, and then choose the OK button.
Появится форма с именем Form1.cs или Form1.vb, в зависимости от выбранного языка программирования. A form that’s named Form1.cs or Form1.vb appears, depending on the programming language that you chose.
Если вы не видите шаблон Приложение Windows Forms (.NET Framework), используйте Visual Studio Installer, чтобы установить рабочую нагрузку Разработка классических приложений .NET. If you don’t see the Windows Forms App (.NET Framework) template, use the Visual Studio Installer to install the .NET desktop development workload.
Дополнительные сведения см. в разделе Установка Visual Studio. For more information, see the Install Visual Studio page.
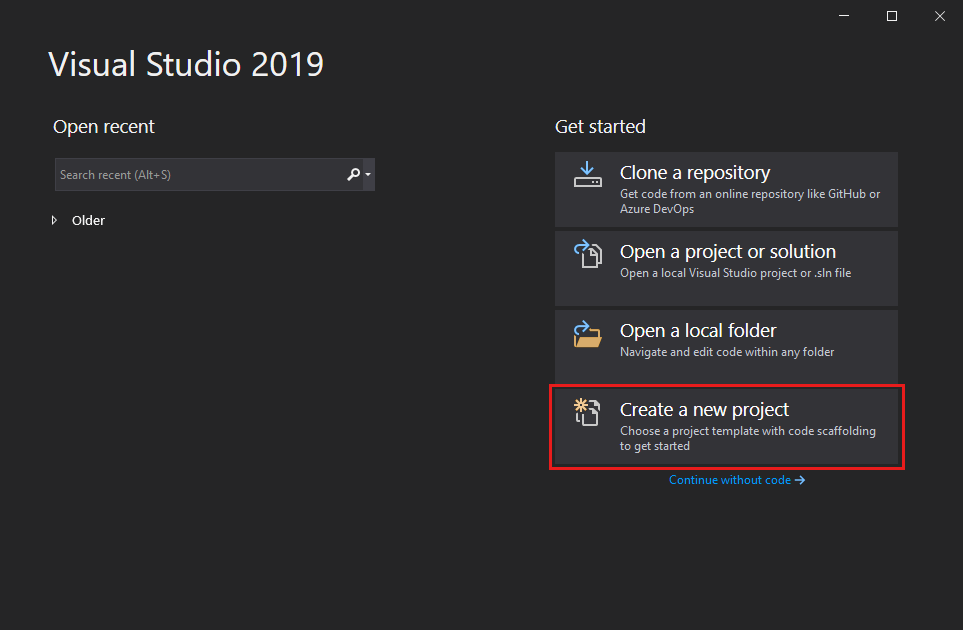
На начальном экране выберите Создать проект. On the start window, choose Create a new project.
В поле поиска окна Создание проекта введите Windows Forms. On the Create a new project window, enter or type Windows Forms in the search box. Затем в списке Тип проекта выберите Рабочий стол. Next, choose Desktop from the Project type list.
Применив фильтр Тип проекта, выберите шаблон Приложение Windows Forms (.NET Framework) для C# или Visual Basic и нажмите кнопку Далее. After you apply the Project type filter, choose the Windows Forms App (.NET Framework) template for either C# or Visual Basic, and then choose Next.

Если шаблон Приложение Windows Forms (.NET Framework) отсутствует, его можно установить из окна Создание проекта. If you do not see the Windows Forms App (.NET Framework) template, you can install it from the Create a new project window. В сообщении Не нашли то, что искали? выберите ссылку Установка других средств и компонентов. In the Not finding what you’re looking for? message, choose the Install more tools and features link.

После этого в Visual Studio Installer выберите рабочую нагрузку Разработка классических приложений .NET. Next, in the Visual Studio Installer, choose the Choose the .NET desktop development workload.

Затем нажмите кнопку Изменить в Visual Studio Installer. After that, choose the Modify button in the Visual Studio Installer. Вам может быть предложено сохранить результаты работы; в таком случае сделайте это. You might be prompted to save your work; if so, do so. Выберите Продолжить, чтобы установить рабочую нагрузку. Next, choose Continue to install the workload.
В окне Настроить новый проект введите MatchingGame в поле Имя проекта. In the Configure your new project window, type or enter MatchingGame in the Project name box. Затем нажмите Создать. Then, choose Create.
Задание свойств формы To set properties for a form
В окне Свойства задайте следующие значения свойств формы. In the Properties window, set the following form properties.
Измените свойство формы Text с Form1 на Matching Game. Change the form’s Text property from Form1 to Matching Game. Этот текст отображается в верхней части окна игры. This text appears at the top of the game window.
Установите размер формы на 550 пикселей в ширину и 550 пикселей в высоту. Set the size of the form to 550 pixels wide by 550 tall. Для этого установите для свойства Size значение 550, 550 или перетащите угол формы, чтобы требуемый размер отобразился в правом нижнем углу интегрированной среды разработки (IDE). You can do this either by setting the Size property to 550, 550, or by dragging the corner of the form until you see the correct size in the lower-right corner of the integrated development environment (IDE).
Откройте панель элементов, выбрав вкладку Панель элементов в левой части интегрированной среды разработки. Display the toolbox by choosing the Toolbox tab on the left side of the IDE.
Перетащите элемент управления TableLayoutPanel из категории Контейнеры панели элементов, а затем установите для него следующие свойства. Drag a TableLayoutPanel control from the Containers category in the toolbox, and then set the following properties for it.
Задайте для свойства BackColor значение CornflowerBlue. Set the BackColor property to CornflowerBlue. Для этого откройте диалоговое окно BackColor, щелкнув стрелку раскрывающегося списка рядом со свойством BackColor в окне Свойства. To do this, open the BackColor dialog box by choosing the drop-down arrow next to the BackColor property in the Properties window. Затем перейдите на вкладку Веб в диалоговом окне BackColor, чтобы просмотреть список доступных имен цветов. Then, choose the Web tab in the BackColor dialog box to view a list of available color names.
Цвета упорядочены не по алфавиту, и цвет CornflowerBlue находится в нижней части списка. The colors are not in alphabetical order, and CornflowerBlue is near the bottom of the list.
Задайте для свойства Dock значение Fill, нажав кнопку раскрывающегося списка рядом со свойством и щелкнув большую среднюю кнопку. Set the Dock property to Fill by choosing the drop-down button next to the property and choosing the large middle button. Таблица будет растянута по всей форме. This spreads the table out so that it covers the entire form.
Для свойства CellBorderStyle установите значение Inset. Set the CellBorderStyle property to Inset. Между ячейками поля появятся видимые границы. This provides visual borders between each cell on the board.
Нажмите треугольную кнопку в правом верхнем углу элемента управления TableLayoutPanel для отображения меню задач этой панели. Choose the triangle button in the upper-right corner of the TableLayoutPanel to display its task menu.
В меню задач дважды щелкните Добавить строку для добавления двух дополнительных строк, а затем дважды щелкните Добавить столбец для добавления двух дополнительных столбцов. On the task menu, choose Add Row twice to add two more rows, and then choose Add Column twice to add two more columns.
В меню задач выберите команду Изменить строки и столбцы, чтобы открыть окно Стили столбцов и строк. On the task menu, choose Edit Rows and Columns to open the Column and Row Styles window. Выберите каждый из столбцов, нажмите кнопку Процент и установите ширину каждого столбца равной 25 процентам от общей ширины. Choose each of the columns, choose the Percent option button, and then set each column’s width to 25 percent of the total width. Затем в раскрывающемся списке в верхней части окна выберите Строки и задайте высоту каждой строки равной 25 процентам. Then select Rows from the drop-down box at the top of the window, and set each row’s height to 25 percent. По завершении нажмите кнопку ОК. When you’re done, choose the OK button.
Теперь на панели макета таблицы должна быть видна сетка размером 4х4, состоящая из шестнадцати одинаковых по размеру квадратных ячеек. Your TableLayoutPanel should now be a 4×4 grid, with sixteen equally sized square cells. Эти строки и столбцы задают места, в которых позже появятся изображения значков. These rows and columns are where the icon images will appear later.
Убедитесь, что TableLayoutPanel выбран в редакторе формы. Be certain that the TableLayoutPanel is selected in the form editor. На это будет указывать надпись tableLayoutPanel1 в верхней части окна Свойства. To verify this, you should see tableLayoutPanel1 at the top of the Properties window. Если этот элемент управления не выбран, выберите элемент управления TableLayoutPanel в форме или в раскрывающемся списке в верхней части окна Свойства. If it is not selected, choose the TableLayoutPanel on the form, or choose it in the dropdown control at the top of the Properties window.
При выбранном элементе управления TableLayoutPanel откройте панель элементов и добавьте элемент управления Label (находится в категории Стандартные элементы управления) в левую верхнюю ячейку TableLayoutPanel. While the TableLayoutPanel is selected, open the toolbox and add a Label control (located in the Common Controls category) to the upper-left cell of the TableLayoutPanel. Теперь элемент управления Label должен быть выбран в интегрированной среде разработки. The label control should now be selected in the IDE. Задайте для него следующие свойства. Set the following properties for it.
Убедитесь, что свойство BackColor имеет значение CornflowerBlue. Be sure that the label’s BackColor property is set to CornflowerBlue.
Задайте свойству AutoSize значение False. Set the AutoSize property to False.
Задайте для свойства Dock значение Fill. Set the Dock property to Fill.
Задайте для свойства TextAlign значение MiddleCenter, нажав кнопку раскрывающегося списка рядом со свойством, а затем щелкнув среднюю кнопку. Set the TextAlign property to MiddleCenter by choosing the drop-down button next to the property, and then choosing the middle button. Это необходимо, чтобы значок отображался в середине ячейки. This ensures the icon appears in the middle of the cell.
Выберите свойство Font. Choose the Font property. Должна появиться кнопка с многоточием (…). An ellipsis (. ) button should appear.
Нажмите кнопку с многоточием и установите для параметра Font значение Webdings, для параметра Font Style — значение Bold, а для параметра Size — значение 48. Choose the ellipsis button, and set the Font value to Webdings, the Font Style to Bold, and the Size to 48.
Установите свойство Text равным букве с. Set the Text property of the label to the letter c.
Теперь в левой верхней ячейке TableLayoutPanel должен располагаться черный квадрат на синем фоне, который выравнивается по центру. The upper-left cell in the TableLayoutPanel should now contain a black box centered on a blue background.
Шрифт Webdings является шрифтом значков, который поставляется с операционной системой Windows. The Webdings font is a font of icons that ships with the Windows operating system. В вашей игре «Подбери пару!» игроку необходимо найти пары одинаковых значков, поэтому используйте этот шрифт для отображения значков. In your matching game, the player needs to match pairs of icons, so you use this font to display the icons to match. Вместо ввода буквы с в свойство Text попробуйте вводить разные буквы, чтобы увидеть, какие значки отображаются. Instead of putting c in the Text property, try entering different letters to see what icons are displayed. Восклицательный знак соответствует пауку, прописная буква N — глазу, а запятая — перцу чили. An exclamation point is a spider, an uppercase N is an eye, and a comma is a chili pepper.
Выберите элемент управления Label и скопируйте его в следующую ячейку TableLayoutPanel. Choose your Label control and copy it to the next cell in the TableLayoutPanel. (Нажмите сочетание клавиш CTRL+C или в строке меню выберите Правка > Копировать.) Затем вставьте его. (Choose the Ctrl+C keys, or on the menu bar, choose Edit > Copy.) Then paste it. (Нажмите сочетание клавиш CTRL+V или в строке меню выберите Правка > Вставить.) Во второй ячейке элемента управления TableLayoutPanel появится копия первого элемента управления Label. (Choose the Ctrl+V keys, or on the menu bar, choose Edit > Paste.) A copy of the first Label appears in the second cell of the TableLayoutPanel. Вставьте его снова, и в третьей ячейке появится еще один элемент управления Label. Paste it again, and another Label appears in the third cell. Продолжайте вставлять элементы управления Label, пока все ячейки не будут заполнены. Keep pasting Label controls until all of the cells are filled.
Если выполнить команду вставки слишком много раз, интегрированная среда разработки добавит новую строку в TableLayoutPanel, чтобы появилось место для добавления нового элемента управления Label. If you paste too many times, the IDE adds a new row to the TableLayoutPanel so that it has a place to add your new Label control. Можно выполнить откат. You can undo it. Чтобы удалить новую ячейку, нажмите сочетание клавиш CTRL+Z или в меню выберите Правка > Отменить. To remove the new cell, choose the Ctrl+Z keys, or on the menu bar, choose Edit > Undo.
Теперь ваша форма готова. Она будет выглядеть примерно так, как показано на рисунке ниже. Now your form is laid out. It should look similar to the following picture.
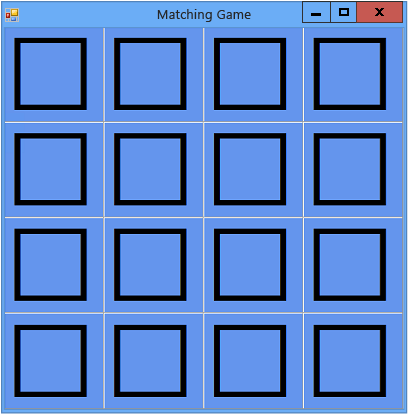
Исходная форма игры «Подбери пару!» Initial matching game form
Продолжить или повторить пройденный материал To continue or review
Предыдущая статья с общими сведениями: Руководство 3. Создание игры «Подбери пару!». To return to the overview topic, see Tutorial 3: Create a matching game.


