How to Disable Internal Speakers in Windows 10 (Guide)
I don’t know why someone would want to turn off a laptop’s speaker, but I have received many requests on how to turn off laptop speakers.
Turning off your laptop’s speakers is easy. You do not need to rip off the laptop to turn off the speakers. Windows 10 offers many ways to turn off the speaker.
Below are the three ways to turn the speaker on or off on a laptop running Windows 10.
If you are using Microsoft Windows 10, you can disable the PC’s internal speaker or speaker by following the steps below.
- Open the device manager
- In the Device Manager, click View, then View Hidden Devices.
- This should make Non-Plug and Play drivers visible in the Device Manager.
- Expand the Non-Plug and Play drivers by clicking the Plus button and double-clicking Beep.
- In the Beep Properties window, click on the Driver tab.
- If you want to temporarily disable this device, click the Stop button on the Driver tab. If you want to permanently disable this device under the Start type, select Disabled.
Using the device settings
Right-click on the list of internal speakers (the default name is “Speakers” or “Internal Speakers”) and select “Disable”. Click Apply, then click OK.
April 2021 Update:
We now recommend using this tool for your error. Additionally, this tool fixes common computer errors, protects you against file loss, malware, hardware failures and optimizes your PC for maximum performance. You can fix your PC problems quickly and prevent others from happening with this software:
- Step 1 : Download PC Repair & Optimizer Tool (Windows 10, 8, 7, XP, Vista – Microsoft Gold Certified).
- Step 2 : Click “Start Scan” to find Windows registry issues that could be causing PC problems.
- Step 3 : Click “Repair All” to fix all issues.

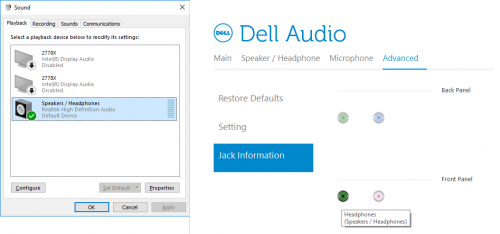
Connect the audio cable from your external speakers to the audio output of your Dell computer. This connector is usually green with a headset or speaker icon. Your Dell computer automatically detects new speakers and uses them as default speakers.
Using the Control Panel
To turn off the internal speakers of Windows 10 and use external speakers as the default speakers on your computer, do the following.
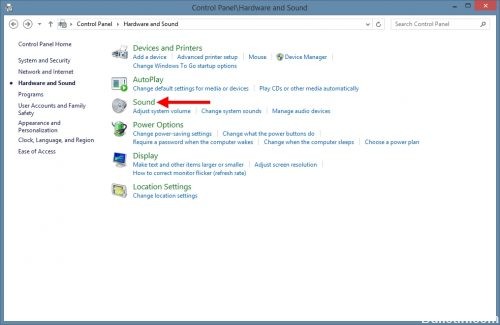
- Open the Control Panel and in the Sound section, select Hardware and sound > Manage audio devices.
- On the next screen, right-click on the list of internal speaker devices (usually listed as speakers) and click Disable.
- Click Apply and OK to save this setting.
- Connect the external speakers to the audio output of your computer.
Your computer should automatically detect new external speakers and set them as the default speakers on your computer.
CONCLUSION
In modern PCs, the PC’s internal speaker is often connected to the PC’s audio solution, so the PC can beep even if no external speakers are connected to the machine. If your Windows 10 PC is running without connected speakers or with sound drivers that do not work or are not disabled, you may hear an annoying beep, such as a notification per message box. If that beep is bothering you, maybe you should turn it off. Let us know in the comments below.

CCNA, Web Developer, PC Troubleshooter
I am a computer enthusiast and a practicing IT Professional. I have years of experience behind me in computer programming, hardware troubleshooting and repair. I specialise in Web Development and Database Design. I also have a CCNA certification for Network Design and Troubleshooting.
No Audio or Sound is missing on Windows 10 computer
Some of you may have faced this problem at some point – there is no sound in Windows 10/8/7. If you are facing such as No Audio or Sound is missing problem, this tutorial may help you resolve the issue. Before you begin, just ensure that you have plugged in all the cables properly and that you have not muted the speakers by mistake.
No Sound on Windows 10 computer
To troubleshoot this No sound issue, you will have to look at the following aspects:
- Check your Driver
- Check your sound card
- Set the correct audio device as default
- Disable enhancements
- Check if the Speakers & headphones cables are connected properly
- Change audio format
- Check if the HDMI cables are connected properly
- Run Sound and Audio Troubleshooter.
1] Check your Driver
Normally you would open Control Panel > Sound > Under Playback and Recording tabs, Select and Set Defaults. Additionally or alternatively, you may also have to try this: Click Start > Type Device Manager in Start Menu Search Bar > Hit Enter.
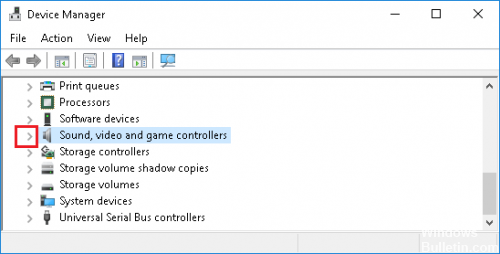
The Device Manager will open. Expand Sound, Video and Game Controllers. Locate your audio device. Double-click on it to open its Properties box. See whether the driver is installed and the device working properly.
In the Driver tab, click on Update Driver. Click OK. Else you may have to uninstall the Driver (but DONT delete it) and then in the Device Manager > Action > Scan for hardware changes. This will reinstall the driver.
2] Check your sound card
Ensure that your Windows PC has a sound card or sound processor, and it’s working properly. To check this, select the ‘Search’ option from the charms-bar, type – Device Manager’ and click ‘Settings’. Open Device Manager, double-click Sound, video and game controllers to expand that category. If a sound card is listed, you have one installed. Laptops and tablets do not usually have sound cards. Instead, they have integrated sound processors, which appear in the same category in Device Manager.
See if it is working properly. If Device Status shows that the device is working correctly, the problem showing up is due to sound settings, the speakers, or the cables.
3] Set the correct audio device as default
Type ‘Sound’ in search and select ‘Settings’. Choose ‘Sound’. Under the Playback tab section, you will find multiple audio devices; appearing as speaker, followed by the name of the device. You will also observe that the default device shows a green a check beside it, labeled as Default if you have multiple devices.
If the wrong audio device is listed as the default audio device, simply choose the correct device and click ‘Set Default’ button. Restart your PC!
4] Disable enhancements
In the Sound Control Panel on the Playback tab, right-click the Default Device and select Properties. On the Enhancements tab, select Disable all enhancements and see if you can play your audio device. If it helps, great, else do this for each default device, and see if any help.
5] Check if the Speakers and headphones cables are connected properly
New PCs these days are equipped with 3 or more jacks including,
- a microphone jack
- line-in jack
- line-out jack.
These jacks connect to a sound processor. So make sure your speakers are plugged into the line-out jack. If unsure which is the right jack, try plugging speakers in to each of the jacks and see it produces any sound.
If you’re using headphones, make sure speakers aren’t plugged into the line out (headphone) jack of your sound card or PC.
6] Change audio format
In the Sound Control Panel on the Playback tab, right-click the Default Device and select Properties. On the Advanced tab, under Default Format, change the setting, and then check your audio device. If it helps, great, else change the setting again and see if that helps.
7] Check if the HDMI cables are connected properly
If you are using an HDMI cable to connect your PC to a monitor with speakers that supports HDMI, chances are you might not hear the sound. In such a situation you need to set the HDMI audio device as the default. To check to see if the sound is supported by HDMI follow these steps:
Enter Sound in the search box, and click Settings. Next, choose Sound. Under the Playback tab look for an HDMI device. If you have an HDMI device, click Set Default button and hit OK. Changing the audio device might require you to restart your PC.
Your HDMI monitor should have an audio input if you don’t have an HDMI audio device. What you are required to do then is connect a separate audio cable from your PC sound card directly to the monitor. If the monitor doesn’t have speakers, you’ll need to connect the audio signal to a different device, such as external PC speakers or your home stereo system.
8] Run Sound and Audio Troubleshooter
If all fails, you may bring in and use the built-in Troubleshooting tool in Windows 10/8. The tool may automatically fix the audio recording problem.
To open the Sound and Audio Troubleshooter, bring up the Control Panel by pressing Win+X in combination and selecting Control Panel. Then, under System and Security click Find and fix problems. Or else, simply right-click on the Speaker icon in the Taskbar notification area and select Troubleshoot sound problems to open the Sound and Audio Troubleshooter.
When done, choose ‘Hardware and Sound’ and click on ‘Troubleshoot audio recording‘ link. This post on Windows Sound is not working or missing may also give you some pointers.
While this post has been written keeping Windows 10 and Windows 8 in mind, it will help if you face the No Sound problem on other Windows versions too.
Windows 7, Windows Vista or Windows XP users can download this Fix It to diagnose, troubleshoot, repair sound & audio problems.


