About the Spell Checking API
For users worldwide, textual input is part of a modern computing experience, for blogging, commenting, tweeting, instant messaging, or any other kind of text typing. In WindowsВ 8, spell checking is built-in to edit controls.
Developers can use the spell checking API in their apps to consume available spell checking services. Developers can also create spell checkers that become providers and are integrated into the Windows spell checking framework.
The Spell Checking API is designed for use by professional C/C++ developers of Windows Component Object Model (COM) apps. The Spell Checking API is not supported for use in a Windows or ASP.NET service.
Versioning
The Spell Checking API is available beginning with the WindowsВ 8 or Windows ServerВ 2012. Future additions to the API will be handled by creating new interfaces that can be determined using QueryInterface on the existing ones.
Interfaces
All interfaces must be released when they are no longer used. All returned (out parameter) LPWSTR strings (and LPOLESTR items from IEnumString) must be released with CoTaskMemFree when no longer used.
Error handling
Errors are returned as HRESULTs. IErrorInfo and ISupportErrorInfo are not supported in this API. Errors are not particularly actionable except for incorrect arguments.
Standard RPC error codes may be returned by any of the API calls because they are out-of-proc. Standard RPC timeouts apply.
Security
The Spell Checking API may load external code (spell check providers). It will run this code out-of-proc and under a restricted security context.
Dictionary files
The user-specific dictionaries for a language, which hold the content for the Added, Excluded, and AutoCorrect word lists, are located under %AppData%\Microsoft\Spelling\ . The filenames are default.dic (Added), default.exc (Excluded) and default.acl (AutoCorrect). The files are UTF-16 LE plaintext that must start with the appropriate Byte Order Mark (BOM). Each line contains a word (in the Added and Excluded word lists), or an autocorrect pair with the words separated by a vertical bar («|») (in the AutoCorrect word list). Other .dic, .exc, and .acl files present in the directory will be detected by the spell checking service and added to the user word lists. These files are considered to be read-only and are not modified by the spell checking API.
Installing a spell checking provider
The installation of a spell checking provider must place all the files it uses in a location that allows read access from the SID (security identifier) «ALL APPLICATION PACKAGES». Installing it in a folder under «Program Files» works well. Also, the provider must set some keys in the registry for it to appear to the spell checking API. It can be in either the HKEY_CURRENT_USER hive or the HKEY_LOCAL_MACHINE hive depending on whether it should install only for the current user or all users.
The spell checking provider sample provides an example of the registration needed to install a provider.
If you are creating new spell checking options for a spell checking provider, see IOptionDescription::Id for guidance on naming.
Check grammar, spelling, and more in Word
In this course:
Microsoft Editor runs in Word for Microsoft 365 to analyze your document and offer suggestions for spelling, grammar, and stylistic issues, like making sentences more concise, choosing simpler words, or writing with more formality.
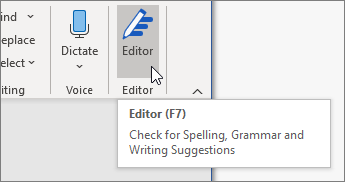
To use Editor, on the Home tab choose Editor.
Reviewing suggestions
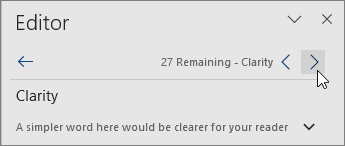
To focus on the issues you care most about, choose a correction or refinement type, like Grammar or Clarity. Then, use the arrows near the top of the pane to step through each of that type of issue.
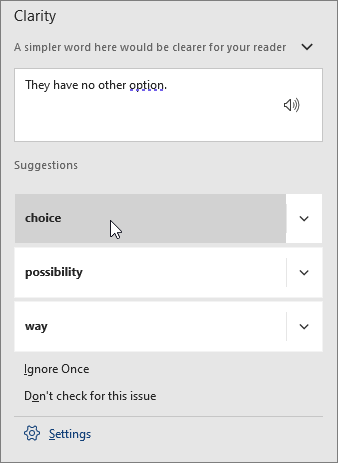
Choose a suggestion to incorporate it into your document. If you don’t like the suggestion, choose Ignore Once. Or, if you never want this type of suggestion, choose Don’t check for this issue.
Note: If you change your mind about an issue you ignored, close and reopen the document, and go back to Editor. Editor will find the issue again.
Tailor what Editor checks for
By default, Editor checks for several categories of issues, and the suggestions may or may not suit your writing style. To finely tune Editor for suggestions you want, do the following:
In the Editor pane, choose Settings.
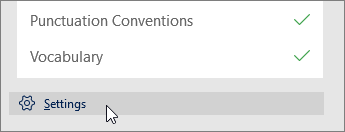
In the Word Options dialog box, next to Grammar & Refinements, choose Settings.
Scroll through the list of options. Select issues you want Editor to check, and clear the issues you want Editor to ignore.
Note: Choosing Reset All returns to the default settings.
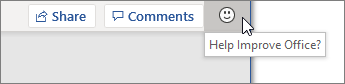
Tip: Editor is designed to empower you to bring out the best in your writing. We are continually making updates to its suggestions and experimenting to learn which suggestions are most welcome. If you have feedback for us, choose Help Improve Office? at the top of the Word window to open the Feedback pane.
You might notice Editor’s red, blue, and purple underlines in your document even when the Editor pane is closed. That’s because Editor is always running in the background, checking for spelling, grammar, and some style issues.
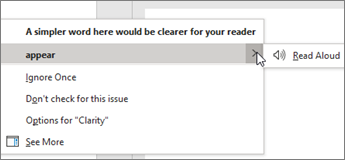
Right-click the underlined text to see the suggestion. Use context menu to:
Listen to the suggestion by clicking the arrow next to the suggestion and then choosing Read Aloud.
Skip this instance of the issue by choosing Ignore Once.
Tell Editor to stop checking for this issue by choosing Don’t check for this issue.
Fine tune the settings for this type of issue by choosing the Options link.
Get more information about the issue by choosing See More.
Your document might be written in more than one language, or you might want to switch to another language for Editor to check. If you are set up to use multiple authoring languages ( File > Options > Language), Word detects the language you’re writing in, and Editor will check for issues in that language.
However, you might be writing in a language that Word doesn’t detect automatically. In that case, you can get Editor to check text in that language by selecting the text and going to Review > Language > Set Proofing Language, and then choose your language.

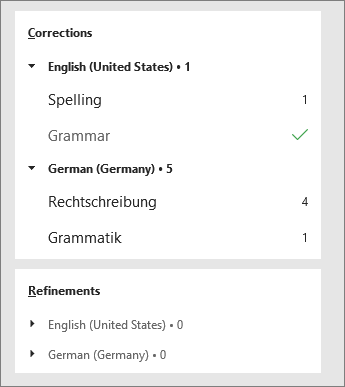
When Editor is checking more than one language, the Editor pane lists corrections and refinements for each language in the document.
For information about the issues that Editor checks in various languages, see Editor’s spelling, grammar, and refinement availability by language.
When you work on documents in Word on the web, Editor provides a rich set of features that are coming soon to Word for Windows. Even when you’re not using Word, the Editor browser extension helps you with writing on websites like LinkedIn, Twitter, Facebook, and Gmail.
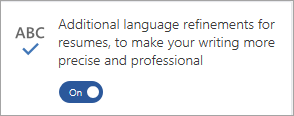
When you are working on your resume, Editor checks for issues like reference to first person, vague verbs, unsuitable expressions, and more.
Go to Review > Resume Assistant.
Enter the Role and Industry. At the bottom of the Resume Assistant pane, switch Editor’s resume checking on or off.

Word marks spelling, grammar, and stylistic issues with an underline. Right-click the underlined word, and then choose the suggestion you want, or learn more about the error and how to correct it.
Or, open the Editor pane to address issues by category.
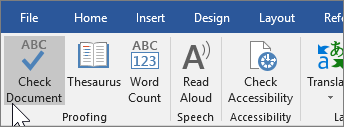
On the Review tab, select Check Document.
The Editor pane categorizes spelling, grammar, and stylistic issues.
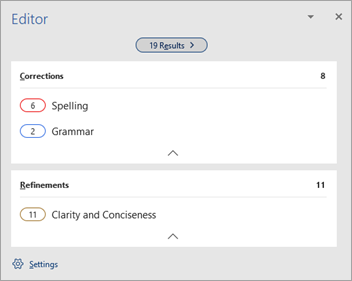
Click each category to address the issues.
Note: For keyboard shortcuts in the Editor pane, there’s no need to press Alt. Just use the underlined letter to select the command (like i for Ignore Once, g for I gnore All, etc) .
In the Editor pane, click Settings.
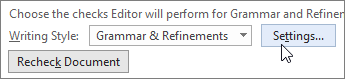
Under When correcting spelling and grammar in Word, select Settings
For Writing Style, select Grammar & Refinements .
Scroll down to see all of the options available, and select or clear the rules you want. The settings apply to all the documents that you edit, not just the current one.
Requirements and availability of the Editor pane include the following:
Internet connection: Make sure your connection is working.
Intelligent Services switched on: Go to File > Options > General and turn on Office Intelligence Services.
Language availability: For information about the issues that Word checks for in various languages, see Editor’s spelling, grammar, and refinement availability by language.
Word marks spelling, grammar, and stylistic issues with an underline. Control-click the word or phrase and choose one of the options.
If Word incorrectly underlined a word as misspelled and you want to add that word to your dictionary so that Word will properly recognize it in the future, see Add or edit words in a spell check dictionary.
If spelling or grammatical errors aren’t underlined, you might need to turn on automatic spelling and grammar checking, as follows.
Turn on (or off) automatic spelling and grammar checking
On the Word menu, click Preferences > Spelling & Grammar.
In the Spelling & Grammar dialog box, under Spelling, check or clear the Check spelling as you type box.
Under Grammar, check or clear the Check grammar as you type box.
Close the dialog box to save your changes.
On the Review tab, click Spelling & Grammar.
Word displays the issues it finds in the Spelling & Grammar dialog box.
To address an issue, do one of the following:
Type the correction in the box and then click Change.
Under Suggestions, click the word you want to use, and then click Change.
To skip the error, do one of the following:
Click Ignore Once to skip only that instance of the error.
Click Ignore All to skip all instances of the error.
For a grammatical error, click Next Sentence to skip that instance of the error and move to the next error.
To skip a misspelled word in all documents, click Add to add it to the dictionary. This only works for spelling. You can’t add custom grammar to the dictionary.
After you correct, ignore, or skip an issue, Word moves to the next one. When Word finishes reviewing the document, you’ll see a message that the spelling and grammar check is complete.
Click OK to return to your document.
You can clear or reset the list of Ignored Words and Grammar so Word will check for spelling and grammar issues you previously told it to ignore.
Note: When you reset the list of Ignored Words and Grammar, the list is cleared only for the currently open document. Any spelling or grammar issues you told Word to ignore in other documents won’t be affected.
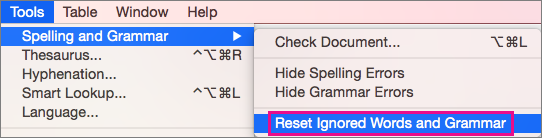
Open the document that needs to be checked.
On the Tools menu, point to Spelling and Grammar, and then click Reset Ignored Words and Grammar.
Word displays a warning about the operation resetting the spelling checker and the grammar checker.
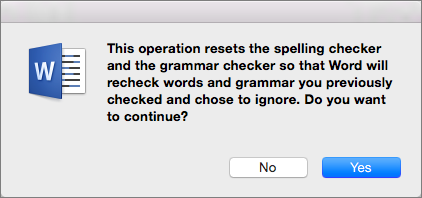
Click Yes to proceed.
Click the Review tab, and then click Spelling & Grammar to check spelling and grammar.
Word marks potential spelling errors with a red squiggly line, and potential grammatical errors are marked with a blue squiggly line.
Right-click on the underlined word or phrase and choose a correction, or ignore the suggestion.
Note: If Word is flagging words as misspelled but you have it spelled the way you want it, select Add to Dictionary to teach Word not to flag that word as misspelled in the future. For more information on this see: Add or edit words in a spell check dictionary.
If you don’t want Office to mark potential errors with squiggly lines while you are working, you can turn automatic spelling and grammar checking off:
On the File menu, click Options, and then click Proofing.
Select or clear the Check spelling as you type and Mark grammar errors as you type check boxes.
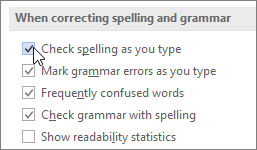
Note: You can turn the spelling checker on or off for the document you’re working with or for all new documents. Select an option in the Exceptions for list, and then select or clear the Hide spelling errors in this document only and Hide grammar errors in this document only check boxes.
If you don’t want Word to check grammar at all (either when running a spell check or automatically as you type), you can turn it off:
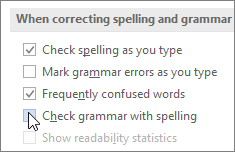
On the File menu, click Options, and then click Proofing.
Clear the Mark grammar errors as you type and Check grammar with spelling check boxes.
On the File menu, click Options > Proofing> Recheck Document.
Click Yes when you see the warning message about resetting the spelling and grammar checker.
Click OK in the dialog box to get back to the document, and then run the spelling and grammar checker again.
See also
For more topics on spelling and grammar, see Spelling and grammar in Word.


