- Пробуем бесплатную виртуализацию со специями в Ubuntu 11.04 amd64
- Spice guest tools linux
- Manually, using qemu-kvm command line directly
- Enabling SPICE using virt-manager
- SPICE
- Contents
- Introduction
- Requirements for SPICE
- SPICE client
- Enable SPICE for a VM
- Caution
- OS specific settings for VM
- Windows
- Windows 7/8/10 and Windows 2012/2016
- Linux
- Start your SPICE session
- Using client USB devices
- Caution
- Using Audio
- SPICE Enhancements
- Troubleshooting
- Can’t start Spice session
- Guest resolution does not resize to Remote Viewer window
- Alternatives
Пробуем бесплатную виртуализацию со специями в Ubuntu 11.04 amd64
Специя или SPICE (сокр. от англ. «Simple Protocol for Independent Computing Environments», то есть «Простой протокол для независимой вычислительной среды») — открытый протокол удаленного доступа к компьютеру или виртуальной машине.
Использование SPICE позволяет не только получить доступ к экрану, а также к буферу обмена и звуковой карте. В настоящее время протокол SPICE находится в стадии интенсивной разработки, несмотря на это его уже сегодня можно попробовать использовать в виртуальной машине под управлением модифицированного гипервизора KVM вместо базового открытого протокола VNC (Virtual Network Computing), используемого по-умолчанию.
Первоначально протокол был разработан кампанией Qumranet, которую затем купила Red Hat, Inc, которая 9 декабря 2009 объявила о решении открыть исходный код протокола. Стабильная версия SPICE доступна в операционной системе Red Hat Enterprise Linux, как средство виртуализации рабочих станций.
Конечно, помимо SPICE и VNC существуют и другие протоколы удаленного доступа такие как:
- PCoverIP — протокол разработанный Terradici, используемый в VmWare View.
- RDP (Remote Desktop Protocol) — протокол, разработанный в Microsoft, используемый в продуктах Microsoft, Oracle VirtualBox.
К сожалению вышеуказанные протоколы являются закрытыми и не могут использоваться свободно.
Настраиваем хост
Чтобы получить возможность использования SPICE следует собрать платформу виртуализации на базе модифицированного гипервизора KVM из исходников либо использовать предварительно собранные пакеты. Чтобы самостоятельно собрать платформу виртуализации из исходников необходимо воспользоваться инструкцией, размещенной на официальном сайте проекта и потратить некоторое время.
В случае если вы используете Ubuntu 11.04 amd64 и не желаете тратить время на компиляцию, вы можете воспользоваться предварительно собраными deb-пакетами подготовленными Борисом Державцем, либо deb-пакетами платформы виртуализации, подготовленными проектом UmVirt.
deb-пакеты платформы виртуализации подготовленные в рамках проекта UmVirt cозданы на основе более свежих версий программ и правил сборки пакетов используемых Борисом Державцем т.е. являются форком.
В качестве окружения вы можете использовать не только реальный компьютер на платформе amd64 обладающий функцией виртуализации, а также эквивалентную виртуальную машину. Что позволяет получить многоуровневую виртуализацию.
Установка из репозитория Бориса Державца
Для установки платформы виртуализации из репозитория Бориса Державца добавьте репозиторий с помощью команды:
sudo add-apt-repository ppa:bderzhavets/git-spice
Затем обновите информацию о пакетах с помощью команды:
sudo apt-get update
Затем установите платформу виртуализации с помощью команды:
sudo apt-get install qemu-kvm virt-manager
Установка из архива deb-пакетов платформы виртуализации UmVirt
Для установки deb-пакетов платформы виртуализации UmVirt, загрузите арихив пакетов «UmVirt VP» со страницы загрузки сайта проекта, распакуйте его и запустите инсталяционный скрипт от имени root используя комманду sudo:
В процессе установки инсталляционный скрипт проверит окружение, осуществит автоматическую установку пакетов и всех зависимостей.
Использование
После того как вы установили платформу виртуализации, вы можете приступить к работе с помощью программы virt-manager, имеющей интуитивно понятный графический интерфейс. Для избежания проблем в работе, рекомендую запускать virt-manager от имени root.
Попробуйте создать и запустить виртуальную машину под управлением Ubuntu, предварительно добавив в нее звуковую карту и сменив протокол удаленного доступа c VNC на SPICE.
Затем попробуйте получить доступ к виртуальной машине, слушающей порт 5900, через SPICE-клиент cpicec выполнив следующую команду:
spicec -h 127.0.0.1 -p 5900
В результате при запуске вы должны услышать звук из виртуальной машины.
Настраиваем гостя
Чтобы работать в виртуальной машине было комфортно, нужно установить гостевые дополнения SPICE: Драйвер видеокарты QXL и VD-агента. Для операционной системы Windows гостевые дополнения доступны на официальных сайте проекта SPICE. Некоторые дистрибутивы Linux изначально поддерживают QXL-видеокарту, однако её драйвер работает не стабильно.
Для Ubuntu дополнения можно установить из специального репозитория spice2, подготовленного Борисом Державцем, и из архива с инсталяционным скриптом, подготовленным проектом UmVirt. Гостевые дополнения в архиве, подготовленным проектом UmVirt, содержат более качественный QXL-драйвер, поддерживающий большее количество разрешений, и более свежий VD-агент.
Для установки гостевых дополнений из репозитория spice2 выполняются следующие команды:
sudo add-apt-repository ppa:bderzhavets/spice2
sudo apt-get update
sudo apt-get install spice-vdagent
Для установки гостевые дополнений, подготовленных проектом UmVirt необходимо загрузить и распаковать архив дополнений со страницы загрузки.Затем установить их с помощью команды:
Для того чтобы улучшить взаимодействие с виртуальной машиной, выключите виртуальную машину, измените тип видеокарты на QXL и осуществите запуск виртуальной машины (если машина не заведется с первого раза, заводите несколько раз). Теперь вы можете слушать не только звук но и смотреть видео, объединить буферы обмена.
В заключение, несколько советов по увеличению производительности:
- Так как Flash плеер перегружает процессор виртуальной машины для чистоты экспериментов по проверке производительности, при воспроизведении видео используйте файлы в форматах OGV и WebM они могут воспроизводится в Ubuntu изначально и не перегружают процессор.
- Используйте сетевое хранилище для сокращения затрат процессорного времени на операции ввода-вывода
- Используйте виртуальные устройства VirtIO
За более подробной информацией обращайтесь на официальный сайт SPICE, а также на сайт платформы виртуализации UmVirt.
Источник
Spice guest tools linux
This example is based on qemu-kvm (0.15.0) as installed in Fedora 15. Will first show how to do this manually, and second how to do it using the virt-manager tool.
For extensive details on SPICE, visit http://spice-space.org
Manually, using qemu-kvm command line directly
The simplest part is adding the qxl graphics device to the guest. By adding -vga qxl :
You’ll see a normal SDL window pop up, and if you poke inside the guest you’ll find that X is using the qxl device to display:
However, this is not enough to use SPICE. We need to enable the spice server in qemu-kvm. We also need a client to view the guest. So first be sure the client is installed:
To keep it simple, we’ll not require authentication and simply bind the server to 127.0.0.1 on port 5900.
This will not pop up an SDL window, so launch the client to connect to the guest.
We’re getting closer. Now the only thing left is to improve the experience by enabling the spice agent communication channel between the host and the guest (you wanted copy and paste between host and guest right? 😉
This part is a bit arcane. We need to add a virtio-serial device to the guest, and open a port for the spice vdagent. We also need to install the spice vdagent in guest. Be sure the agent is running (and for future, started automatically).
First the guest side, since the guest is running.
Now stop the guest and we’ll build up the hostside qemu-kvm commandline. We need to add the virtio-serial device: -device virtio-serial-pci We need to add a port for spice in that device: -device virtserialport,chardev=spicechannel0,name=com.redhat.spice.0 And we need a spicevmc chardev for that port: -chardev spicevmc,id=spicechannel0,name=vdagent
It’s important that the virserialport chardev= option matches the id= given the chardev ( spicechannel0 in this example). It’s also important that the port’s name= is com.redhat.spice.0 , because that’s the namespace spice-vdagentd is looking for in the guest. And finally, you need to specify name=vdagent so spice knows what this channel is for.
So we launch the guest one last time with the complete command line:
And kick off a spice client:
Now you can login to the guest, and you’ll still see the qxl display device. In addition, you’ll see the virtio-serial port:
Now test it out. Grab some text and copy it to the clipboard in the guest. (In gnome-terminal it’s Shift-Ctrl-C to copy). And paste it in the host (again, Shift-Ctrl-V to paste in gnome-terminal).
Enabling SPICE using virt-manager
This assumes you’ve already installed a guest with virt-manager or virt-install and it’s shut off.
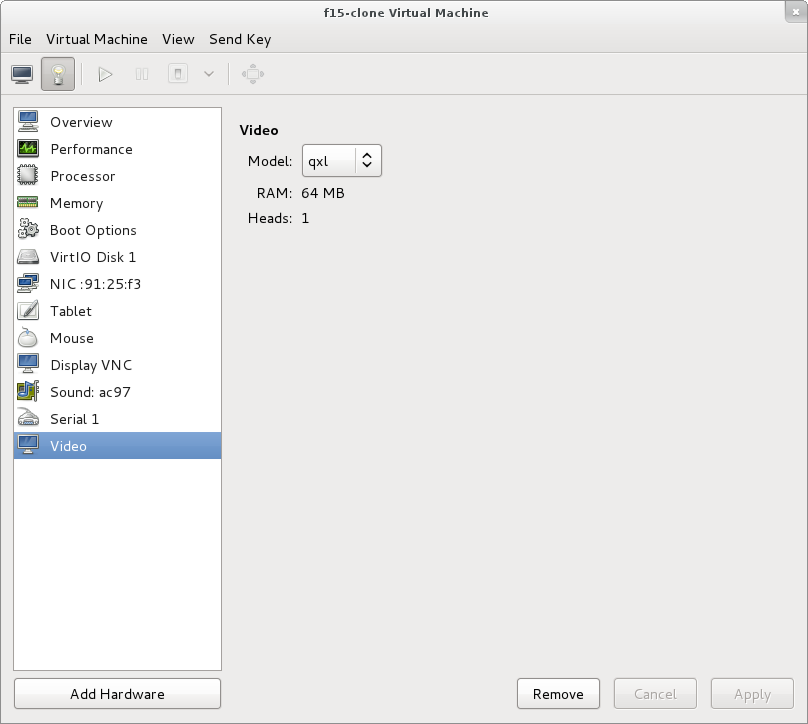
Start virt-manager, and open your VM by double clicking on it. Click the virtual hardware details (lightbulb).
First we need to make the Video card a qxl device. Click on Video, and in the Model pulldown, choose, qxl. And Apply.
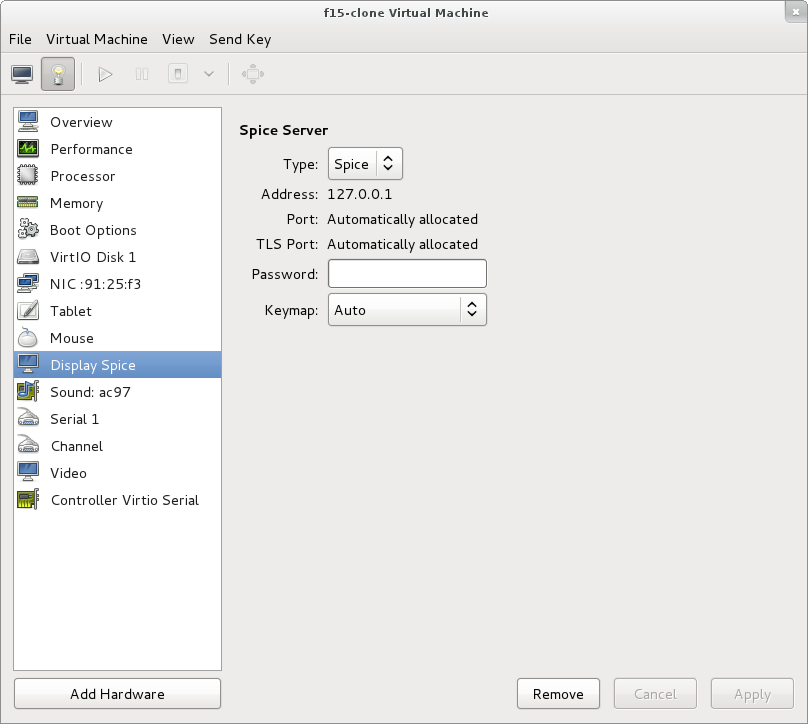
Next we need to change the display from VNC to Spice. Click on Display VNC, and in the Type pulldown, choose Spice. And Apply. You’ll be prompted to add the Spice agent channels, click Yes. (notice the additional Controller Virtio Serial too).
Now start the VM. virt-manager has a spice-gtk client built-in. So you don’t need to fuss with a manual spice client like you did above. You still need to be sure that the guest has spice-vdagent installed and running. In the guest:
And you’re done. Test copy and paste and enjoy.
Источник
SPICE

Contents
Introduction
SPICE (Simple Protocol for Independent Computing Environments) is an open remote computing solution built for virtual environments which allows users to view a computing «desktop» environment. The integrating of Spice into Proxmox VE provides a solution for interaction with virtualized desktop devices, like keyboard, mouse, audio and video. Interaction between front-end and back-end is done using Virtual Device Interfaces (VDI).
Spice achieves a user experience similar to an interaction with a local machine. It is suitable for both LAN and WAN usage, without compromising on the user experience.
Using Spice on Proxmox VE is easy and secure. It is integrated in the cluster environment, the user- and authentication system — and of course, all traffic is fully encrypted.
Spice was first introduced with Proxmox VE 3.1.
Requirements for SPICE
In order to use Spice you need the following:
- Spice client on your desktop OS
- Spice drivers inside your VM (VirtIO, QXL Graphic card drivers)
SPICE client
- Windows: virt-viewer 0.5.6 or higher, http://www.spice-space.org/download.html
- Linux: virt-viewer 0.5.6 or higher
- OS X (not yet working as expected): virt-viewer 0.5.7 or higher, https://www.spice-space.org/osx-client.html
Enable SPICE for a VM
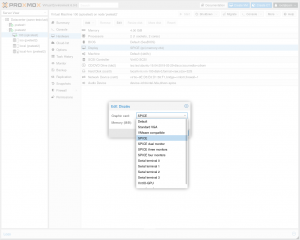
Spice is not enabled by default. To enable it set the Display in the Hardware section of the VM to Spice (shown in the screenshot at the top). Increase the memory if you intend to use SPICE with high resolutions. 32 MiB is plenty for 4K resolutions.
Caution
Before changing the Display setting to SPICE check the following section. You may need to install QXL/SPICE drivers depending on the guest OS.
OS specific settings for VM
Windows
Windows 7/8/10 and Windows 2012/2016
Fully supported. Before you switch the Display to SPICE install the Windows SPICE guest tools 0.132 or higher (spice-guest-tools-0.132.exe or higher)
Linux
All Linux distributions released after 2011 have the necessary qxl driver included as a part of the Xorg package.
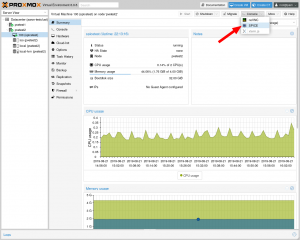
Start your SPICE session
A Spice session can be started by clicking directly on the Console button or by opening the Console sub menu and selecting Spice explicitly. This will trigger the download of the connection config file.
Open this file with Remote Viewer to start the session.
The association is automatic for Chrome and Internet Explorer (they use the mime type association from the OS). For Firefox, the association must be done manually, as Firefox has his own internal mime type association (See Options/Applications).
Using client USB devices
You can pass USB devices from the client into the VM. Add a USB device of the type Spice Port in the Hardware section of the VM.
Old methods of editing the config file directly are not necessary anymore with recent versions of Proxmox VE.
Caution
- The Windows version of the virt-viewer does not support it.
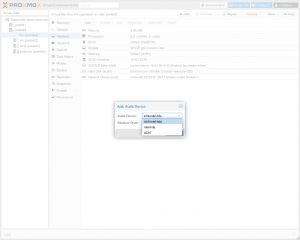
Using Audio
Audio devices can be added in the Hardware section of the VM. Three audio devices are supported:
- ich9-intel-hda: emulates Intel HDA Audio on ICH9 chipsets
- intel-hda: emulates Intel HDA Audio on ICH6 chipsets. Use if the ICH9 one does not work properly
- AC97: useful for older OS`s like Windows XP
Manually editing the config file of the VM is not necessary with recent versions of Proxmox VE.
SPICE Enhancements
SPICE Enhancements are optional features that can improve the remote viewer experience. They can be enabled in the Options panel of a VM.
Two enhancements are currently available:
Foldersharing enables you to share a local folder with the VM you are connecting to. The «spice-webdavd» daemon needs to be installed in the VM.
HINT: only the Linux version of Virt-viewer (remote-viewer) supports this.
Videostreaming will encode fast refreshing areas in a lossy video stream. A general recommendation cannot be given but depending on your situation this can greatly improve the performance.
More information can be found in the reference manual by clicking the «Help» button in the dialog to enable the enhancements.
Troubleshooting
Can’t start Spice session
If you can’t start a Spice session from the PVE Web gui, you can try the following shell script: https://git.proxmox.com/?p=pve-manager.git;a=blob_plain;f=spice-example-sh;hb=HEAD
Guest resolution does not resize to Remote Viewer window
Make sure the spice-vdagent service is installed and running in the VM.
If the guest stops resizing once you go higher than a certain size it is possible that the video memory is not enough. Increase the Memory settings of the Display in the Hardware section of the VM by a few MiB. For the changes to take effect you have to shutdown the VM and do a clean start.
Alternatives
Depending on your situation SPICE might not be the best solution. Alternatives are:
- RDP (Remote Desktop Protocol) for Windows Guests
- X2GO for Linux Guests
Источник


