- Как правильно установить MYSQL на Mac OSX
- Install SQL Server on a Mac
- Install and Configure Docker
- Now the Actual SQL Server Installation
- Pull the SQL Server Image
- Launch the SQL Server Image
- Password Strength
- Check the Docker container (optional)
- Show All Containers
- Check your Installation & Manage SQL Server
- sql-cli
- Azure Data Studio
- DBeaver
- SQLPro for MSSQL 4+
- Hankinsoft Development Inc
- Снимки экрана
- Описание
- Как установить MySQL на Mac OS?
- Подготовка
- Как установить MySQL на Mac OS?
- Как пользоваться?
- Запуск
- Перезапуск
- Устанавливаем пароль на root
- Удаленный доступ к серверу
- Как удалить MySQL на Mac OS?
- Installing SQL Server on macOS
- Installing Docker
- Running SQL Server Container Image
- Handy Tips & Tools
Как правильно установить MYSQL на Mac OSX
В предыдущей заметке я рассказывал как удалть Mysql с вашей системы, в этой же заметке давайте поговорим о том как правильно его установить. Давайте начнём с простого и согласимся что в век пакетных менеджеров устанавливать что либо в ручную это как минимум нелепо.
Так вот для усановки дополнительных пакетов в Mac Os существует прекрасный менеджер компонентов Homebrew его то мы и будет использовать. Если у вас по каким то причинам ещё не установлен данный чудесный инструмент, немедленно его установите следующей командой:
Ну а теперь вы можете одной лишь командой установить вообще всё что угодно в вашу Mac Os в том числе и MySql. Вот так вот просто и быстро:
Так как сейчас актуальная версия сейчас 8.x, а мне пока что больше по душе 5.7, если вы с числе таких-же ратроградов, вам поможет вот такая команда:
Всё наш sql сервер установлен и готов рватся в бой. Давайте теперь немного сконфигурируем его:
Для конфигурации запустите сервер:
Зададим пароль пользователю root
Если на этом этапе у вас возникнет проблема с тем что терминал не знает команды MySQL выполните линковку с версией 5.7 или той, которую вы выбрали в качестве фаворита
Для запуска последующего запуска сервера Mysql
Для администрирования баз данных в OSX я предпочитаю использовать программу Sequel Pro вместо пресловутого PhpMyadmin возможно вам будет интересно попробовать что то новое для себя =) Кстати программа бесплатная и чертовски удобная. Позволяет подключатся по SSH к вашим удалённым серверам ну и с локальным справляется просто отлично!
Источник
Install SQL Server on a Mac
Install SQL Server directly to your Mac — no virtual machine required!
Microsoft has made SQL Server available for macOS and Linux systems. This is made possible by running SQL Server from a Docker container. Therefore, there’s no need to install a virtual machine with Windows (which was the only way to run SQL Server on a Mac prior to SQL Server 2017).
Install and Configure Docker
This is a prerequisite for installing SQL Server on your Mac. Because the Mac runs SQL Server inside a Docker container, the first thing we need to do is download and install Docker (unless it’s already installed). Once installed, we’ll increase its memory allocation to a more suitable level for running SQL Server.
- Download Docker from the download page, extract it, and drag it into your Application folder.
- Launch Docker, and go to Preferences > Advanced and increase its memory allocation to 4GB
If I’ve confused you, don’t worry. I’ve written a tutorial with screenshots: Install Docker on a Mac and Configure for SQL Server.
OK, we’re now ready to install SQL Server on your Mac.
Now the Actual SQL Server Installation
Now that we’ve installed Docker and increased its memory allocation, we can go ahead and install SQL Server. The Mac uses the Linux image (the SQL Server for Linux Docker image).
Pull the SQL Server Image
Open a Terminal window and run the following command:*
This pulls the latest SQL Server for Linux Docker image to your computer.
* The exact command will depend on which release you download. Also, since I wrote this article, Docker has moved the repository for SQL Server. You might need to use docker pull mcr.microsoft.com/mssql/server:2017-latest-ubuntu to download SQL Server 2017.
Also, SQL Server 2019 Preview has been available since late 2018. As of late 2019 you can download it at docker pull mcr.microsoft.com/mssql/server:2019-CTP3.2-ubuntu .
For the latest image, see the official Microsoft repository on the Docker website.
Launch the SQL Server Image
Run the following command to launch an instance of the Docker image you just downloaded:
Replace the container name and password with your own. Also be sure to make a strong password, or you may get an error (see below).
Also, if you downloaded a different container image, replace microsoft/mssql-server-linux with your container image.
Here’s an explanation of the above parameters:
-d This is an optional parameter that launches the Docker container in daemon mode. This means that it runs in the background and doesn’t need its own Terminal window open. You can omit this parameter to have the container run in its own Terminal window. —name Homer This optional parameter provides a name for the container. This can be handy when stopping and starting the container from the Terminal. -e ‘ACCEPT_EULA=Y’ The Y shows that you agree with the EULA (End User Licence Agreement). This is required in order to install SQL Server. -e ‘SA_PASSWORD=myPassw0rd’ Required parameter that sets the sa database password. -p 1433:1433 This maps the local port 1433 to port 1433 on the container. This is the default TCP port that SQL Server uses to listen for connections. microsoft/mssql-server-linux This tells Docker which image to use. If you downloaded a different one, use that instead.
Password Strength
If you get the following error at this step, try again, but with a stronger password.
Check the Docker container (optional)
Type the following command to check that the Docker container is running.
If it’s up and running, it should return something like this:
Show All Containers
The above command only shows those containers that are currently running. To show all containers (whether they’re running or not), append the -a flag to the command (you can also use -all ):
Check your Installation & Manage SQL Server
Now that you’ve installed SQL Server on your Mac, you’ll probably want to check that you can access it and query it, etc. Then you’ll probably want to start creating databases and doing other DB-related tasks. You’ll need some sort of management tool for this.
Here are three options:
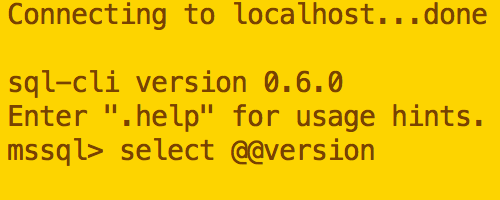
sql-cli
sql-cli is a cross platform command line tool for SQL Server. This means you can create databases and query them right from your Mac’s Terminal window.
Installation is as easy as running a single command (assuming you already have NodeJs installed).
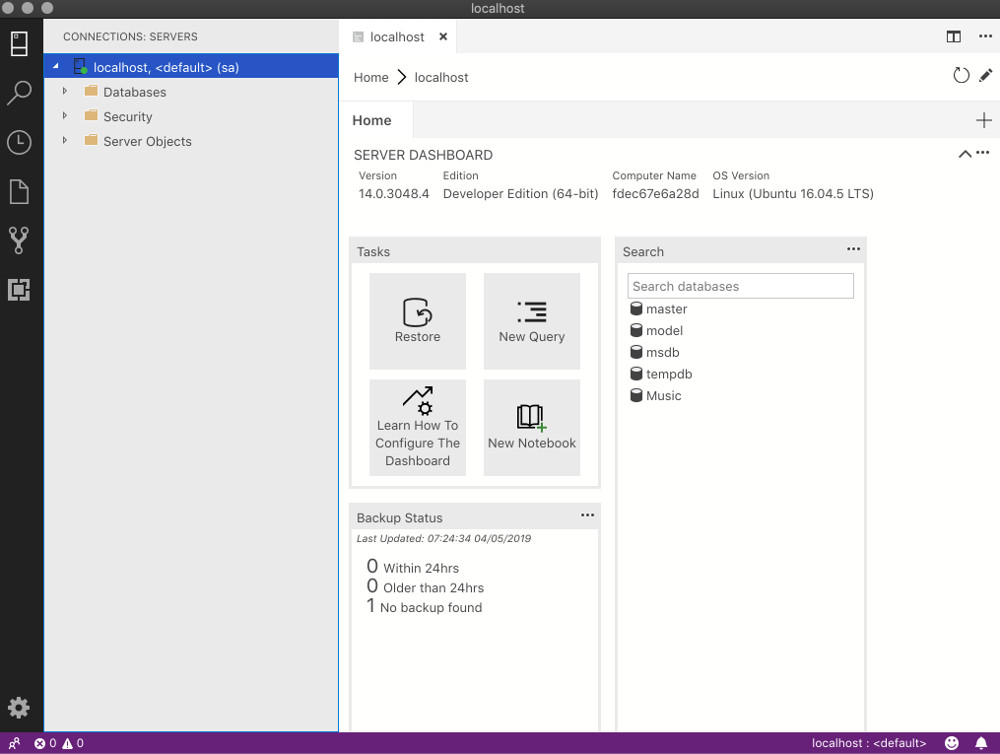
Azure Data Studio
Azure Data Studio (formerly called SQL Operations Studio) is a free GUI tool from Microsoft. It’s a bit more user friendly for those who aren’t comfortable with the command line interface.
Installation is as easy as downloading it and dragging it to your Applications folder.
DBeaver
Another GUI option is DBeaver. DBeaver is a free open source database tool that works with many different database management systems (MySQL, PostgreSQL, MariaDB, SQLite, Oracle, DB2, SQL Server, Sybase, MS Access, Teradata, Firebird, Derby, etc).
You have a few options for installing DBeaver. The easiest way is to download the «installer option», and then run the installation wizard.
Источник
SQLPro for MSSQL 4+
Hankinsoft Development Inc
-
- 3,0 • Оценок: 4
-
- Бесплатно
- Включает встроенные покупки
Снимки экрана
![]()
![]()
![]()
Описание
SQLPro for MSSQL is a lightweight Microsoft SQL Server database client, allowing quick and simple access to MSSQL Servers, including those hosted via cloud services such as SQL Azure or Amazon RDS.
Features include:
+ Syntax highlighting (including customizable themes).
+ Intellisense.
+ Tabbed based interface.
+ Support for executing multiple queries at once.
+ Quick access to tables, columns and more.
+ Stored procedure execution.
+ NTLMv2 supported (but not required).
SQLPro for MSSQL can be used to connect with the following databases:
+ Microsoft SQL Azure
+ Microsoft SQL Server 2005
+ Microsoft SQL Server 2008
+ Microsoft SQL Server 2008 R2
+ Microsoft SQL Server 2012
+ Microsoft SQL Server 2014
+ Microsoft SQL Server 2016
Thanks to the FreeTDS project (http://www.freetds.org/) for their great library.
This SQL Client does NOT work with MySQL or Postgres. Please ensure that your server is a Microsoft SQL Server (2005 or above).
Note 1: SQL Server Express is supported, however using it makes me sad. Please confirm that the SQL Server Express installation has been configured properly for remote connections over TCP/IP, and that you can connect remotely from another windows pc before requesting support.
Note 2: SQLPro for MSSQL can connect to Microsoft SQL Server 2000 however it is not supported.
Terms of Use:
https://hankinsoft.com/termsofuse.html
Price:
SQLPro offers Premium subscriptions in order to interact with database result sets. Premium subscriptions are available as either a Monthly, or a Yearly duration. Subscriptions auto-renew within 24 hours of the expiration date unless auto-renewal is turned off in the iTunes account settings. Payment will be charged to your iTunes Account at confirmation of purchase.
Источник
Как установить MySQL на Mac OS?
MySQL установить на компьютер с MacOS очень просто. Это сделать также просто как установить на Linux. Для установки нам понадобится пакетный менеджер brew и 5-10 минут свободного времени.
Подготовка
Как Вы уже поняли для установки MySQL на Mac OS нам понадобится brew, в котором есть все из мира Linux. Если у Вас его еще нет на Mac`е, то установить можно командой:
Многие разрабы считают, что такие вещи захламляют Mac и им нет места на их компьютере. И что предпочтительно устанавливать MysSQL через докер. Но brew очень бережно относится к вашей операционной системе и при выполнении команды на удаления, он полностью удалить MySQL из ОС.
Как установить MySQL на Mac OS?
Для установки нужно выполнить команду:
Если Вам по какой-то причине нужно установить определенную версию, то в конце указываем mysql@нужная_версия . Примерно вот так — brew install mysql@5.7
Чтобы Ваш мак «научился» работать с алиасом – mysql, нужно создать линк. Это нужно чтобы в консоли было удобно управлять через команду mysql. Для этого выполним:
Если был установлен MySQL 5.7, то команда будет такой: brew link —force mysql@5.7
Если хотите, чтобы MySQL запускался всегда при включении компа, то вот команда для этого:
Эта команда не зависит от версией установленного MySQL.
Вот и все! Сервер баз данных MySQL установлен на ваш Mac OS.
Как пользоваться?
Запуск
Если Вы не сделали автоматическую загрузку сервиса MySQL, то запустить его вручную можно вот так:
Перезапуск
Устанавливаем пароль на root
По умолчанию на root в MySQL не установлен пароль. Исправить просто! Выполняем по очереди команды:
Не забываем, что:
- password — это ваш пароль,
- localhost — это означает, что подключиться к серверу можно будет только с локальной машины. Если нужен доступ извне, то меняем это на знак % или 192.168.0.0, если для безопасности нужно ограничить подключение только из локальной сети.
Удаленный доступ к серверу
Файл конфигурации MySQL на MacOS находится по адресу /usr/local/etc/my.ini. По умлчанию доступ к серверу ограничен только локальной машиной, где он установлен. Чтобы снять это ограничение, нужно в файле конфигурации внести изменения:
Как удалить MySQL на Mac OS?
С пакетным менеджером brew также легко удалять пакеты, как их устанавливать.
Для удаления Mysql на Mac OS воспользуйтесь командой:
Источник
Installing SQL Server on macOS


It’s a bit inconvenience when working on a project that uses the Microsoft SQL Server while your dev machine is either Linux or macOS. I always ended up setting up and using a remote test database.
But now it’s no longer the case. October last year, SQL Server 2017 for Linux finally went into general availability. It’s container images are also available on Docker hub for us to use. That means we can finally install SQL Server on macOS!
Installing Docker
First, you’re going to need Docker. If you haven’t had it installed, heads up to the Docker store website and download the community edition for Mac. Just follow the instructions, it’s super easy to install.
Once it’s installed, you’ll have a new Docker icon on your menu bar. Click this icon and make sure that Docker is already.

Running SQL Server Container Image
Once you have Docker installed and running, open the terminal and run the following command to pull the latest version of SQL Server 2017 container image from Docker hub:
If you want to pull another version, just replace the 2017-latest part with the desired tag. You can check all of the available tags on Docker hub. For example, if want to pull the GA (General Availability) version instead, use the following command:
Once the image is pulled, you can run it on a new container using the following command:
- -d : Detached mode, run the container in the background.
- -p : Publish a container’s port (second value) to the host (first value). In our case, SQL server is listening on port 1433 within the container and we expose it to the same port on the host.
- —name : Assign a name to the container, we named it awesome 😎.
- -e : Set environment variables. ACCEPT_EULA=Y to confirm your acceptance of the licensing agreement. MSSQL_SA_PASSWORD=P@55word set the password for the sa user (the default system administrator username). It must be at least 8 characters and contains three of the following categories: lowercase, uppercase, digits, and symbols.
To list all of the containers, run the following command:
You should see the output similar to this:
Locate your awesome container and make sure that its STATUS column is Up . If the status is Exited , checkout the troubleshooting guide.
Handy Tips & Tools
Congratulation! 🎉 You now have Microsoft SQL Server installed on your macOS machine! Here are some common Docker commands that might come in handy for you:
It’s a bit inconvenience to run the sqlcmd from within the container in order to work with the database. Luckily there are some tools that you can use for interfacing with SQL Server:
- TablePlus: This is my favorite one. A native macOS application that works not only with MySQL and SQL Server databases but also Postgres and Redis!
- SQL Operations Studio: This one is coming from Microsoft and can be run on Windows, macOS or Linux.
- mssql for VS Code: If you’re using Visual Studio Code, this extension might come in handy.
- sql-cli for Node: If you’re a fellow Javascript developer. You can install this sql-cli for Node globally. This way you’ll have the quite similar sqlcmd feel.
Источник


